本节书摘来自异步社区《Android 源码设计模式解析与实战》一书中的第2章,第2.8节无名英雄——深入理解LayoutInflater,作者 何红辉 , 关爱民,更多章节内容可以访问云栖社区“异步社区”公众号查看
2.8 无名英雄——深入理解LayoutInflater
LayoutInflater在我们的开发中扮演着重要的角色,但很多时候我们都不知道它的重要性,因为它的重要性被隐藏在了Activity、Fragment等组件的光环之下。
LayoutInflater是一个抽象类,具体代码如下:
public abstract class LayoutInflater {
    // 代码省略
}
既然是抽象不是具体的,那我们必须把这个深藏功与名的“家伙”找出来!需要先从layoutInflater的起源开始。在上文中知道,在加载ContenxtImpl时会通过如下代码将LayoutInflater的ServiceFetcher注入到容器中,具体代码如下:
registerService(LAYOUT_INFLATER_SERVICE, new ServiceFetcher() {
     public Object createService(ContextImpl ctx) {
        return PolicyManager.makeNewLayoutInflater(ctx.getOuterContext());
        }
});
这里调用了PolicyManager. makeNewLayoutInflater方法,继续往下看看:
public final class PolicyManager {
    // Policy实现类
    private static final String POLICY_IMPL_CLASS_NAME =
        "com.android.internal.policy.impl.Policy";
    private static final IPolicy sPolicy;
    static {
        // 通过反射构造Policy对象
        try {
            Class policyClass = Class.forName(POLICY_IMPL_CLASS_NAME);
            sPolicy = (IPolicy)policyClass.newInstance();
        }
        // catch 代码段
}
    private PolicyManager() {}
    // 这里就是创建PhoneWindow对象的地方
    public static Window makeNewWindow(Context context) {
        return sPolicy.makeNewWindow(context);
    }
    // 通过sPolicy创建LayoutInflater
    public static LayoutInflater makeNewLayoutInflater(Context context) {
        return sPolicy.makeNewLayoutInflater(context);
    }
}
PolicyManager中通过反射构造了Policy实现类,这个类实现了IPolicy接口,通过这种形式将具体的Policy类对外进行隐藏实现。PolicyManager实际上是一个代理类,具体的功能通过sPolicy对象进行实现,我们看看sPolicy对应的Policy类,也就是com.android.internal.policy.impl.Policy:
public class Policy implements IPolicy {
    // 代码省略
    // 创建PhoneWindow,这就是Activity中Window的具体实现类
    public Window makeNewWindow(Context context) {
        return new PhoneWindow(context);
    }
    // 创建LayoutInflater,具体类为PhoneLayoutInflater,这才是我们要关注的地方
    public LayoutInflater makeNewLayoutInflater(Context context) {
        return new PhoneLayoutInflater(context);
    }
}
此时,已经很清楚了,真正LayoutInflater的实现类就是PhoneLayoutInflater。我们继续深入看看PhoneLayoutInflater的源代码:

public class PhoneLayoutInflater extends LayoutInflater {
    // 内置View类型的前缀,如TextView的完整路径是android.widget.TextView
    private static final String[] sClassPrefixList = {
        "android.widget.",
        "android.webkit."
    };

    // 代码省略
    @Override protected View onCreateView(String name, AttributeSet attrs) throws ClassNot FoundException {
        // 在View名字的前面添加前缀来构造View的完整路径,例如,类名为TextView,那么TextView完整
        //路径是android.widget.TextView
        for (String prefix : sClassPrefixList) {
            try {
                View view = createView(name, prefix, attrs);
                if (view != null) {
                    return view;
                }
            } catch (ClassNotFoundException e) {
                // 省略
            }
        }
        return super.onCreateView(name, attrs);
    }
}
代码不多,核心的程序语句就是覆写了LayoutInflater的onCreateView方法,该方法就是在传递进来的View名字前面加上“android.widget.”或者“android.webkit.”前缀用以得到该内置View类(如TextView、Button等都在android.widget包下)的完整路径。最后,根据类的完整路径来构造对应的View对象。
具体是一个怎样的流程呢?以Activity的setContentView为例,先来看看这个函数的实现:
public void setContentView(View view) {
    getWindow().setContentView(view);
    initActionBar();
}
Activity的setContentView方法实际上调用的是Window的setContentView,而Window是一个抽象类,上文提到Window的具体实现类是PhoneWindow,我们看看PhoneWindow中对应的方法:
 @Override
public void setContentView(int layoutResID) {
        // 1. 当mContentParent为空时先构建DecorView
        // 并且将DecorView包裹到mContentParent中
        if (mContentParent == null) {
            installDecor();
        } else {
            mContentParent.removeAllViews();
        }
        // 2. 解析layoutResID
        mLayoutInflater.inflate(layoutResID, mContentParent);
    // 代码省略
    }
在分析之前,我们来看看一个Window的View层级图,如图2-2所示。
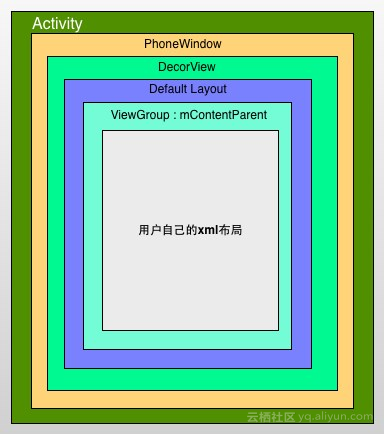
从图2-2中,我们看到mDecor中会加载一个系统定义好的布局,这个布局中又包裹了mContentParent,而这个mContentParent就是我们设置的布局,并将添加到parent区域。在PhoneWindow的setContentView方法中也验证了这点,首先会构建mContentParent这个对象,然后通过LayoutInflater的inflate函数将指定布局的视图添加到mContentParent中。那么就先来看看inflate方法:
public View inflate(int resource, ViewGroup root) {
        // root不为空,则会从resource布局解析到View,并添加到root中
        return inflate(resource, root, root != null);
}

public View inflate(int resource, ViewGroup root, boolean attachToRoot) {
        // 获取xml资源解析器
    XmlResourceParser parser = getContext().getResources().getLayout(resource);
    try {
            return inflate(parser, root, attachToRoot);
     } finally {
            parser.close();
        }
    }

// 参数1为xml解析器,参数2为要解析布局的父视图,参数3为是否将要解析的视图添加到父视图中
public View inflate(XmlPullParser parser, ViewGroup root, boolean attachToRoot) {
        synchronized (mConstructorArgs) {
            final AttributeSet attrs = Xml.asAttributeSet(parser);
            Context lastContext = (Context)mConstructorArgs[0];
            // Context对象
            mConstructorArgs[0] = mContext;
            // 存储父视图
            View result = root;
            try {
                // Look for the root node.
                int type;
                // 找到root元素
                while ((type = parser.next()) != XmlPullParser.START_TAG &&
                        type != XmlPullParser.END_DOCUMENT) {
                    // Empty
                }
                // 代码省略
                final String name = parser.getName();
                // 1. 解析merge标签
                if (TAG_MERGE.equals(name)) {
                    rInflate(parser, root, attrs, false);
                } else {
                    // 2. 不是merge标签那么直接解析布局中的视图
                    View temp;
                    if (TAG_1995.equals(name)) {
                        temp = new BlinkLayout(mContext, attrs);
                    } else {
                        // 3. 这里就是通过xml的tag来解析layout根视图
                        // name就是要解析的视图的类名,如RelativeLayout
                        temp = createViewFromTag(root, name, attrs);
                    }

                    ViewGroup.LayoutParams params = null;
                    if (root != null) {
                        // 生成布局参数
                        params = root.generateLayoutParams(attrs);
                        // 如果attachToRoot为false,那么将给temp设置布局参数
                        if (!attachToRoot) {
                            temp.setLayoutParams(params);
                        }
                    }
                    // 解析temp视图下的所有子View
                    rInflate(parser, temp, attrs, true);
                    // 如果Root不为空,且attachToRoot为true,那么将temp添加到父视图中
                    if (root != null && attachToRoot) {
                        root.addView(temp, params);
                    }
                    // 如果root为空或者attachToRoot为false,那么返回的结果就是temp
                    if (root == null || !attachToRoot) {
                        result = temp;
                    }
                }
            }
            // 省略catch, finaly代码
            return result;
        }
上述的inflate方法中,主要有下面几步:
(1)解析xml中的根标签(第一个元素);
(2)如果根标签是merge,那么调用rInflate进行解析,rInflate会将merge标签下的所有子View直接添加到根标签中;
(3)如果标签是普通元素,那么运行到代码3,调用createViewFromTag对该元素进行解析;
(4)调用rInflate解析temp根元素下的所有子View,并且将这些子View都添加到temp下;
(5)返回解析到的根视图。
我们先从简单的地方理解,即解析单个元素的createViewFromTag,看看如下代码:
 View createViewFromTag(View parent, String name, AttributeSet attrs) {
        if (name.equals("view")) {
            name = attrs.getAttributeValue(null, "class");
        }
        try {
            View view;
            // 1. 用户可以通过设置LayoutInflater的factory来自行解析View,默认这些Factory都为
            //空, 可以忽略这段
            if (mFactory2 != null) view = mFactory2.onCreateView(parent, name, mContext, attrs);
            else if (mFactory != null) view = mFactory.onCreateView(name, mContext, attrs);
            else view = null;
            // 代码省略
            // 2. 没有Factory的情况下通过onCreateView或者createView创建View
            if (view == null) {
                // 3. 内置View控件的解析
                if (-1 == name.indexOf('.')) {
                    view = onCreateView(parent, name, attrs);
                } else {
                    // 4. 自定义控件的解析
                    view = createView(name, null, attrs);
                }
            }
            return view;

        }
        // 省略catch块
    }
本程序重点就在代码2,以及以后的代码,createViewFromTag会将该元素的parent及名字传递过来。当这个tag的名字中没有包含“.”(在名字中查找“.”返回-1)时,LayoutInflater会认为这是一个内置的View,例如,我们在xml中声明一个内置View时大概是这样的:
<TextView
        android:id="@+id/my_textview "
        android:layout_width="60dp"
    android:layout_height="60dp" />
这里的TextView就是xml元素的名字,因此,在执行infate时就会调用代码3处的onCreateView来解析这个TextView标签。当我们自定义View时,在xml中必须写View的完整路径,例如:
<com.dp.custom.MyView
            android:id="@+id/my_custom_view "
            android:layout_width="fill_parent"
       android:layout_height="fill_parent" />
此时,就会调用代码注释4的createView来解析该View。为什么要这么处理,它们之间又有什么不同呢?
在上文的PhoneLayoutInflater中我们知道,PhoneLayoutInflater覆写了onCreateView方法,也就是代码3处的onCreateView,该方法就是在View标签名的前面设置一个“android.widget.”前缀,然后再传递给createView进行解析。也就是说内置View和自定义View最终都调用了createView进行解析,只是Google为了让开发者在xml中更方便定义View,只写View名称而不需要写完整的路径。在LayoutInflater解析时如果遇到只写类名的View,那么认为是内置的View控件,在 onCreateView方法中会将“android.widget.”前缀传递给createView方法,最后,在createView中构造View的完整路径来进行解析。如果是自定义控件,那么必须写完整的路径,此时调用createView且前缀为null进行解析。
关于createView的解释已经有很多,我们还是看下面的代码吧:
// 根据完整路径的类名通过反射机制构造View对象
    public final View createView(String name, String prefix, AttributeSet attrs)
            throws ClassNotFoundException, InflateException {
        // 1. 从缓存中获取构造函数
        Constructor<? extends View> constructor = sConstructorMap.get(name);
        Class<? extends View> clazz = null;
        try {
            // 2. 没有缓存构造函数
            if (constructor == null) {
                // 如果prefix不为空,那么构造完整的View路径,并且加载该类
                clazz = mContext.getClassLoader().loadClass(
                        prefix != null ? (prefix + name) : name).asSubclass(View.class);
                // 代码省略
                // 3. 从Class对象中获取构造函数
                constructor = clazz.getConstructor(mConstructorSignature);
                // 4. 将构造函数存入缓存中
                sConstructorMap.put(name, constructor);
            } else {
                // 代码省略
            }
            Object[] args = mConstructorArgs;
            args[1] = attrs;
            // 5. 通过反射构造View
            final View view = constructor.newInstance(args);
            if (view instanceof ViewStub) {
                // always use ourselves when inflating ViewStub later
                final ViewStub viewStub = (ViewStub) view;
                viewStub.setLayoutInflater(this);
            }
            return view;

        }
        // 省略各种catch、finaly代码
    }
createView相对比较简单,如果有前缀,那么构造View的完整路径,并且将该类加载到虚拟机中,然后获取该类的构造函数并且缓存起来,再通过构造函数来创建该View的对象,最后将View对象返回,这就是解析单个View的过程。而我们的窗口中是一棵视图树,LayoutInflater需要解析完这棵树,这个功能就交给了rInflate方法,具体代码如下:
void rInflate(XmlPullParser parser, View parent, final AttributeSet attrs,
            boolean finishInflate) throws XmlPullParserException, IOException {
        // 1. 获取树的深度,深度优先遍历
        final int depth = parser.getDepth();
        int type;
        // 2. 挨个元素解析
        while (((type = parser.next()) != XmlPullParser.END_TAG || parser.getDepth() > depth)
         && type != XmlPullParser.END_DOCUMENT) {
            if (type != XmlPullParser.START_TAG) {
                continue;
            }
            final String name = parser.getName();
            if (TAG_REQUEST_FOCUS.equals(name)) {
                parseRequestFocus(parser, parent);
            } else if (TAG_INCLUDE.equals(name)) {  // 解析include标签
                parseInclude(parser, parent, attrs);
            } else if (TAG_MERGE.equals(name)) { // 解析merge标签,抛出异常,因为merge标签
                                                        //必须为根视图
                throw new InflateException("<merge /> must be the root element");
            } else if (TAG_1995.equals(name)) {// 闪烁视图,这里可以不用管
// 代码省略
            } else {
                // 3. 根据元素名进行解析
                final View view = createViewFromTag(parent, name, attrs);
                final ViewGroup viewGroup = (ViewGroup) parent;
                final ViewGroup.LayoutParams params = viewGroup.generateLayoutParams (attrs);
                // 递归调用进行解析,也就是深度优先遍历
                rInflate(parser, view, attrs, true);
                // 将解析到的View添加到viewGroup中,也就是它的parent
                viewGroup.addView(view, params);
            }
        }
        if (finishInflate) parent.onFinishInflate();
    }
rInflate通过深度优先遍历来构造视图树,每解析到一个View元素就会递归调用rInflate,直到这条路径下的最后一个元素,然后再回溯过来将每个View元素添加到它们的parent中。通过rInflate的解析之后,整棵视图树就构建完毕。当调用了Activity的onResume之后,我们通过setContentView设置的内容就会出现在我们的视野中。