又有一段时间没有写博客了,真是不爽~~~ 趁着最近两天没事,赶紧补上一篇,这次开始写一篇Pure ECS版本示例解析,对上次Hybrid版本Unity之浅析 Entity Component System (ECS)的补充,使用的是官方案例的Rotation场景。
有说错或不准确的地方欢迎留言指正
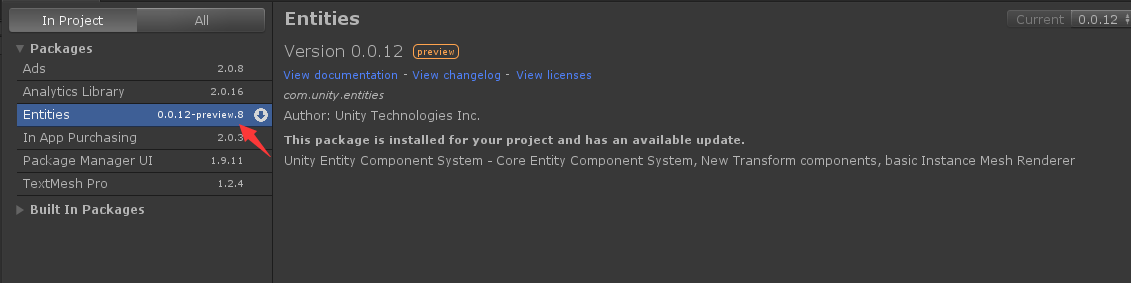
Unity版本 208.2.3f1 Entities 版本 preview.8
ECS虽然现在已经实装,但还在实验阶段,笔者在开发的过程中也遇到了一些IDE卡顿,Unity编辑器崩溃的情况。这个情况相信在Unity后续版本中会得到改善。
这么多问题为什么还要用呢?那就是计算速度快!!!真的很快,笔者这垃圾笔记本此场景创建20W个Cube还能保持在20帧左右,所以可见一斑。
主要参考官方文档地址
对应工程文件下载
- 2018/08/29更新 添加 [BurstComplie]特性 以后如果你打开Burst Complier的话,下面的代码会在编译的时候被Burst Compiler优化,运行速度更快,目前Burst只是运行在编辑器模式下,之后正式出了会支持编译
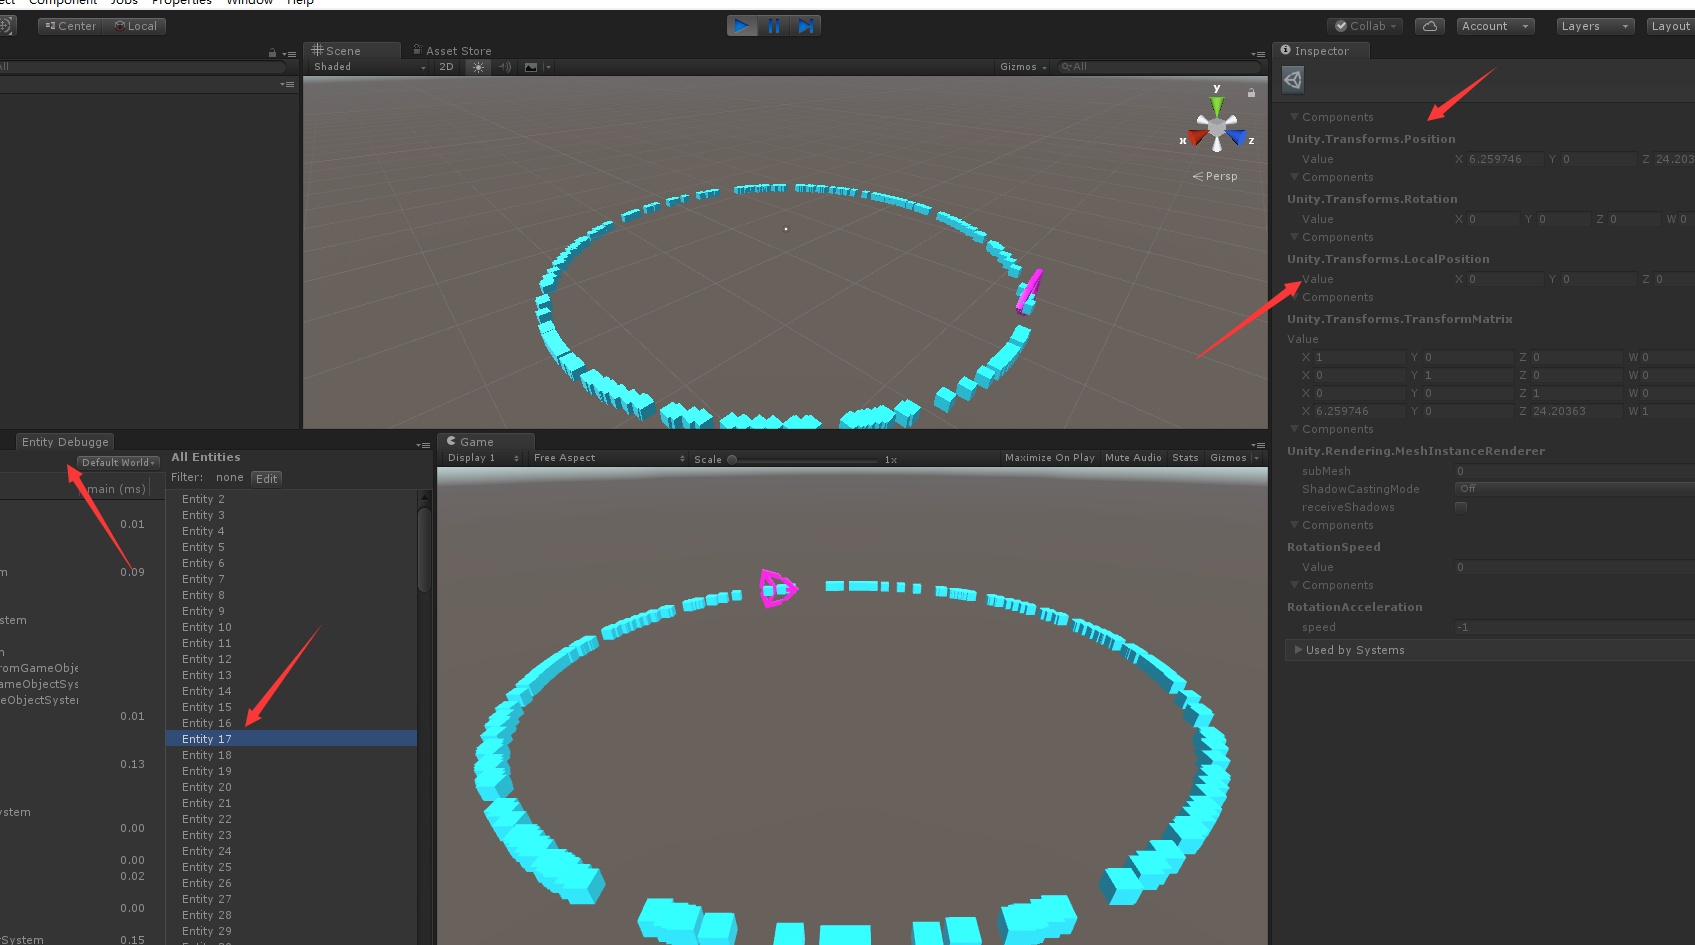
效果展示
下面笔者会逐步创建示例中的场景,使用Unity版本2018.2.3f1 ,基本配置请参考Unity之浅析 Entity Component System (ECS)
首选需要准备的资源为:
- Unity对应Logo模型
- 一个在场景中对应的Logo Object
- 一个产卵器,生产指定Cube按照规定半径随机分布
创建Unity对应Logo模型
在hierarchy中创建一个gameObject命名为RotationLogo然后添加组下组件,这些组件都是ECS自带的
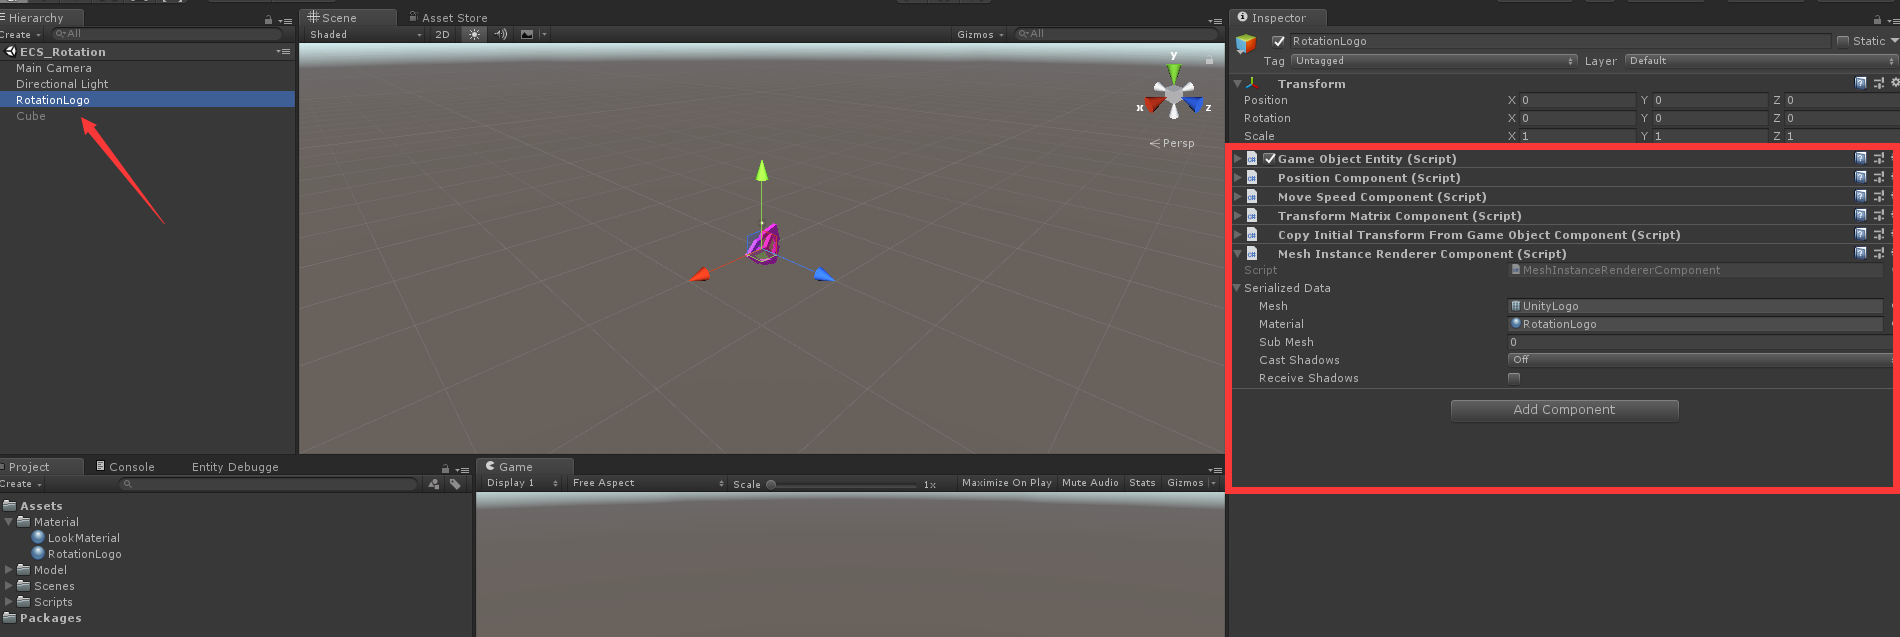
- GameObjectEntity 必带组件,没有的话ECS系统不识别
- PositionComponent 组件对应传统模式中 transform.position
- CopyInitialTransformFromGameObjectComponent 初始化TransformMatrix中的数据
- TransformMatrix 指定应该存储一个4x4矩阵。这个矩阵是根据位置的变化自动更新的【直译官方文档】
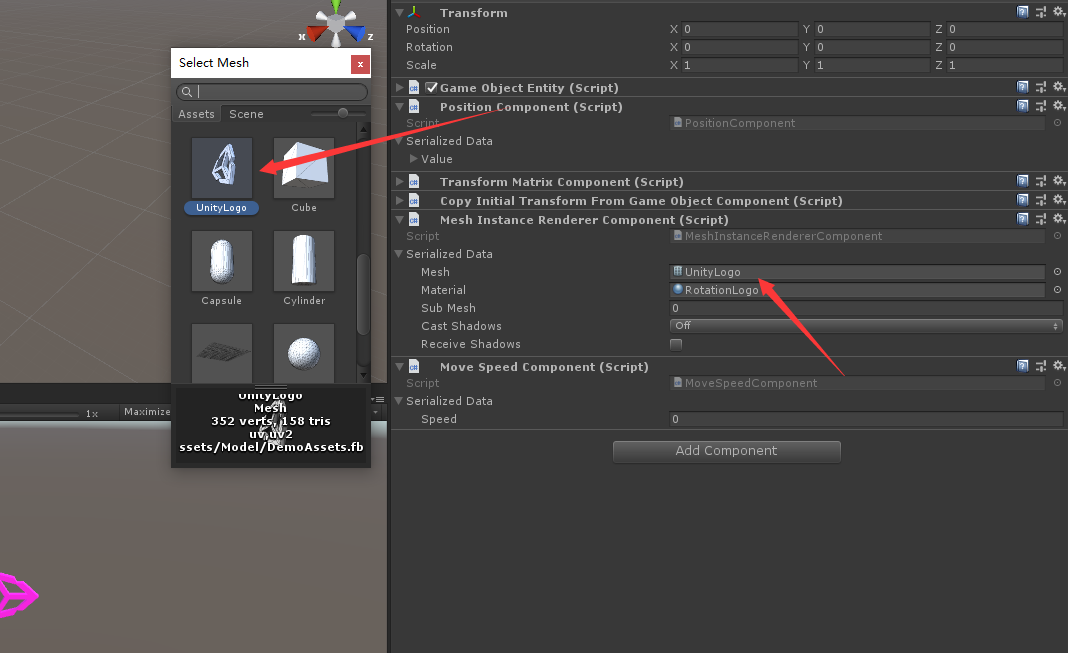
- MeshInstanceRendererComponent可以理解为原来的Mesh Filter与Mesh Renderer结合体,且大小不受tranform中Scale数值控制
- MoveSpeedComponent也是官方自带组件,因为ECS主要是面向数据编程,此组件仅仅代表一个运行速度的数据
注意:MeshInstanceRendererComponent中需要Mesh是指定使用哪个网格,对应的Material需要勾选Enable GPU Instancing

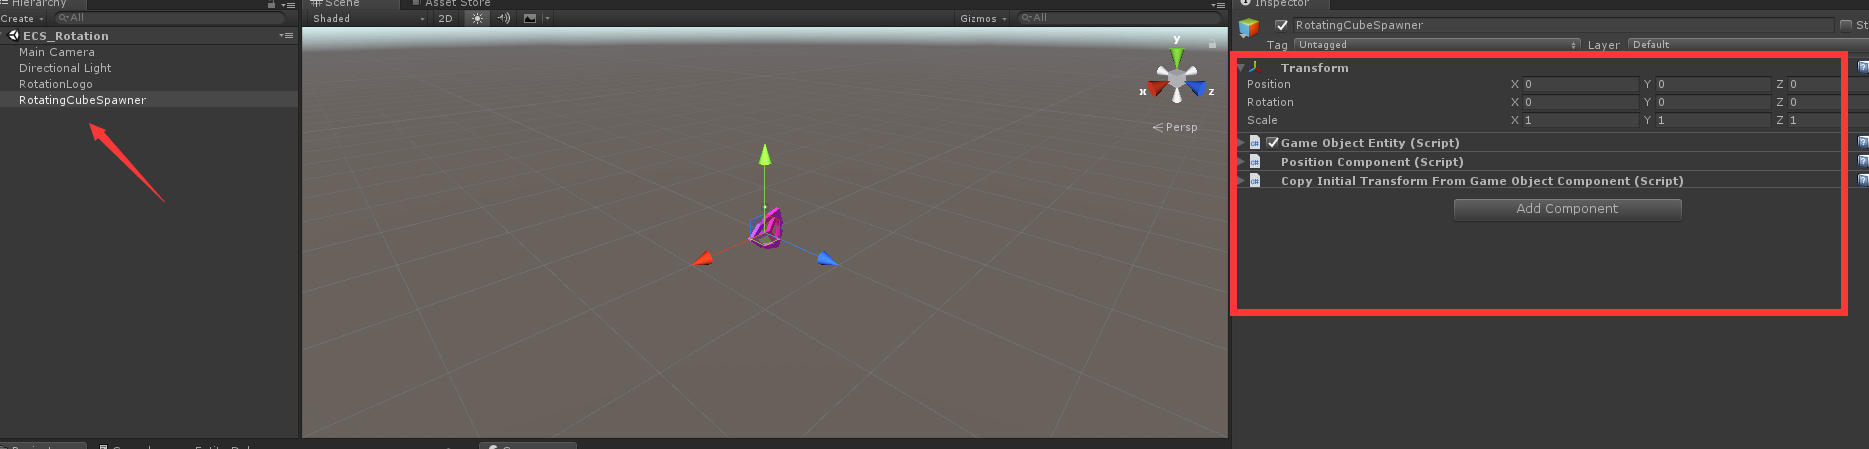
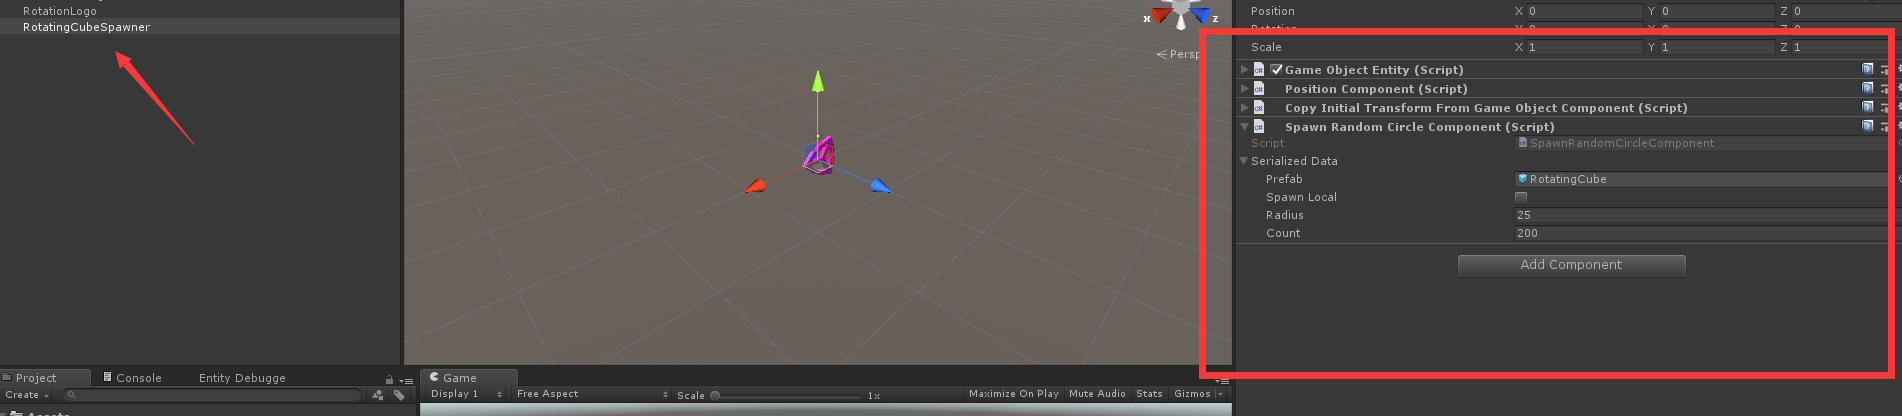
创建一个产卵器,生产指定Cube按照规定半径随机分布
在hierarchy中创建一个gameObject命名为RotatingCubeSpawner然后添加如下组件,这些组件都是ECS自带的,这里没有使用TransformMatrix 组件,因为TransformMatrix 组件需要配合其他组件或系统使用,例如MeshInstanceRenderer,这里RotatingCubeSpawner仅仅是一个产卵触发,所以不需要。
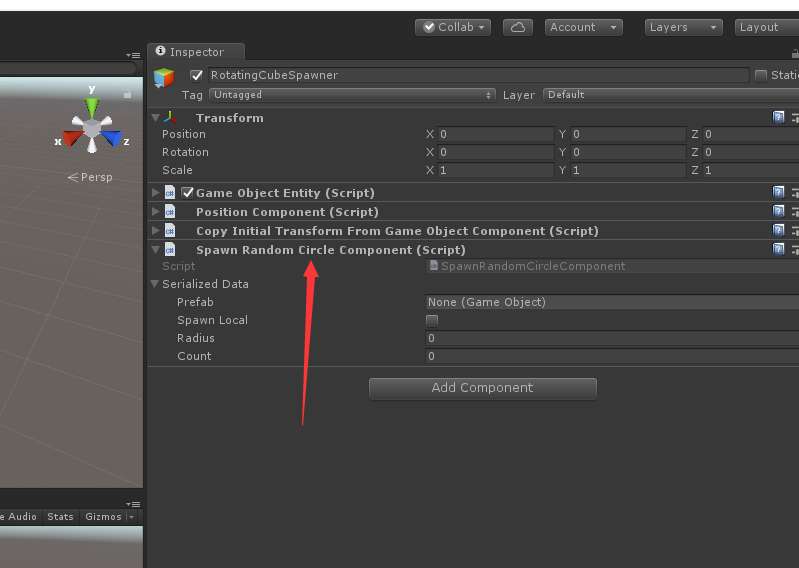
创建脚本 SpawnRandomCircleComponent ,然后添加到RotatingCubeSpawner上
using System;
using Unity.Entities;
using UnityEngine;


/// <summary>
/// 使用ISharedComponentData可显著降低内存
/// </summary>
[Serializable]
public struct SpawnRandomCircle : ISharedComponentData//使用ISharedComponentData可显著降低内存
{
    //预制方块
    public GameObject prefab;
    public bool spawnLocal;
    //生成的半径
    public float radius;
    //生成物体个数
    public int count;
}

/// <summary>
/// 包含方块的个数个生成半径等
/// </summary>
public class SpawnRandomCircleComponent : SharedComponentDataWrapper<SpawnRandomCircle> { }
在传统模式中,我们能把脚本挂到gameObejc上是因为继承了MonoBehaviour,但是在Pure ECS版本中,如需要的数据挂在对应的Object上,创建的类需要继承SharedComponentDataWrapper或ComponentDataWrapper,包含的数据(struct)需要继承ISharedComponentData或IComponentData。
这里大家可能有疑问了,既然都能创建挂载为什么出现两个类?使用SharedComponentDataWrapper与ISharedComponentData可显著降低内存,创建100个cube和一个cube的消耗内存的差异几乎为零。如使用的数据仅仅是读取,或很少的改变,且在同Group中(后续示例中有展示),使用SharedComponentData是一个不错的选择。
接下来开始编写Logo模型旋转所需的额外数据
按照示例显示,Logo图标在一个指定的位置以规定的半径旋转,在Logo一定范围的cube会触发旋转效果
创建如下数据添加到Object上
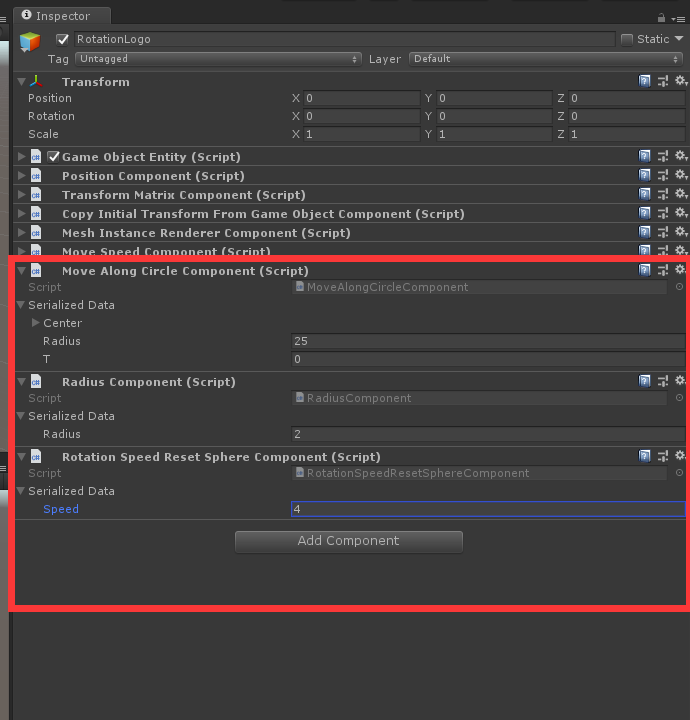
旋转中心点和对应半径的数据
using System;
using Unity.Entities;
using Unity.Mathematics;

/// <summary>
/// 转动Logo的中心点和转动半径
/// </summary>
[Serializable]
public struct MoveAlongCircle : IComponentData
{
    //Logo对应的中心点
    public float3 center;
    //Logo对应的半径
    public float radius;
    //运行时间
    //[NonSerialized]
    public float t;
}
/// <summary>
/// 转动Logo的中心点和转动半径
/// </summary>
public class MoveAlongCircleComponent : ComponentDataWrapper<MoveAlongCircle> { }
Logo碰撞方块后给予方块重置的速度数据
using System;
using Unity.Entities;

/// <summary>
/// Logo碰撞方块后给予方块重置的速度
/// </summary>
[Serializable]
public struct RotationSpeedResetSphere : IComponentData
{
    //方块重置的速度
    public float speed;
}
/// <summary>
/// 方块旋转的速度
/// </summary>
public class RotationSpeedResetSphereComponent : ComponentDataWrapper<RotationSpeedResetSphere> { }
触发方块旋转的半径数据
using System;
using Unity.Entities;


[Serializable]
public struct Radius : IComponentData
{
    //触发方块旋转的半径
    public float radius;
}
/// <summary>
/// 触发方块旋转的半径
/// </summary>
public class RadiusComponent : ComponentDataWrapper<Radius> { }
话不多说,接下来要让Logo嗨起来! 哦不对,让Logo转起来。。。。
下面是Logo旋转的全部逻辑代码,笔者会逐步为大家解析
using Unity.Collections;
using Unity.Entities;
using Unity.Jobs;
using Unity.Burst;
using Unity.Mathematics;
using Unity.Transforms;
using UnityEngine;


//Logo运动相关逻辑
public class MoveAlongCircleSystem : JobComponentSystem
{
    // Logo运动相关逻辑中需要用到的数据
    struct MoveAlongCircleGroup
    {
        //Logo位置
        public ComponentDataArray<Position> positions;
        //旋转的中心点和半径数据
        public ComponentDataArray<MoveAlongCircle> moveAlongCircles;
        //旋转速度数据
        [ReadOnly] public ComponentDataArray<MoveSpeed> moveSpeeds;
        //固定写法
        public readonly int Length;
    }
    //注入数据 Inject自带特性
    [Inject] private MoveAlongCircleGroup m_MoveAlongCircleGroup;


    [BurstCompile]
    struct MoveAlongCirclePosition : IJobParallelFor//Logo位置旋转更新逻辑,可以理解为传统模式中的Update
    {
        /// <summary>
        /// 位置数据
        /// </summary>
        public ComponentDataArray<Position> positions;
        /// <summary>
        /// 中心点及半径数据
        /// </summary>
        public ComponentDataArray<MoveAlongCircle> moveAlongCircles;
        /// <summary>
        /// 运行速度
        /// </summary>
        [ReadOnly] public ComponentDataArray<MoveSpeed> moveSpeeds;
        /// <summary>
        /// 运行时间
        /// </summary>
        public float dt;

        /// <summary>
        /// 并行执行for循环 i 根据length计算 打印的一直是0
        /// </summary>
        /// <param name="i"></param>
        public void Execute(int i)
        {
            //Debug.Log(i); //打印的一直是0 虽然可以打印,但是会报错,希望官方会出针对 ECS 的 Debug.Log

            //运行时间
            float t = moveAlongCircles[i].t + (dt * moveSpeeds[i].speed);
            //位置偏移量
            float offsetT = t + (0.01f * i);
            float x = moveAlongCircles[i].center.x + (math.cos(offsetT) * moveAlongCircles[i].radius);
            float y = moveAlongCircles[i].center.y;
            float z = moveAlongCircles[i].center.z + (math.sin(offsetT) * moveAlongCircles[i].radius);

            moveAlongCircles[i] = new MoveAlongCircle
            {
                t = t,
                center = moveAlongCircles[i].center,
                radius = moveAlongCircles[i].radius
            };
            //更新Logo的位置
            positions[i] = new Position
            {
                Value = new float3(x, y, z)
            };
        }
    }

    //数据初始化
    protected override JobHandle OnUpdate(JobHandle inputDeps)
    {
        var moveAlongCirclePositionJob = new MoveAlongCirclePosition();
        moveAlongCirclePositionJob.positions = m_MoveAlongCircleGroup.positions;
        moveAlongCirclePositionJob.moveAlongCircles = m_MoveAlongCircleGroup.moveAlongCircles;
        moveAlongCirclePositionJob.moveSpeeds = m_MoveAlongCircleGroup.moveSpeeds;
        moveAlongCirclePositionJob.dt = Time.deltaTime;
        return moveAlongCirclePositionJob.Schedule(m_MoveAlongCircleGroup.Length, 64, inputDeps);
    }
}
解析一
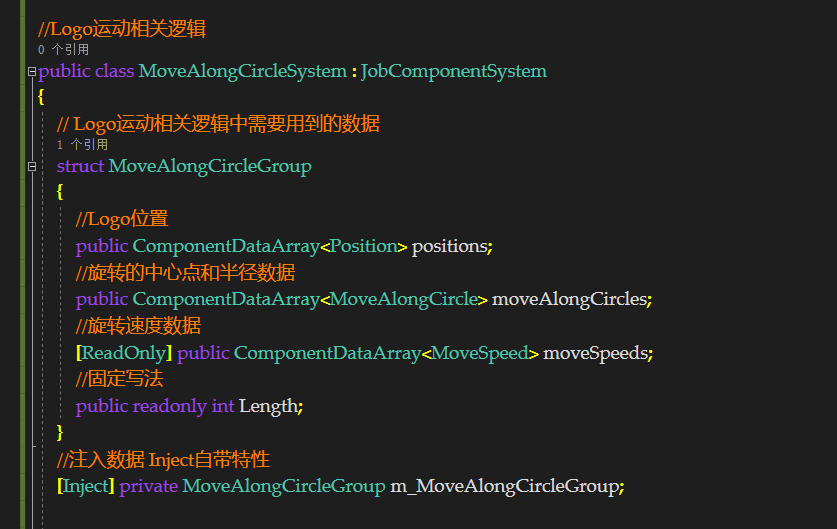
其中这段code 指的是需要声明一个Group 【可以理解为传统模式中组件的集合】,这里含有Logo运动相关逻辑中需要用到的数据,注入m_MoveAlongCircleGroup,可以使在unity运行时unity自动寻找符合此数据集合的物体,然后把对应的数据都注入到m_MoveAlongCircleGroup中。这样我们也就变相的找到了Logo物体
解析二
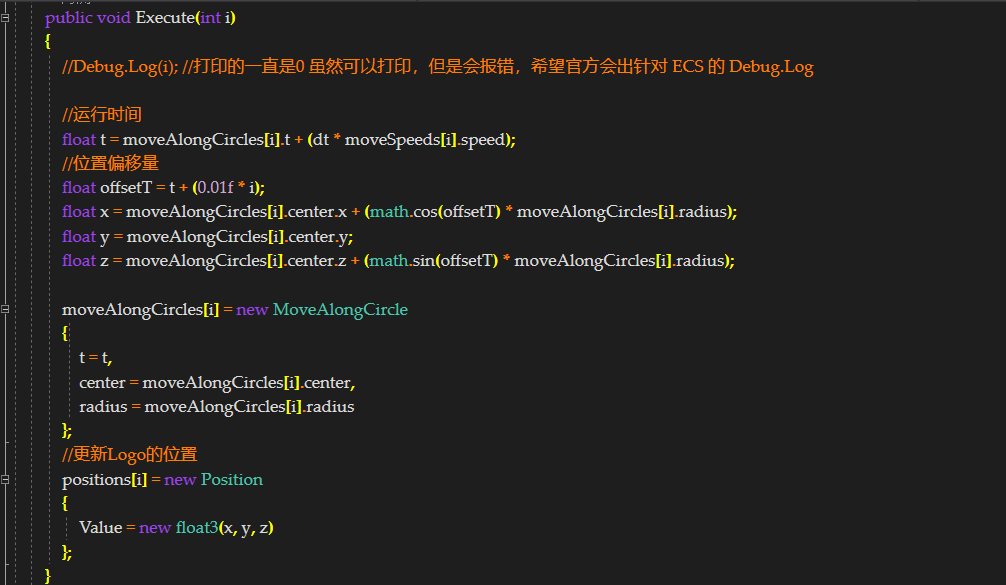
struct MoveAlongCirclePosition : IJobParallelFor代码块中的Execute,可以理解为传统模式中的Update,不过是并行执行的。相关逻辑就是计算运行时间、运算位置并赋值。
以为这就完了,并没有,看下面
解析三
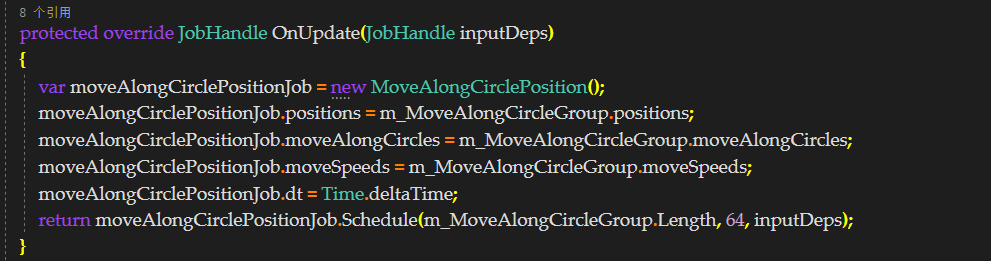
想要把MoveAlongCirclePosition中的变量和我们找到的物体联系起来,且在Job系统中并行执行就需要JobHandle OnUpdate。他的作用是把我们包装起来的业务逻辑【就是Execute】放到Job系统执行【多核心并行计算】,并且把找到的物体和MoveAlongCirclePosition中的变量关联起来。
下面我们要让产卵器动起来
准备产卵器中预制体
在hierarchy中创建一个gameObject命名为RotatingCube然后添加如下组件
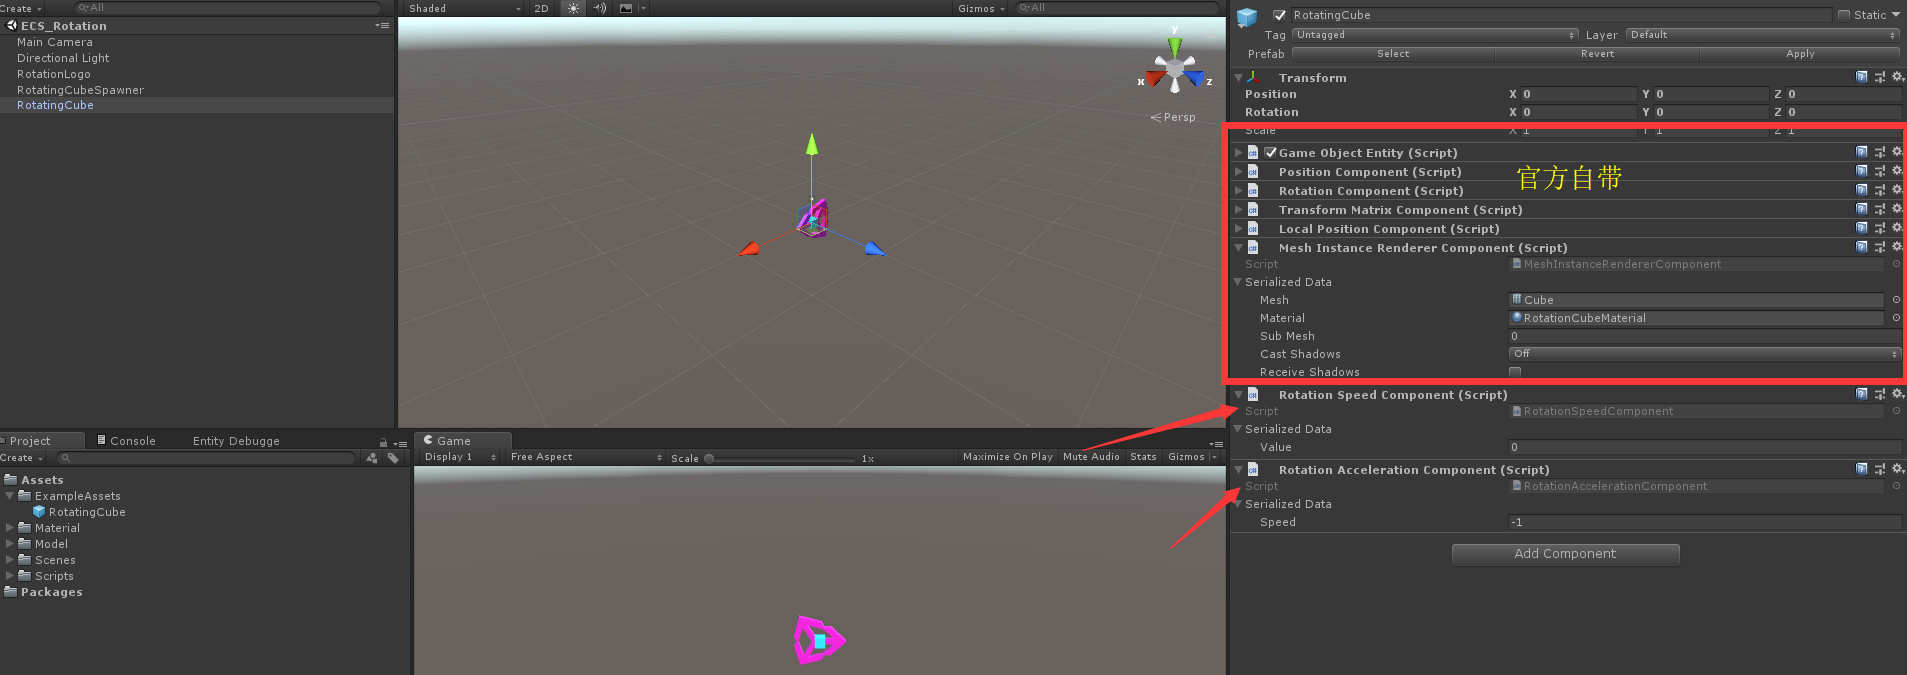
除官方自带组件外添加额外组件RotationSpeedComponent和RotationAccelerationComponent,分别代表cube实时的旋转速度和cube速度衰减的加速度
实时的旋转速度 数据
using System;
using Unity.Entities;

/// <summary>
/// 方块自身速度
/// </summary>
[Serializable]
public struct RotationSpeed : IComponentData
{
    public float Value;
}
public class RotationSpeedComponent : ComponentDataWrapper<RotationSpeed> { }
速度衰减的加速度 数据
using System;
using Unity.Entities;
/// <summary>
/// 方块的加速度 -1 速度逐渐变慢
/// </summary>
[Serializable]
public struct RotationAcceleration : IComponentData
{
    public float speed;
}
public class RotationAccelerationComponent : ComponentDataWrapper<RotationAcceleration> { }
然后把预制体拖拽到指定的产卵器中,设置好数据
产卵Cube全部Code
using System.Collections.Generic;
using Unity.Collections;
using Unity.Entities;
using Unity.Mathematics;
using Unity.Transforms;

//产卵器系统相关逻辑
public class SpawnRandomCircleSystem : ComponentSystem
{
    //对应产卵器的组件集合
    struct Group
    {
        //含有产卵所需的 个数、半径、预制体数据
        [ReadOnly] public SharedComponentDataArray<SpawnRandomCircle> Spawner;
        //产卵器位置数据
        public ComponentDataArray<Position> Position;
        //产卵器对应的 GameObject Entity 实体
        public EntityArray Entity;
        //因为目前产卵器只有一个,所以其 Length 数值为 1
        public readonly int Length;
    }
    //注入组件集合
    [Inject] Group m_Group;


    protected override void OnUpdate()
    {

        while (m_Group.Length != 0)
        {
            var spawner = m_Group.Spawner[0];
            var sourceEntity = m_Group.Entity[0];
            var center = m_Group.Position[0].Value;

            //根据产卵的个数声明对应个数的 entities 数组
            var entities = new NativeArray<Entity>(spawner.count, Allocator.Temp);
            //实例化cube
            EntityManager.Instantiate(spawner.prefab, entities);
            //创建对应的position数组(个数等于cube创建个数)
            var positions = new NativeArray<float3>(spawner.count, Allocator.Temp);

            if (spawner.spawnLocal)
            {
                //计算出每一个Cube对应的Position位置 使用 ref 填充
                GeneratePoints.RandomPointsOnCircle(new float3(), spawner.radius, ref positions);

                //遍历Position赋值
                for (int i = 0; i < spawner.count; i++)
                {
                    var position = new LocalPosition
                    {
                        Value = positions[i]
                    };
                    //为每一个Entity赋值
                    EntityManager.SetComponentData(entities[i], position);
                    //因为选择的是spawnLocal,所以要为对应的 entity添加 TransformParent(类似于原来的 transform.SetParent)
                    EntityManager.AddComponentData(entities[i], new TransformParent { Value = sourceEntity });
                }
            }
            else
            {
                GeneratePoints.RandomPointsOnCircle(center, spawner.radius, ref positions);
                for (int i = 0; i < spawner.count; i++)
                {
                    var position = new Position
                    {
                        Value = positions[i]
                    };
                    EntityManager.SetComponentData(entities[i], position);
                }
            }

            entities.Dispose();
            positions.Dispose();

            EntityManager.RemoveComponent<SpawnRandomCircle>(sourceEntity);

            //实例化 & AddComponent和RemoveComponent调用使注入的组无效,
            //所以在我们进入下一个产卵之前我们必须重新注入它们
            UpdateInjectedComponentGroups();
        }
    }
}
解析一

看到 ComponentSystem我们就可以知道里面的主要业务逻辑是基于Hybrid版ECS实现的,还是老套路,声明组件集合(产卵器),然后注入变量m_Group中
解析二
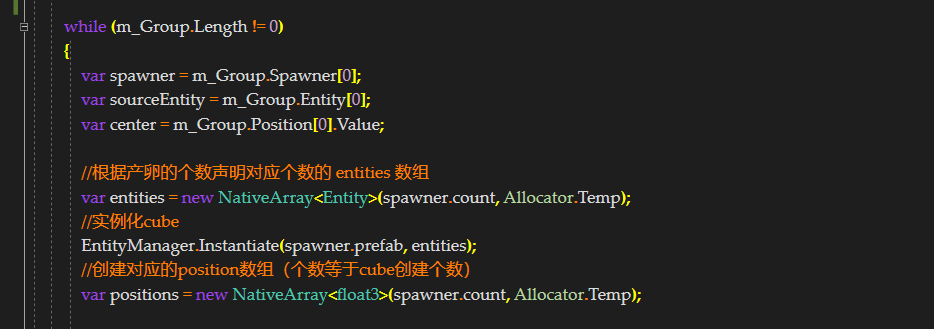
在这一段代码块中我们可以看到,因为Length==1(一个产卵器),所以后进入到while循环中执行对应的业务逻辑,当然在最后Length会为0,后续会提到原因。会根据产卵的个数声明对应个数的 entities 数组。使用EntityManager.Instantiate实例化Cube,创建对应的position数组(个数等于cube创建个数)。使用EntityManager.Instantiate最明显的特点是创建的Cube在hierarchy视图中是没有的。

解析三
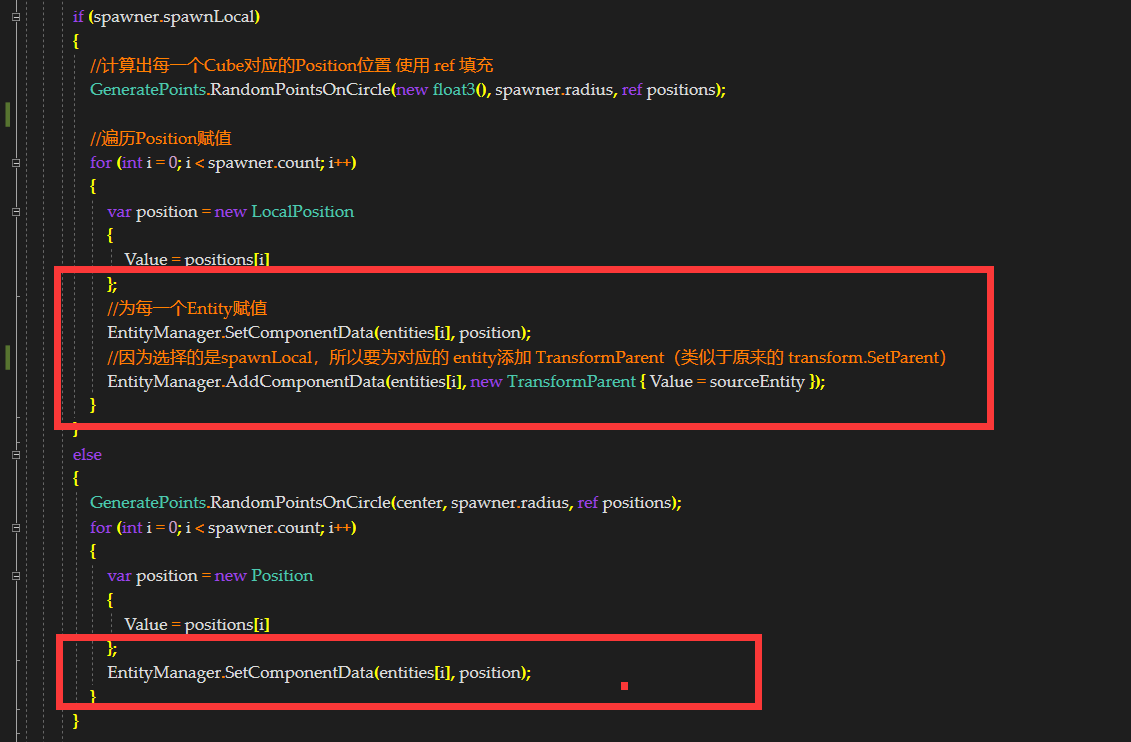
使用GeneratePoints.RandomPointsOnCircle设置对应的随机位置(工程中有提供)。区分使用Local Position主要是这两地方,用EntityManager.AddComponentData把对应的父物体数据添加进去,类似于原来的 transform.SetParent。

解析四
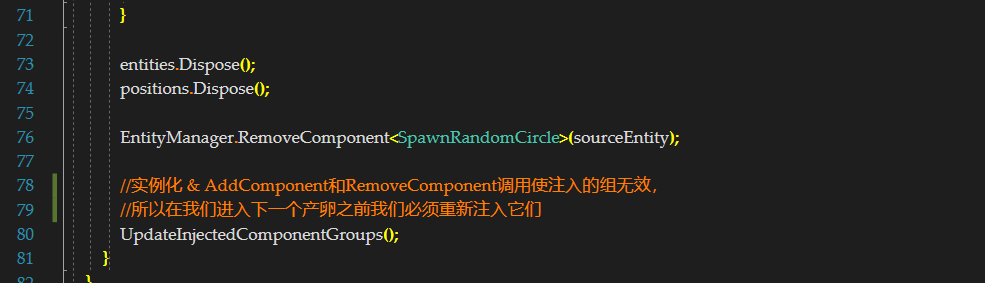
这一部分也是使Length的值变为0的关键,把无用的数据entities与positions进行释放。移除对应的产卵器再重新注入。换句话说就是destory产卵器。
然后我们创建一个能让Cube自转的sysytem,类似于
自转系统Code
using Unity.Collections;
using Unity.Entities;
using Unity.Jobs;
using Unity.Burst;
using Unity.Mathematics;
using Unity.Transforms;
using UnityEngine;

public class RotationSpeedSystem : JobComponentSystem
{
    [BurstCompile]
    struct RotationSpeedRotation : IJobProcessComponentData<Rotation, RotationSpeed>
    {
        //Time.deltaTime
        public float dt;

        public void Execute(ref Rotation rotation, [ReadOnly]ref RotationSpeed speed)
        {
            rotation.Value = math.mul(math.normalize(rotation.Value), quaternion.axisAngle(math.up(), speed.Value * dt));
        }
    }

    protected override JobHandle OnUpdate(JobHandle inputDeps)
    {
        var job = new RotationSpeedRotation() { dt = Time.deltaTime };
        return job.Schedule(this, 64, inputDeps);
    }
}
解析一
在自转系统中我们没有指定对应的Group(组件系统集合),而且执行的Execute代码块所继承接口IJobParallelFor代替为IJobProcessComponentData,IJobProcessComponentData文档中的解释笔者并是不是很理解,但根据测试的结果笔者认为是使用ref关键字搜索全部的Rotation组件,然后把自身的RotationSpeed数值赋值进去。因为如果在Logo上添加Rotation与RotationSpeed组件,Logo物体也会进行旋转(赋值相关代码下面会有讲解)。
触发Cube旋转系统
全部Code
using Unity.Collections;
using Unity.Entities;
using Unity.Jobs;
using Unity.Burst;
using Unity.Mathematics;
using Unity.Transforms;

//在RotationSpeedSystem前运行
[UpdateBefore(typeof(RotationSpeedSystem))]
public class RotationSpeedResetSphereSystem : JobComponentSystem
{
    /// <summary>
    /// Logo对应的entity group
    /// </summary>
    struct RotationSpeedResetSphereGroup
    {
        //Logo给予Cube速度对应的数据
        [ReadOnly] public ComponentDataArray<RotationSpeedResetSphere> rotationSpeedResetSpheres;
        //Logo对应的旋转半径
        [ReadOnly] public ComponentDataArray<Radius> spheres;
        //Logo对应的位置
        [ReadOnly] public ComponentDataArray<Position> positions;
        public readonly int Length;
    }
    //注入Logo组件集合
    [Inject] RotationSpeedResetSphereGroup m_RotationSpeedResetSphereGroup;

    /// <summary>
    /// 方块的entity group
    /// </summary>
    struct RotationSpeedGroup
    {
        //方块自身的旋转速度
        public ComponentDataArray<RotationSpeed> rotationSpeeds;
        //方块的位置
        [ReadOnly] public ComponentDataArray<Position> positions;
        //固定写法 数值等于Cube的个数
        public readonly int Length;
    }
    //注入Cube组件集合
    [Inject] RotationSpeedGroup m_RotationSpeedGroup;

    [BurstCompile]
    struct RotationSpeedResetSphereRotation : IJobParallelFor
    {
        /// <summary>
        /// 方块的速度
        /// </summary>
        public ComponentDataArray<RotationSpeed> rotationSpeeds;
        /// <summary>
        /// 方块的坐标
        /// </summary>
        [ReadOnly] public ComponentDataArray<Position> positions;

        //下面都是Logo上面的组件
        [ReadOnly] public ComponentDataArray<RotationSpeedResetSphere> rotationSpeedResetSpheres;
        [ReadOnly] public ComponentDataArray<Radius> spheres;
        [ReadOnly] public ComponentDataArray<Position> rotationSpeedResetSpherePositions;

        public void Execute(int i)//i 0-9  这个i值取对应 Schedule 中设置的 arrayLength 的数值 此Code中设置的为 m_RotationSpeedGroup.Length
        {
            //UnityEngine.Debug.Log($"长度{i}");
            //方块的中心点
            var center = positions[i].Value;

            for (int positionIndex = 0; positionIndex < rotationSpeedResetSpheres.Length; positionIndex++)
            {
                //计算圆球与方块的距离 ,小于指定具体传入速度
                if (math.distance(rotationSpeedResetSpherePositions[positionIndex].Value, center) < spheres[positionIndex].radius)
                {
                    rotationSpeeds[i] = new RotationSpeed
                    {
                        Value = rotationSpeedResetSpheres[positionIndex].speed
                    };
                }
            }
        }
    }

    protected override JobHandle OnUpdate(JobHandle inputDeps)
    {
        var rotationSpeedResetSphereRotationJob = new RotationSpeedResetSphereRotation
        {
            rotationSpeedResetSpheres = m_RotationSpeedResetSphereGroup.rotationSpeedResetSpheres,
            spheres = m_RotationSpeedResetSphereGroup.spheres,
            rotationSpeeds = m_RotationSpeedGroup.rotationSpeeds,
            rotationSpeedResetSpherePositions = m_RotationSpeedResetSphereGroup.positions,
            positions = m_RotationSpeedGroup.positions
        };

        return rotationSpeedResetSphereRotationJob.Schedule(m_RotationSpeedGroup.Length, 32, inputDeps);
    }
}
解析一
用的还是前面的老套路,与以往不同是在RotationSpeedResetSphereSystem上添加的[UpdateBefore(typeof(RotationSpeedSystem))]特性,他负责确保RotationSpeedResetSphereSystem在RotationSpeedSystem前执行,可以理解为手动的控制执行顺序
最后一步就是Cube速度衰减系统
全部Code
using Unity.Collections;
using Unity.Entities;
using Unity.Jobs;
using Unity.Burst;
using Unity.Mathematics;
using UnityEngine;

public class RotationAccelerationSystem : JobComponentSystem
{
    [BurstCompile]
    struct RotationSpeedAcceleration : IJobProcessComponentData<RotationSpeed, RotationAcceleration>
    {
        public float dt;
        //对Cube自身的RotationSpeed进行衰减处理
        public void Execute(ref RotationSpeed speed, [ReadOnly]ref RotationAcceleration acceleration)
        {
            speed.Value = math.max(0.0f, speed.Value + (acceleration.speed * dt));
        }
    }

    protected override JobHandle OnUpdate(JobHandle inputDeps)
    {
        var rotationSpeedAccelerationJob = new RotationSpeedAcceleration { dt = Time.deltaTime };
        return rotationSpeedAccelerationJob.Schedule(this, 64, inputDeps);
    }
}
解析一
使用的也是IJobProcessComponentData接口,整体和自旋转系统基本一致。
打完收工!!!真尼玛累~~~~