1. 距离传感器
#import "ViewController.h"

@implementation ViewController

- (void)viewDidLoad {
    [super viewDidLoad];

    //1. 开启距离传感器
    [UIDevice currentDevice].proximityMonitoringEnabled = YES;

    //2. 注册通知
    [[NSNotificationCenter defaultCenter] addObserver:self selector:@selector(proximityStateDidChangeNotification) name:UIDeviceProximityStateDidChangeNotification object:nil];
}

#pragma mark 通知的方法
- (void)proximityStateDidChangeNotification {
    //3. 获取通知的值
    if ([UIDevice currentDevice].proximityState) {
        NSLog(@"有逗比靠近");
    } else {
        NSLog(@"逗比被吓跑了");
    }
}

@end
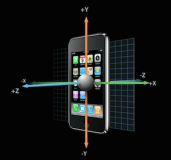
2. 加速计
#import "ViewController.h"
#import <CoreMotion/CoreMotion.h>

//CoreMotion框架 加速计 陀螺仪 磁力计

/**
 加速计 : 检测力在某个方向上有作用 (摇一摇)
 陀螺仪 : 检测转动的角速度 (绕着Y轴旋转, 玩手机赛车游戏)
 磁力计 : 检测磁场变化, 主要用于导航
 */

@interface ViewController ()

/** 运动管理器对象*/
@property (nonatomic, strong) CMMotionManager *motionMgr;

@end

@implementation ViewController

- (void)viewDidLoad {
    [super viewDidLoad];
    [self accelerometerPush];
//    [self accelerometerPull];
}

- (void)touchesBegan:(NSSet<UITouch *> *)touches withEvent:(UIEvent *)event
{
    //1. 点击时获取加速计的值
    // 运动管理器会记录所有的值, 在自己的属性中
    CMAcceleration acceleration = self.motionMgr.accelerometerData.acceleration;
    NSLog(@"x : %f, y : %f, z : %f", acceleration.x, acceleration.y, acceleration.z);
}


- (void)accelerometerPull
{
    /**
     加速计Pull方式 --> 在需要的时候来获取值
     */
    //1. 创建CMMotionManager对象
    self.motionMgr = [CMMotionManager new];

    //2. 判断加速计是否可用
    if (![self.motionMgr isAccelerometerAvailable]) {
        return;
    }

    //3. 开始采样
    [self.motionMgr startAccelerometerUpdates];
}

- (void)accelerometerPush {
    /**
       加速计Push方式
    */
    //1. 创建CMMotionManager对象
    self.motionMgr = [CMMotionManager new];

    //2. 判断加速计是否可用
    if (![self.motionMgr isAccelerometerAvailable]) {
        return;
    }

    //3. 设置采样间隔 单位是秒 --> 只有push方式需要采样间隔
    self.motionMgr.accelerometerUpdateInterval = 1;

    //4. 开始采样
    [self.motionMgr startAccelerometerUpdatesToQueue:[NSOperationQueue new] withHandler:^(CMAccelerometerData * _Nullable accelerometerData, NSError * _Nullable error) {

        //5 获取data中的数据值

        // 正值负值: 轴的方向, 哪个指向地面, 就会打印出打个方向的值
        // 只要在某个轴上, 进行快速移动, 那么值就会发生变化
        CMAcceleration acceleration = accelerometerData.acceleration;

        NSLog(@"x : %f, y : %f, z : %f", acceleration.x, acceleration.y, acceleration.z);

    }];
}
@end
3. 陀螺仪
#import "ViewController.h"
#import <CoreMotion/CoreMotion.h>

//CoreMotion框架 加速计 陀螺仪 磁力计

/**
 加速计 : 检测力在某个方向上有作用 (摇一摇)
 陀螺仪 : 检测转动的角速度 (绕着Y轴旋转, 玩手机赛车游戏)
 磁力计 : 检测磁场变化, 主要用于导航
 */

@interface ViewController ()

/** 运动管理器对象*/
@property (nonatomic, strong) CMMotionManager *motionMgr;

@end

@implementation ViewController

- (void)viewDidLoad {
    [super viewDidLoad];
    [self gyroPush];
    [self gyroPull];
}

- (void)touchesBegan:(NSSet<UITouch *> *)touches withEvent:(UIEvent *)event
{
    //1. 点击时获取陀螺仪的值
    CMRotationRate rotationRate = self.motionMgr.gyroData.rotationRate;
    NSLog(@"x : %f, y : %f, z : %f", rotationRate.x, rotationRate.y, rotationRate.z);
}

- (void)gyroPush
{
    /**
     陀螺仪Push方式
     */
    //1. 创建CMMotionManager对象
    self.motionMgr = [CMMotionManager new];

    //2. 判断陀螺仪是否可用
    if (![self.motionMgr isGyroAvailable]) {
        return;
    }

    //3. 设置采样间隔 单位是秒 --> 只有push方式需要采样间隔
    self.motionMgr.gyroUpdateInterval = 1;

    //4. 开始采样
    [self.motionMgr startGyroUpdatesToQueue:[NSOperationQueue new] withHandler:^(CMGyroData * _Nullable gyroData, NSError * _Nullable error) {

        //5 获取data中的数据值

        // 正值负值: 轴的方向, 哪个指向地面, 就会打印出打个方向的值
        // 只要在某个轴上, 进行快速移动, 那么值就会发生变化
        CMRotationRate rotationRate = gyroData.rotationRate;

        NSLog(@"x : %f, y : %f, z : %f", rotationRate.x, rotationRate.y, rotationRate.z);

    }];

}

- (void)gyroPull
{
    /**
     加速计Pull方式 --> 在需要的时候来获取值
     */
    //1. 创建CMMotionManager对象
    self.motionMgr = [CMMotionManager new];

    //2. 判断加速计是否可用
    if (![self.motionMgr isGyroAvailable]) {
        return;
    }

    //3. 开始采样
    [self.motionMgr startGyroUpdates];
}

@end
4. 磁力计
#import "ViewController.h"
#import <CoreMotion/CoreMotion.h>
//CoreMotion框架 加速计 陀螺仪 磁力计
/**
 加速计 : 检测力在某个方向上有作用 (摇一摇)
 陀螺仪 : 检测转动的角速度 (绕着Y轴旋转, 玩手机赛车游戏)
 磁力计 : 检测磁场变化, 主要用于导航
 */

@interface ViewController ()

/** 运动管理器对象*/
@property (nonatomic, strong) CMMotionManager *motionMgr;

@end

@implementation ViewController

- (void)viewDidLoad {
    [super viewDidLoad];

    /**
     磁力计Pull方式 --> 在需要的时候来获取值
     */
    //1. 创建CMMotionManager对象
    self.motionMgr = [CMMotionManager new];

    //2. 判断磁力计是否可用
    if (![self.motionMgr isMagnetometerAvailable]) {
        return;
    }

    //3. 开始采样
    [self.motionMgr startMagnetometerUpdates];
}

- (void)touchesBegan:(NSSet<UITouch *> *)touches withEvent:(UIEvent *)event
{
    //1. 点击时获取磁力计的值
    //单位特斯拉, 不是车
    CMMagneticField magneticField = self.motionMgr.magnetometerData.magneticField;

    NSLog(@"x : %f, y : %f, z : %f", magneticField.x, magneticField.y, magneticField.z);
}

@end
5. 小球移动
#import "ViewController.h"
#import <CoreMotion/CoreMotion.h>

@interface ViewController ()

@property (weak, nonatomic) IBOutlet UIImageView *ballView;

/** 运动管理器*/
@property (nonatomic, strong) CMMotionManager *motionManager;

/** 此属性用来记录加速计的值*/
@property (nonatomic, assign) CGPoint ballPoint;

@end

@implementation ViewController

- (void)viewDidLoad {
    [super viewDidLoad];

    /**
     思路分析
     1. 涉及到了x, y轴
     2. 加速计的x, y值 来进行叠加 --> CoreMotion push方式的加速计
     3. 叠加之后赋值给frame即可
     4. 需要属性来记录加速计的两个值
     */

    //1. 创建管理器对象
    self.motionManager = [CMMotionManager new];

    //2. 判断加速计是否可用
    if (![self.motionManager isAccelerometerAvailable]) {
        NSLog(@"不能");
        return;
    }

    //3. 设置采样间隔
    self.motionManager.accelerometerUpdateInterval = 1.0 / 20.0;

    //4. 开始采样 --> push方式, 使用的是下面这种方式
    [self.motionManager startAccelerometerUpdatesToQueue:[NSOperationQueue new] withHandler:^(CMAccelerometerData * _Nullable accelerometerData, NSError * _Nullable error) {
        if (error) {
            NSLog(@"error: %@",error);
            return;
        }

        // 5. 调用方法, 来完成小球相关的逻辑代码
        [self accelerationUpdate:accelerometerData.acceleration];
    }];

}


#pragma mark 此方法处理小球相关的逻辑
- (void)accelerationUpdate:(CMAcceleration)acceleration {
    //更改小球的位置变化 --> 值从加速计的值来获取的
    //Frame    加速计的值  叠加值
    //100  --> 1   --> 101
    //101 --> 3 --> 104
    //104 --> 5  --> 109

    // 如果不发生运动, 加速计的值, 默认在1~-1之间

    //1. 叠加加速计的值 --> 才能有用加速的效果
//    _ballPoint.x =

    CGRect frame = self.view.frame;
    frame.size.height = 30;
    self.view.frame = frame;

//    self.ballPoint.x =3;

    _ballPoint.x += acceleration.x;
    _ballPoint.y -= acceleration.y;

    // 上一次的速度 + 加速度 = 当前的速度
    // 上一次的位置 + 位移 = 当前的位置
    // ballPoint.x 和 ballPoint.y 存放的是速度
    // ballFrame.x 和 ballFrame.y 存放的是位置
    // 位移 = 速度 * 时间

    NSLog(@"_ballPoint: %@",NSStringFromCGPoint(self.ballPoint));

    //2. 修改Frame
    CGRect ballFrame = self.ballView.frame;
    ballFrame.origin.x += _ballPoint.x;
    ballFrame.origin.y += _ballPoint.y;

    //判断边界的问题
    if (ballFrame.origin.x <= 0) {

        //99 -100 ==-1?
        //0 + 100 = 100
        ballFrame.origin.x = 0;

        //在这里将小球的加速值取反 --> 为的是更改下一次的frame --> 模拟了碰撞现象
        //还要进行*= 0.7 操作, 以为着反弹之后, 小球不会返回原来的位置 --> 模拟重力现象
        _ballPoint.x *= -0.7;
    } else if (ballFrame.origin.x > (self.view.frame.size.width - ballFrame.size.width)) {

        //374 + 100 = 474?
        //375 - 100 = 275

        ballFrame.origin.x = self.view.frame.size.width - ballFrame.size.width;
        _ballPoint.x *= -0.7;
    }

    if (ballFrame.origin.y <= 0) {

        ballFrame.origin.y = 0;
        _ballPoint.y *= -0.7;
    } else if (ballFrame.origin.y > (self.view.frame.size.height - ballFrame.size.height)) {

        ballFrame.origin.y = self.view.frame.size.height - ballFrame.size.height;
        _ballPoint.y *= -0.7;
    }


    //3. 重设frame 主界面中更新
    dispatch_sync(dispatch_get_main_queue(), ^{
        self.ballView.frame = ballFrame;
    });
}

@end
6. 摇一摇
#import "ViewController.h"

@interface ViewController ()

@end

@implementation ViewController

- (void)viewDidLoad {
    [super viewDidLoad];

    // 摇一摇在iOS中的2种实现方式
    //1. 加速计的值 --> 默认不动手机,1~-1 , 如果摇动了手机, 值会增大
    //可以取绝对值, 自行判断(譬如, 值大于5, 就认为是动摇了)

    //2. 系统已经封装号的摇动方法

}

- (void)motionBegan:(UIEventSubtype)motion withEvent:(UIEvent *)event
{
    NSLog(@"摇一摇");
}

- (void)motionCancelled:(UIEventSubtype)motion withEvent:(UIEvent *)event
{
    NSLog(@"取消摇动");
}

- (void)motionEnded:(UIEventSubtype)motion withEvent:(UIEvent *)event
{
    NSLog(@"摇动结束");
}

@end
7. 计步器
#import "ViewController.h"
#import <CoreMotion/CoreMotion.h>

@interface ViewController ()

@property (weak, nonatomic) IBOutlet UILabel *label;

@property (nonatomic, strong) CMPedometer *pedometer;

@end

@implementation ViewController

- (void)viewDidLoad {
    [super viewDidLoad];

    //iOS8的 计步器
    //1. 判断硬件是否可用
    if (![CMPedometer isStepCountingAvailable]) {
        return;
    }

    //2. 创建计步器的类
    self.pedometer = [CMPedometer new];

    //3. 开始计步统计
    [self.pedometer startPedometerUpdatesFromDate:[NSDate date] withHandler:^(CMPedometerData * _Nullable pedometerData, NSError * _Nullable error) {


        // 4. 主线程中去更新UI
        NSNumber *number = pedometerData.numberOfSteps;
        [self performSelectorOnMainThread:@selector(updateUI:) withObject:number waitUntilDone:NO];

    }];
}

- (void)updateUI:(NSNumber *)number
{
    self.label.text = [NSString stringWithFormat:@"您当前一共走了%@步",number];
}

- (void)setpCounter {
    //iOS7的 计步器
    if (![CMStepCounter isStepCountingAvailable]) {
        return;
    }

    CMStepCounter *stepCounter = [CMMotionManager new];

    [stepCounter startStepCountingUpdatesToQueue:[NSOperationQueue new] updateOn:5 withHandler:^(NSInteger numberOfSteps, NSDate * _Nonnull timestamp, NSError * _Nullable error) {
        NSLog(@"numberSteps: %zd", numberOfSteps);
    }];

}

@end