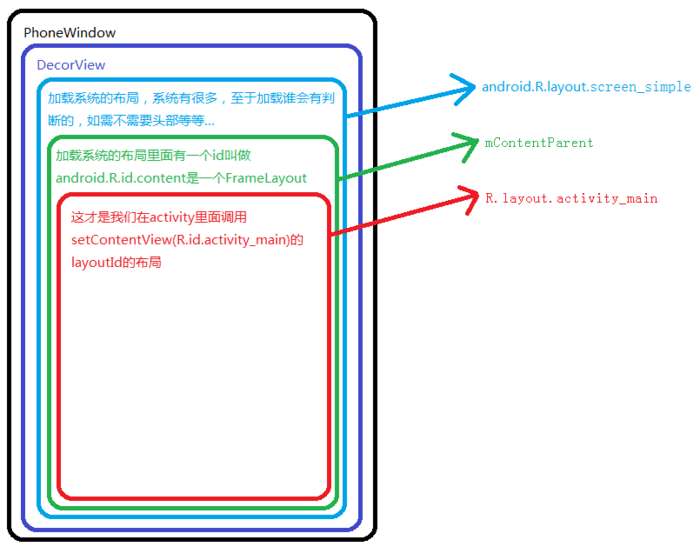
关键词:PhoneWindow DecorView
在调用setContentView方法设置布局的时候,系统做了什么?
在AppCompatActivity中
@Override
    public void setContentView(@LayoutRes int layoutResID) {
        getDelegate().setContentView(layoutResID);
    }
可以看到AppCompatDelegate中
public abstract void setContentView(@LayoutRes int resId);
是一个抽象方法
接下来看这个getDelegate是什么
/**
     * @return The {@link AppCompatDelegate} being used by this Activity.
     */
    @NonNull
    public AppCompatDelegate getDelegate() {
        if (mDelegate == null) {
            mDelegate = AppCompatDelegate.create(this, this);
        }
        return mDelegate;
    }
AppCompatDelegate是一个类似工厂类的抽象类,会根据sdk版本create不同的子类
/**
     * Create a {@link android.support.v7.app.AppCompatDelegate} to use with {@code dialog}.
     *
     * @param callback An optional callback for AppCompat specific events
     */
    public static AppCompatDelegate create(Dialog dialog, AppCompatCallback callback) {
        return create(dialog.getContext(), dialog.getWindow(), callback);
    }

    private static AppCompatDelegate create(Context context, Window window,
            AppCompatCallback callback) {
        final int sdk = Build.VERSION.SDK_INT;
        if (BuildCompat.isAtLeastN()) {
            return new AppCompatDelegateImplN(context, window, callback);
        } else if (sdk >= 23) {
            return new AppCompatDelegateImplV23(context, window, callback);
        } else if (sdk >= 14) {
            return new AppCompatDelegateImplV14(context, window, callback);
        } else if (sdk >= 11) {
            return new AppCompatDelegateImplV11(context, window, callback);
        } else {
            return new AppCompatDelegateImplV9(context, window, callback);
        }
    }
我们就是要从这些实现类中找到setContentView方法
从源码中可以看到这些子类的继承关系
AppCompatDelegateImplN extends AppCompatDelegateImplV23
AppCompatDelegateImplV23 extends AppCompatDelegateImplV14
AppCompatDelegateImplV14 extends AppCompatDelegateImplV11
AppCompatDelegateImplV11 extends AppCompatDelegateImplV9
AppCompatDelegateImplV9 extends AppCompatDelegateImplBase
最终
AppCompatDelegateImplBase extends AppCompatDelegate
我们在AppCompatDelegateImplV9中找到setContentView方法
@Override
    public void setContentView(int resId) {
        //获取到mSubDecor,这是一个ViewGroup,在这个ViewGroup中有一个id为content的ViewGroup,最终我们设置的layout就是添加到这个id为content的ViewGroup中的
        ensureSubDecor();
        ViewGroup contentParent = (ViewGroup) mSubDecor.findViewById(android.R.id.content);
        contentParent.removeAllViews();
        LayoutInflater.from(mContext).inflate(resId, contentParent);
        mOriginalWindowCallback.onContentChanged();
    }
这里先简单看一下LayoutInflator inflate的源码,以后会具体分析,看完这个我们再分析mSubDecor的获取
LayoutInflater.from(mContext).inflate(resId, contentParent);
LayoutInflator中
    public View inflate(@LayoutRes int resource, @Nullable ViewGroup root) {
        return inflate(resource, root, root != null);
    }

    public View inflate(@LayoutRes int resource, @Nullable ViewGroup root, boolean attachToRoot) {
        final Resources res = getContext().getResources();
        if (DEBUG) {
            Log.d(TAG, "INFLATING from resource: \"" + res.getResourceName(resource) + "\" ("
                    + Integer.toHexString(resource) + ")");
        }
        //从一个layout的id中解析出XmlResourceParser
        final XmlResourceParser parser = res.getLayout(resource);
        try {
            return inflate(parser, root, attachToRoot);
        } finally {
            parser.close();
        }
    }
    public View inflate(XmlPullParser parser, @Nullable ViewGroup root, boolean attachToRoot) {
        synchronized (mConstructorArgs) {
            Trace.traceBegin(Trace.TRACE_TAG_VIEW, "inflate");

            final Context inflaterContext = mContext;
            //获取布局的参数
            final AttributeSet attrs = Xml.asAttributeSet(parser);
            Context lastContext = (Context) mConstructorArgs[0];
            mConstructorArgs[0] = inflaterContext;
            View result = root;

            //解析这个xml布局
            try {
                // Look for the root node.
                int type;
                while ((type = parser.next()) != XmlPullParser.START_TAG &&
                        type != XmlPullParser.END_DOCUMENT) {
                    // Empty
                }
                //xml解析失败,没有找到start tag
                if (type != XmlPullParser.START_TAG) {
                    throw new InflateException(parser.getPositionDescription()
                            + ": No start tag found!");
                }

                final String name = parser.getName();

                ......


                //merge标签处理
                if (TAG_MERGE.equals(name)) {
                    if (root == null || !attachToRoot) {
                        throw new InflateException("<merge /> can be used only with a valid "
                                + "ViewGroup root and attachToRoot=true");
                    }

                    rInflate(parser, root, inflaterContext, attrs, false);
                } else {
                    // Temp is the root view that was found in the xml
                    final View temp = createViewFromTag(root, name, inflaterContext, attrs);

                    ViewGroup.LayoutParams params = null;

                    if (root != null) {
                        ......
                        // 设置布局参数
                        params = root.generateLayoutParams(attrs);
                        if (!attachToRoot) {
                            temp.setLayoutParams(params);
                        }
                    }
                    ......
                    // Inflate all children under temp against its context.
                    rInflateChildren(parser, temp, attrs, true);

                    ......
                    // We are supposed to attach all the views we found (int temp)
                    // to root. Do that now.
                    if (root != null && attachToRoot) {
                        //把view add到root中,inflate方法的作用其实就是把一个view添加到一个ViewGroup中
                        root.addView(temp, params);
                    }

                    // Decide whether to return the root that was passed in or the
                    // top view found in xml.
                    if (root == null || !attachToRoot) {
                        result = temp;
                    }
                }

            ......

            return result;
        }
    }
我们简单看下rInflate和rInflateChildren方法
rInflate
/**
     * Recursive method used to descend down the xml hierarchy and instantiate
     * views, instantiate their children, and then call onFinishInflate().
     * <p>
     * <strong>Note:</strong> Default visibility so the BridgeInflater can
     * override it.
     */
    void rInflate(XmlPullParser parser, View parent, Context context,
            AttributeSet attrs, boolean finishInflate) throws XmlPullParserException, IOException {

        final int depth = parser.getDepth();
        int type;
        boolean pendingRequestFocus = false;

        while (((type = parser.next()) != XmlPullParser.END_TAG ||
                parser.getDepth() > depth) && type != XmlPullParser.END_DOCUMENT) {

            if (type != XmlPullParser.START_TAG) {
                continue;
            }

            final String name = parser.getName();

            if (TAG_REQUEST_FOCUS.equals(name)) {
                pendingRequestFocus = true;
                consumeChildElements(parser);
            } else if (TAG_TAG.equals(name)) {
                parseViewTag(parser, parent, attrs);
            } else if (TAG_INCLUDE.equals(name)) {
                if (parser.getDepth() == 0) {
                    throw new InflateException("<include /> cannot be the root element");
                }
                parseInclude(parser, context, parent, attrs);
            } else if (TAG_MERGE.equals(name)) {
                throw new InflateException("<merge /> must be the root element");
            } else {
                final View view = createViewFromTag(parent, name, context, attrs);
                final ViewGroup viewGroup = (ViewGroup) parent;
                final ViewGroup.LayoutParams params = viewGroup.generateLayoutParams(attrs);
                rInflateChildren(parser, view, attrs, true);
                //添加到布局中
                viewGroup.addView(view, params);
            }
        }

        if (pendingRequestFocus) {
            parent.restoreDefaultFocus();
        }
        //当布局inflate完成的时候,回调view的onFinishInflate方法,这个方法就是我们在自定义View时经常重写的那个onFinishInflate方法,
        //在这个方法中为什么获取不到view的宽高?因为只是布局inflate完成,还没有进行测量,onMeasure还没有开始
        if (finishInflate) {
            parent.onFinishInflate();
        }
    }
rInflateChildren
/**
     * Recursive method used to inflate internal (non-root) children. This
     * method calls through to {@link #rInflate} using the parent context as
     * the inflation context.
     * <strong>Note:</strong> Default visibility so the BridgeInflater can
     * call it.
     */
    final void rInflateChildren(XmlPullParser parser, View parent, AttributeSet attrs,
            boolean finishInflate) throws XmlPullParserException, IOException {
        //最终调用的还是rInflate方法
        rInflate(parser, parent, parent.getContext(), attrs, finishInflate);
    }
看到这里我们知道了一些东西,setContentView方法就是将我们设置的layout解析成view之后add到了mSubDecor的一个id为android.R.id.content的ViewGroup中(contentParent)了,然后再次回到setContentView 方法中的ensureSubDecor方法中,mSubDecor是什么?如何获取的?
private void ensureSubDecor() {
        if (!mSubDecorInstalled) {
            mSubDecor = createSubDecor();
            .......
        }
    }
private ViewGroup createSubDecor() {

        ......

        // Now let's make sure that the Window has installed its decor by retrieving it
        mWindow.getDecorView();

        ......

        // Now set the Window's content view with the decor
        mWindow.setContentView(subDecor);

        ......

        return subDecor;
    }
这里的Window指的是PhoneWindow
看
mWindow.getDecorView();
//如果mDecor不存在就创建,所以官方注释说
Now let's make sure that the Window has installed its decor by retrieving it
@Override
    public final View getDecorView() {
        if (mDecor == null || mForceDecorInstall) {
            installDecor();
        }
        return mDecor;
    }
installDecor这个方法,我们关注两个点,第一,它创建了DecorView,并返回,
第二,通过DecorView创建了mContentParent
private void installDecor() {
        mForceDecorInstall = false;

        if (mDecor == null) {
            //如果mDecor为null,就创建出来
            mDecor = generateDecor(-1);
            ......
        } else {
            //给DecorView设置Window
            mDecor.setWindow(this);
        }
        if (mContentParent == null) {
            //如果mContentParent为null,就创建出来
            mContentParent = generateLayout(mDecor);
            ........
        }
    }
    //DecorView是被new出来的
    protected DecorView generateDecor(int featureId) {

        ......

        return new DecorView(context, featureId, this, getAttributes());
    }

    protected ViewGroup generateLayout(DecorView decor) {
        ......
        //The ID that the main layout in the XML layout file should have.这是一个系统层面的ViewGroup
        ViewGroup contentParent = (ViewGroup)findViewById(ID_ANDROID_CONTENT);
        ......
        return contentParent;
    }
源码new出来了一个DecorView,然后再根据具体情况选取一个系统的布局add到DecorView中,subDecor就是这个系统布局,这个布局会被添加到DecorView中,DecorView又是被添加到PhoneWindow上
mWindow.setContentView(subDecor);
@Override
    public void setContentView(View view) {
        setContentView(view, new ViewGroup.LayoutParams(MATCH_PARENT, MATCH_PARENT));
    }

    @Override
    public void setContentView(View view, ViewGroup.LayoutParams params) {
        // Note: FEATURE_CONTENT_TRANSITIONS may be set in the process of installing the window
        // decor, when theme attributes and the like are crystalized. Do not check the feature
        // before this happens.
        if (mContentParent == null) {
            //确保mContentParent不为null,这里基本上不存在为null的情况,因为在
            //mWindow.getDecorView();的时候如果为 null就会创建出来
            installDecor();
        } else if (!hasFeature(FEATURE_CONTENT_TRANSITIONS)) {
            mContentParent.removeAllViews();
        }

        if (hasFeature(FEATURE_CONTENT_TRANSITIONS)) {
            ......
        } else {
            //把subDecor加入了mContentParent
            mContentParent.addView(view, params);
        }
        ......
    }
这样一个过程下来,基本上setContentView的作用有了基本的结论
这里借用一下一位博主的图片来说明手机屏幕的View层级关系