SpringBoot-外部资源的配置
1.外部资源的配置优先级
为了能够在不同的环境运行不同的配置文件,或者有些代码的一些变量是跟随着环境的改变而改变的,这时候就需要在外部做一些配置。SpringBoot允许这么做,并且有一套配置规则。可以通过@Value注解进行将一些变量动态的取出来。SpringBoot支持多种的外部配置的方式,其中的优先级如下:
- 全局的设置在根目录中(~/.spring-boot-devtools.properties)
- @TestPropertySource在Test模块中的注解
- @SpringBootTest#properties也是在Test模块中
- 命令行
- 命令行中的SPRING_APPLICATION_JSONJSON字符串, 例如java -Dspring.application.json='{"foo":"bar"}' -jar myapp.jar
- ServletConfig 初始化参数,可在代码进行配置
- ServletContext 初始化参数,可在代码进行配置
- 来自java:comp/env的JNDI属性
- Java系统属性(System.getProperties())
- 操作系统的环境变量
- RandomValuePropertySource配置的random.*属性值
- jar外部的带指定profile的application.yml,比如application-{profile}.yml
- jar内部的带指定profile的application.yml,比如application-{profile}.yml
- jar外部的application.yml
- jar内部的application.yml
- 在自定义的@Configuration类中定于的@PropertySource
- 启动的main方法中,定义的默认配置。SpringApplication.setDefaultProperties
下面给出具体的实例:
@SpringBootApplication
@RestController
public class FirstSpringBootApplication {

    @Value("${name}")
    private String name;

    @RequestMapping("/")
    String home() {
        return name;
    }

    public static void main(String[] args) {
        SpringApplication app = new SpringApplication(FirstSpringBootApplication.class);
        app.run(args);
    }
}
可以在application.yml或者application.properties配置文件中设置name的值
application.yml
name: 不学无数
注意在name: 的冒号后面要加空格
application.properties
name=不学无数
这样在启动项目的时候然后访问http:localhost:8080就可以取出了name的值

2.配置随机值
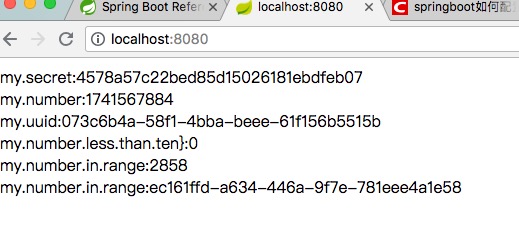
当想要一些随机值的时候SpringBoot也提供了一些方法,随机数具体有哪些应用呢,例如可以防止浏览器认为是相同的资源而去读取缓存,或者是生成验证码,在application.properties配置如下
my.secret=${random.value} --生成随机字符串
my.number=${random.int}   --生成随机数
my.uuid=${random.uuid}    --生成uuid
my.number.less.than.ten=${random.int(10)} -- 生成10以内的随机数
my.number.in.range=${random.int[1024,65536]} --生成1024到65536的随机数
取出的代码如下:
    @Value("${my.secret}")
    private String secret;
    @Value("${my.number}")
    private String number;
    @Value("${my.uuid}")
    private String uuid;
    @Value("${my.number.less.than.ten}")
    private Integer ten;
    @Value("${my.number.in.range}")
    private Integer range;

    @RequestMapping("/")
    String home() {
        StringBuffer stringBuffer=new StringBuffer();
        stringBuffer.append("my.secret:"+secret+"<br/>");
        stringBuffer.append("my.number:"+number+"<br/>");
        stringBuffer.append("my.uuid:"+uuid+"<br/>");
        stringBuffer.append("my.number.less.than.ten}:"+ten+"<br/>");
        stringBuffer.append("my.number.in.range:"+range+"<br/>");
        return stringBuffer.toString();
    }
然后访问http:localhost:8080可以查看到如下的页面

3.命令行配置
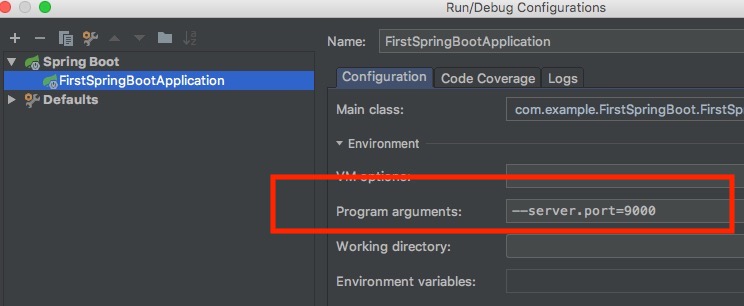
SpingApplication默认的能够转变任何命令行的参数然后将其配置在Spring中,例如--server.port=9000,那么web启动的端口号就变为了9000。

然后启动项目就会发现端口号改变了。
如果不想让命令行的配置加入到Spring环境中的话,可以SpringApplication.setAddCommandLineProperties(false)进行设置
4.资源文件配置
SpringApplication会从application.properties进行加载系统的配置,并且将其配置加入到Spring的环境中
你也可以使用YAML('.yml')来代替.properties
如果不想使用application.properties作为配置文件的名字的话,那么可以选择其他名字的文件作为配置文件。可以具体设置spring.config.name环境变量进行设置。也可以使用spring.config.location后面跟文件的全路径名。
$ java -jar myproject.jar --spring.config.name=myproject
$ java -jar myproject.jar --spring.config.location=classpath:/default.properties,classpath:/override.properties
spring.config.name和spring.config.location这两个配置因为是要设置哪个配置文件起作用的,所以必须在程序启动之前设置,例如设置在系统的环境变量中,或者是设置在启动的参数中。
5.独特的配置(Profile-specific Properties)
不知道该怎么翻译,就把英文给加在后面了,以免误人子弟。在公司进行开发的过程中,也许我们会碰到这种情况,例如在开发环境中用的一套配置,而在测试环境是另一套的配置。所以在不同的环境需要有不同的配置文件。SpringBoot也提供了这样一套的配置规则。application-{profile}.properties。其中的profile可以进行配置化,如果没有配置的话那么就会以默认的application-default.properties为配置文件。其中profile的属性可以在application.properties进行配置spring.profiles.active的值。
application.properties配置如下
spring.profiles.active=test --即加载application-test.properties

或者spring.profiles.active=dev --即加载application-dev.properties
application-test.properties
name=BuXueWuShu---Test
application-dev.properties
name=BuXueWuShu---Dev
这样在application.properties中就可以加载不同的配置文件
    @Value("${name}")
    private String name;
    @RequestMapping("/")
    String home() {
        return name;
    }
通过不同的环境配置就可以访问不同值
当然你也可以通过上一节的spring.config.location这个启动的环境变量进行设置想要启动的时候加载具体哪个配置文件
6.资源文件中的占位符
当在资源文件中定义过一些变量的时候,如果在同样的资源文件中要复用,那么也可以进行引用。
application.properties配置
my.name=BuXueWuShu
my.description=My name is ${my.name}
7.使用YAML
YAML是针对于JSON的一种扩展,所以做配置文件是非常不错的选择。并且在SpringApplication中如果你引入了spring-boot-starter的包,那么SpringApplication会自动的支持YAML。
7.1解析YAML
Spring框架提供了两个简便的类能够解析YAML文档。YamlPropertiesFactoryBean解析YAML作为Properties。YamlMapFactoryBean解析YAML作为Map。例如下面的YAML文件中
environments:
    dev:
        url: http://dev.example.com
        name: Developer Setup
    prod:
        url: http://another.example.com
        name: My Cool App
刚才的例子这个YAML将会被解析成
environments.dev.url=http://dev.example.com
environments.dev.name=Developer Setup
environments.prod.url=http://another.example.com
environments.prod.name=My Cool App
YAML列表将会被替代成数组的类型,根据[index]进行取值
my:
servers:
    - dev.example.com
    - another.example.com
上面的例子将会被解析成下面这种形式的
my.servers[0]=dev.example.com
my.servers[1]=another.example.com
如果你想讲这些数据进行取出来的话,新建一个配置类,使用SpringBoot提供的@ConfigurationProperties的注解,然后在此类中得有一个List或者Set集合,然后设置get方法就能将值取出来了,具体实现如下:
@ConfigurationProperties(prefix="my")
public class Config {

    private List<String> servers = new ArrayList<String>();

    public List<String> getServers() {
        return this.servers;
    }
}
7.2 多环境配置YAML
在讲解application.properties的时候如果想使用多环境的配置那么就是设置不同的application-{profile}.properties的文件具体哪个文件生效可以在application.properties中设置spring.profiles.active属性即可。但是在YAML如何在不同的环境中生效呢?当然第一种办法就是和application.properties一样设置不同的yml文件,然后进行设置具体哪个生效即可。YAML也有另一种的方法。如下所示
server:
    address: 192.168.1.100
spring:
    profiles:
        active:在此设置具体哪个profiles生效即可(例如此处填写 test) adress就是192.168.1.120
---
spring:
    profiles: development
server:
    address: 127.0.0.1
---
spring:
    profiles: test
server:
    address: 192.168.1.120
通过"---"设置不同的环境的配置属性
如果你在配置文件中没有设置spring.profiles.active属性那么配置文件就不知道哪个生效,所以他会找一个默认的进行设置。只需要设置spring.profiles:default 即可
server:
  port: 8000
---
spring:
  profiles: default
  security:
    user:
      password: weak
8.通过类型匹配属性(Type-safe Configuration Properties)
通过@Value("${property}")可以将配置中的属性在类中取出来,这样是可以的,但是如果有多个类型要取或者是要取的有着严格的等级。那么取的时候会有些麻烦,SpringBoot提供了一套可以通过类型匹配在相应的Bean实体中取出配置中的属性。而这也是SpringBoot的一项宗旨,尽量减少xml的配置。
在yml文件中的配置如下
acme:
  remote-address: 192.168.1.1
  security:
    username: admin
    roles:
      - USER
      - ADMIN
接收这些配置信息的类如下
package com.example.FirstSpringBoot.Configuration;

import org.springframework.boot.context.properties.ConfigurationProperties;

import java.util.ArrayList;
import java.util.Collections;
import java.util.List;

@ConfigurationProperties("acme")
public class AcmeProperties {

    private boolean enabled;

    private String remoteAddress;

    private final Security security = new Security();

    public boolean isEnabled() { return enabled; }

    public void setEnabled(boolean enabled) { this.enabled=enabled; }

    public String getRemoteAddress() { return remoteAddress; }

    public void setRemoteAddress(String remoteAddress) { this.remoteAddress=remoteAddress; }

    public Security getSecurity() { return security; }

    public static class Security {

        private String username;

        private String password;

        private List<String> roles = new ArrayList<>(Collections.singleton("USER"));

        public String getUsername() { return username; }

        public void setUsername(String username) { this.username=username; }

        public String getPassword() { return password; }

        public void setPassword(String password) { this.password=password; }

        public List<String> getRoles() { return roles; }

        public void setRoles(List<String> roles) { this.roles=roles; }

    }
}
然后再写一个类将上面的类进行注册进Spring中
@Configuration
@EnableConfigurationProperties(AcmeProperties.class)
public class MyConfiguration {
}
然后在任何类中就可以进行配置了
@Service
public class MyService {

    private final AcmeProperties acmeProperties;

    @Autowired
    public MyService(AcmeProperties acmeProperties){
        this.acmeProperties=acmeProperties;
    }

    @PostConstruct
    public void openConnection() {
        System.out.println("remote-address:"+acmeProperties.getRemoteAddress());
        System.out.println("username:"+acmeProperties.getSecurity().getUsername());
        System.out.println("role:"+acmeProperties.getSecurity().getRoles());
    }
}
这样就可以将配置文件中的属性从bean中取出来,而不是一个一个@Value进行取了。其中@PostConstruct注解意思是在加载Servlet的时候进行运行,并且只运行一次。
2018-07-18 17:55:51.593  INFO 17487 --- [ost-startStop-1] o.s.b.w.servlet.ServletRegistrationBean  : Mapping servlet: 'dispatcherServlet' to [/]
2018-07-18 17:55:51.599  INFO 17487 --- [ost-startStop-1] o.s.b.w.servlet.FilterRegistrationBean   : Mapping filter: 'characterEncodingFilter' to: [/*]
2018-07-18 17:55:51.599  INFO 17487 --- [ost-startStop-1] o.s.b.w.servlet.FilterRegistrationBean   : Mapping filter: 'hiddenHttpMethodFilter' to: [/*]
2018-07-18 17:55:51.599  INFO 17487 --- [ost-startStop-1] o.s.b.w.servlet.FilterRegistrationBean   : Mapping filter: 'httpPutFormContentFilter' to: [/*]
2018-07-18 17:55:51.599  INFO 17487 --- [ost-startStop-1] o.s.b.w.servlet.FilterRegistrationBean   : Mapping filter: 'requestContextFilter' to: [/*]
remote-address:192.168.1.1
username:admin
role:[USER, ADMIN]
查看启动信息就可以知道,他是在加载Servlet的时候运行的。
8.1第三方的配置
如果你的配置想要作为一个jar包供第三方进行使用,那么可以在与配置进行类型匹配的类中即上面提到的AcmeProperties类上面加上@Bean注解。这样就可以将配置进行打包传输了。
@ConfigurationProperties(prefix = "acme")
@Bean
public class AcmeProperties() {
    ...
}
8.2对于资源文件的校验
SpringBoiot提供了一套对资源文件的校验。假如在资源文件中某个字段是不可或缺的,只要如下配置即可。
@ConfigurationProperties(prefix="acme")
@Validated
public class AcmeProperties {

    @NotNull
    private String remoteAddress;

    // ... getters and setters

}
此时如果资源文件中没有定义acme.remoteAddress的值的话那么在项目启动的时候就会报错
Description:

Binding to target com.example.FirstSpringBoot.Configuration.AcmeProperties@2eadc9f6 failed:

    Property: acme.remoteAddress
    Value: null
    Reason: 不能为null
当复杂的资源文件想要校验怎么办?就如下配置即可
@ConfigurationProperties(prefix="acme")
@Validated
public class AcmeProperties {

    @NotNull
    private String remoteAddress;

    @Valid
    private final Security security = new Security();

    // ... getters and setters

    public static class Security {

        @NotEmpty
        public String username;

        // ... getters and setters

    }

}
当然这个@Validated注解是SpringMvc中的注解,这里就不详细解释了。关于@Validated的参考资料: