目录介绍
-
1.最简单的创建方法
- 1.1 PopupWindow构造方法
- 1.2 显示PopupWindow
- 1.3 最简单的创建
- 1.4 注意问题宽和高属性
-
2.源码分析
- 2.1 setContentView(View contentView)
- 2.2 showAsDropDown()源码
- 2.3 dismiss()源码分析
- 2.4 PopupDecorView源码分析
-
3.经典总结
- 3.1 PopupWindow和Dialog有什么区别?
- 3.2 创建和销毁的大概流程
- 3.3 为何弹窗点击一下就dismiss呢?
- 4.PopupWindow封装库介绍
好消息
- 博客笔记大汇总【16年3月到至今】,包括Java基础及深入知识点,Android技术博客,Python学习笔记等等,还包括平时开发中遇到的bug汇总,当然也在工作之余收集了大量的面试题,长期更新维护并且修正,持续完善……开源的文件是markdown格式的!同时也开源了生活博客,从12年起,积累共计47篇[近20万字],转载请注明出处,谢谢!
- 链接地址:https://github.com/yangchong211/YCBlogs
- 如果觉得好,可以star一下,谢谢!当然也欢迎提出建议,万事起于忽微,量变引起质变!
- PopupWindow封装库项目地址:https://github.com/yangchong211/YCDialog
-
- 最简单的创建,简单改造避免重复创建,show()方法源码分析,scheduleTimeoutLocked吐司如何自动销毁的,TN类中的消息机制是如何执行的,普通应用的Toast显示数量是有限制的,用代码解释为何Activity销毁后Toast仍会显示,Toast偶尔报错Unable to add window是如何产生的,Toast运行在子线程问题,Toast如何添加系统窗口的权限等等
-
- 最简单的使用方法,onCreate(@Nullable Bundle savedInstanceState)源码分析,重点分析弹窗展示和销毁源码,使用中show()方法遇到的IllegalStateException分析
-
- 显示PopupWindow,注意问题宽和高属性,showAsDropDown()源码,dismiss()源码分析,PopupWindow和Dialog有什么区别?为何弹窗点击一下就dismiss呢?
-
- 最简单的创建,Snackbar的make方法源码分析,Snackbar的show显示与点击消失源码分析,显示和隐藏中动画源码分析,Snackbar的设计思路,为什么Snackbar总是显示在最下面
-
- DialogFragment使用中show()方法遇到的IllegalStateException,什么常见产生的?Toast偶尔报错Unable to add window,Toast运行在子线程导致崩溃如何解决?
1.最简单的创建方法
1.1 PopupWindow构造方法
-
如下所示
public PopupWindow (Context context)
public PopupWindow(View contentView)
public PopupWindow(int width, int height)
public PopupWindow(View contentView, int width, int height)
public PopupWindow(View contentView, int width, int height, boolean focusable)
1.2 显示PopupWindow
-
如下所示
showAsDropDown(View anchor):相对某个控件的位置(正左下方),无偏移
showAsDropDown(View anchor, int xoff, int yoff):相对某个控件的位置,有偏移
showAtLocation(View parent, int gravity, int x, int y):相对于父控件的位置(例如正中央Gravity.CENTER,下方Gravity.BOTTOM等),可以设置偏移或无偏移
1.3 最简单的创建
-
具体如下所示
//创建对象
PopupWindow popupWindow = new PopupWindow(this);
View inflate = LayoutInflater.from(this).inflate(R.layout.view_pop_custom, null);
//设置view布局
popupWindow.setContentView(inflate);
popupWindow.setWidth(LinearLayout.LayoutParams.WRAP_CONTENT);
popupWindow.setHeight(LinearLayout.LayoutParams.WRAP_CONTENT);
//设置动画的方法
popupWindow.setAnimationStyle(R.style.BottomDialog);
//设置PopUpWindow的焦点,设置为true之后,PopupWindow内容区域,才可以响应点击事件
popupWindow.setTouchable(true);
//设置背景透明
popupWindow.setBackgroundDrawable(new ColorDrawable(0x00000000));
//点击空白处的时候让PopupWindow消失
popupWindow.setOutsideTouchable(true);
// true时,点击返回键先消失 PopupWindow
// 但是设置为true时setOutsideTouchable,setTouchable方法就失效了(点击外部不消失,内容区域也不响应事件)
// false时PopupWindow不处理返回键,默认是false
popupWindow.setFocusable(false);
//设置dismiss事件
popupWindow.setOnDismissListener(new PopupWindow.OnDismissListener() {
    @Override
    public void onDismiss() {

    }
});
boolean showing = popupWindow.isShowing();
if (!showing){
    //show,并且可以设置位置
    popupWindow.showAsDropDown(mTv1);
}
1.4 注意问题宽和高属性
-
先看问题代码,下面这个不会出现弹窗,思考:为什么?
PopupWindow popupWindow = new PopupWindow(this); View inflate = LayoutInflater.from(this).inflate(R.layout.view_pop_custom, null); popupWindow.setContentView(inflate); popupWindow.setAnimationStyle(R.style.BottomDialog); popupWindow.showAsDropDown(mTv1); -
注意:必须设置宽和高,否则不显示任何东西
- 这里的WRAP_CONTENT可以换成fill_parent 也可以是具体的数值,它是指PopupWindow的大小,也就是contentview的大小,注意popupwindow根据这个大小显示你的View,如果你的View本身是从xml得到的,那么xml的第一层view的大小属性将被忽略。相当于popupWindow的width和height属性直接和第一层View相对应。
2.源码分析
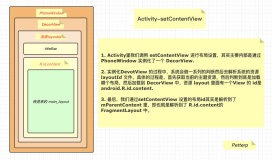
2.1 setContentView(View contentView)源码分析
-
首先先来看看源码
- 可以看出,先判断是否show,如果没有showing的话,则进行contentView赋值,如果mWindowManager为null,则取获取mWindowManager,这个很重要。最后便是根据SDK版本而不是在构造函数中设置附加InDecor的默认设置,因为构造函数中可能没有上下文对象。我们只想在这里设置默认,如果应用程序尚未设置附加InDecor。
public void setContentView(View contentView) { //判断是否show,如果已经show,则返回 if (isShowing()) { return; } //赋值 mContentView = contentView; if (mContext == null && mContentView != null) { mContext = mContentView.getContext(); } if (mWindowManager == null && mContentView != null) { mWindowManager = (WindowManager) mContext.getSystemService(Context.WINDOW_SERVICE); } //在这里根据SDK版本而不是在构造函数中设置附加InDecor的默认设置,因为构造函数中可能没有上下文对象。我们只想在这里设置默认,如果应用程序尚未设置附加InDecor。 if (mContext != null && !mAttachedInDecorSet) { setAttachedInDecor(mContext.getApplicationInfo().targetSdkVersion >= Build.VERSION_CODES.LOLLIPOP_MR1); } } -
接着来看一下setAttachedInDecor源码部分
- 执行setAttachedInDecor给一个变量赋值为true,表示已经在decor里注册了(注意:现在还没有使用WindowManager把PopupWindow添加到DecorView上)
public void setAttachedInDecor(boolean enabled) {
    mAttachedInDecor = enabled;
    mAttachedInDecorSet = true;
}
2.2 showAsDropDown()源码
-
先来看一下showAsDropDown(View anchor)部分代码
- 可以看出,调用这个方法,默认偏移值都是0;关于这个attachToAnchor(anchor, xoff, yoff, gravity)方法作用,下面再说。之后通过createPopupLayoutParams方法创建和初始化LayoutParams,然后把这个LayoutParams传过去,把PopupWindow真正的样子,也就是view创建出来。
public void showAsDropDown(View anchor) { showAsDropDown(anchor, 0, 0); } //主要看这个方法 //注意啦:关于更多内容,可以参考我的博客大汇总:https://github.com/yangchong211/YCBlogs public void showAsDropDown(View anchor, int xoff, int yoff, int gravity) { if (isShowing() || mContentView == null) { return; } TransitionManager.endTransitions(mDecorView); //下面单独讲 //https://github.com/yangchong211/YCBlogs attachToAnchor(anchor, xoff, yoff, gravity); mIsShowing = true; mIsDropdown = true; //通过createPopupLayoutParams方法创建和初始化LayoutParams final WindowManager.LayoutParams p = createPopupLayoutParams(anchor.getWindowToken()); preparePopup(p); final boolean aboveAnchor = findDropDownPosition(anchor, p, xoff, yoff, p.width, p.height, gravity); updateAboveAnchor(aboveAnchor); p.accessibilityIdOfAnchor = (anchor != null) ? anchor.getAccessibilityViewId() : -1; invokePopup(p); } -
接着来看看attachToAnchor(anchor, xoff, yoff, gravity)源码
- 执行了一个attachToAnchor,意思是PopupWindow类似一个锚挂在目标view的下面,这个函数主要讲xoff、yoff(x轴、y轴偏移值)、gravity(比如Gravity.BOTTOM之类,指的是PopupWindow放在目标view哪个方向边缘的位置)这个attachToAnchor有点意思,通过弱引用保存目标view和目标view的rootView(我们都知道:通过弱引用和软引用可以防止内存泄漏)、这个rootview是否依附在window、还有保存偏差值、gravity
- 关于四种引用的深入介绍可以参考我的这边文章:01.四种引用比较与源码分析
private void attachToAnchor(View anchor, int xoff, int yoff, int gravity) { detachFromAnchor(); final ViewTreeObserver vto = anchor.getViewTreeObserver(); if (vto != null) { vto.addOnScrollChangedListener(mOnScrollChangedListener); } final View anchorRoot = anchor.getRootView(); anchorRoot.addOnAttachStateChangeListener(mOnAnchorRootDetachedListener); mAnchor = new WeakReference<>(anchor); mAnchorRoot = new WeakReference<>(anchorRoot); mIsAnchorRootAttached = anchorRoot.isAttachedToWindow(); mAnchorXoff = xoff; mAnchorYoff = yoff; mAnchoredGravity = gravity; } -
接着再来看看preparePopup(p)这个方法源码
- 把这个LayoutParams传过去,把PopupWindow真正的样子,也就是view创建出来,在这个preparePopup函数里,一开始准备backgroundView,因为一般mBackgroundView是null,所以把之前setContentView设置的contentView作为mBackgroundView。

-
接着看看createDecorView(mBackgroundView)这个方法源码
- 把PopupWindow的根view创建出来,并把contentView通过addView方法添加进去。PopupDecorView继承FrameLayout,其中没有绘画什么,只是复写了dispatchKeyEvent和onTouchEvent之类的事件分发的函数,还有实现进场退场动画的执行函数


-
最后看看invokePopup(WindowManager.LayoutParams p)源码
- 执行invokePopup(p),这个函数主要将popupView添加到应用DecorView的相应位置,通过之前创建WindowManager完成这个步骤,现在PopupWIndow可以看得到。
- 并且请求在下一次布局传递之后运行Enter转换。

2.3 dismiss()源码分析
-
通过对象调用该方法可以达到销毁弹窗的目的。
- 重点看一下这个两个方法。移除view和清除锚视图

-
接着看看dismissImmediate(View decorView, ViewGroup contentHolder, View contentView)源码
- 第一步,通过WindowManager注销PopupView
- 第二步,PopupView移除contentView
- 第三步,讲mDecorView,mBackgroundView置为null
private void dismissImmediate(View decorView, ViewGroup contentHolder, View contentView) {
    // If this method gets called and the decor view doesn't have a parent,
    // then it was either never added or was already removed. That should
    // never happen, but it's worth checking to avoid potential crashes.
    if (decorView.getParent() != null) {
        mWindowManager.removeViewImmediate(decorView);
    }

    if (contentHolder != null) {
        contentHolder.removeView(contentView);
    }

    // This needs to stay until after all transitions have ended since we
    // need the reference to cancel transitions in preparePopup().
    mDecorView = null;
    mBackgroundView = null;
    mIsTransitioningToDismiss = false;
}
2.4 PopupDecorView源码分析
-
通过createDecorView(View contentView)方法可以知道,是PopupDecorView直接new出来的布局对象decorView,外面包裹了一层PopupDecorView,这里的PopupDecorView也是我们自定义的FrameLayout的子类,然后看一下里面的代码:
- 可以发现其重写了onTouchEvent时间,这样我们在点击popupWindow外面的时候就会执行pupopWindow的dismiss方法,取消PopupWindow。
private class PopupDecorView extends FrameLayout {
    private TransitionListenerAdapter mPendingExitListener;

    public PopupDecorView(Context context) {
        super(context);
    }
    @Override
    public boolean onTouchEvent(MotionEvent event) {
        final int x = (int) event.getX();
        final int y = (int) event.getY();

        if ((event.getAction() == MotionEvent.ACTION_DOWN)
                && ((x < 0) || (x >= getWidth()) || (y < 0) || (y >= getHeight()))) {
            dismiss();
            return true;
        } else if (event.getAction() == MotionEvent.ACTION_OUTSIDE) {
            dismiss();
            return true;
        } else {
            return super.onTouchEvent(event);
        }
    }
}
3.经典总结
3.1 PopupWindow和Dialog有什么区别?
- 两者最根本的区别在于有没有新建一个window,PopupWindow没有新建,而是将view加到DecorView;Dialog是新建了一个window,相当于走了一遍Activity中创建window的流程
- 从源码中可以看出,PopupWindow最终是执行了mWindowManager.addView方法,全程没有新建window
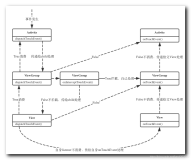
3.2 创建和销毁的大概流程
- 源码比较少,比较容易懂,即使不太懂,只要借助有道词典翻译一下英文注释,还是可以搞明白的。
-
总结一下PopupWindow的创建出现、消失有哪些重要操作
- 创建PopupWindow的时候,先创建WindowManager,因为WIndowManager拥有控制view的添加和删除、修改的能力。这一点关于任主席的艺术探索书上写的很详细……
- 然后是setContentView,保存contentView,这个步骤就做了这个
- 显示PopupWindow,这个步骤稍微复杂点,创建并初始化LayoutParams,设置相关参数,作为以后PopupWindow在应用DecorView里哪里显示的凭据。然后创建PopupView,并且将contentView插入其中。最后使用WindowManager将PopupView添加到应用DecorView里。
- 销毁PopupView,WindowManager把PopupView移除,PopupView再把contentView移除,最后把对象置为null
3.3 为何弹窗点击一下就dismiss呢?
- PopupWindow通过为传入的View添加一层包裹的布局,并重写该布局的点击事件,实现点击PopupWindow之外的区域PopupWindow消失的效果
4.PopupWindow封装库介绍
项目地址:https://github.com/yangchong211/YCDialog
- 链式编程,十分方便,更多内容可以直接参考我的开源demo
new CustomPopupWindow.PopupWindowBuilder(this)
        //.setView(R.layout.pop_layout)
        .setView(contentView)
        .setFocusable(true)
        //弹出popWindow时,背景是否变暗
        .enableBackgroundDark(true)
        //控制亮度
        .setBgDarkAlpha(0.7f)
        .setOutsideTouchable(true)
        .setAnimationStyle(R.style.popWindowStyle)
        .setOnDissmissListener(new PopupWindow.OnDismissListener() {
            @Override
            public void onDismiss() {
                //对话框销毁时
            }
        })
        .create()
        .showAsDropDown(tv6,0,10);
关于其他内容介绍
01.关于博客汇总链接
02.关于我的博客
- 我的个人站点:www.yczbj.org,www.ycbjie.cn
- github:https://github.com/yangchong211
- 知乎:https://www.zhihu.com/people/yang-chong-69-24/pins/posts
- 简书:http://www.jianshu.com/u/b7b2c6ed9284
- csdn:http://my.csdn.net/m0_37700275
- 喜马拉雅听书:http://www.ximalaya.com/zhubo/71989305/
- 开源中国:https://my.oschina.net/zbj1618/blog
- 泡在网上的日子:http://www.jcodecraeer.com/member/content_list.php?channelid=1
- 邮箱:yangchong211@163.com
- 阿里云博客:https://yq.aliyun.com/users/article?spm=5176.100- 239.headeruserinfo.3.dT4bcV
- segmentfault头条:https://segmentfault.com/u/xiangjianyu/articles