在之前的一篇文章中,从概念上学习了Andoird系统的启动过程,Android系统启动过程学习
而在这篇文章中,我们将从代码角度仔细学习Android系统的启动过程,同时,学习Android启动过程中的初始化脚本语言,即init.rc中的语言语法。在这里,不在详细介绍Linux内核的启动过程,主要学习从Linux内核启动之后,init初始化是如何工作的,他是如何启动Android系统的第一个进程–Zygote进程。并且还会继续了解后面其他的进程是如何通过Zygote进程启动的。话不多说,我们现在就来气Android系统启动之路。
## Android系统启动流程图
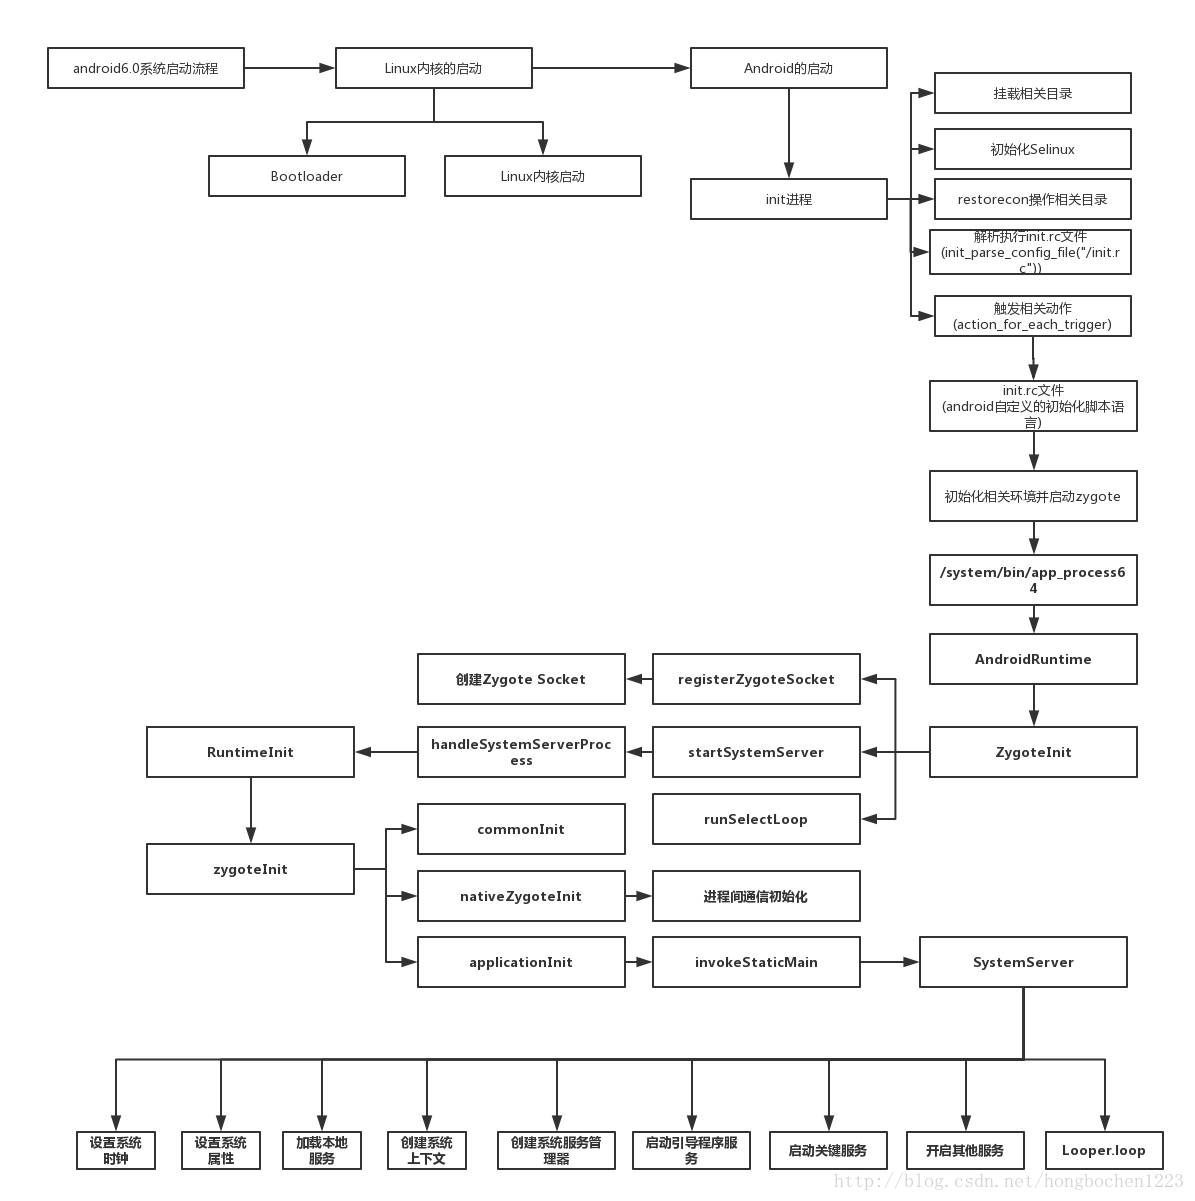
我们都知道,Android系统内核是基于Linux内核,所以在Android系统启动过程中,首先启动Linux内核,Bootloader加载并启动Linux内核,内核启动完成之后,内核开始启动Android系统的init进程,然后init进程通过init.rc启动脚本语言的执行,来启动Zygote进程,作为Android其他进程的父进程,Zygote进程做完初始化工作之后,启动SystemServer来启动其他系统服务。
下面我们从init进程的启动开始学习。
      int main(int argc, char** argv) {
        if (!strcmp(basename(argv[0]), "ueventd")) {
            return ueventd_main(argc, argv);
        }

        if (!strcmp(basename(argv[0]), "watchdogd")) {
            return watchdogd_main(argc, argv);
        }

        // Clear the umask.
        umask(0);

        add_environment("PATH", _PATH_DEFPATH);

        bool is_first_stage = (argc == 1) || (strcmp(argv[1], "--second-stage") != 0);

        // Get the basic filesystem setup we need put together in the initramdisk
        // on / and then we'll let the rc file figure out the rest.
        if (is_first_stage) {
            mount("tmpfs", "/dev", "tmpfs", MS_NOSUID, "mode=0755");
            mkdir("/dev/pts", 0755);
            mkdir("/dev/socket", 0755);
            mount("devpts", "/dev/pts", "devpts", 0, NULL);
            mount("proc", "/proc", "proc", 0, NULL);
            mount("sysfs", "/sys", "sysfs", 0, NULL);
        }

        // We must have some place other than / to create the device nodes for
        // kmsg and null, otherwise we won't be able to remount / read-only
        // later on. Now that tmpfs is mounted on /dev, we can actually talk
        // to the outside world.
        open_devnull_stdio();
        klog_init();
        klog_set_level(KLOG_NOTICE_LEVEL);

        NOTICE("init%s started!\n", is_first_stage ? "" : " second stage");

        if (!is_first_stage) {
            // Indicate that booting is in progress to background fw loaders, etc.
            close(open("/dev/.booting", O_WRONLY | O_CREAT | O_CLOEXEC, 0000));

            property_init();

            // If arguments are passed both on the command line and in DT,
            // properties set in DT always have priority over the command-line ones.
            process_kernel_dt();
            process_kernel_cmdline();

            // Propogate the kernel variables to internal variables
            // used by init as well as the current required properties.
            export_kernel_boot_props();
        }

        // Set up SELinux, including loading the SELinux policy if we're in the kernel domain.
        selinux_initialize(is_first_stage);

        // If we're in the kernel domain, re-exec init to transition to the init domain now
        // that the SELinux policy has been loaded.
        if (is_first_stage) {
            if (restorecon("/init") == -1) {
                ERROR("restorecon failed: %s\n", strerror(errno));
                security_failure();
            }
            char* path = argv[0];
            char* args[] = { path, const_cast<char*>("--second-stage"), nullptr };
            if (execv(path, args) == -1) {
                ERROR("execv(\"%s\") failed: %s\n", path, strerror(errno));
                security_failure();
            }
        }

        // These directories were necessarily created before initial policy load
        // and therefore need their security context restored to the proper value.
        // This must happen before /dev is populated by ueventd.
        INFO("Running restorecon...\n");
        restorecon("/dev");
        restorecon("/dev/socket");
        restorecon("/dev/__properties__");
        restorecon_recursive("/sys");

        epoll_fd = epoll_create1(EPOLL_CLOEXEC);
        if (epoll_fd == -1) {
            ERROR("epoll_create1 failed: %s\n", strerror(errno));
            exit(1);
        }

        signal_handler_init();

        property_load_boot_defaults();
        start_property_service();

        init_parse_config_file("/init.rc");

        action_for_each_trigger("early-init", action_add_queue_tail);

        // Queue an action that waits for coldboot done so we know ueventd has set up all of /dev...
        queue_builtin_action(wait_for_coldboot_done_action, "wait_for_coldboot_done");
        // ... so that we can start queuing up actions that require stuff from /dev.
        queue_builtin_action(mix_hwrng_into_linux_rng_action, "mix_hwrng_into_linux_rng");
        queue_builtin_action(keychord_init_action, "keychord_init");
        queue_builtin_action(console_init_action, "console_init");

        // Trigger all the boot actions to get us started.
        action_for_each_trigger("init", action_add_queue_tail);

        // Repeat mix_hwrng_into_linux_rng in case /dev/hw_random or /dev/random
        // wasn't ready immediately after wait_for_coldboot_done
        queue_builtin_action(mix_hwrng_into_linux_rng_action, "mix_hwrng_into_linux_rng");

        // Don't mount filesystems or start core system services in charger mode.
        char bootmode[PROP_VALUE_MAX];
        if (property_get("ro.bootmode", bootmode) > 0 && strcmp(bootmode, "charger") == 0) {
            action_for_each_trigger("charger", action_add_queue_tail);
        } else {
            action_for_each_trigger("late-init", action_add_queue_tail);
        }

        // Run all property triggers based on current state of the properties.
        queue_builtin_action(queue_property_triggers_action, "queue_property_triggers");

        while (true) {
            if (!waiting_for_exec) {
                execute_one_command();
                restart_processes();
            }

            int timeout = -1;
            if (process_needs_restart) {
                timeout = (process_needs_restart - gettime()) * 1000;
                if (timeout < 0)
                    timeout = 0;
            }

            if (!action_queue_empty() || cur_action) {
                timeout = 0;
            }

            bootchart_sample(&timeout);

            epoll_event ev;
            int nr = TEMP_FAILURE_RETRY(epoll_wait(epoll_fd, &ev, 1, timeout));
            if (nr == -1) {
                ERROR("epoll_wait failed: %s\n", strerror(errno));
            } else if (nr == 1) {
                ((void (*)()) ev.data.ptr)();
            }
        }

        return 0;
    }
该文件位于system/core/init/init.cpp中,我们来看看init进程都做了哪些工作。
首先,init进程添加环境变量,并且挂载相应的目录。在主目录/之外为kmsg和null创建设备节点。初始化selinux,由于我们这里并不研究selinux的运行机制,所以其初始化细节也不在详究。根据起注释可以知道,如果当前系统处于内核域中,重新执行init来转换到init域中,因为SELinux策略已经被加载了。下面接着通过restorecon命令来将在selinux启动之前创建的目录的安全上下文恢复到正确的属性。
接着,便是信号处理机制的初始化工作,加载启动属性,并启动属性服务器。下面,便进入至关重要的一个函数,也是init进程的主要工作,便是执行init_parse_config_file("/init.rc")函数,该函数的主要作用就是解析init.rc文件,并执行init初始化进程语言。下面我们来看一下这个函数:
    int init_parse_config_file(const char* path) {
        INFO("Parsing %s...\n", path);
        Timer t;
        std::string data;
        if (!read_file(path, &data)) {
            return -1;
        }

        data.push_back('\n'); // TODO: fix parse_config.
        parse_config(path, data);
        dump_parser_state();

        NOTICE("(Parsing %s took %.2fs.)\n", path, t.duration());
        return 0;
}该代码位于system/core/init/init_parser.cpp中,该函数读取init.rc文件,并将数据传入到parse_config(path, data)函数中。
我们来看一下parse_config函数:
    static void parse_config(const char *fn, const std::string& data)
    {
        struct listnode import_list;
        struct listnode *node;
        char *args[INIT_PARSER_MAXARGS];

        int nargs = 0;

        parse_state state;
        state.filename = fn;
        state.line = 0;
        state.ptr = strdup(data.c_str());  // TODO: fix this code!
        state.nexttoken = 0;
        state.parse_line = parse_line_no_op;

        list_init(&import_list);
        state.priv = &import_list;

        for (;;) {
            switch (next_token(&state)) {
            case T_EOF:
                state.parse_line(&state, 0, 0);
                goto parser_done;
            case T_NEWLINE:
                state.line++;
                if (nargs) {
                    int kw = lookup_keyword(args[0]);
                    if (kw_is(kw, SECTION)) {
                        state.parse_line(&state, 0, 0);
                        parse_new_section(&state, kw, nargs, args);
                    } else {
                        state.parse_line(&state, nargs, args);
                    }
                    nargs = 0;
                }
                break;
            case T_TEXT:
                if (nargs < INIT_PARSER_MAXARGS) {
                    args[nargs++] = state.text;
                }
                break;
            }
        }

    parser_done:
        list_for_each(node, &import_list) {
             struct import *import = node_to_item(node, struct import, list);
             int ret;

             ret = init_parse_config_file(import->filename);
             if (ret)
                 ERROR("could not import file '%s' from '%s'\n",
                       import->filename, fn);
        }
}该函数和刚刚那个函数位于同一个文件中,很明显,该函数用于解析读取的init.rc文件的字符串,该函数与文件parse.cpp中的next_token()函数配合,进行字符串的解析,然后通过调用parse_new_section()函数将services和actions等添加到运行队列中,等待trigger触发器的触发运行。
有关与Android init language(Android初始化语言)我在博客 Android Init Language(android初始化语言)
中已经进行了详细的介绍。下面我们接着看init进程中的main函数中所做的工作:
init.rc解析完成之后,所有的启动项目都被放入到action_add_queue_tail中,接着调用action_for_each_trigger("early-init", action_add_queue_tail),触发early-init触发器来出发这些相关services和actions的运行。
我们来看一下,在init.rc中,我们看early-init相关启动的services和actions。在这里基本上是恢复某些文件或文件夹的安全上下文,然后调用init_zygote32_64.rc文件中的命令启动zygote。
  service zygote /system/bin/app_process32 -Xzygote /system/bin --zygote --start-system-server --socket-name=zygote
    class main
    socket zygote stream 660 root system
    onrestart write /sys/android_power/request_state wake
    onrestart write /sys/power/state on
    onrestart restart media
    onrestart restart netd
这里的意思是通过/system/bin/app_process32程序启动zygote进程,参数为--zygote和--start-system-server,这两个参数在后面我们会用到的。下面我们来看一下Zygote的main函数。
      public static void main(String argv[]) {
            try {
                RuntimeInit.enableDdms();
                // Start profiling the zygote initialization.
                SamplingProfilerIntegration.start();

                boolean startSystemServer = false;
                String socketName = "zygote";
                String abiList = null;
                for (int i = 1; i < argv.length; i++) {
                    if ("start-system-server".equals(argv[i])) {
                        startSystemServer = true;
                    } else if (argv[i].startsWith(ABI_LIST_ARG)) {
                        abiList = argv[i].substring(ABI_LIST_ARG.length());
                    } else if (argv[i].startsWith(SOCKET_NAME_ARG)) {
                        socketName = argv[i].substring(SOCKET_NAME_ARG.length());
                    } else {
                        throw new RuntimeException("Unknown command line argument: " + argv[i]);
                    }
                }

                if (abiList == null) {
                    throw new RuntimeException("No ABI list supplied.");
                }

                registerZygoteSocket(socketName);
                EventLog.writeEvent(LOG_BOOT_PROGRESS_PRELOAD_START,
                    SystemClock.uptimeMillis());

                preload();
                EventLog.writeEvent(LOG_BOOT_PROGRESS_PRELOAD_END,
                    SystemClock.uptimeMillis());

                // Finish profiling the zygote initialization.
                SamplingProfilerIntegration.writeZygoteSnapshot();

                // Do an initial gc to clean up after startup
                gcAndFinalize();

                // Disable tracing so that forked processes do not inherit stale tracing tags from
                // Zygote.
                Trace.setTracingEnabled(false);

                if (startSystemServer) {
                    startSystemServer(abiList, socketName);
                }

                Log.i(TAG, "Accepting command socket connections");
                runSelectLoop(abiList);

                closeServerSocket();
            } catch (MethodAndArgsCaller caller) {
                caller.run();
            } catch (RuntimeException ex) {
                Log.e(TAG, "Zygote died with exception", ex);
                closeServerSocket();
                throw ex;
            }
        }
该代码位于frameworks/base/core/java/com/android/internal/os/ZygiteInit.java中。在代码中,他首先通过参数判断是否启动systemServer,也就是通过刚刚我们记录下来的参数--start-system-server判定startSystemServer为true;接着通过调用registerZygoteSocket(socketName)函数来注册zygote套接字,进行进程间的通信,我们来看一下这个函数:
          /**
         * Registers a server socket for zygote command connections
         *
         * @throws RuntimeException when open fails
         */
        private static void registerZygoteSocket(String socketName) {
            if (sServerSocket == null) {
                int fileDesc;
                final String fullSocketName = ANDROID_SOCKET_PREFIX + socketName;
                try {
                    String env = System.getenv(fullSocketName);
                    fileDesc = Integer.parseInt(env);
                } catch (RuntimeException ex) {
                    throw new RuntimeException(fullSocketName + " unset or invalid", ex);
                }

                try {
                    FileDescriptor fd = new FileDescriptor();
                    fd.setInt$(fileDesc);
                    sServerSocket = new LocalServerSocket(fd);
                } catch (IOException ex) {
                    throw new RuntimeException(
                            "Error binding to local socket '" + fileDesc + "'", ex);
                }
            }
        }
该代码位于同一个文件中,通过代码我们可以看到,创建zygote套接字的方式是通过创建一个LocalServerSocket对象来建立进程间的通信,在注释中有说明,注册一个服务套接字用于zygote命令连接。
创建完成zygote套接字之后,执行preload()函数来进行资源文件的预加载工作。
      static void preload() {
            Log.d(TAG, "begin preload");
            preloadClasses();
            preloadResources();
            preloadOpenGL();
            preloadSharedLibraries();
            preloadTextResources();
            // Ask the WebViewFactory to do any initialization that must run in the zygote process,
            // for memory sharing purposes.
            WebViewFactory.prepareWebViewInZygote();
            Log.d(TAG, "end preload");
        }
在这里,加载类,加载资源文件,加载OPenGl,加载共享库,文本资源以及准备WebView。这里不在所说,我们接着往下看。
接着便调用startSystemServer(abiList, socketName)方法启动系统服务,我们来看一下这个函数:
         /**
         * Prepare the arguments and fork for the system server process.
         */
        private static boolean startSystemServer(String abiList, String socketName)
                throws MethodAndArgsCaller, RuntimeException {
            long capabilities = posixCapabilitiesAsBits(
                OsConstants.CAP_BLOCK_SUSPEND,
                OsConstants.CAP_KILL,
                OsConstants.CAP_NET_ADMIN,
                OsConstants.CAP_NET_BIND_SERVICE,
                OsConstants.CAP_NET_BROADCAST,
                OsConstants.CAP_NET_RAW,
                OsConstants.CAP_SYS_MODULE,
                OsConstants.CAP_SYS_NICE,
                OsConstants.CAP_SYS_RESOURCE,
                OsConstants.CAP_SYS_TIME,
                OsConstants.CAP_SYS_TTY_CONFIG
            );
            /* Hardcoded command line to start the system server */
            String args[] = {
                "--setuid=1000",
                "--setgid=1000",
                "--setgroups=1001,1002,1003,1004,1005,1006,1007,1008,1009,1010,1018,1021,1032,3001,3002,3003,3006,3007",
                "--capabilities=" + capabilities + "," + capabilities,
                "--nice-name=system_server",
                "--runtime-args",
                "com.android.server.SystemServer",
            };
            ZygoteConnection.Arguments parsedArgs = null;

            int pid;

            try {
                parsedArgs = new ZygoteConnection.Arguments(args);
                ZygoteConnection.applyDebuggerSystemProperty(parsedArgs);
                ZygoteConnection.applyInvokeWithSystemProperty(parsedArgs);

                /* Request to fork the system server process */
                pid = Zygote.forkSystemServer(
                        parsedArgs.uid, parsedArgs.gid,
                        parsedArgs.gids,
                        parsedArgs.debugFlags,
                        null,
                        parsedArgs.permittedCapabilities,
                        parsedArgs.effectiveCapabilities);
            } catch (IllegalArgumentException ex) {
                throw new RuntimeException(ex);
            }

            /* For child process */
            if (pid == 0) {
                if (hasSecondZygote(abiList)) {
                    waitForSecondaryZygote(socketName);
                }

                handleSystemServerProcess(parsedArgs);
            }

            return true;
        }
在这里准备系统服启动的参数,并通过forkSystemServer来创建系统服务进程,接着调用handleSystemServerProcess(parsedArgs)来进行系统服务的处理。
        /**
         * Finish remaining work for the newly forked system server process.
         */
        private static void handleSystemServerProcess(
                ZygoteConnection.Arguments parsedArgs)
                throws ZygoteInit.MethodAndArgsCaller {

            closeServerSocket();

            // set umask to 0077 so new files and directories will default to owner-only permissions.
            Os.umask(S_IRWXG | S_IRWXO);

            if (parsedArgs.niceName != null) {
                Process.setArgV0(parsedArgs.niceName);
            }

            final String systemServerClasspath = Os.getenv("SYSTEMSERVERCLASSPATH");
            if (systemServerClasspath != null) {
                performSystemServerDexOpt(systemServerClasspath);
            }

            if (parsedArgs.invokeWith != null) {
                String[] args = parsedArgs.remainingArgs;
                // If we have a non-null system server class path, we'll have to duplicate the
                // existing arguments and append the classpath to it. ART will handle the classpath
                // correctly when we exec a new process.
                if (systemServerClasspath != null) {
                    String[] amendedArgs = new String[args.length + 2];
                    amendedArgs[0] = "-cp";
                    amendedArgs[1] = systemServerClasspath;
                    System.arraycopy(parsedArgs.remainingArgs, 0, amendedArgs, 2, parsedArgs.remainingArgs.length);
                }

                WrapperInit.execApplication(parsedArgs.invokeWith,
                        parsedArgs.niceName, parsedArgs.targetSdkVersion,
                        VMRuntime.getCurrentInstructionSet(), null, args);
            } else {
                ClassLoader cl = null;
                if (systemServerClasspath != null) {
                    cl = new PathClassLoader(systemServerClasspath, ClassLoader.getSystemClassLoader());
                    Thread.currentThread().setContextClassLoader(cl);
                }

                /*
                 * Pass the remaining arguments to SystemServer.
                 */
                RuntimeInit.zygoteInit(parsedArgs.targetSdkVersion, parsedArgs.remainingArgs, cl);
            }

            /* should never reach here */
        }
在这里完成对创建的系统服务剩余的工作,最后调用RuntimeInit.zygoteInit将剩余的参数传递到系统服务中。
        public static final void zygoteInit(int targetSdkVersion, String[] argv, ClassLoader classLoader)
                throws ZygoteInit.MethodAndArgsCaller {
            if (DEBUG) Slog.d(TAG, "RuntimeInit: Starting application from zygote");

            Trace.traceBegin(Trace.TRACE_TAG_ACTIVITY_MANAGER, "RuntimeInit");
            redirectLogStreams();

            commonInit();
            nativeZygoteInit();
            applicationInit(targetSdkVersion, argv, classLoader);
        }
该函数位于同目录下面的RuntimeInit.java文件中。这里的nativeZygoteInit()用于进程间通信的初始化操作,applicationInit函数用于服务的启动,我们来看一下:
    private static void applicationInit(int targetSdkVersion, String[] argv, ClassLoader classLoader)
                throws ZygoteInit.MethodAndArgsCaller {
            // If the application calls System.exit(), terminate the process
            // immediately without running any shutdown hooks.  It is not possible to
            // shutdown an Android application gracefully.  Among other things, the
            // Android runtime shutdown hooks close the Binder driver, which can cause
            // leftover running threads to crash before the process actually exits.
            nativeSetExitWithoutCleanup(true);

            // We want to be fairly aggressive about heap utilization, to avoid
            // holding on to a lot of memory that isn't needed.
            VMRuntime.getRuntime().setTargetHeapUtilization(0.75f);
            VMRuntime.getRuntime().setTargetSdkVersion(targetSdkVersion);

            final Arguments args;
            try {
                args = new Arguments(argv);
            } catch (IllegalArgumentException ex) {
                Slog.e(TAG, ex.getMessage());
                // let the process exit
                return;
            }

            // The end of of the RuntimeInit event (see #zygoteInit).
            Trace.traceEnd(Trace.TRACE_TAG_ACTIVITY_MANAGER);

            // Remaining arguments are passed to the start class's static main
            invokeStaticMain(args.startClass, args.startArgs, classLoader);
        }
该函数主要是一些运行时的一些工作,同时调用invokeStaticMain来进行main函数的执行,看这个方法的注释,意思便是剩下的参数被传递,用于启动类的静态main函数。这里传递的类参数便是SystemServer类,所以这个函数的工作便是启动SystemServer的main函数。
     /**
         * The main entry point from zygote.
         */
        public static void main(String[] args) {
            new SystemServer().run();
        }
该函数位于frameworks/base/services/java/com/android/server/SystemServer.java类中,这里运行SystemServer的run函数,该函数设置环境变量,启动其他服务,后面就不再赘述了。
接着返回到ZygoteInit.java的main函数中,这个函数最后执行runSelectLoop函数,这里运行一个循环,接收新的连接,读取来自连接的命令。
至此,Android系统的启动过程就到了启动系统服务以及其他服务阶段了,后面我们会在别的博客中进行学习和讲解。
