1、什么是汽车检测数据集;
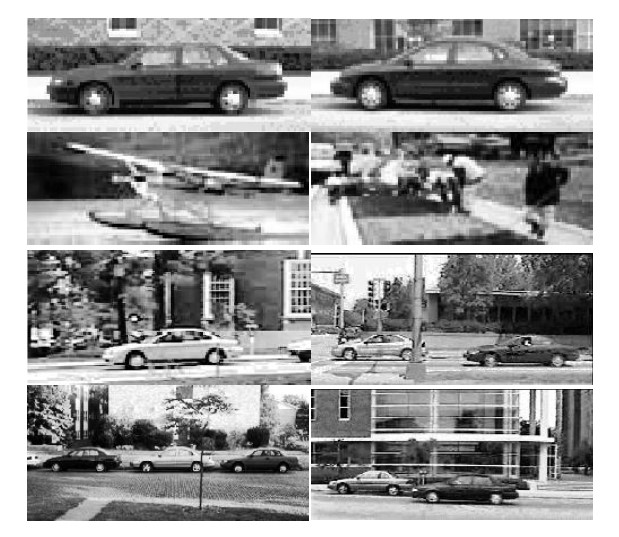
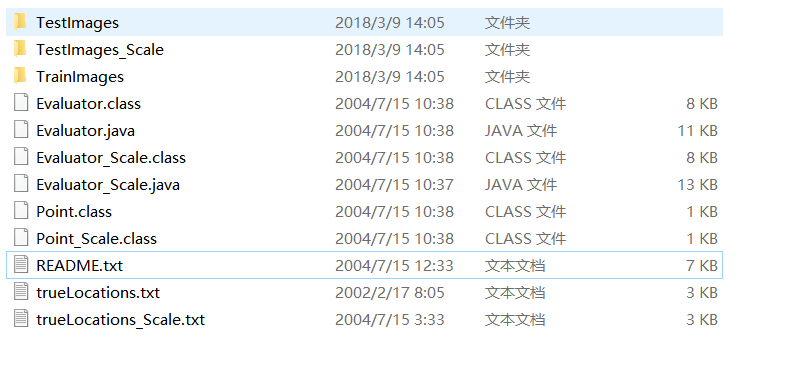
伊利诺伊大学汽车检测图像数据库(
UIUC Image Database for Car Detection)
包括1w+的有汽车/无汽车图片,并且精确地标注了汽车位置;同时还包括1k+的测试数据集;
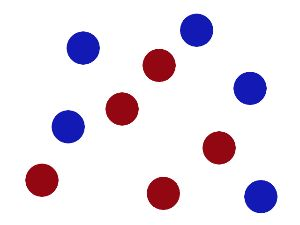
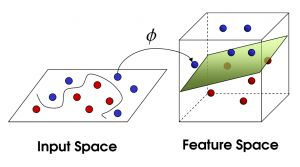
2、什么是svm算法:
SVM(Support Vector Machine)指的是支持向量机,是常见的一种判别方法。在机器学习领域,是一个有监督的学习模型,通常用来进行模式识别、分类以及回归分析。
寻找到超平面
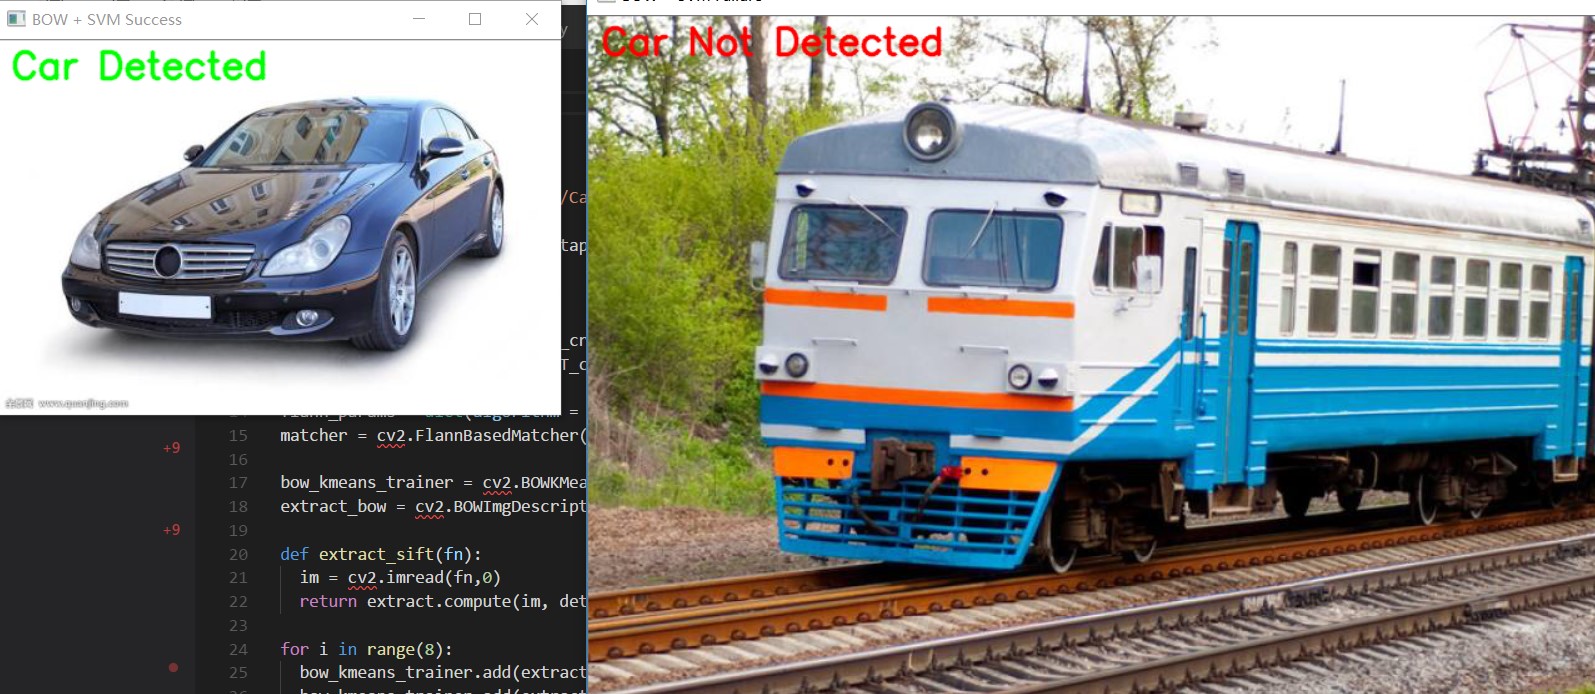
3、单个汽车检测
import cv2
import numpy
as np
from os.path
import join
datapath =
"E:/dl4cv/datesets/CarData/TrainImages/"
def
path(
cls,
i):
return
"
%s
/
%s%d
.pgm" % (datapath,
cls,i+
1)
pos, neg =
"pos-",
"neg-"
#创建sift特征提取
detect = cv2.xfeatures2d.SIFT_create()
extract = cv2.xfeatures2d.SIFT_create()
flann_params =
dict(
algorithm =
1,
trees =
5)
matcher = cv2.FlannBasedMatcher(flann_params, {})
bow_kmeans_trainer = cv2.BOWKMeansTrainer(
40)
#创建词袋模型
extract_bow = cv2.BOWImgDescriptorExtractor(extract, matcher)
def
extract_sift(
fn):
im = cv2.imread(fn,
0)
return extract.compute(im, detect.detect(im))[
1]
for i
in
range(
8):
bow_kmeans_trainer.add(extract_sift(path(pos,i)))
bow_kmeans_trainer.add(extract_sift(path(neg,i)))
voc = bow_kmeans_trainer.cluster()
extract_bow.setVocabulary( voc )
def
bow_features(
fn):
im = cv2.imread(fn,
0)
return extract_bow.compute(im, detect.detect(im))
traindata, trainlabels = [],[]
for i
in
range(
20):
traindata.extend(bow_features(path(pos, i))); trainlabels.append(
1)
traindata.extend(bow_features(path(neg, i))); trainlabels.append(-
1)
#创建svm模型
svm = cv2.ml.SVM_create()
svm.train(np.array(traindata), cv2.ml.ROW_SAMPLE, np.array(trainlabels))
def
predict(
fn):
f = bow_features(fn);
p = svm.predict(f)
print(fn,
"
\t
", p[
1][
0][
0])
return p
#测试两图
car, notcar =
"E:/sandbox/car3.jpg",
"E:/sandbox/car4.jpg"
car_img = cv2.imread(car)
notcar_img = cv2.imread(notcar)
car_predict = predict(car)
not_car_predict = predict(notcar)
font = cv2.FONT_HERSHEY_SIMPLEX
if (car_predict[
1][
0][
0] ==
1.0):
cv2.putText(car_img,
'Car Detected',(
10,
30), font,
1,(
0,
255,
0),
2,cv2.LINE_AA)
if (not_car_predict[
1][
0][
0] == -
1.0):
cv2.putText(notcar_img,
'Car Not Detected',(
10,
30), font,
1,(
0,
0,
255),
2,cv2.LINE_AA)
cv2.imshow(
'BOW + SVM Success', car_img)
cv2.imshow(
'BOW + SVM Failure', notcar_img)
cv2.waitKey(
0)
cv2.destroyAllWindows()
其结果,仅仅是检查出图片中是否有汽车。比较关键的部分
flann_params =
dict(
algorithm =
1,
trees =
5)
matcher = cv2.FlannBasedMatcher(flann_params, {})
创建基于flann的匹配器
bow_kmeans_trainer = cv2.BOWKMeansTrainer(
40)
创建bow训练器
def
extract_sift(
fn):
im = cv2.imread(fn,
0)
return extract.compute(im, detect.detect(im))[
1]
以灰度方式读取图像,提取sift,并返回结果
for i
in
range(
8):
bow_kmeans_trainer.add(extract_sift(path(pos,i)))
bow_kmeans_trainer.add(extract_sift(path(neg,i)))
为模型输入正负样本
voc = bow_kmeans_trainer.cluster()
extract_bow.setVocabulary( voc )
cluster函数,执行k-means分类,并且返回词汇。进一步制定extract_bow提取描述符
def
bow_features(
fn):
im = cv2.imread(fn,
0)
return extract_bow.compute(im, detect.detect(im))
返回bow的描述符提取器计算得到的描述符
traindata, trainlabels = [],[]
for i
in
range(
20):
traindata.extend(bow_features(path(pos, i))); trainlabels.append(
1)
traindata.extend(bow_features(path(neg, i))); trainlabels.append(-
1)
创建2个数组,生成svm模型所需正负样本标签
svm = cv2.ml.SVM_create()
svm.train(np.array(traindata), cv2.ml.ROW_SAMPLE, np.array(trainlabels))
创建并训练一个svm模型
def
predict(
fn):
f = bow_features(fn);
p = svm.predict(f)
print(fn,
"
\t
", p[
1][
0][
0])
return p
返回预测的结果。在没有经过精确测算的情况下sift+bow+svm的组合表现良好,我找到的几幅图像都能够正确识别。这个时候,必须用更科学的数据集来进行测试。
3、通过交叉检验
import cv2
import numpy
as np
from os.path
import join
import numpy
as np
import os
import math
#在carData建立svm模型并且k_fold测试,ratio=1表示全部数据用于测试
RATIO =
0.2
datapath =
"E:/dl4cv/datesets/CarData/TrainImages/"
def
path(
cls,
i):
return
"
%s
/
%s%d
.pgm" % (datapath,
cls,i+
1)
#根据Ratio获得训练和测试数据集的图片地址和标签
def
get_files(
file_dir,
ratio):
'''
Args:
file_dir: file directory
Returns:
list of images and labels
'''
pos = []
label_pos = []
neg = []
label_neg = []
for
file
in os.listdir(file_dir):
name =
file.split(
sep=
'-')
if name[
0]==
'pos':
pos.append(file_dir +
file)
label_pos.append(
1)
else:
neg.append(file_dir +
file)
label_neg.append(-
1)
print(
'数据集中有
%d
pos
\n
以及
%d
neg ' %(
len(pos),
len(neg)))
#图片list和标签list
#hstack 水平(按列顺序)把数组给堆叠起来
image_list = np.hstack((pos, neg))
label_list = np.hstack((label_pos, label_neg))
temp = np.array([image_list, label_list])
temp = temp.transpose()
#乱序的目的是为了让正样本和负样本混在一起,这样直接取其中百分之多少就可以来用了
np.random.shuffle(temp)
all_image_list = temp[:,
0]
all_label_list = temp[:,
1]
n_sample =
len(all_label_list)
#根据比率,确定训练和测试数量
n_val = math.ceil(n_sample*ratio)
# number of validation samples
n_train = n_sample - n_val
# number of trainning samples
tra_images = []
val_images = []
#按照0-n_train为tra_images,后面位val_images的方式来排序
tra_images = all_image_list[:n_train]
tra_labels = all_label_list[:n_train]
tra_labels = [
int(
float(i))
for i
in tra_labels]
val_images = all_image_list[n_train:]
val_labels = all_label_list[n_train:]
val_labels = [
int(
float(i))
for i
in val_labels]
return tra_images,tra_labels,val_images,val_labels
pos, neg =
"pos-",
"neg-"
#创建sift特征提取
detect = cv2.xfeatures2d.SIFT_create()
extract = cv2.xfeatures2d.SIFT_create()
#创建基于flann的匹配器
flann_params =
dict(
algorithm =
1,
trees =
5)
matcher = cv2.FlannBasedMatcher(flann_params, {})
#创建bow训练器
bow_kmeans_trainer = cv2.BOWKMeansTrainer(
40)
extract_bow = cv2.BOWImgDescriptorExtractor(extract, matcher)
#以灰度方式读取图像,提取sift,并返回结果
def
extract_sift(
fn):
im = cv2.imread(fn,
0)
return extract.compute(im, detect.detect(im))[
1]
#为模型输入正负样本
for i
in
range(
8):
bow_kmeans_trainer.add(extract_sift(path(pos,i)))
bow_kmeans_trainer.add(extract_sift(path(neg,i)))
#cluster函数,执行k-means分类,并且返回词汇。进一步制定extract_bow提取描述符
voc = bow_kmeans_trainer.cluster()
extract_bow.setVocabulary( voc )
#返回bow的描述符提取器计算得到的描述符
def
bow_features(
fn):
im = cv2.imread(fn,
0)
return extract_bow.compute(im, detect.detect(im))
#获得数据集
train_images, train_labels, val_images, val_labels = get_files(datapath, RATIO)
traindata, trainlabels = [],[]
#20这个参数并不是越大越好
#for i in range(400):
# traindata.extend(bow_features(path(pos, i))); trainlabels.append(1)
# traindata.extend(bow_features(path(neg, i))); trainlabels.append(-1)
#当给出较大训练数据集的时候,预测是明显错误的
for i
in
range(
len(train_images)):
traindata.extend(bow_features(train_images[i]))
trainlabels.append(train_labels[i])
#创建并训练一个svm模型
#初步认为,加大数据集并没有提高svm的识别率
svm = cv2.ml.SVM_create()
svm.train(np.array(traindata), cv2.ml.ROW_SAMPLE, np.array(trainlabels))
#返回预测的结果
def
predict(
fn):
f = bow_features(fn);
p = svm.predict(f)
print(fn,
"
\t
", p[
1][
0][
0])
return p
#在测试集上进行测试
result = []
for i
in
range(
len(val_images)):
f = bow_features(val_images[i]);
p = svm.predict(f)
result.append(p[
1][
0][
0])
np_val_labels = np.array(val_labels)[:,np.newaxis]
np_result = np.array(result)[:,np.newaxis]
matches = np_result == np_val_labels
correct = np.count_nonzero(matches)
accuracy = correct*
100.0/
len(result)
print(accuracy)
#测试两图
car, notcar =
"E:/sandbox/car3.jpg",
"E:/sandbox/car4.jpg"
car_img = cv2.imread(car)
notcar_img = cv2.imread(notcar)
car_predict = predict(car)
not_car_predict = predict(notcar)
font = cv2.FONT_HERSHEY_SIMPLEX
if (car_predict[
1][
0][
0] ==
1.0):
cv2.putText(car_img,
'Car Detected',(
10,
30), font,
1,(
0,
255,
0),
2,cv2.LINE_AA)
if (not_car_predict[
1][
0][
0] == -
1.0):
cv2.putText(notcar_img,
'Car Not Detected',(
10,
30), font,
1,(
0,
0,
255),
2,cv2.LINE_AA)
cv2.imshow(
'BOW + SVM Success', car_img)
cv2.imshow(
'BOW + SVM Failure', notcar_img)
cv2.waitKey(
0)
cv2.destroyAllWindows()
对数据集进行交叉检验,在20/80的比率下,成功识别率为
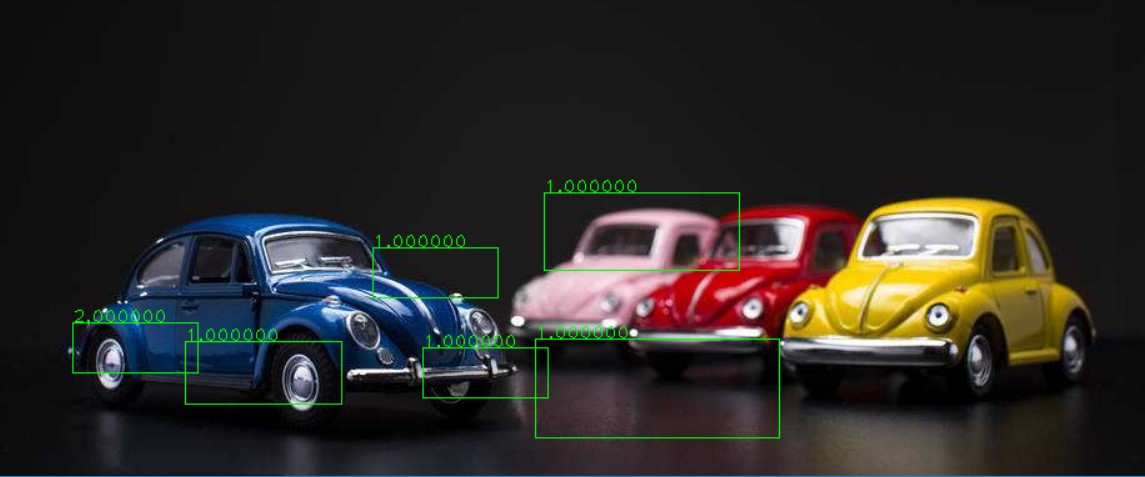
4、多个汽车和滑动窗口检测
该应用的执行过程如下:
1、获取数据集
2、创建BOW训练器并且获得视觉词汇
3、采用词汇训练svm
4、尝试对测试图像的金字塔采用滑动窗口进行检测
5、对重叠的矩形采用“非最大抑制”,进行过滤
6、得到结果。
各个函数如下
def
resize(
img,
scaleFactor):
return cv2.resize(img, (
int(img.shape[
1] * (
1 / scaleFactor)),
int(img.shape[
0] * (
1 / scaleFactor))),
interpolation=cv2.INTER_AREA)
大小变化
def
pyramid(
image,
scale=
1.5,
minSize=(
200,
80)):
yield image
while
True:
image = resize(image, scale)
if image.shape[
0] < minSize[
1]
or image.shape[
1] < minSize[
0]:
break
yield image
采用yield方法,获得金字塔层
def
sliding_window(
image,
step,
window_size):
for y
in
xrange(
0, image.shape[
0], step):
for x
in
xrange(
0, image.shape[
1], step):
yield (x, y, image[y:y + window_size[
1], x:x + window_size[
0]])
同样采用yield的方法,获得滑动窗口数据
# import the necessary packages
import numpy
as np
# Malisiewicz et al.
# Python port by Adrian Rosebrock
def
non_max_suppression_fast(
boxes,
overlapThresh):
# if there are no boxes, return an empty list
if
len(boxes) ==
0:
return []
# if the bounding boxes integers, convert them to floats --
# this is important since we'll be doing a bunch of divisions
if boxes.dtype.kind ==
"i":
boxes = boxes.astype(
"float")
# initialize the list of picked indexes
pick = []
# grab the coordinates of the bounding boxes
x1 = boxes[:,
0]
y1 = boxes[:,
1]
x2 = boxes[:,
2]
y2 = boxes[:,
3]
scores = boxes[:,
4]
# compute the area of the bounding boxes and sort the bounding
# boxes by the score/probability of the bounding box
area = (x2 - x1 +
1) * (y2 - y1 +
1)
idxs = np.argsort(scores)[::-
1]
# keep looping while some indexes still remain in the indexes
# list
while
len(idxs) >
0:
# grab the last index in the indexes list and add the
# index value to the list of picked indexes
last =
len(idxs) -
1
i = idxs[last]
pick.append(i)
# find the largest (x, y) coordinates for the start of
# the bounding box and the smallest (x, y) coordinates
# for the end of the bounding box
xx1 = np.maximum(x1[i], x1[idxs[:last]])
yy1 = np.maximum(y1[i], y1[idxs[:last]])
xx2 = np.minimum(x2[i], x2[idxs[:last]])
yy2 = np.minimum(y2[i], y2[idxs[:last]])
# compute the width and height of the bounding box
w = np.maximum(
0, xx2 - xx1 +
1)
h = np.maximum(
0, yy2 - yy1 +
1)
# compute the ratio of overlap
overlap = (w * h) / area[idxs[:last]]
# delete all indexes from the index list that have
idxs = np.delete(idxs, np.concatenate(([last],
np.where(overlap > overlapThresh)[
0])))
# return only the bounding boxes that were picked using the
# integer data type
return boxes[pick].astype(
"int")
这个函数得到系列举行并且对这些矩形按照评分进行排序。从评分醉倒的矩形开始消除所有重叠超过一定阈值的矩形。
datapath =
"E:/py4cv/CarData/TrainImages"
SAMPLES =
400
def
path(
cls,
i):
return
"
%s
/
%s%d
.pgm" % (datapath,
cls,i+
1)
获得系列路径下地址
def
get_flann_matcher():
flann_params =
dict(
algorithm =
1,
trees =
5)
return cv2.FlannBasedMatcher(flann_params, {})
获得flann的matcher
def
get_bow_extractor(
extract,
match):
return cv2.BOWImgDescriptorExtractor(extract, match)
获得bow的image描述
def
get_extract_detect():
return cv2.xfeatures2d.SIFT_create(), cv2.xfeatures2d.SIFT_create()
获得sift描述
def
extract_sift(
fn,
extractor,
detector):
im = cv2.imread(fn,
0)
return extractor.compute(im, detector.detect(im))[
1]
及其计算值
def
bow_features(
img,
extractor_bow,
detector):
return extractor_bow.compute(img, detector.detect(img))
获得bow features
import cv2
import numpy
as np
datapath =
"E:/py4cv/CarData/TrainImages"
SAMPLES =
400
def
path(
cls,
i):
return
"
%s
/
%s%d
.pgm" % (datapath,
cls,i+
1)
def
get_flann_matcher():
flann_params =
dict(
algorithm =
1,
trees =
5)
return cv2.FlannBasedMatcher(flann_params, {})
def
get_bow_extractor(
extract,
match):
return cv2.BOWImgDescriptorExtractor(extract, match)
def
get_extract_detect():
return cv2.xfeatures2d.SIFT_create(), cv2.xfeatures2d.SIFT_create()
def
extract_sift(
fn,
extractor,
detector):
im = cv2.imread(fn,
0)
return extractor.compute(im, detector.detect(im))[
1]
def
bow_features(
img,
extractor_bow,
detector):
return extractor_bow.compute(img, detector.detect(img))
def
car_detector():
pos, neg =
"pos-",
"neg-"
#获得两个sift的检测器
detect, extract = get_extract_detect()
#获得flann的描述符
matcher = get_flann_matcher()
#创建bow描述检测器
print(
"building BOWKMeansTrainer...")
bow_kmeans_trainer = cv2.BOWKMeansTrainer(
12)
extract_bow = cv2.BOWImgDescriptorExtractor(extract, matcher)
#首先构建bow词典
print(
"adding features to trainer...")
for i
in
range(SAMPLES):
print i
bow_kmeans_trainer.add(extract_sift(path(pos,i), extract, detect))
#注意,这里地方没有添加负样本
#bow_kmeans_trainer.add(extract_sift(path(neg,i), extract, detect))
#聚类并返回词汇
vocabulary = bow_kmeans_trainer.cluster()
extract_bow.setVocabulary(vocabulary)
#基于词汇进行svm训练
traindata, trainlabels = [],[]
print
"adding to train data"
for i
in
range(SAMPLES):
print i
#1为有数据,-1为没有数据
traindata.extend(bow_features(cv2.imread(path(pos, i),
0), extract_bow, detect))
trainlabels.append(
1)
traindata.extend(bow_features(cv2.imread(path(neg, i),
0), extract_bow, detect))
trainlabels.append(-
1)
svm = cv2.ml.SVM_create()
svm.setType(cv2.ml.SVM_C_SVC)
svm.setGamma(
1)
svm.setC(
35)
#越大,误判的可能性越小;越低,则可能导致过拟合
svm.setKernel(cv2.ml.SVM_RBF)
#svm_linear 超平面 两类;svm_rbf高斯核,多类
svm.train(np.array(traindata), cv2.ml.ROW_SAMPLE, np.array(trainlabels))
return svm, extract_bow
车辆滑动窗口探测
import cv2
import numpy
as np
from car_detector.detector
import car_detector, bow_features
from car_detector.pyramid
import pyramid
from car_detector.non_maximum
import non_max_suppression_fast
as nms
from car_detector.sliding_window
import sliding_window
import urllib
def
in_range(
number,
test,
thresh=
0.2):
return
abs(number - test) < thresh
img_path =
"E:/sandbox/car1.png"
#获得svm模型训练结果。注意在训练过程中没有使用滑动窗口
svm, extractor = car_detector()
detect = cv2.xfeatures2d.SIFT_create()
w, h =
100,
40
img = cv2.imread(img_path)
rectangles = []
counter =
1
scaleFactor =
1.25
scale =
1
font = cv2.FONT_HERSHEY_PLAIN
for resized
in pyramid(img, scaleFactor):
scale =
float(img.shape[
1]) /
float(resized.shape[
1])
for (x, y, roi)
in sliding_window(resized,
20, (
100,
40)):
#窗口大小100*40
if roi.shape[
1] != w
or roi.shape[
0] != h:
continue
try:
bf = bow_features(roi, extractor, detect)
_, result = svm.predict(bf)
a, res = svm.predict(bf,
flags=cv2.ml.STAT_MODEL_RAW_OUTPUT | cv2.ml.STAT_MODEL_UPDATE_MODEL)
print ((
"Class:
%d
, Score:
%f
, a:
%s
") % (result[
0][
0], res[
0][
0], res))
score = res[
0][
0]
if result[
0][
0] ==
1:
if score < -
1.0:
rx, ry, rx2, ry2 =
int(x * scale),
int(y * scale),
int((x+w) * scale),
int((y+h) * scale)
rectangles.append([rx, ry, rx2, ry2,
abs(score)])
except:
pass
counter +=
1
windows = np.array(rectangles)
#调用非最大值抑制
boxes = nms(windows,
0.25)
for (x, y, x2, y2, score)
in boxes:
print (x, y, x2, y2, score)
cv2.rectangle(img, (
int(x),
int(y)),(
int(x2),
int(y2)),(
0,
255,
0),
1)
cv2.putText(img,
"
%f
" % score, (
int(x),
int(y)), font,
1, (
0,
255,
0))
cv2.imshow(
"img", img)
cv2.waitKey(
0)
小结和启示:
1、python作为这个时代的语言,的确是非常适合机器学习和图像处理应用层算法的编写的;
2、svm作为一种已经发展很长世间的算法,90左右应该已经是它的瓶颈,即使存在sift+bow的特征提取方式;
3、再想提高,尽快进入mlp和cnn乃至dl的境地;
4、挖掘发现机器学习的现实应用场景,是除了掌握机器学习方法以外,最难也是最有意义的一件事情。
5、今日是学习时间机器学习的最好时间,时不我们待。
感谢阅读至此,希望有所帮助。
附件列表
目前方向:图像拼接融合、图像识别 联系方式:jsxyhelu@foxmail.com