
我们使用google提供的colab,对我们现有的GoNetwork进行适当修改,利用网络资源进行运算。


目前方向:图像拼接融合、图像识别 联系方式:jsxyhelu@foxmail.com
一、什么是 Colaboratory?
Colaboratory 是一款研究工具,用于进行机器学习培训和研究。它是一个 Jupyter 笔记本环境,不需要进行任何设置就可以使用。
Colaboratory 是一款研究工具,用于进行机器学习培训和研究。它是一个 Jupyter 笔记本环境,不需要进行任何设置就可以使用。
二、什么是 Jupyter?
Jupyter Notebook(此前被称为 IPython notebook)是一个交互式笔记本。
三、使用Jupyter
Anaconda中自己带有Jupyter,启动后新建页面(具体内容可以参考相关资料)
Anaconda中自己带有Jupyter,启动后新建页面(具体内容可以参考相关资料)
这里我推荐的是,首先在本机,使用jupyter编写成功代码,而后放到colab上进行离线运行。现在colab一次可以提供12小时的GPU加速(也就是最多连续训练12小时),还是相当不错的。
四、修改数据集的获取
在所有代码的修改中,以数据集的获取修改最为复杂。如果是jupyter,我们可以直接获取本机已经下载成功的数据集,但是对于colab,则无法获取本机数据,当然我们可以读取Google硬盘中的数据,但是这个过程比较麻烦。这里借鉴并且使用了keras获取数据集的相关代码,直接从Github上(或其他官网上)下载数据集,为我所用。由于相当于Google下载数据,所以速度非常快。
在所有代码的修改中,以数据集的获取修改最为复杂。如果是jupyter,我们可以直接获取本机已经下载成功的数据集,但是对于colab,则无法获取本机数据,当然我们可以读取Google硬盘中的数据,但是这个过程比较麻烦。这里借鉴并且使用了keras获取数据集的相关代码,直接从Github上(或其他官网上)下载数据集,为我所用。由于相当于Google下载数据,所以速度非常快。
其中,keras下载数据集为这段
 from keras.utils.data_utils import get_file
path='mnist.npz'
path = get_file(path,origin='https://s3.amazonaws.com/img-datasets/mnist.npz',file_hash='8a61469f7ea1b51cbae51d4f78837e45')
print(path)
由于keras是系统内置库,所以这段代码可以直接引用。我们需要修改的就是将mnist的地址修改掉,这个最好 从github上寻找,注意是这个地方
修改后变成这样,我还添加了一段打印的代码
 #打开Mnist数据
def load_data():
    path='mnist2.pkl.gz'
    path = get_file(path,origin='https://github.com/mnielsen/neural-networks-and-deep-learning/raw/master/data/mnist.pkl.gz')
    print(path)
    f = gzip.open(path, 'rb')
    training_data, validation_data, test_data = pickle.load(f, encoding="latin1")
五、修改其他代码
其他代码的修改,主要目的是将所有代码融合到一起去(因为jupyter一次只能运行一个单元格内容)。完成后类似:
 # %load D:/dl4cv/GoNetwork/GoNetwork.py
# %load network.py

"""
network.py
~~~~~~~~~~
IT WORKS

A module to implement the stochastic gradient descent learning
algorithm for a feedforward neural network.  Gradients are calculated
using backpropagation.  Note that I have focused on making the code
simple, easily readable, and easily modifiable.  It is not optimized,
and omits many desirable features.
jsxyhelu添加了适当的中文注释
"""

#### Libraries
# Standard library
import random
# Third-party libraries
import numpy as np

class GoNetwork(object):

    def __init__(self, sizes):
        """size代表的是网络的分层结构,比如[2, 3, 1]
        The list ``sizes`` contains the number of neurons in the
        respective layers of the network.  For example, if the list
        was [2, 3, 1] then it would be a three-layer network, with the
        first layer containing 2 neurons, the second layer 3 neurons,
        and the third layer 1 neuron.  The biases and weights for the
        network are initialized randomly, using a Gaussian
        distribution with mean 0, and variance 1.  Note that the first
        layer is assumed to be an input layer, and by convention we
        won't set any biases for those neurons, since biases are only
        ever used in computing the outputs from later layers."""
        self.num_layers = len(sizes) #层数
        self.sizes = sizes #每层size
        self.biases = [np.random.randn(y, 1) for y in sizes[1:]]   #随机生成子节点
        # net.weights[1] 是⼀个存储着连接第⼆层和第三层神经元权重的 Numpy 矩阵。
        self.weights = [np.random.randn(y, x)
                        for x, y in zip(sizes[:-1], sizes[1:])]

    #前向网络,主要用于测试当前网络
    def feedforward(self, a):
        """Return the output of the network if ``a`` is input."""
        for b, w in zip(self.biases, self.weights):
            a = sigmoid(np.dot(w, a)+b)
        return a
    #随机梯度下降算法
    def SGD(self, training_data, epochs, mini_batch_size, eta,
            test_data=None):
        """Train the neural network using mini-batch stochastic
        gradient descent.  The ``training_data`` is a list of tuples
        ``(x, y)`` representing the training inputs and the desired
        outputs.  The other non-optional parameters are
        self-explanatory.  If ``test_data`` is provided then the
        network will be evaluated against the test data after each
        epoch, and partial progress printed out.  This is useful for
        tracking progress, but slows things down substantially."""

        training_data = list(training_data)
        n = len(training_data)

        if test_data:
            test_data = list(test_data)
            n_test = len(test_data)
        #⾸先随机地将训练数据打乱
        for j in range(epochs):
            random.shuffle(training_data)
            #再将它分成多个适当⼤⼩的⼩批量数据
            mini_batches = [
                training_data[k:k+mini_batch_size]
                for k in range(0, n, mini_batch_size)]
            #最主要的一行代码
            for mini_batch in mini_batches:
                self.update_mini_batch(mini_batch, eta)
            if test_data:
                print("Epoch {} : {} / {}".format(j,self.evaluate(test_data),n_test))
            else:
                print("Epoch {} complete".format(j))

    #根据单次梯度下降的迭代更新⽹络的权重和偏置
    def update_mini_batch(self, mini_batch, eta):
        """Update the network's weights and biases by applying
        gradient descent using backpropagation to a single mini batch.
        The ``mini_batch`` is a list of tuples ``(x, y)``, and ``eta``
        is the learning rate."""
        nabla_b = [np.zeros(b.shape) for b in self.biases]
        nabla_w = [np.zeros(w.shape) for w in self.weights]
        for x, y in mini_batch:
            delta_nabla_b, delta_nabla_w = self.backprop(x, y)
            nabla_b = [nb+dnb for nb, dnb in zip(nabla_b, delta_nabla_b)]
            nabla_w = [nw+dnw for nw, dnw in zip(nabla_w, delta_nabla_w)]
        self.weights = [w-(eta/len(mini_batch))*nw
                        for w, nw in zip(self.weights, nabla_w)]
        self.biases = [b-(eta/len(mini_batch))*nb
                       for b, nb in zip(self.biases, nabla_b)]

    #反向传播就是一种快速计算代价函数梯度的方法,也就是计算delta的一种方法
    def backprop(self, x, y):
        """Return a tuple ``(nabla_b, nabla_w)`` representing the
        gradient for the cost function C_x.  ``nabla_b`` and
        ``nabla_w`` are layer-by-layer lists of numpy arrays, similar
        to ``self.biases`` and ``self.weights``."""
        nabla_b = [np.zeros(b.shape) for b in self.biases]
        nabla_w = [np.zeros(w.shape) for w in self.weights]
        # feedforward
        activation = x
        activations = [x] # list to store all the activations, layer by layer
        zs = [] # list to store all the z vectors, layer by layer
        for b, w in zip(self.biases, self.weights):
            z = np.dot(w, activation)+b
            zs.append(z)
            activation = sigmoid(z)
            activations.append(activation)
        # backward pass
        delta = self.cost_derivative(activations[-1], y) * sigmoid_prime(zs[-1]) #bp1
        nabla_b[-1] = delta  #bp3
        nabla_w[-1] = np.dot(delta, activations[-2].transpose())  #bp4
        # Note that the variable l in the loop below is used a little
        # differently to the notation in Chapter 2 of the book.  Here,
        # l = 1 means the last layer of neurons, l = 2 is the
        # second-last layer, and so on.  It's a renumbering of the
        # scheme in the book, used here to take advantage of the fact
        # that Python can use negative indices in lists.
        for l in range(2, self.num_layers):
            z = zs[-l]
            sp = sigmoid_prime(z)
            delta = np.dot(self.weights[-l+1].transpose(), delta) * sp #bp2,注意这里的+1,其实是计算了下一层了
            nabla_b[-l] = delta
            nabla_w[-l] = np.dot(delta, activations[-l-1].transpose())
        return (nabla_b, nabla_w)
    #evaluate评价函数
    def evaluate(self, test_data):
        """Return the number of test inputs for which the neural
        network outputs the correct result. Note that the neural
        network's output is assumed to be the index of whichever
        neuron in the final layer has the highest activation."""
        test_results = [(np.argmax(self.feedforward(x)), y)
                        for (x, y) in test_data]
        return sum(int(x == y) for (x, y) in test_results)
    #cost代价函数
    def cost_derivative(self, output_activations, y):
        """Return the vector of partial derivatives \partial C_x /
        \partial a for the output activations."""
        return (output_activations-y)

#########helper函数########
#计算sigmoid,这个函数来自定义
def sigmoid(z):
    """The sigmoid function."""
    return 1.0/(1.0+np.exp(-z))
#计算sigmoid的导数,这个函数可以被证明
def sigmoid_prime(z):
    """Derivative of the sigmoid function."""
    return sigmoid(z)*(1-sigmoid(z))

'''
GoDateSets:
GreenOpen 系列
引入数据集
by:jsxyhelu 2018/3/31
'''
import pickle
import gzip
import numpy as np
from keras.utils.data_utils import get_file
#打开Mnist数据
def load_data():
    path='mnist2.pkl.gz'
    path = get_file(path,origin='https://github.com/mnielsen/neural-networks-and-deep-learning/raw/master/data/mnist.pkl.gz')
    print(path)
    f = gzip.open(path, 'rb')
    training_data, validation_data, test_data = pickle.load(f, encoding="latin1")
    f.close()
    return (training_data, validation_data, test_data)

#对读取的数据进行重新封装
def load_data_wrapper():
    tr_d, va_d, te_d = load_data()
    training_inputs = [np.reshape(x, (784, 1)) for x in tr_d[0]]
    training_results = [vectorized_result(y) for y in tr_d[1]]
    training_data = zip(training_inputs, training_results)
    validation_inputs = [np.reshape(x, (784, 1)) for x in va_d[0]]
    validation_data = zip(validation_inputs, va_d[1])
    test_inputs = [np.reshape(x, (784, 1)) for x in te_d[0]]
    test_data = zip(test_inputs, te_d[1])
    return (training_data, validation_data, test_data)

#返回OneHot图
def vectorized_result(j):
    e = np.zeros((10, 1))
    e[j] = 1.0
    return e

import numpy as np
import random

training_data, validation_data, test_data = load_data_wrapper()
training_data = list(training_data)

net = GoNetwork([784, 30, 10])
net.SGD(training_data, 30, 10, 3.0, test_data=test_data)
六、调整colab,运行代码
在jupyter上运行没有问题,则可以调整到colab上运行。首先我们需要使用GPU
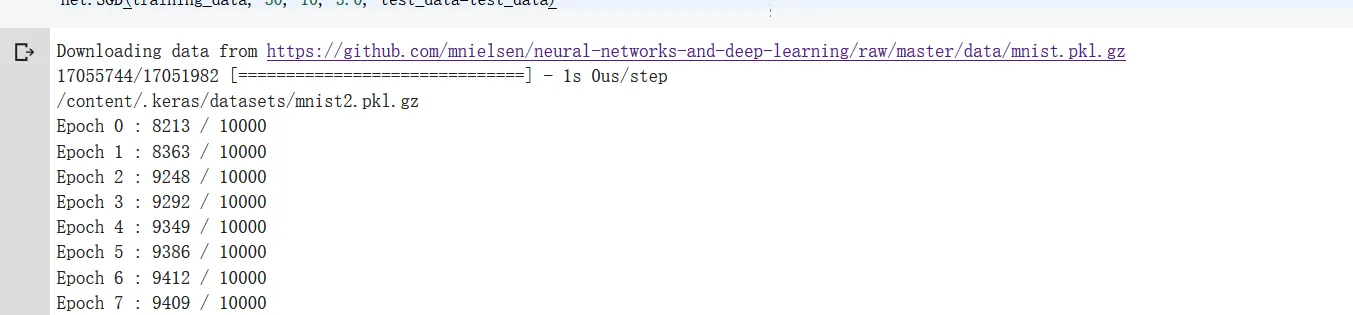
这里是运行结果截图。结果上来看,这里实现的是一个基础网络,只能达到95%的准确率。主要是我们使用colab,这样就可以使用GPU和网络资源了。
目前方向:图像拼接融合、图像识别 联系方式:jsxyhelu@foxmail.com


