ior和mdtest测试工具安装
测试工具通过网络下载如果较慢,也可以直接访问云盘进行下载
链接:https://pan.baidu.com/s/1lrVUeOxDlXpIHR7OBvpxJQ
提取码:h63p
1、安装依赖程序
[root@test1 ~]# yum -y install gcc gcc-c++ gcc-gfortran2、创建软件包目录
[root@test1 ~]# mkdir tools3、安装openmpi(除了openmpi外,还可以使用mpich,不过使用上跟openmpi会有所差异)
[root@test1 ~]# cd tools

[root@test1 tools]# curl -O https://download.open-mpi.org/release/open-mpi/v1.10/openmpi-1.10.7.tar.gz

[root@test1 openmpi-1.10.7]# ./configure --prefix=/usr/local/openmpi/

[root@test1 openmpi-1.10.7]# make

[root@test1 openmpi-1.10.7]# make install
4、添加环境变量
在.bashrc文件中添加以下三行内容
[root@test1 ~]# vim /root/.bashrc

export PATH=$PATH:/usr/local/openmpi/bin/:/usr/local/ior/bin/

export LD_LIBRARY_PATH=/usr/local/openmpi/lib:${LD_LIBRARY_PATH}

export MPI_CC=mpicc

[root@test1 ~]# source /root/.bashrc
5、安装IOR
[root@test1 ~]# cd tools/

[root@test1 tools]# yum -y install git automake

[root@test1 tools]# git clone https://github.com/chaos/ior.git

[root@test1 tools]# cd ior

[root@test1 ior]# ./bootstrap

[root@test1 ior]# ./configure --prefix=/usr/local/ior/

[root@test1 ior]# make

[root@test1 ior]# make install
6、安装mdtest
[root@test1 ~]# cd tools/

[root@test1 tools]# mkdir mdtest

[root@test1 tools]# cd mdtest

[root@test1 mdtest]# wget https://nchc.dl.sourceforge.net/project/mdtest/mdtest%20latest/mdtest-1.9.3/mdtest-1.9.3.tgz

[root@test1 mdtest]# tar xf mdtest-1.9.3.tgz

[root@test1 mdtest]# make
使用IOR和MDtest测试cephfs
环境
| 主机功能 |
主机IP |
主机组件 |
| Server |
10.0.98.21 |
mon,osd,mds |
| 10.0.98.22 |
mon,osd,mds |
|
| 10.0.98.23 |
mon,osd,mds |
|
| Clients |
192.168.1.100 |
ceph-fuse,openmpi,ior,mdtest |
| 192.168.1.101 |
ceph-fuse,openmpi,ior,mdtest |
|
| 192.168.1.102 |
ceph-fuse,openmpi,ior,mdtest |
|
| 192.168.1.103 |
ceph-fuse,openmpi,ior,mdtest |
|
| 192.168.1.104 |
ceph-fuse,openmpi,ior,mdtest |
服务端和客户端组件的的安装这里不再赘述。服务端的配置可以参考之前的文章,通过ceph-ansible快速完成部署;客户端的配置可以参考之前的IOR和Mdtest安装文档进行配置。下面说明一下客户端的部署和配置。
挂载CephFS
以下操作需要在所有的客户端节点完成
1、在客户端节点安装ceph-fuse
[root@test1 ~]# yum -y install ceph-fuse2、创建ceph文件保存目录
[root@test1 ~]# mkdir /etc/ceph3、拷贝服务端的ceph的keyring文件
[root@test1 ~]# scp 10.0.98.21:/etc/ceph/* /etc/ceph/4、创建挂载目录
[root@test1 ~]# mkdir /mnt/fs{1,2,3,4}5、挂载cephfs
[root@test1 ~]# ceph-fuse -m 10.0.98.21:6789/ /mnt/fs1/

[root@test1 ~]# ceph-fuse -m 10.0.98.21:6789/ /mnt/fs2/

[root@test1 ~]# ceph-fuse -m 10.0.98.21:6789/ /mnt/fs3/

[root@test1 ~]# ceph-fuse -m 10.0.98.21:6789/ /mnt/fs4/
6、在挂载目录下创建测试目录
[root@test1 ~]# mkdir /mnt/fs{1,2,3,4}/iortest
如果有部署ansible服务端的话,可以执行以下命令通过ansible快速完成5个client的配置。如果对ansible的使用不是太熟练,那就老老实实的用上面的步骤在所有的client上手动完成操作吧。
1、安装ceph-fuse
ansible clients -m yum -a ‘name=ceph-fuse state=installed’2、创建ceph文件目录
ansible clients -m file -a ‘name=/etc/ceph state=directory’3、拷贝ceph文件
ansible clients -m copy -a ‘src=/etc/ceph/ceph.client.admin.keyring dest=/etc/ceph/ceph.client.admin.keyring’4、创建挂载目录
ansible clients -m shell -a ‘mkdir -p /mnt/fs{1,2,3,4}’5、挂载cephfs
ansible clients -m shell -a ‘ceph-fuse -m MDSIP:6789/ /mnt/fs1’

ansible clients -m shell -a ‘ceph-fuse -m MDSIP:6789/ /mnt/fs2’

ansible clients -m shell -a ‘ceph-fuse -m MDSIP:6789/ /mnt/fs3’

ansible clients -m shell -a ‘ceph-fuse -m MDSIP:6789/ /mnt/fs4’
6、在挂载目录下创建测试目录
ansible clients -m shell -a ‘mkdir /mnt/fs{1,2,3,4}/iortest’创建测试脚本
ior的测试通过scripts完成,以下是几个测试脚本示例,实际测试过程中可以根据测试环境进行修改
1、单个客户端单个进程
[root@test1 ~]# cat test/iorconf-11

===============> start script <===============

IOR START

  api=POSIX

  hintsFileName=hintsFile

  testFile=/mnt/fs1/iortest/f11-1

  repetitions=1

  readFile=1

  writeFile=1

  filePerProc=1

  segmentCount=1

  blockSize=128g

  transferSize=1024k

  collective=0

IOR STOP

===============> stop script <===============
2、单个客户端4个进程
[root@test1 ~]# cat test/iorconf-14

===============> start script <===============

IOR START

  api=POSIX

  hintsFileName=hintsFile

  testFile=/mnt/fs1/iortest/f14-1@/mnt/fs2/iortest/f14-2@/mnt/fs3/iortest/f14-3@/mnt/fs4/iortest/f14-4

  repetitions=1

  readFile=1

  writeFile=1

  filePerProc=1

  segmentCount=1

  blockSize=32g

  transferSize=1024k

  collective=0

IOR STOP

===============> stop script <===============
3、5个客户端4个进程
[root@test1 ~]# cat test/iorconf-54

===============> start script <===============

IOR START

  api=POSIX

  hintsFileName=hintsFile

  testFile=/mnt/fs1/iortest/f54-1@/mnt/fs2/iortest/f54-2@/mnt/fs3/iortest/f54-3@/mnt/fs4/iortest/f54-4@/mnt/fs1/iortest/f54-5@/mnt/fs2/iortest/f54-6@/mnt/fs3/iortest/f54-7@/mnt/fs4/iortest/f54-8@/mnt/fs1/iortest/f54-9@/mnt/fs2/iortest/f54-10@/mnt/fs3/iortest/f54-11@/mnt/fs4/iortest/f54-12@/mnt/fs1/iortest/f54-13@/mnt/fs2/iortest/f54-14@/mnt/fs3/iortest/f54-15@/mnt/fs4/iortest/f54-16@/mnt/fs1/iortest/f54-17@/mnt/fs2/iortest/f54-18@/mnt/fs3/iortest/f54-19@/mnt/fs4/iortest/f54-20

  repetitions=1

  readFile=1

  writeFile=1

  filePerProc=1

  segmentCount=1

  blockSize=32g

  transferSize=1024k

  collective=0

IOR STOP

===============> stop script <===============
测试命令
一、IOR测试
1、单个客户端单个进程
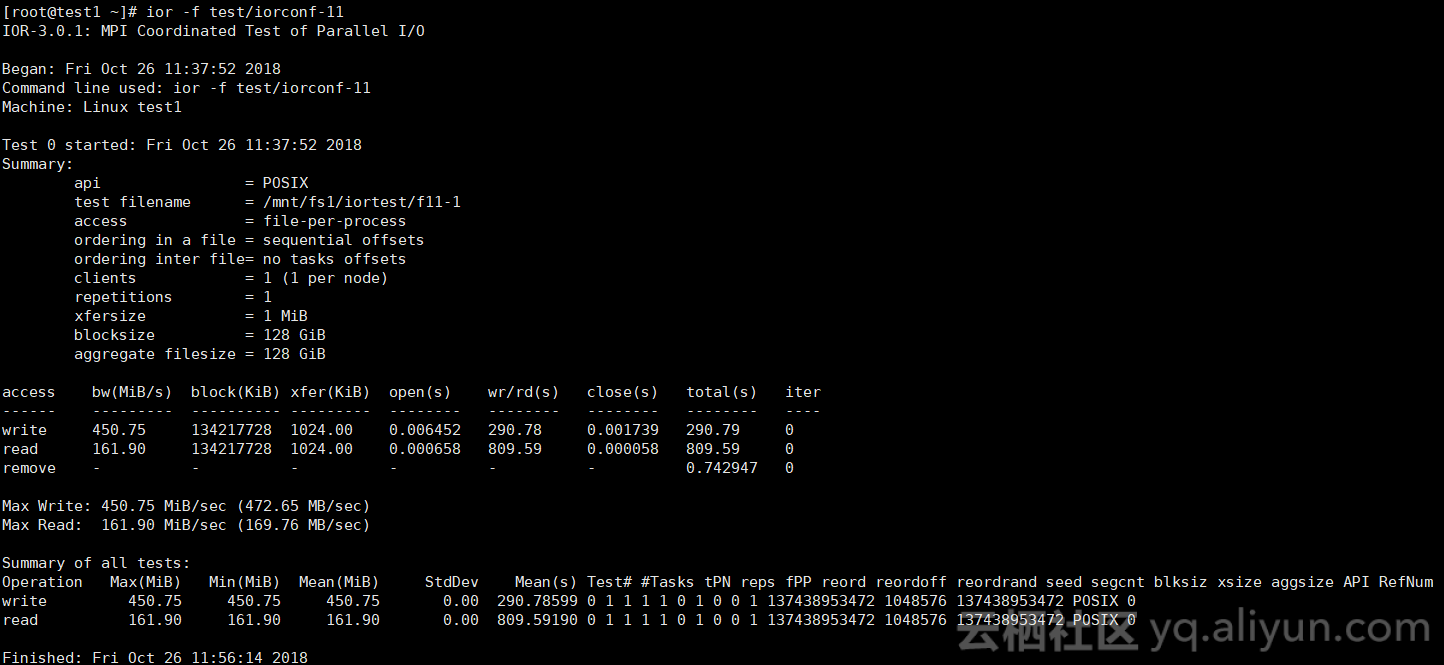
[root@test1 ~]# ior -f test/iorconf-11
2、单个客户端4个进程
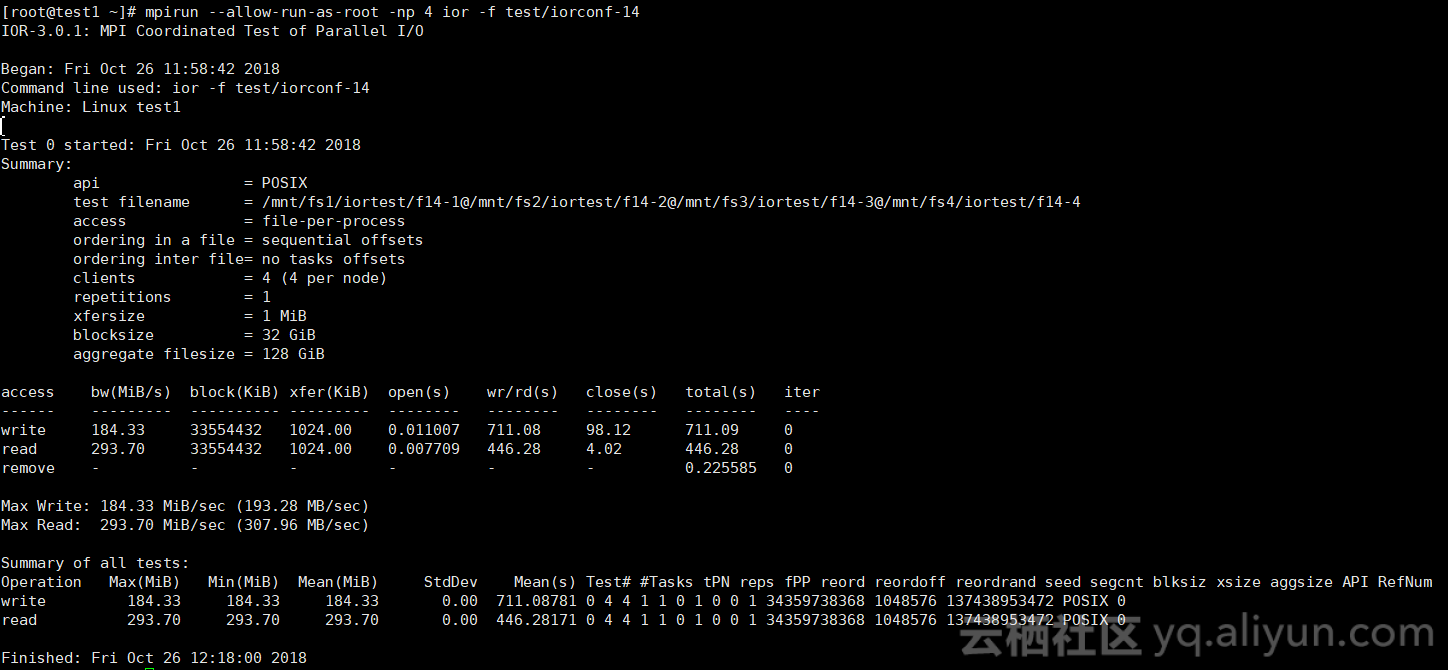
[root@test1 ~]# mpirun --allow-run-as-root -np 4 ior -f test/iorconf-14
3、5个客户端4个进程
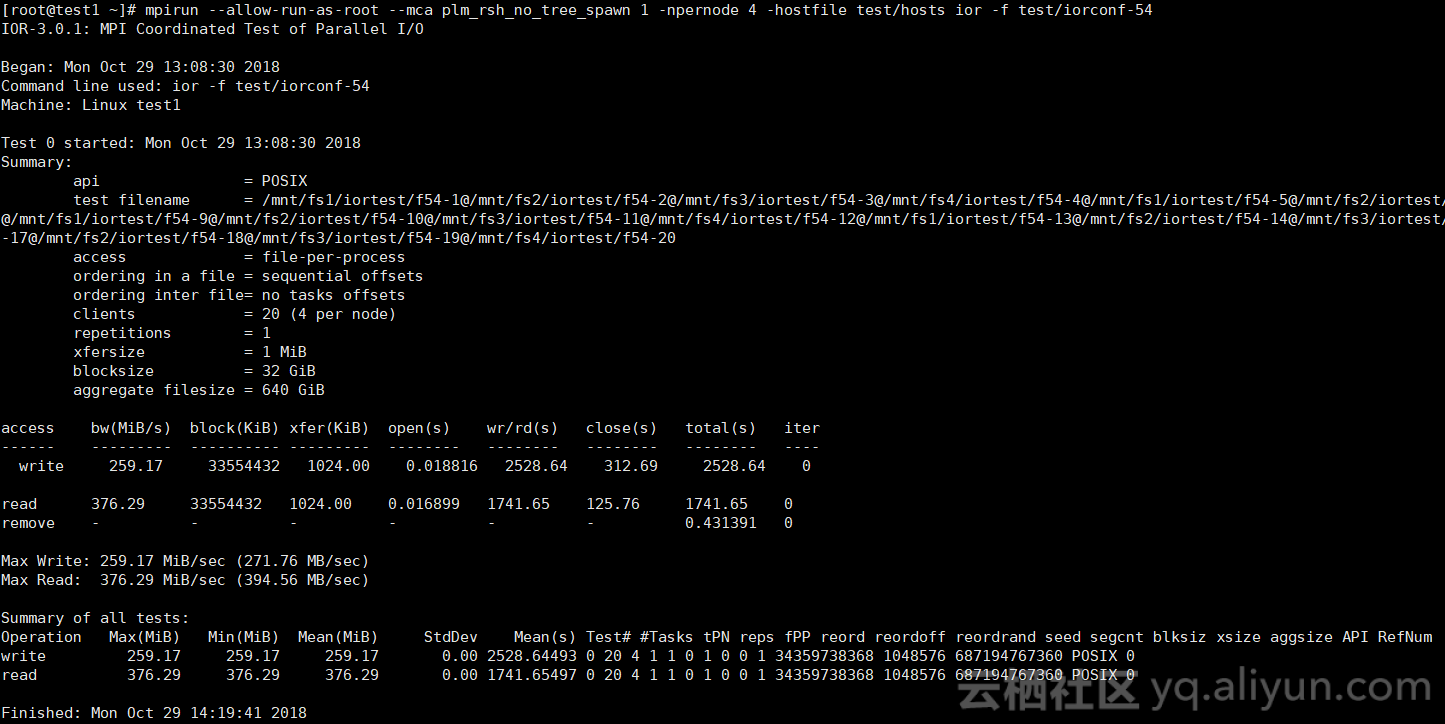
[root@test1 ~]# mpirun --allow-run-as-root --mca plm_rsh_no_tree_spawn 1 -npernode 4 -hostfile test/hosts ior -f test/iorconf-54
注:进行多个客户端测试时,需要在每个节点的对应目录下都上传测试脚本,测试命令中的hosts文件内容如下:
| [root@test1 ~]# cat test/hosts test1 slots=4 test2 slots=4 test3 slots=4 test4 slots=4 test5 slots=4 |
二、MDtest测试
MDtest参数说明
| -F |
只创建文件 |
| -L |
只在目录树的子目录层创建文件/目录 |
| -z |
目录树深度 |
| -b |
目录树的分支数 |
| -I |
每个树节点包含的项目数 |
| -u |
为每个工作任务指定工作目录 |
| -d |
指出测试运行的目录 |
1、单个客户端单个进程
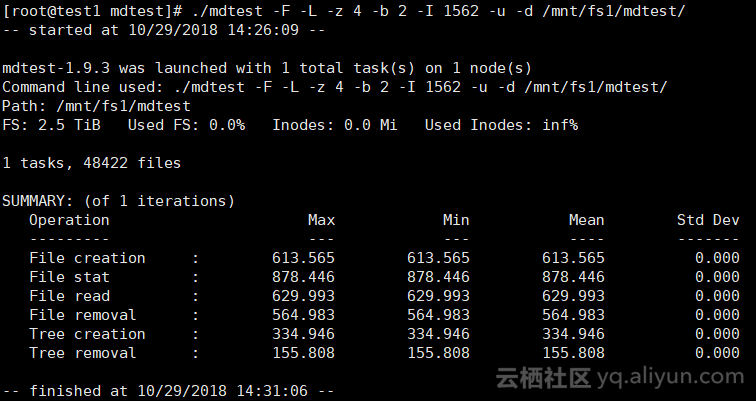
[root@test1 mdtest]# ./mdtest -F -L -z 4 -b 2 -I 1562 -u -d /mnt/fs1/mdtest/
2、单个客户端4个进程
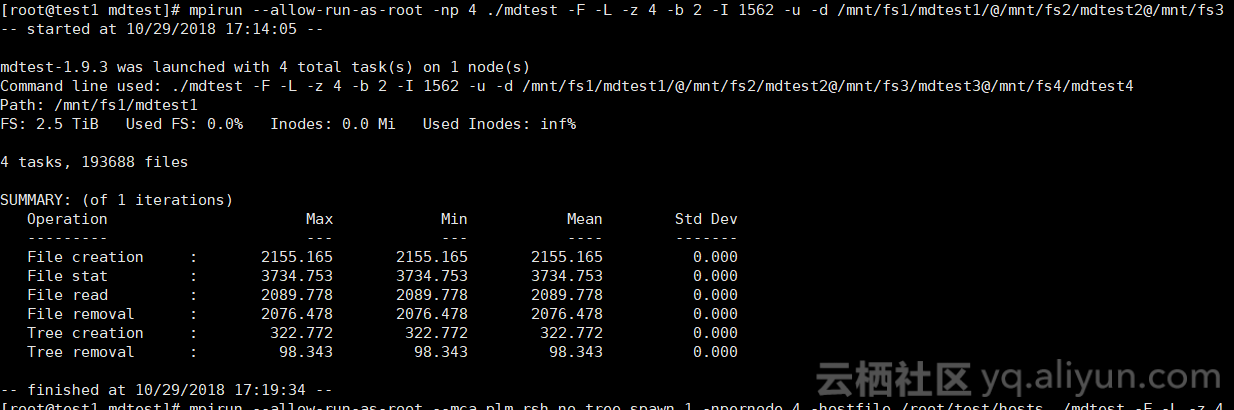
mpirun --allow-run-as-root -np 4 ./mdtest -F -L -z 4 -b 2 -I 1562 -u -d /mnt/fs1/mdtest1/@/mnt/fs2/mdtest2@/mnt/fs3/mdtest3@/mnt/fs4/mdtest4
3、5个客户端4个进程
[root@test1 mdtest]# mpirun --allow-run-as-root --mca plm_rsh_no_tree_spawn 1 -npernode 4 -hostfile /root/test/hosts ./mdtest -F -L -z 4 -b 2 -I 1562 -u -d /mnt/fs1/mdtest1/@/mnt/fs2/mdtest2@/mnt/fs3/mdtest3@/mnt/fs4/mdtest4@/mnt/fs1/mdtest5/@/mnt/fs2/mdtest6@/mnt/fs3/mdtest7@/mnt/fs4/mdtest8@/mnt/fs1/mdtest9/@/mnt/fs2/mdtest10@/mnt/fs3/mdtest11@/mnt/fs4/mdtest12@/mnt/fs1/mdtest13/@/mnt/fs2/mdtest14@/mnt/fs3/mdtest15@/mnt/fs4/mdtest16@/mnt/fs1/mdtest17/@/mnt/fs2/mdtest18@/mnt/fs3/mdtest19@/mnt/fs4/mdtest20