预备知识: http://www.cnblogs.com/cgzl/p/7746496.html
第一部分: http://www.cnblogs.com/cgzl/p/7780559.html
第二部分: http://www.cnblogs.com/cgzl/p/7788636.html
第三部分: http://www.cnblogs.com/cgzl/p/7793241.html
第四部分: http://www.cnblogs.com/cgzl/p/7795121.html
第五部分: http://www.cnblogs.com/cgzl/p/7799567.html
由于手头目前用项目, 所以与前几篇文章不同, 这次要讲的js客户端这部分是通过我刚刚开发的真是项目的代码来讲解的.
这是后端的代码: https://github.com/solenovex/asp.net-core-2.0-web-api-boilerplate
这里面有几个dbcontext, 需要分别对Identity Server和Sales.DataContext进行update-database, 如果使用的是Package Manager Console的话.
进行update-database的时候, 如果是针对IdentityServer这个项目的要把IdentityServer设为启动项目, 如果是针对Sales.DataContext的, 那么要把SalesApi.Web设为启动项目, 然后再进行update-database.
项目结构如图:
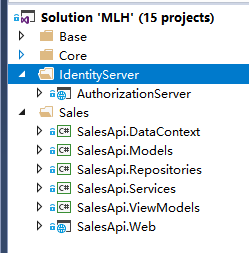
目前项目只用到AuthorizationServer和Sales这两部分.
首先查看AuthorizationServer的相关配置: 打开Configuration/Config.cs
ApiResource:
public static IEnumerable<ApiResource> GetApiResources()
        {
            return new List<ApiResource>
            {
                new ApiResource(CoreApiSettings.ApiResource.Name, CoreApiSettings.ApiResource.DisplayName) { },
                new ApiResource(SalesApiSettings.ApiResource.Name, SalesApiSettings.ApiResource.DisplayName) {
                    UserClaims = { JwtClaimTypes.Name, JwtClaimTypes.PreferredUserName, JwtClaimTypes.Email }
                }
            };
        }
红色部分是相关代码, 是所需要的ApiResource的定义.
其中需要注意的是, 像user的name, email等这些claims按理说应该可以通过id_token传递给js客户端, 也就是IdentityResource应该负责的. 但是我之所以这样做是因为想把这些信息包含在access_token里面, 以便js可以使用包含这些信息的access_token去访问web api, 这样 web api就可以直接获得到当前的用户名(name), email了. 标准的做法应该是web api通过访问authorization server的user profile节点来获得用户信息, 我这么做就是图简单而已.
所以我把这几个claims添加到了ApiResource里面.
配置好整个项目之后你可以把 name 去掉试试, 如果去掉的话, 在web api的controller里面就无法取得到user的name了, 因为js收到的access token里面没有name这个claim, 所以js传给web api的token里面也没有name. 这个一定要自己修改下试试.
然后配置Client:
public static IEnumerable<Client> GetClients()
        {
            return new List<Client>
            {
                // Core JavaScript Client
                new Client
                {
                    ClientId = CoreApiSettings.Client.ClientId,
                    ClientName = CoreApiSettings.Client.ClientName,
                    AllowedGrantTypes = GrantTypes.Implicit,
                    AllowAccessTokensViaBrowser = true,

                    RedirectUris =           { CoreApiSettings.Client.RedirectUri, CoreApiSettings.Client.SilentRedirectUri },
                    PostLogoutRedirectUris = { CoreApiSettings.Client.PostLogoutRedirectUris },
                    AllowedCorsOrigins =     { CoreApiSettings.Client.AllowedCorsOrigins },

                    AllowedScopes =
                    {
                        IdentityServerConstants.StandardScopes.OpenId,
                        IdentityServerConstants.StandardScopes.Profile,
                        IdentityServerConstants.StandardScopes.Email,
                        CoreApiSettings.ApiResource.Name
                    }
                },
                // Sales JavaScript Client
                new Client
                {
                    ClientId = SalesApiSettings.Client.ClientId,
                    ClientName = SalesApiSettings.Client.ClientName,
                    AllowedGrantTypes = GrantTypes.Implicit,
                    AllowAccessTokensViaBrowser = true,
                    AccessTokenLifetime = 60 * 10,
                    AllowOfflineAccess = true,
                    RedirectUris =           { SalesApiSettings.Client.RedirectUri, SalesApiSettings.Client.SilentRedirectUri },
                    PostLogoutRedirectUris = { SalesApiSettings.Client.PostLogoutRedirectUris },
                    AllowedCorsOrigins =     { SalesApiSettings.Client.AllowedCorsOrigins },
                    //AlwaysIncludeUserClaimsInIdToken = true,
                    AllowedScopes =
                    {
                        IdentityServerConstants.StandardScopes.OpenId,
                        IdentityServerConstants.StandardScopes.Profile,
                        IdentityServerConstants.StandardScopes.Email,
                        SalesApiSettings.ApiResource.Name,
                        CoreApiSettings.ApiResource.Name
                    }
                }
            };
        }
红色部分是相关的代码.
AccessTokenLifeTime是token的有效期, 单位是秒, 这里设置的是 10 分钟.
AlwaysIncludeUserClaimsInIdToken默认是false, 如果写true的话, 那么返回给客户端的id_token里面就会有user的name, email等等user相关的claims信息.
然后是IdentityResource:
        public static IEnumerable<IdentityResource> GetIdentityResources()
        {
            return new List<IdentityResource>
            {
                new IdentityResources.OpenId(),
                new IdentityResources.Profile(),
                new IdentityResources.Email()
            };
        }
这里需要这三个IdentityResource, 其中的openId scope(identity resource)是必须要加上的, 如果没有这个openid scope, 那么这个请求也许是一个合理的OAuth2.0请求, 但它肯定不会被当作OpenId Connect 请求.
如果你把profile这项去掉, 其他相关代码也去掉profile, 那么客户端新请求的id_token是无论如何也不会包括profile所包含的信息的(name等), 但是并不影响api resource里面包含相关的claim(access_token还是可以获得到user的name等的).
其他的Identity Scopes(Identity Resource)所代表的内容请看文档: http://openid.net/specs/openid-connect-core-1_0.html#ScopeClaims:
profile: name, family_name, given_name, middle_name, nickname, preferred_username,profile, picture, website, gender, birthdate, zoneinfo, locale, and updated_at.
email: email and email_verified Claims.
address: address Claim.
phone: phone_number and phone_number_verified Claims.
看一下Authorization Server的Startup.cs:
namespace AuthorizationServer
{
    public class Startup
    {
        public Startup(IConfiguration configuration)
        {
            Configuration = configuration;
        }

        public IConfiguration Configuration { get; }

        public void ConfigureServices(IServiceCollection services)
        {
            var connectionString = Configuration.GetConnectionString("DefaultConnection");
            var migrationsAssembly = typeof(Startup).GetTypeInfo().Assembly.GetName().Name;

            services.AddDbContext<ApplicationDbContext>(options =>
                options.UseSqlServer(connectionString));

            services.AddIdentity<ApplicationUser, IdentityRole>(options =>
            {
                // Password settings
                options.Password.RequireDigit = false;
                options.Password.RequiredLength = 4;
                options.Password.RequireNonAlphanumeric = false;
                options.Password.RequireUppercase = false;
                options.Password.RequireLowercase = false;
                options.Password.RequiredUniqueChars = 1;
                // Lockout settings
                options.Lockout.DefaultLockoutTimeSpan = TimeSpan.FromMinutes(5);
                options.Lockout.MaxFailedAccessAttempts = 5;
                options.Lockout.AllowedForNewUsers = true;
                // Signin settings
                options.SignIn.RequireConfirmedEmail = false;
                options.SignIn.RequireConfirmedPhoneNumber = false;
                // User settings
                options.User.RequireUniqueEmail = false;
            })
                .AddEntityFrameworkStores<ApplicationDbContext>()
                .AddDefaultTokenProviders();

            services.ConfigureApplicationCookie(options =>
            {
                options.Cookie.Name = "MLHAuthorizationServerCookie";
                options.Cookie.HttpOnly = true;
                options.ExpireTimeSpan = TimeSpan.FromMinutes(60);
                options.LoginPath = "/Account/Login";
                options.LogoutPath = "/Account/Logout";
                options.AccessDeniedPath = "/Account/AccessDenied";
                options.SlidingExpiration = true;
                options.ReturnUrlParameter = CookieAuthenticationDefaults.ReturnUrlParameter;
            });

            services.AddTransient<IEmailSender, EmailSender>();
            services.AddMvc();

            services.AddAutoMapper();

            services.AddIdentityServer()
#if DEBUG
                .AddDeveloperSigningCredential()
#else
                .AddSigningCredential(new System.Security.Cryptography.X509Certificates.X509Certificate2(
                    SharedSettings.Settings.AuthorizationServerSettings.Certificate.Path,
                    SharedSettings.Settings.AuthorizationServerSettings.Certificate.Password))
#endif
                .AddInMemoryIdentityResources(Config.GetIdentityResources())
                .AddInMemoryApiResources(Config.GetApiResources())
                .AddInMemoryClients(Config.GetClients())
                .AddOperationalStore(options =>
                {
                    options.ConfigureDbContext = builder =>
                        builder.UseSqlServer(connectionString,
                            sql => sql.MigrationsAssembly(migrationsAssembly));
                    options.EnableTokenCleanup = true;
                    options.TokenCleanupInterval = 30;
                })
                .AddAspNetIdentity<ApplicationUser>();

            services.AddAuthorization(options =>
            {
                options.AddPolicy(CoreApiAuthorizationPolicy.PolicyName, policy =>
                    policy.RequireClaim(CoreApiAuthorizationPolicy.ClaimName, CoreApiAuthorizationPolicy.ClaimValue));
            });
        }

        public void Configure(IApplicationBuilder app, IHostingEnvironment env)
        {
            app.InitializeDatabase();
            if (env.IsDevelopment())
            {
                app.UseDeveloperExceptionPage();
                app.UseBrowserLink();
                app.UseDatabaseErrorPage();
            }
            else
            {
                app.UseExceptionHandler("/Home/Error");
            }

            app.UseStaticFiles();
            app.UseIdentityServer();
            app.UseMvc(routes =>
            {
                routes.MapRoute(
                    name: "default",
                    template: "{controller=Home}/{action=Index}/{id?}");
            });
        }
    }
}
这里我只将Operation数据保存到了数据库. 而Client和ApiResource, IdentityResource等定义还是放在了内存中, 我感觉这样比较适合我.
Sales Web Api:
打开SalesApi.Web的Startup ConfigureServices: 这个非常简单:
            services.AddAuthentication("Bearer")
                .AddIdentityServerAuthentication(options =>
                {
                    options.Authority = AuthorizationServerSettings.AuthorizationServerBase;
                    options.RequireHttpsMetadata = false;

                    options.ApiName = SalesApiSettings.ApiResource.Name;
                });
没什么可说的.
js 客户端 和 oidc-client.js
无论你使用什么样的前端框架, 最后都使用oidc-client.js来和identity server 4来配套操作.
我使用的是 angular 5: 由于这个代码是公司的项目, 后端处于早期阶段, 被我开源了, 没什么问题.
但是前端是某机构买的一套收费的皮肤, 所以没法开源, 这里我尝试提供部分代码, 我相信您一定可以从头搭建出完整的js客户端的.
我的前端应用流程是:
访问前端地址, 如果没有登录用户, 那么跳转到Authorization Server进行登陆, 同意后, 返回到前端的网站.
如果前端网站有登录的用户, 那么在用户快过期的时候自动刷新token. 以免登陆过期.
前端应用访问api时, 自动拦截所有请求, 把登陆用户的access token添加到请求的authorization header, 然后再发送给 web api.
我把前端精简了一下, 放到了网盘,是好用的
链接: https://pan.baidu.com/s/1minARgc 密码: ipyw
首先需要安装angular-cli:
npm install -g @angular/cli
然后在项目根目录执行:
npm install
虽然npm有点慢, 但是也不要使用cnpm, 有bug.
js客户端参考
你可以参考官方文档: http://docs.identityserver.io/en/release/quickstarts/7_javascript_client.html
安装oidc-client:
地址是: https://github.com/IdentityModel/oidc-client-js, 查看文档的话点wiki即可.
在你的框架里面执行:
npm install oidc-client --save
配置oidc-client:
我的配置放在了angular5项目的environments里面, 因为这个配置根据环境的不同(开发和生产)里面的设定是不同的:
import { WebStorageStateStore } from 'oidc-client';

// The file contents for the current environment will overwrite these during build.
// The build system defaults to the dev environment which uses `environment.ts`, but if you do
// `ng build --env=prod` then `environment.prod.ts` will be used instead.
// The list of which env maps to which file can be found in `angular-cli.json`.

export const environment = {
    production: false,
    authConfig: {
        authority: 'http://localhost:5000',
        client_id: 'sales',
        redirect_uri: 'http://localhost:4200/login-callback',
        response_type: 'id_token token',
        scope: 'openid profile salesapi email',
        post_logout_redirect_uri: 'http://localhost:4200',

        silent_redirect_uri: 'http://localhost:4200/silent-renew.html',
        automaticSilentRenew: true,
        accessTokenExpiringNotificationTime: 4,
        // silentRequestTimeout:10000,
        userStore: new WebStorageStateStore({ store: window.localStorage })
    },
    salesApiBase: 'http://localhost:5100/api/sales/',
    themeKey: 'MLHSalesApiClientThemeKeyForDevelopment'
};
authority就是authorization server的地址.
redirect_url是登陆成功后跳转回来的地址.
silent_redirect_uri是自动刷新token的回掉地址.
automaticSilentRenew为true是启用自动安静刷新token.
userStore默认是放在sessionStorage里面的, 我需要使用localStorage, 所以改了.
建立AuthService:
import { Injectable, EventEmitter } from '@angular/core';
import { Router } from '@angular/router';
import { Observable } from 'rxjs/Observable';
import { User, UserManager, Log } from 'oidc-client';
import 'rxjs/add/observable/fromPromise';
import { environment } from '../../../environments/environment';

Log.logger = console;
Log.level = Log.DEBUG;

@Injectable()
export class AuthService {

    private manager: UserManager = new UserManager(environment.authConfig);
    public loginStatusChanged: EventEmitter<User> = new EventEmitter();
    private userKey = `oidc.user:${environment.authConfig.authority}:${environment.authConfig.client_id}`;

    constructor(
        private router: Router
    ) {
        this.manager.events.addAccessTokenExpired(() => {
            this.login();
        });
    }

    login() {
        this.manager.signinRedirect();
    }

    loginCallBack() {
        return Observable.create(observer => {
            Observable.fromPromise(this.manager.signinRedirectCallback())
                .subscribe((user: User) => {
                    this.loginStatusChanged.emit(user);
                    observer.next(user);
                    observer.complete();
                });
        });
    }

    tryGetUser() {
        return Observable.fromPromise(this.manager.getUser());
    }

    logout() {
        this.manager.signoutRedirect();
    }

    get type(): string {
        return 'Bearer';
    }

    get token(): string | null {
        const temp = localStorage.getItem(this.userKey);
        if (temp) {
            const user: User = JSON.parse(temp);
            return user.access_token;
        }
        return null;
    }

    get authorizationHeader(): string | null {
        if (this.token) {
            return `${this.type} ${this.token}`;
        }
        return null;
    }
}
UserManager就是oidc-client里面的东西. 我们主要是用它来操作.
constructor里面那个事件是表示, 如果用户登录已经失效了或者没登录, 那么自动调用login()登陆方法.
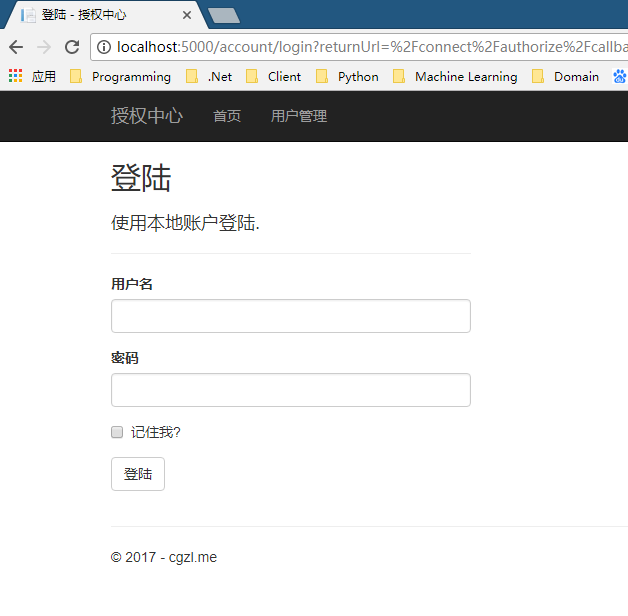
login()方法里面的signInRedirect()会直接跳转到Authorization Server的登陆窗口.
logout()里的signoutRedirect()就会跳转到AuthorizationServer并执行登出.
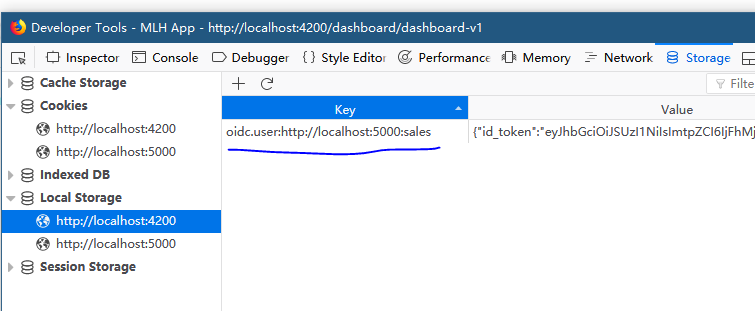
其中的userKey字符串是oidc-client在localStorage默认存放用户信息的key, 这个可以通过oidc-client的配置来更改.
我没有改, 所以key是这样的: "oidc.user:http://localhost:5000:sales":
Token Interceptor 请求拦截器:
针对angular 5 所有的请求, 都应该加上authorization header, 其内容就是 access token, 所以token.interceptor.ts就是做这个工作的:
import { Injectable } from '@angular/core';
import { HttpEvent, HttpInterceptor, HttpHandler, HttpRequest } from '@angular/common/http';
import { Observable } from 'rxjs/Observable';
import { User } from 'oidc-client';
import { environment } from '../../../environments/environment';
import { AuthService } from './auth.service';

@Injectable()
export class TokenInterceptor implements HttpInterceptor {

    constructor(
        private authService: AuthService
    ) { }

    intercept(req: HttpRequest<any>, next: HttpHandler): Observable<HttpEvent<any>> {
        const authHeader = this.authService.authorizationHeader;
        const authReq = req.clone({ headers: req.headers.set('Authorization', authHeader) });
        return next.handle(authReq);
    }
}
angular 5 的interceptor不会修改request, 所以只能clone.
设置AuthGuard:
angular5的authguard就是里面有个方法, 如果返回true就可以访问这个路由, 否则就不可以访问.
所以我在几乎最外层添加了这个authguard, 里面的代码是:
import { Injectable } from '@angular/core';
import { CanActivate } from '@angular/router';
import { Router } from '@angular/router';
import { User } from 'oidc-client';
import { AuthService } from './../services/auth.service';
import { Observable } from 'rxjs/Observable';
import 'rxjs/add/operator/map';

@Injectable()
export class AuthGuard implements CanActivate {

    constructor(
        private router: Router,
        private authService: AuthService) { }

    canActivate(): Observable<boolean> {
        return this.authService.tryGetUser().map((user: User) => {
            if (user) {
                return true;
            }
            this.authService.login();
            return false;
        });
    }
}
意思就是, 取当前用户, 如果有用户那么就可以继续访问路由, 否走执行登陆动作.

所以访问访问网站后会跳转到这, 这里有个内置用户 admin 密码也是admin, 可以使用它登陆.
外层路由代码app-routing.module.ts:
import { NgModule } from '@angular/core';
import { Routes } from '@angular/router';

import { AuthGuard } from './shared/guards/auth.guard';

import { MainComponent } from './main/main.component';
import { LoginCallbackComponent } from './shared/components/login-callback/login-callback.component';
import { NotFoundComponent } from './shared/components/not-found/not-found.component';

export const AppRoutes: Routes = [{
    path: '',
    redirectTo: 'dashboard',
    pathMatch: 'full',
}, {
    path: 'login-callback',
    component: LoginCallbackComponent
}, {
    path: '',
    component: MainComponent,
    canActivate: [AuthGuard],
    children: [{
        path: 'dashboard',
        loadChildren: './dashboard/dashboard.module#DashboardModule'
    }, {
        path: 'settings',
        loadChildren: './settings/settings.module#SettingsModule'
    }]
},
{ path: '**', component: NotFoundComponent }];
登陆成功后首先会跳转到设置好的redirect_uri, 这里就是login-callback这个路由地址对应的component:
import { Component, OnInit } from '@angular/core';
import { AuthService } from '../../../shared/services/auth.service';
import { User } from 'oidc-client';
import { ToastrService } from 'ngx-toastr';

@Component({
    selector: 'app-login-callback',
    templateUrl: './login-callback.component.html',
    styleUrls: ['./login-callback.component.css']
})
export class LoginCallbackComponent implements OnInit {

    constructor(
        private authService: AuthService,
        private toastr: ToastrService
    ) { }

    ngOnInit() {
        this.authService.loginCallBack().subscribe(
            (user: User) => {
                this.toastr.info('登陆成功, 跳转中...', '登陆成功');
                if (user) {
                    window.location.href = '/';
                }
            }
        );
    }

}
我在这里没做什么, 就是重新加载了一下页面, 我感觉这并不是好的做法.
您可以单独建立一个简单的页面就像官方文档那样, 然后再跳转到angular5项目里面.
这个页面一闪而过:

回到angular5项目后就可以正常访问api了.
自动刷新Token:
oidc-client的自动刷新token是只要配置好了, 你就不用再做什么操作了.
刷新的时候, 它好像是会在页面上弄一个iframe, 然后在iframe里面操作.
不过还是需要建立一个页面, 用于刷新:
<!DOCTYPE html>
<html>
<head>
    <meta charset="utf-8" />
    <title></title>
</head>
<body>
    <h1 id="waiting">Waiting...</h1>
    <div id="error"></div>
    <script src="assets/js/oidc-client.min.js"></script>
    <script>
        new Oidc.UserManager().signinSilentCallback();
    </script>
</body>
</html>
很简单就这些.
最后操作一下试试: 最好自己调试一下:
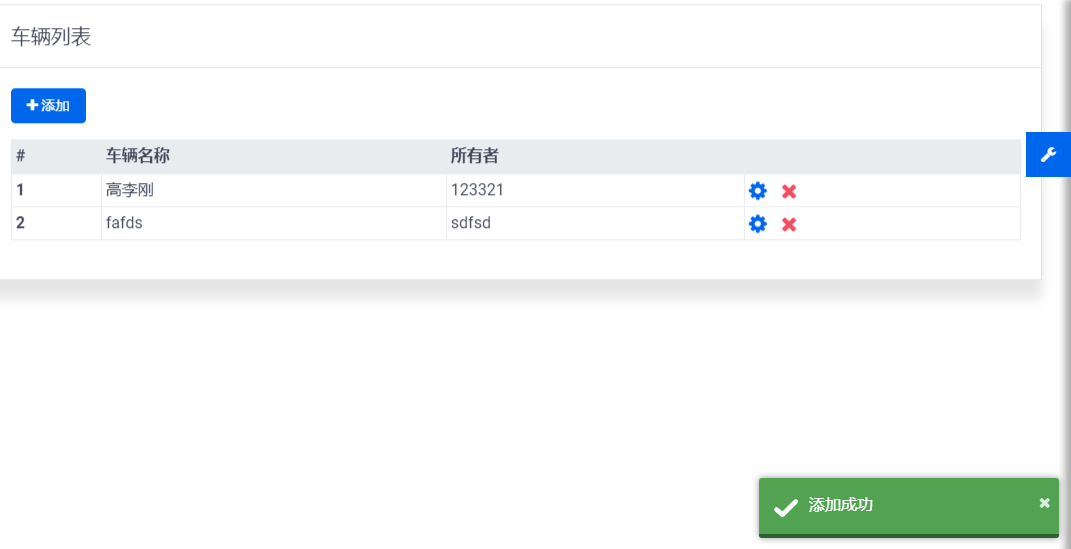
菜单那几个都是好用的页面.
下面是我的关于ASP.NET Core Web API相关技术的公众号--草根专栏: