从这一章开始要讲Region Server这块的了,但是在讲Region Server这块之前得讲一下StoreFile,否则后面的不好讲下去,这块是基础,Region Sever上面的操作,大部分都是基于它来进行的。
HFile概述
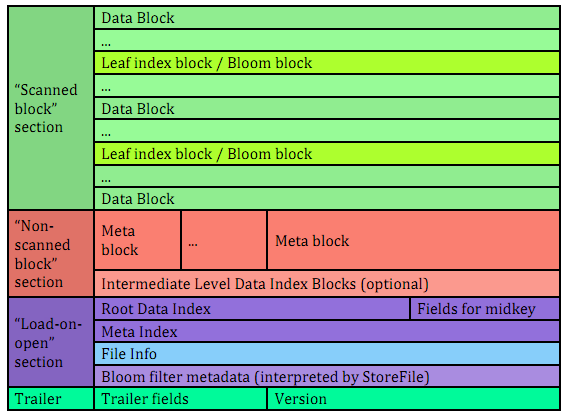
HFile是HBase中实际存数据的文件,为HBase提供高效快速的数据访问。它是基于Hadoop的TFile,模仿Google Bigtable 架构中的SSTable格式。文件格式如下:

文件是变长的,唯一固定的块是File Info和Trailer,如图所示,Trailer有指向其它块的指针,这些指针也写在了文件里,Index块记录了data和meta块的偏移量,meta块是可选的。
下面我们从原来上来一个一个的看它们到底是啥样的,先从入口看起,那就是StoreFile.Writer的append方法,先看怎么写入的,然后它就怎么读了,不知道怎么使用这个类的,可以看看我写的这篇文章《非mapreduce生成Hfile,然后导入hbase当中》。
往HFile追加KeyValue
不扯这些了,看一下StoreFile里面的append方法。
public void append(final KeyValue kv) throws IOException {
      //如果是新的rowkey的value,就追加到Bloomfilter里面去
      appendGeneralBloomfilter(kv);
      //如果是DeleteFamily、DeleteFamilyVersion类型的kv
      appendDeleteFamilyBloomFilter(kv);
      writer.append(kv);
      //记录最新的put的时间戳,更新时间戳范围
      trackTimestamps(kv);
    }
在用writer进行append之前先把kv写到generalBloomFilterWriter里面,但是我们发现generalBloomFilterWriter是HFile.Writer里面的InlineBlockWriter。
generalBloomFilterWriter = BloomFilterFactory.createGeneralBloomAtWrite(
          conf, cacheConf, bloomType,
          (int) Math.min(maxKeys, Integer.MAX_VALUE), writer);
//在createGeneralBloomAtWriter方法发现了以下代码
......
CompoundBloomFilterWriter bloomWriter = new CompoundBloomFilterWriter(getBloomBlockSize(conf),
        err, Hash.getHashType(conf), maxFold, cacheConf.shouldCacheBloomsOnWrite(),
        bloomType == BloomType.ROWCOL ? KeyValue.COMPARATOR : KeyValue.RAW_COMPARATOR);
    writer.addInlineBlockWriter(bloomWriter);
我们接下来看HFileWriterV2的append方法吧。
public void append(final KeyValue kv) throws IOException {
    append(kv.getMvccVersion(), kv.getBuffer(), kv.getKeyOffset(), kv.getKeyLength(),
        kv.getBuffer(), kv.getValueOffset(), kv.getValueLength());
    this.maxMemstoreTS = Math.max(this.maxMemstoreTS, kv.getMvccVersion());
}
为什么贴这段代码,注意这个参数maxMemstoreTS,它取kv的mvcc来比较,mvcc是用来实现MemStore的原子性操作的,在MemStore flush的时候同一批次的mvcc都是一样的,失败的时候,把mvcc相同的全部干掉,这里提一下,以后应该还会说到,继续追杀append方法。方法比较长,大家展开看看。
private void append(final long memstoreTS, final byte[] key, final int koffset, final int klength,
      final byte[] value, final int voffset, final int vlength)
      throws IOException {
    boolean dupKey = checkKey(key, koffset, klength);
    checkValue(value, voffset, vlength);
    if (!dupKey) {
      //在写每一个新的KeyValue之间,都要检查,到了BlockSize就重新写一个HFileBlock
      checkBlockBoundary();
    }
    //如果当前的fsBlockWriter的状态不对,就重新写一个新块
    if (!fsBlockWriter.isWriting())
      newBlock();

    // 把值写入到ouputStream当中,怎么写入的自己看啊
    {
      DataOutputStream out = fsBlockWriter.getUserDataStream();
      out.writeInt(klength);
      totalKeyLength += klength;
      out.writeInt(vlength);
      totalValueLength += vlength;
      out.write(key, koffset, klength);
      out.write(value, voffset, vlength);
      if (this.includeMemstoreTS) {
        WritableUtils.writeVLong(out, memstoreTS);
      }
    }

    // 记录每个块的第一个key 和 上次写的key
    if (firstKeyInBlock == null) {
      firstKeyInBlock = new byte[klength];
      System.arraycopy(key, koffset, firstKeyInBlock, 0, klength);
    }

    lastKeyBuffer = key;
    lastKeyOffset = koffset;
    lastKeyLength = klength;
    entryCount++;
}private void checkBlockBoundary() throws IOException {
if (fsBlockWriter.blockSizeWritten() < blockSize)
return;
finishBlock();
writeInlineBlocks(false);
newBlock();
}简单交代一下
1、结束一个block的时候,把block的所有数据写入到hdfs的流当中,记录一些信息到DataBlockIndex(块的第一个key和上一个块的key的中间值,块的大小,块的起始位置)。
2、writeInlineBlocks(false)给了一个false,是否要关闭,所以现在什么都没干,它要等到最后才会输出的。
3、newBlock方法就是重置输出流,做好准备,读写下一个块。
Close的时候
close的时候就有得忙咯,从之前的图上面来看,它在最后的时候是最忙的,因为它要写入一大堆索引信息、附属信息啥的。
public void close() throws IOException {
      boolean hasGeneralBloom = this.closeGeneralBloomFilter();
      boolean hasDeleteFamilyBloom = this.closeDeleteFamilyBloomFilter();
      writer.close();
}
在调用writer的close方法之前,close了两个BloomFilter,把BloomFilter的类型写进FileInfo里面去,把BloomWriter添加到Writer里面。下面进入正题吧,放大招了,我折叠吧。。。
public void close() throws IOException {
    if (outputStream == null) {
      return;
    }
    // 经过编码压缩的,把编码压缩方式写进FileInfo里面
    blockEncoder.saveMetadata(this);
    //结束块
    finishBlock();
    //输出DataBlockIndex索引的非root层信息
    writeInlineBlocks(true);

    FixedFileTrailer trailer = new FixedFileTrailer(2,HFileReaderV2.MAX_MINOR_VERSION);

    // 如果有meta块的存在的话
    if (!metaNames.isEmpty()) {
      for (int i = 0; i < metaNames.size(); ++i) {
        long offset = outputStream.getPos();
        // 输出meta的内容,它是meta的名字的集合,按照名字排序
        DataOutputStream dos = fsBlockWriter.startWriting(BlockType.META);
        metaData.get(i).write(dos);

        fsBlockWriter.writeHeaderAndData(outputStream);
        totalUncompressedBytes += fsBlockWriter.getUncompressedSizeWithHeader();

        // 把meta块的信息加到meta块的索引里
        metaBlockIndexWriter.addEntry(metaNames.get(i), offset,
            fsBlockWriter.getOnDiskSizeWithHeader());
      }
    }

    //下面这部分是打开文件的时候就加载的部分,是前面部分的索引
    //HFileBlockIndex的根层次的索引
    long rootIndexOffset = dataBlockIndexWriter.writeIndexBlocks(outputStream);
    trailer.setLoadOnOpenOffset(rootIndexOffset);

    //Meta块的索引
    metaBlockIndexWriter.writeSingleLevelIndex(fsBlockWriter.startWriting(
        BlockType.ROOT_INDEX), "meta");
    fsBlockWriter.writeHeaderAndData(outputStream);
    totalUncompressedBytes += fsBlockWriter.getUncompressedSizeWithHeader();

    //如果需要写入Memstore的最大时间戳到FileInfo里面
    if (this.includeMemstoreTS) {
      appendFileInfo(MAX_MEMSTORE_TS_KEY, Bytes.toBytes(maxMemstoreTS));
      appendFileInfo(KEY_VALUE_VERSION, Bytes.toBytes(KEY_VALUE_VER_WITH_MEMSTORE));
    }

    //把FileInfo的起始位置写入trailer,然后输出
    writeFileInfo(trailer, fsBlockWriter.startWriting(BlockType.FILE_INFO));
    fsBlockWriter.writeHeaderAndData(outputStream);
    totalUncompressedBytes += fsBlockWriter.getUncompressedSizeWithHeader();

    // 输出GENERAL_BLOOM_META、DELETE_FAMILY_BLOOM_META类型的BloomFilter的信息
    for (BlockWritable w : additionalLoadOnOpenData){
      fsBlockWriter.writeBlock(w, outputStream);
      totalUncompressedBytes += fsBlockWriter.getUncompressedSizeWithHeader();
    }

    //HFileBlockIndex的二级实体的层次
    trailer.setNumDataIndexLevels(dataBlockIndexWriter.getNumLevels());
    //压缩前的HFileBlockIndex的大小
    trailer.setUncompressedDataIndexSize(
        dataBlockIndexWriter.getTotalUncompressedSize());
    //第一个HFileBlock的起始位置
    trailer.setFirstDataBlockOffset(firstDataBlockOffset);
    //最后一个HFileBlock的起始位置
    trailer.setLastDataBlockOffset(lastDataBlockOffset);
    //比较器的类型
    trailer.setComparatorClass(comparator.getClass());
    //HFileBlockIndex的根实体的数量,应该是和HFileBlock的数量是一样的
    //它每次都把HFileBlock的第一个key加进去
    trailer.setDataIndexCount(dataBlockIndexWriter.getNumRootEntries());

    //把Trailer的信息写入硬盘,关闭输出流
    finishClose(trailer);

    fsBlockWriter.release();
  }
和图片上写的有些出入。
1、输出HFileBlocks
2、输出HFileBlockIndex的二级索引(我叫它二级索引,我也不知道对不对,HFileBlockIndex那块我有点儿忘了,等我再重新调试的时候再看看吧)
3、如果有的话,输出MetaBlock
下面的部分是打开文件的时候就加载的
4、输出HFileBlockIndex的根索引
5、如果有的话,输出MetaBlockIndex的根索引(它比较小,所以只有一层)
6、输出文件信息(FileInfo)
7、输出文件尾巴(Trailer)
Open的时候
这部分打算讲一下实例化Reader的时候,根据不同类型的文件是怎么实例化Reader的,在StoreFile里面搜索open方法。
this.reader = fileInfo.open(this.fs, this.cacheConf, dataBlockEncoder.getEncodingInCache());

 // 加载文件信息到map里面去,后面部分就不展开讲了
metadataMap = Collections.unmodifiableMap(this.reader.loadFileInfo());
我们进入F3进入fileInfo.open这个方法里面去。
FSDataInputStreamWrapper in;
    FileStatus status;

    if (this.link != null) {
      // HFileLink
      in = new FSDataInputStreamWrapper(fs, this.link);
      status = this.link.getFileStatus(fs);
    } else if (this.reference != null) {
      // HFile Reference 反向计算出来引用所指向的位置的HFile位置
      Path referencePath = getReferredToFile(this.getPath());
      in = new FSDataInputStreamWrapper(fs, referencePath);
      status = fs.getFileStatus(referencePath);
    } else {
      in = new FSDataInputStreamWrapper(fs, this.getPath());
      status = fileStatus;
    }
    long length = status.getLen();
    if (this.reference != null) {
      hdfsBlocksDistribution = computeRefFileHDFSBlockDistribution(fs, reference, status);
      //如果是引用的话,创建一个一半的reader
      return new HalfStoreFileReader(
          fs, this.getPath(), in, length, cacheConf, reference, dataBlockEncoding);
    } else {
      hdfsBlocksDistribution = FSUtils.computeHDFSBlocksDistribution(fs, status, 0, length);
      return new StoreFile.Reader(fs, this.getPath(), in, length, cacheConf, dataBlockEncoding);
    }
它一上来就判断它是不是HFileLink是否为空了,这是啥情况?找了一下,原来在StoreFile的构造函数的时候,就开始判断了。
this.fileStatus = fileStatus;
    Path p = fileStatus.getPath();
    if (HFileLink.isHFileLink(p)) {
      // HFileLink 被判断出来它是HFile
      this.reference = null;
      this.link = new HFileLink(conf, p);
    } else if (isReference(p)) {
      this.reference = Reference.read(fs, p);
      //关联的地址也可能是一个HFileLink,snapshot的时候介绍了
      Path referencePath = getReferredToFile(p);
      if (HFileLink.isHFileLink(referencePath)) {
        // HFileLink Reference 如果它是一个HFileLink型的
        this.link = new HFileLink(conf, referencePath);
      } else {
        // 只是引用
        this.link = null;
      }
    } else if (isHFile(p)) {
      // HFile
      this.reference = null;
      this.link = null;
    } else {
      throw new IOException("path=" + p + " doesn't look like a valid StoreFile");
    }
它有4种情况:
1、HFileLink
2、既是HFileLink又是Reference文件
3、只是Reference文件
4、HFile
说HFileLink吧,我们看看它的构造函数。
public HFileLink(final Path rootDir, final Path archiveDir, final Path path) {
    Path hfilePath = getRelativeTablePath(path);
    this.tempPath = new Path(new Path(rootDir, HConstants.HBASE_TEMP_DIRECTORY), hfilePath);
    this.originPath = new Path(rootDir, hfilePath);
    this.archivePath = new Path(archiveDir, hfilePath);
    setLocations(originPath, tempPath, archivePath);
}
尼玛,它计算了三个地址,原始位置,archive中的位置,临时目录的位置,按照顺序添加到一个locations数组里面。。接着看FSDataInputStreamWrapper吧,下面是三段代码。
this.stream = (link != null) ? link.open(hfs) : hfs.open(path);
//走的link.open(hfs)
new FSDataInputStream(new FileLinkInputStream(fs, this));
//注意tryOpen方法
public FileLinkInputStream(final FileSystem fs, final FileLink fileLink, int bufferSize)
        throws IOException {
      this.bufferSize = bufferSize;
      this.fileLink = fileLink;
      this.fs = fs;
      this.in = tryOpen();
}
tryOpen的方法,会按顺序打开多个locations列表。。
for (Path path: fileLink.getLocations()) {
        if (path.equals(currentPath)) continue;
        try {
          in = fs.open(path, bufferSize);
          in.seek(pos);
          assert(in.getPos() == pos) : "Link unable to seek to the right position=" + pos;
          if (LOG.isTraceEnabled()) {
            if (currentPath != null) {
              LOG.debug("link open path=" + path);
            } else {
              LOG.trace("link switch from path=" + currentPath + " to path=" + path);
            }
          }
          currentPath = path;
          return(in);
        } catch (FileNotFoundException e) {
          // Try another file location
        }
}
恩,这回终于知道它是怎么出来的了,原来是尝试打开了三次,直到找到正确的位置。
StoreFile的文件格式到这里就结束了,有点儿遗憾的是HFileBlockIndex没给大家讲清楚。
补充:经网友"东岸往事"的提醒,有一个地方写错了,在结束一个块之后,会把它所有的BloomFilter全部输出,HFileBlockIndex的话,如果满了默认的128*1024个就输出二级索引。
具体的的内容在后面说查询的时候会说,下面先交代一下:
通过看继承InlineBlockWriter的类,发现了以下信息
1、BlockIndexWriter 不是关闭的情况下,没有超过默认值128*1024是不会输出的,每128*1024个HFileBlock 1个二级索引。
HFileBlockIndex包括2层,如果是MetaBlock的HFileBlock是1层。
二级索引 curInlineChunk 在结束了一个块之后添加一个索引的key(上一个块的firstKey和这个块的firstKey的中间值)。
byte[] indexKey = comparator.calcIndexKey(lastKeyOfPreviousBlock, firstKeyInBlock);
curInlineChunk.add(firstKey, blockOffset, blockDataSize);
一级索引 rootChunk 输出一次二级索引之后添加每个HFileBlock的第一个key,这样子其实二级索引里面是包括是一级索引的所有key的。
firstKey = curInlineChunk.getBlockKey(0);
rootChunk.add(firstKey, offset, onDiskSize, totalNumEntries);
2、CompoundBloomFilterWriter也就是Bloom Filter,在数据不为空的时候,就会输出。
对于HFileV2的正确的图,应该是下面这个,但是上面的那个图看起来好看一点,就保留了。


