XAMPP目录结构
重要的文件和目录
文件/目录 用途
| /opt/lampp/bin/ | XAMPP 命令库。例如 /opt/lampp/bin/mysql 可执行 MySQL 监视器。 |
| /opt/lampp/htdocs/ | Apache 文档根目录。 |
| /opt/lampp/etc/httpd.conf | Apache 配制文件。 |
| /opt/lampp/etc/my.cnf | MySQL 配制文件。 |
| /opt/lampp/etc/php.ini | PHP 配制文件。 |
| /opt/lampp/etc/proftpd.conf | ProFTPD 配制文件。(从 0.9.5 版开始) |
| /opt/lampp/phpmyadmin/config.inc.php | phpMyAdmin 配制文件。 |
----------------------------------------------------------------------
阿里云Linux环境下,进入后,在opt目录上传xampp安装包: xampp-linux-x64-5.6.3-0-installer.run
上传后可以在ftp工具中修改为755权限
Linux下XAMPP环境安装
官方教程:https://www.apachefriends.org/faq_linux.html
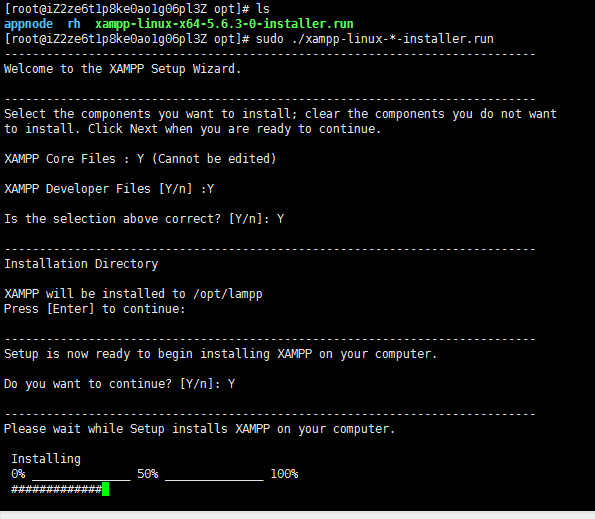
安装XAMPP
Choose your flavor for your linux OS, the 32-bit or 64-bit version.
Change the permissions to the installer
chmod 755 xampp-linux-*-installer.run
Run the installer
sudo ./xampp-linux-*-installer.run
That's all. XAMPP is now installed below the /opt/lampp directory.
启动XAMPP:
To start XAMPP simply call this command:
sudo /opt/lampp/lampp start
You should now see something like this on your screen:
Starting XAMPP 1.8.2...
LAMPP: Starting Apache...
LAMPP: Starting MySQL...
LAMPP started.
Ready. Apache and MySQL are running.
If you get any error messages visit our community pages for help.
Also, note that there is a graphical tool that you can use to manage your servers easily. You can start this tool with the following commands:
cd /opt/lampp
sudo ./manager-linux.run (or manager-linux-x64.run)
停止XAMPP:
To stop XAMPP simply call this command:
sudo /opt/lampp/lampp stop
You should now see something like this on your screen:
Stopping XAMPP 1.8.2...
LAMPP: Stopping Apache...
LAMPP: Stopping MySQL...
LAMPP stopped.
If you get any error messages visit our community pages for help.
Also, note that there is a graphical tool that you can use to start/stop your servers easily. You can start this tool with the following commands:
cd /opt/lampp
sudo ./manager-linux.run (or manager-linux-x64.run)
------------------------------------------------------------
首先,请从www.xampp.org下载最新版XAMPP。然后,将安装文件服知道/opt下并解压。如果你计算机没有/opt目录,清用超级用户身份执行mkdir/opt命令来创建目录。如果计算机没有sudo命令请用su命令并输入超级用户密码来切换到超级用户。
使用以下命令将文件复制到/opt:
$sudo cp xampp-linux-x.x.tar.gz /opt
使用一下命令进入opt/目录并解压缩文件:
$ cd /opt
$ sudo tar zxvf xampp-linux-x.x-x.tar.gz /opt
卸载 XAMPP,只需输入如下命令:sudo rm -rf /opt/lampp
卸载完成。
如果想要普通用户能写htdocs目录,清修改目录权限。
$ sudo chmod -R a+rw /opt/lampp/htdocs
启动或停止xampp:
$ sudo /opt/lampp/lampp start & stop
小技巧:
Linux下的XAMPP图形化面板
$ cd /opt/lampp/share/xampp-control-panel
$ sudo ./xampp-control-panel
XAMPP 命令
安装 XAMPP
tar xvfz xampp-linux-1.6.4.tar.gz -C /opt
启动 XAMPP
/opt/lampp/lampp start
停止 XAMPP
/opt/lampp/lampp stop
重启 XAMPP
/opt/lampp/lampp restart
安全设置
/opt/lampp/lampp security
使用php4
/opt/lampp/lampp php4
使用php5
/opt/lampp/lampp php5
查看php版本
/opt/lampp/lampp phpstatus
只启动 Apache
/opt/lampp/lampp startapache
停止 Apache
/opt/lampp/lampp stopapache
启动 Apache 的 SSL 支持
/opt/lampp/lampp startssl
停止 Apache 的 SSL 支持
/opt/lampp/lampp stopssl
只启动 MySQL 数据库
/opt/lampp/lampp startmysql
停止 MySQL 数据库
/opt/lampp/lampp stopmysql
启动 ProFTPD 服务
器
/opt/lampp/lampp startftp
停止 ProFTPD 服务器
/opt/lampp/lampp stopftp
随系统自动启动
ln -s /opt/lampp/lampp /etc/rc.d/rc3.d/S99lampp
ln -s /opt/lampp/lampp /etc/rc.d/rc4.d/S99lampp
ln -s /opt/lampp/lampp /etc/rc.d/rc5.d/S99lampp
取消随系统自动运行
ln -s /opt/lampp/lampp K01lampp
卸载 XAMPP
rm -rf /opt/lampp
XAMPP 重要的文件和目录
XAMPP 命令库。例如 /opt/lampp/bin/mysql 可执行 MySQL 监视器
/opt/lampp/bin/
Apache 文档根目录
/opt/lampp/htdocs/
Apache 配置文件
/opt/lampp/etc/httpd.conf
MySQL 配置文件
/opt/lampp/etc/my.cnf
PHP 配制文件
/opt/lampp/etc/php.ini
ProFTPD 配制文件。(从 0.9.5 版开始)
/opt/lampp/etc/proftpd.conf
phpMyAdmin 配制文件
/opt/lampp/phpmyadmin/config.inc.php
xmapp 404设置
这样做的好处一个是很友好,另一个是对于你的网站会更安全些,如果没设置,别人在你的网址后随便输入一个路径,会显示404错误,并且会显示你的服务器版本号,服务器配置一目了然,为了避免这种情况,可以设置错误页面。
当出现404错误,即找不到网页时,把访问者导入到一个事先定义好的错误页面。
修改 httpd.conf
找到:
#ErrorDocument 500 "The server made a boo boo."
#ErrorDocument 404 /missing.html
#ErrorDocument 404 "/cgi-bin/missing_handler.pl"
#ErrorDocument 402 xxxxxxx
httpd.conf中的这一部分,#ErrorDocument 404 /missing.html 是显示错误页信息的,去掉前面的#
修改为 ErrorDocument 404 /error.htm,
其中error.htm为站点根目录下和error目录下的一个错误文件,需要你自己建立。当发生404错误时,进入error.htm页面,可以提示网页没有找到。这样就不可能看到你的服务器软件信息了。也可以设置其它的错误导向的页面,具体http响应错误编号请查阅相关资料。
重新启动apache,如果没意外,此时已经安装成功,把静态页面放到站点根目录和error目录下,看能不能成功解析。随便输入一个:http://localhost/abcd.htm,看是不是导向你设置的404错误,即error.htm错误页面.!
百度到这个方法,配置好重启apache之后发现不行。。。
找了半天看到Include "conf/extra/httpd-multilang-errordoc.conf"这种类似的语句。
在conf/extra/httpd-multilang-errordoc.conf文件里面发现了
ErrorDocument 400 /error/HTTP_BAD_REQUEST.html.var
ErrorDocument 401 /error/HTTP_UNAUTHORIZED.html.var
ErrorDocument 403 /error/HTTP_FORBIDDEN.html.var
ErrorDocument 404 /404error.html
ErrorDocument 405 /error/HTTP_METHOD_NOT_ALLOWED.html.var
ErrorDocument 408 /error/HTTP_REQUEST_TIME_OUT.html.var
ErrorDocument 410 /error/HTTP_GONE.html.var
ErrorDocument 411 /error/HTTP_LENGTH_REQUIRED.html.var
ErrorDocument 412 /error/HTTP_PRECONDITION_FAILED.html.var
ErrorDocument 413 /error/HTTP_REQUEST_ENTITY_TOO_LARGE.html.var
ErrorDocument 414 /error/HTTP_REQUEST_URI_TOO_LARGE.html.var
ErrorDocument 415 /error/HTTP_UNSUPPORTED_MEDIA_TYPE.html.var
ErrorDocument 500 /error/HTTP_INTERNAL_SERVER_ERROR.html.var
ErrorDocument 501 /error/HTTP_NOT_IMPLEMENTED.html.var
ErrorDocument 502 /error/HTTP_BAD_GATEWAY.html.var
ErrorDocument 503 /error/HTTP_SERVICE_UNAVAILABLE.html.var
ErrorDocument 506 /error/HTTP_VARIANT_ALSO_VARIES.html.var
原来是被覆盖掉了
在这里改掉之后重启apache之后就OK了。。。。
我安装的是xampp集成环境
今天有人问小编如何设置404页面,小编就问他使用的什么web服务器,原来是使用的xampp集成环境,那不就等于为Apache配置一个404页面,那还不简单,于是乎打开Apache的配置文件,找到“#ErrorDocument 404 /missing.html”,去了#号,在网站根目录下建立一个missing.html页面,然后重启Apache,本来期待成功后显摆一下,没想到意外的情况发生了,居然没有生效,以前这么配置明明就可以了,为什么现在不行,改的配置文件不对?还是其他什么问题?经过一系列的测试,终于定位到了问题所在,原来在配置404的指令“#ErrorDocument 404 /missing.html”下面有这样一段指令“Include conf/extra/httpd-multilang-errordoc.conf”,该指令引入httpd-multilang-errordoc.conf这个配置文件,看名称好像是关于错误信息的文档,是不是跟配置404不生效有关系?打开一看,除了404之外,还定义400,403,500等错误信息,八成就是因为这个配置文件的指令覆盖了404配置所致,于是打开它定义的404文档,果不其然,既然找到了原因,解决办法就简单很多了。
方法一:
使用#号注释了Include conf/extra/httpd-multilang-errordoc.conf,使之无法生效,当然其他的错误信息的配置也无法生效了。
方法二:
把ErrorDocument 404 /missing.html指令书写在Include conf/extra/httpd-multilang-errordoc.conf之后,这样后书写的指令会覆盖前面的配置。
方法三:
使用.htaccess配置文件,在里面书写ErrorDocument 404 /missing.html。需要开启mod_rewrite组件。
虽然三种方法都能够解决问题,但是前两个方法均在Apache的配置文件中操作,影响了基于Apache提供服务的所有站点,第三种方法仅影响添加该配置文件的站点,至于选择哪种方法,可以根据自身情况进行选择。
如何联系我:【万里虎】www.bravetiger.cn 【QQ】3396726884 (咨询问题100元起,帮助解决问题500元起) 【博客】http://www.cnblogs.com/kenshinobiy/