1 工作在ISO 七层 根据http协议(或者工作在ISO四层 根据tcp协议) 提供web服务的负载均衡调度器
|
1
2
3
4
5
6
7
8
9
10
11
12
13
|
负载均衡调度器分类
工作在四层:
# lvs
工作在七层:
# nginx (web,http reverse proxy,cache)
# haproxy (http reverse proxy,tcp proxy)
# tcp: 实现MySQL的读写中读的负载均衡
# ats (apache traffic server)
# perlbal
# pound
# squid
# varnish
以上程序都可以实现服务的向外拓展;
|
haproxy特性
haproxy 当前版本为1.3 1.4,下面我们介绍1.4版本的特性
|
1
2
3
4
5
6
7
8
9
10
11
12
|
# 客户端侧的长连接(client-side keep-alive)
# TCP加速(TCP speedups)
# 响应池(response buffering)
# RDP协议
# 基于源的粘性(source-based stickiness)
# 更好的统计数据接口(a much better stats interfaces)
# 更详细的健康状态检测机制(more verbose health checks)
# 基于流量的健康评估机制(traffic-based health)
# 支持HTTP认证
# 服务器管理命令行接口(server management from the CLI)
# 基于ACL的持久性(ACL-based persistence)
# 日志分析器
|
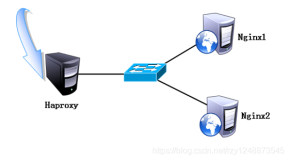
官网站点:haproxy.1wt.eu
haproxy 架构图

haproxy.cfg 配置文件详解
|
1
2
3
4
|
安装
# yum inistall haproxy -y
配置文件路径
/etc/haproxy/haproxy
.cfg
|
|
1
2
3
4
5
6
7
8
9
10
11
12
13
14
15
16
17
18
19
20
21
22
23
|
(1)配置由两部分组成
#global settings: 对haproxy进程自身属性的设定----------全局设定段
#proxies: 对代理的设定 -----------------代理设定段
defaults
frontend
backend
listen
其中defaults为proxies提供默认属性,frontend接受客户端的请求,backend连接后端的上游服务器(类似于nginx的upstream),listen是特定的frontend与backend的组合
(2)定义一个完整的代理的方式:
frontend
backend
listen
(3)defaults段分析
# option httpclose:使用短连接
# option redispath:使用cookie保持会话,如果后端的server宕机,则使用redispath 重定向另一个路径继续保持会话;
# option http-server-close :当keep-alive超时时,使用该选项在服务器上关闭会话
# timeout connect :haproxy转发到后边upstream server 时等待的时长
# timeout client :客户端非活动状态的超时时长
# timeout server : haproxy和后边的服务器段保持一个会话,当后台服务器down掉后,haproxy等待的超时时间
# timeout-keep-alive:定义保持连接模式的超时时长
# timeout-check : 建立状态检测时间的超时时间
# maxconn :每一个server最大并发连接数
|
负载均衡调度方法
|
1
|
格式:balance roundrobin| static-rr| leastconn |
source
| uri | uri_param | hdr(<name>) | rdp-cookie(name)
|
|
1
2
3
4
5
6
7
8
9
|
调度方法解析
#roundrobin :属于加权轮询 (动态) 支持服务器活动时修改其权重,服务器下线后重新上线时支持慢启动
#static-rr : 属于加权轮询(静态)不支持服务器活动时修改,需要重启服务才能生效
# 老服务器重新上线上时,立刻会收到大批量的请求
#leastconn :支持动态修改权重,慢启动
#source :默认为(静态)方法,hash/ 源ip 取模算法,支持hash-type调整为动态
#uri :默认为(静态)方法,hash/weight 取模算法,支持hash-type来调整
#url-params:默认为(静态)方法,hash/wgith 算法,支持hash-type调整
#hdr (<name>):默认为静态方法, 先对<name>做hash计算然后 hash/weight 计算,支持hash-type调整
|
|
1
2
3
4
5
6
7
8
9
10
11
12
|
调度方法的使用总结
#1、调度众多的MySQL从服务器,用什么调度方法?
leastconn
#2、调度web图片服务器组,用什么调度方法?
roundrobin
#3、调度web图片服务器组,用什么调度方法?
source
或者 cookie
#4、调度web缓存服务器组,用什么调度方法?
uri
hash
-
type
:
map-based (默认的静态的
hash
表)
consistent(动态的一致性
hash
) ---------在后端的cache服务器上使用,否则会导致服务器的加入或者退出时 服务器群瘫痪
|
haproxy 的工作模式 (使用mode参数)
|
1
2
3
4
5
6
7
|
http :http协议 --------haproxy的价值体现于此
# 对应用层数据做深入分析,因此支持7层的过滤、处理、转换等机制;
tcp :haproxy在客户端和upstream server之间建立一个全双工的连接
# 不会对应用层协议做任何检查
# SSL 、MySQL、SSL等都应该使用此模式;
# 默认模式!
|
指定haproxy日志
|
1
2
3
4
5
6
7
8
9
10
11
12
13
14
15
16
17
18
|
# log global : 使用全局配置中定义的日志服务器;
# log <address> <facility> [<level> [<minlevel>]]
# capture request header <HEADER> len <LENGTH>
# capture resopense header <HEADER> len <LENGTH>
实例:在frontend中定义一个日志
(1)编辑rsyslog.conf
#vim /etc/rsyslog.conf 在日志服务器上先定义一个日志
local3.*
/var/log/hawebsrv
.log
#service rsyslog restart
(2)编辑haproxy.cfg
#vim /etc/haproxy/haproxy.cfg
frontend websrv
log 127.0.0.1 local3
bind *:80
default_backend webservers
#serivce haproxy reload
(3)haproxy服务器测试
#tail /var/log/hawebsrv.log
|
haproxy中的ACL
|
1
2
3
4
5
6
|
格式:acl <aclname> <criterion> [flags] [oprator] <value>
value: 支持整数或者整数范围
支持字符串
支持正则表达式
支持ip地址和网络地址
|
|
1
2
3
4
5
6
7
|
ACL例子
# acl url_static path_beg /static /images /img /css
# acl url_static path_end .gif .png .jpg .css .js
# acl host_www hdr_beg(host) -i www
# acl host_static hdr_beg(host) -i img. video. download. ftp.
# use_backend static if host_static or host_www or url_static
# use_backend www if host_www
|
|
1
2
3
|
实现访问控制
http-request:7层过滤 (借助于定义好的acl实现)
tcp-request: 4层过滤 (借助于定义好的acl实现)
|
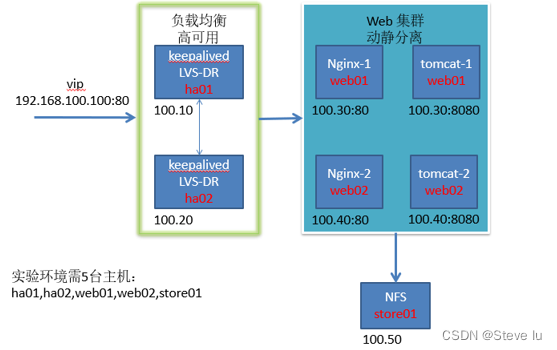
haproxy 动静分离的实现
架构图

1、 环境配置
|
1
2
3
4
5
6
7
8
9
10
11
12
13
14
15
16
17
18
19
20
21
22
23
24
|
haproxy服务器配置
外网网卡
# ifconfig eth0 172.16.13.2/16 up
# route add default gw 172.16.0.1
内网网卡
# ifconfig eth1 192.168.20.1/24 up
两台上游服务器配置
server1 配置
# ifconfig eth0 192.168.20.11/24
# route add default gw 192.168.20.1
提供页面
# vim /var/www/html/index.html
<h1>node1.linux.com<
/h1
>
# service httpd start
server2配置
# ifconfig eth0 192.168.20.12/24 up
# route add default gw 192.168.20.1
提供页面
# vim /var/www/html/index.html
<h1>node2.linux.com<h1>
# service httpd start
|
2、 安装配置haproxy
|
1
2
3
4
5
6
7
8
|
# yum install haproxy -y 安装haproxy
# vim /etc/haproxy/haproxy.cfg 编辑配置文件自定义一个backend和frontend,注释原有的内容
frontend websrv *:80
default_backend webservers
backend webservers
balance roundrobin
server node1 192.168.20.11:80 check
server node2 192.168.20.12:80 check
|
3、 客户端测试


此时说明 haproxy服务器将客户的请求以roundrobin算法 反向代理给后端的服务器!
4、启用全局日志功能
|
1
2
3
4
5
6
7
8
9
10
11
12
13
14
15
16
17
18
|
(一)编辑rsyslog.conf
#vim /etc/rsyslog.conf 开启如下行
# Provides UDP syslog reception
$ModLoad imudp
$UDPServerRun 514
# Provides TCP syslog reception
$ModLoad imtcp
$InputTCPServerRun 514
添加日志
local2.*
/var/log/haproxy
.log
#service rsyslog restart 重启服务
(二)编辑haproxy.cfg
# vim /etc/haproxy/haproxy.cfg 开启如下行
log 127.0.0.1 local2
# service haproxy restart 重启服务
(三)日志查看
#tail -f /var/log/haproxy.log
|

接下来让我们来拓展haproxy的功能
5 、调度算法 uri的实现
|
1
2
3
4
5
6
7
8
9
|
1)后端服务器 server1 与 server2 同时创建多个页面
server1
#cd /var/www/html/
# for i in {1..10}; do echo "<h1>node1.test$i</h1>" > test$i.html; done
server2 方法同 server1
2)更改haproxy.cfg的配置文件中的调度算法
balance uri
3)客户端测试
# http://172.16.13.2/test1.html
|

基于172.16.13.2/test1.html 该uri,haproxy服务器反向代理至后台服务器至同一台服务器server2
6、基于cookie实现会话绑定
|
1
2
3
4
5
6
7
8
9
10
11
12
|
1)编辑haproxy.cfg配置文件
#vim /etc/haproxy/haproxy.cfg 内容如下
frontend websrv
bind *:80
default_backend webservers
backend webservers
cookie node insert nocache
balance roundrobin
server node1 192.168.20.11:80 check cookie node1
server node2 192.168.20.12:80 check cookie node2
2)客户端测试
#http://172.16.13.2/test1.html
|

上图可见,基于cookie实现了客户端的请求与后端服务器server2的会话绑定。
7、haproxy管理界面---stats enable
|
1
2
3
4
5
6
7
8
|
# vim /etc/haproxy/haproxy.cfg 增加一个listen段,如下所示
listen statspage
bind *:8009 -------侦听端口
stats
enable
-------开启stats
stats hide-version -----隐藏版本
stats auth admin:admin ----登录验证信息
stats admin
if
TRUE ----实现在管理界面上对所有backend服务器管理
stats uri
/admin
?stats ----登录的uri路径
|

8、haproxy动静分离的实现
|
1
2
3
4
5
6
7
8
9
10
11
12
13
14
15
16
17
18
19
20
21
22
23
24
25
26
27
28
29
|
1)server2 服务器安装php
#yum -y install php php-mysql
提供php动态页面
#vim /var/www/html/index.php
<h1>node2.linux.com<
/h1
>
<?php
phpinfo();
?>
2)重新配置haproxy配置文件
#vim /etc/haproxy/haproxy.cfg 定义frontend 和 backend
frontend websrvs
bind *:80
acl url_static path_beg -i
/static
/images
/javascript
/stylesheets
acl url_static path_end -i .jpg .gif .png .css .js .html
acl host_static hdr_beg(host) -i img. video. download.
ftp
. imags. videos.
acl url_php path_end -i .php
use_backend static
if
url_static or host_static
use_backend dynamic
if
url_php
default_backend dynamic
backend static
balance roundrobin
server node1 192.168.20.11:80 check maxconn 30000
backend dynamic
balance roundrobin
server node2 192.168.20.12:80 check maxconn 1000
# service haproxy restart
3) 客户端测试 动静分离
|


如图所示:静态页面由server1服务器显示,动态页面由server2 显示。
本文转自 dengaosky 51CTO博客,原文链接:http://blog.51cto.com/dengaosky/2050317,如需转载请自行联系原作者