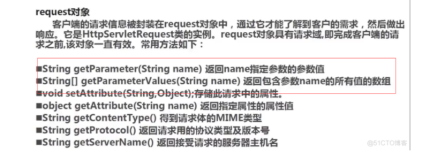
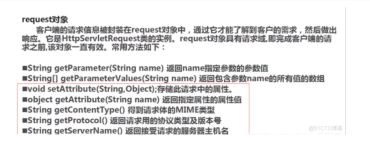
1 访问Request对象
1.1 访问请求参数
(1)在index.jsp中添加一个链接到deal.jsp页面的超链接
|
1
|
<a href=
"deal.jsp?id=1&user="
>处理页</a>
|
(2)在deal.jsp页面中获取请求参数id、user和pwd的值并输出
|
1
2
3
4
5
6
7
8
9
10
11
12
13
14
15
16
17
|
<%@ page language=
"java"
contentType=
"text/html; charset=GB18030"
pageEncoding=
"utf-8"
%>
<%
String
id=request.getParameter(
"id"
);
//获取id参数的值
String
user=request.getParameter(
"user"
);
//获取user参数的值
String
pwd=request.getParameter(
"pwd"
);
//获取pwd参数值
%>
<html>
<head>
<meta http-equiv=
"Content-Type"
content=
"text/html; charset=utf-8"
>
<title>处理页</title>
</head>
<body>
id参数的值为:<%=id %><br>
user参数的值为:<%=user %><br>
pwd参数的值为:<%=pwd %>
</body>
</html>
|
输出结果:
id参数的值为:1
user参数的值为:
pwd参数的值为:null
结论:request的getParameter()方法传递参数时,若参数不存在,返回null,若参数存在但未赋值,返回值为""。
典型应用:
|
1
|
message=request.getParameter(
"id"
)!=
null
?request.getParameter(
"id"
):
""
;
|
1.2 在作用域中管理属性
采用request对象的request.setAttribute(String name,Object object)方法和request.getAttribute(String name)方法来实现。
(1)index.jsp页面:
|
1
2
3
4
5
6
7
8
9
10
11
12
13
14
15
16
17
18
19
|
<%@ page language=
"java"
contentType=
"text/html; charset=utf-8"
pageEncoding=
"utf-8"
%>
<html>
<head>
<meta http-equiv=
"Content-Type"
content=
"text/html; charset=utf-8"
>
<title>Insert title here</title>
</head>
<body>
<%
try
{
//捕获异常信息
int
money=
100
;
int
number=
0
;
request.setAttribute(
"result"
,money/number);
//保存执行结果
}
catch
(Exception e){
request.setAttribute(
"result"
,
"很抱歉,页面产生错误!"
);
//保存错误提示信息
}
%>
<jsp:forward page=
"deal.jsp"
/>
</body>
</html>
|
(2)deal.jsp页面
|
1
2
3
4
5
6
7
8
9
10
11
|
<%@ page language=
"java"
contentType=
"text/html; charset=utf-8"
pageEncoding=
"utf-8"
%>
<html>
<head>
<meta http-equiv=
"Content-Type"
content=
"text/html; charset=utf-8"
>
<title>结果页</title>
</head>
<body>
<%
String
message=request.getAttribute(
"result"
).toString(); %>
<%=message %>
</body>
</html>
|
输出结果:
很抱歉,页面产生错误!
1.3 获取cookie
通过cookie的 GetCookies()方法即可获取到所有的cookied对象的集合;通过cookie对象的getName()方法可以获取到指定名称的cookie;通过getValue()方法即可获得cookie对象的值。将一个cookie对象发送到客户端,使用request对象的addCookie()方法。
备注:若显示“Cookie无法解析为类型”错误,只需要在构建路径”--“配置构建路径”。点击“库”选项卡,单击右边的添加外部jar,将%Tomcat_Home%/lib/servlet-aip.jar,要将其导入到项目的构建路径中
(1)index.jsp页面
|
1
2
3
4
5
6
7
8
9
10
11
12
13
14
15
16
17
18
19
20
21
22
23
24
25
26
27
28
29
30
31
32
33
34
35
36
37
|
<%@ page language=
"java"
contentType=
"text/html; charset=utf-8"
pageEncoding=
"utf-8"
%>
<%@ page
import
=
"java.net.URLDecoder"
%>
<html>
<head>
<meta http-equiv=
"Content-Type"
content=
"text/html; charset=utf-8"
>
<title>通过cookie保存并读取用户登录信息</title>
</head>
<body>
<%
Cookie[] cookies = request.getCookies();
//从request中获得Cookie对象的集合
String
user =
""
;
//登录用户
String
date =
""
;
//注册的时间
if
(cookies !=
null
) {
for
(
int
i =
0
; i < cookies.length; i++) {
//遍历cookie对象的集合
if
(cookies[i].getName().equals(
"mrCookie"
)) {
//如果cookie对象的名称为mrCookie
user = URLDecoder.decode(cookies[i].getValue().split(
"#"
)[
0
],
"UTF-8"
);
//获取用户名
date = cookies[i].getValue().split(
"#"
)[
1
];
//获取注册时间
}
}
}
if
(
""
.equals(user) &&
""
.equals(date)) {
//如果没有注册
%>
游客您好,欢迎您初次光临!
<form action=
"deal.jsp"
method=
"post"
>
请输入姓名:<input name=
"user"
type=
"text"
value=
""
>
<input type=
"submit"
value=
"确定"
>
</form>
<%
}
else
{
//已经注册
%>
欢迎[<b><%=user %></b>]再次光临<br>
您注册的时间是:<%=date %>
<%
}
%>
</body>
</html>
|
(2)deal.jsp页面
|
1
2
3
4
5
6
7
8
9
10
11
12
13
14
15
16
17
18
19
|
<%@ page language=
"java"
contentType=
"text/html; charset=utf-8"
pageEncoding=
"utf-8"
%>
<%@ page
import
=
"java.net.URLEncoder"
%>
<html>
<head>
<meta http-equiv=
"Content-Type"
content=
"text/html; charset=utf-8"
>
<title>写入cookie</title>
<script type=
"text/javascript"
>window.location.href=
"index.jsp"
;</script>
</head>
<body>
<%
request.setCharacterEncoding(
"utf-8"
);
//设置请求编码
response.setCharacterEncoding(
"utf-8"
);
//设置相应编码
String
user=URLEncoder.encode(request.getParameter(
"user"
),
"utf-8"
);
//获取用户名
Cookie cookie =
new
Cookie(
"mrCookie"
, user+
"#"
+
new
java.util.
Date
().toLocaleString());
cookie.setMaxAge(
60
*
60
*
24
*
30
);
//设置cookie有效期30天
response.addCookie(cookie);
//保存cookie
%>
</body>
</html>
|
备注:
URLEncoder.encode(string)方法
static String |
encode(String s)已过时。结果字符串可能因平台默认编码不同而不同。因此,改用 encode(String,String) 方法指定编码。 |
static String |
encode(String s, String enc)使用指定的编码机制将字符串转换为 application/x-www-form-urlencoded 格式。 |
1.4 获取客户端信息
|
1
2
3
4
5
6
7
8
9
10
11
12
13
14
15
16
17
18
19
20
21
22
|
<%@ page language=
"java"
contentType=
"text/html; charset=UTF-8"
pageEncoding=
"UTF-8"
%>
<html>
<head>
<meta http-equiv=
"Content-Type"
content=
"text/html; charset=UTF-8"
>
<title>使用request对象的相关方法获取客户端信息</title>
</head>
<body>
<br>客户提交信息的方式:<%=request.getMethod()%>
<br>使用的协议:<%=request.getProtocol()%>
<br>获取发出请求字符串的客户端地址:<%=request.getRequestURI()%>
<br>获取发出请求字符串的客户端地址:<%=request.getRequestURL()%>
<br>获取提交数据的客户端IP地址:<%=request.getRemoteAddr()%>
<br>获取服务器端口号:<%=request.getServerPort()%>
<br>获取服务器的名称:<%=request.getServerName()%>
<br>获取客户端的主机名:<%=request.getRemoteHost()%>
<br>获取客户端所请求的脚本文件的文件路径:<%=request.getServletPath()%>
<br>获得Http协议定义的文件头信息Host的值:<%=request.getHeader(
"host"
)%>
<br>获得Http协议定义的文件头信息User-Agent的值:<%=request.getHeader(
"user-agent"
)%>
<br>获得Http协议定义的文件头信息accept-language的值:<%=request.getHeader(
"accept-language"
)%>
<br>获得请求文件的绝对路径:<%=request.getRealPath(
"index.jsp"
)%>
</body>
</html>
|
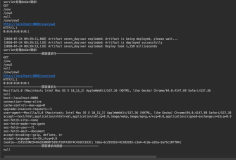
输出结果:
客户提交信息的方式:GET
使用的协议:HTTP/1.1
获取发出请求字符串的客户端地址:/6.05/
获取发出请求字符串的客户端地址:http://xjuthink:8080/6.05/
获取提交数据的客户端IP地址:fe80:0:0:0:b878:6ec5:c777:706d
获取服务器端口号:8080
获取服务器的名称:xjuthink
获取客户端的主机名:fe80:0:0:0:b878:6ec5:c777:706d
获取客户端所请求的脚本文件的文件路径:/index.jsp
获得Http协议定义的文件头信息Host的值:xjuthink:8080
获得Http协议定义的文件头信息User-Agent的值:Mozilla/5.0 (Windows NT 6.1; WOW64; Trident/7.0; rv:11.0) like Gecko
获得Http协议定义的文件头信息accept-language的值:zh-CN
获得请求文件的绝对路径:D:\MyEclipse 10\.metadata\.me_tcat\webapps\6.05\index.jsp
1.5 解决中文乱码
(1)获取请求参数时乱码
index.jsp页面:
|
1
|
<a href=
"show.jsp?name=张三&sex=男"
>解决中文乱码</a>
|
show.jsp页面:
|
1
2
|
name参数的值为:<%=
new
String
(request.getParameter(
"name"
).getBytes(
"iso-8859-1"
),
"UTF-8"
) %><br>
sex参数的值为:<%=
new
String
(request.getParameter(
"sex"
).getBytes(
"iso-8859-1"
),
"UTF-8"
) %>
|
输出结果为:
name参数的值为:张三
sex参数的值为:男
(2)获取表单提交信息乱码
|
1
|
request.setCharacterEncoding(
"utf-8"
);
//设置请求编码
|