之前看了网上很多篇Linux静默安装Oracle的文章,但安装测试时老觉得有问题,后来直接找来Oracle官方英文文档并仔细阅读研究rsp文件的内容说明,经过自己在虚拟机中的安装测试,使用RedHat 6.5(内核版本:2.6.32-431.el6.x86_64)上静默安装Oracle 11gR2(版本:11.2.0.3),整理出了本文,主要包括了环境要求与准备、静默安装Oracle软件与监听、静默安装Oracle数据库、安装完成后检查、设置Oracle开机自动启动等部分。
一、 环境要求与准备
1、硬件要求
(1)内存
Minimum: 1 GB of RAM
Recommended: 2 GB of RAM or more
To determine the RAM size, enter the following command:
# grep MemTotal /proc/meminfo
(2)SWAP
Available RAM Swap Space Required
Between 1 GB and 2 GB 1.5 ——times the size of the RAM
Between 2 GB and 16 GB ——Equal to the size of the RAM
More than 16 GB ——16 GB
# grep SwapTotal /proc/meminfo
(3)ASM
Automatic Memory Management feature requires more shared memory ( /dev/shm) and file descriptors
#df -h /dev/shm/
Note: MEMORY_MAX_TARGET and MEMORY_TARGET cannot be used when LOCK_SGA is enabled or with HugePages on Linux.
(4)磁盘空间
At least 1 GB of disk space in the /tmp directory
Enterprise Edition ——At least 4.7 GB for Software Files and 1.7 GB for Data Files
Standard Edition ——At least 4.6 GB for Software Files and 1.5 GB for Data Files
2、软件要求
(1)操作系统要求
■ Asianux Server 3 SP2
■ Asianux Server 4 SP3
■ Oracle Linux 4 Update 7
■ Oracle Linux 5 Update 2 (with Red Hat Compatible Kernel)
■ Oracle Linux 5 Update 5
■ Oracle Linux 6
■ Oracle Linux 6 (with Red Hat Compatible Kernel)
■ Oracle Linux 7
■ Oracle Linux 7 (with the Red Hat Compatible Kernel)
■ Red Hat Enterprise Linux 4 Update 7
■ Red Hat Enterprise Linux 5 Update 2
■ Red Hat Enterprise Linux 6
■ Red Hat Enterprise Linux 7
■ SUSE Linux Enterprise Server 10 SP2
■ SUSE Linux Enterprise Server 11
(2)内核要求
■On Red Hat Enterprise Linux 5 Update 5
2.6.18 or later
■On Red Hat Enterprise Linux 6
2.6.32-71.el6.x86_64 or later
■ On Red Hat Enterprise Linux 7
3.10.0-54.0.1.el7.x86_64 or later
(3)依赖包要求
Note: Starting with Oracle Database 11g Release 2 (11.2.0.2), all the 32-bit packages, except for gcc-32bit-4.3 , listed in the following table are no longer required for installing a database on Linux x86-64. Only the 64-bit packages are required. However, for any Oracle Database 11g release before 11.2.0.2, both the 32-bit and 64-bit packages listed in the following table are required.
The following or later version of packages for Oracle Linux 6, Red Hat Enterprise Linux 6, and Asianux Server 4 must be installed:
binutils-2.20.51.0.2-5.11.el6 (x86_64)
compat-libcap1-1.10-1 (x86_64)
compat-libstdc++-33-3.2.3-69.el6 (x86_64)
compat-libstdc++-33-3.2.3-69.el6.i686
gcc-4.4.4-13.el6 (x86_64)
gcc-c++-4.4.4-13.el6 (x86_64)
glibc-2.12-1.7.el6 (i686)
glibc-2.12-1.7.el6 (x86_64)
glibc-devel-2.12-1.7.el6 (x86_64)
glibc-devel-2.12-1.7.el6.i686
ksh
libgcc-4.4.4-13.el6 (i686)
libgcc-4.4.4-13.el6 (x86_64)
libstdc++-4.4.4-13.el6 (x86_64)
libstdc++-4.4.4-13.el6.i686
libstdc++-devel-4.4.4-13.el6 (x86_64)
libstdc++-devel-4.4.4-13.el6.i686
libaio-0.3.107-10.el6 (x86_64)
libaio-0.3.107-10.el6.i686
libaio-devel-0.3.107-10.el6 (x86_64)
libaio-devel-0.3.107-10.el6.i686
make-3.81-19.el6
sysstat-9.0.4-11.el6 (x86_64)
(4)ODBC要求
On Oracle Linux 6, Red Hat Enterprise Linux 6:
unixODBC-2.2.14-11.el6 (x86_64) or later
unixODBC-2.2.14-11.el6.i686 or later
unixODBC-devel-2.2.14-11.el6 (x86_64) or later
unixODBC-devel-2.2.14-11.el6.i686 or later
3、用户和组要求
The following local operating system groups and users are required if you are installing Oracle Database:
■ The Oracle Inventory group (typically, oinstall )
■ The OSDBA group (typically, dba )
■ The Oracle software owner (typically, oracle )
■ The OSOPER group (optional. Typically, oper )
# grep dba /etc/group
# id oracle
#groupadd dba
#groupadd oinstall
If the oracle user exists:
# /usr/sbin/usermod -g oinstall -G dba oracle
If the oracle user does not exist:
# /usr/sbin/useradd -g oinstall -G dba oracle
set the password:
# passwd oracle
4、内核参数要求
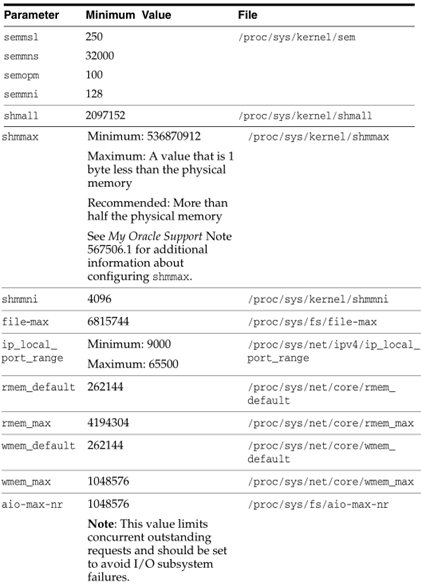
Note: If the current value of any parameter is higher than the value listed in this table, then do not change the value of that parameter.本文原始出处:江健龙的技术博客http://jiangjianlong.blog.51cto.com/3735273/1832986
修改方法:
create or edit the /etc/sysctl.conf file, and add or edit lines similar to the following:
fs.aio-max-nr = 1048576
fs.file-max = 6815744
kernel.sem = 250 32000 100 128
net.ipv4.ip_local_port_range = 9000 65500
net.core.rmem_default = 262144
net.core.rmem_max = 4194304
net.core.wmem_default = 262144
net.core.wmem_max = 1048576
Note: if any of the current values are larger than the
minimum value, then specify the larger value。
使生效:
# /sbin/sysctl -p或reboot
如果运行 #sysctl -p 命令报错
error: "net.bridge.bridge-nf-call-ip6tables" is an unknown key
error: "net.bridge.bridge-nf-call-iptables" is an unknown key
error: "net.bridge.bridge-nf-call-arptables" is an unknown key
则解决方法为执行如下命令:
#modprobe bridge
查看:
# /sbin/sysctl -a
5、资源限制要求
修改好后必须使用Oracle用户登出再登录才生效
$ ulimit -Sn
4096
$ ulimit -Hn
65536
$ ulimit -Su
2047
$ ulimit -Hu
16384
$ ulimit -Ss
10240
$ ulimit -Hs
32768
修改方法:
vi /etc/security/limits.conf
末尾加入以下内容:
oracle soft nproc 2047
oracle hard nproc 16384
oracle soft nofile 4096
oracle hard nofile 65536
oracle hard stack 32768
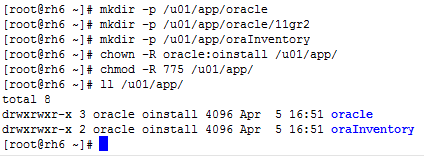
6、创建安装目录
Oracle_Base目录:/u01/app/oracle/
Oracle_Home目录:/u01/app/oracle/11gr2
Oracle清单目录:/u01/app/oracle/oraInventory
7、配置Oracle用户环境变量
vi /home/oracle/.bash_profile
export EDITOR=vi
export ORACLE_SID=orcl
export ORACLE_BASE=/u01/app/oracle
export ORACLE_HOME=$ORACLE_BASE/11gr2
export nls_date_format="yyyy-mm-dd hh24:mi:ss"
export PATH=/u01/app/oracle/11gr2/bin:$PATH
执行命令ource .bash_profile 使配置生效
8、编辑/etc/profile
vi /etc/profile
末尾加入:
if [ $USER = "oracle" ]; then
if [ $SHELL = "/bin/ksh" ]; then
ulimit -p 16384
ulimit -n 65536
else
ulimit -u 16384 -n 65536
fi
fi
本文原始出处:江健龙的技术博客http://jiangjianlong.blog.51cto.com/3735273/1832986
二、 静默安装Oracle 软件和监听
1、静默安装命令
$ /directory_path/runInstaller [-silent] [-noconfig] -responseFile responsefilename
■-noconfig suppresses running the configuration assistants during installation,
and a software-only installation is performed instead.
■ responsefilename is the full path and file name of the installation response
file that you configured.
2、编辑应答文件db_install.rsp
更改以下内容,其他不需要改,标橙色的需注意要结合实际环境更改。Oracle版本:11.2.0.3
oracle.install.option=INSTALL_DB_SWONLY
ORACLE_HOSTNAME=rh6
UNIX_GROUP_NAME=oinstall
SELECTED_LANGUAGES=en,zh_CN
ORACLE_HOME=/u01/app/oracle/11gr2
ORACLE_BASE=/u01/app/oracle/
INVENTORY_LOCATION=/u01/app/oraInventory
oracle.install.db.InstallEdition=EE
oracle.install.db.DBA_GROUP=dba
oracle.install.db.OPER_GROUP=oinstall
DECLINE_SECURITY_UPDATES=true
oracle.install.db.EEOptionsSelection=false
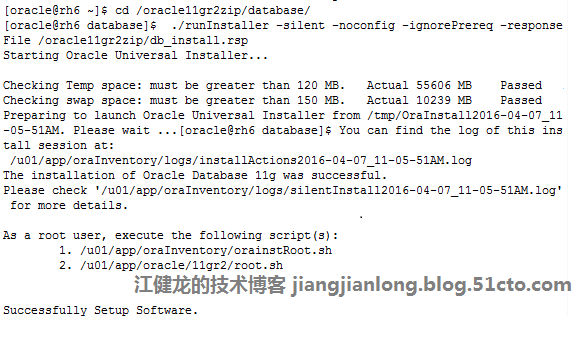
3、执行静默安装Oracle命令
./runInstaller -silent -noconfig -ignorePrereq -responseFile /oracle11gr2zip/db_install.rsp
4、使用root登录执行脚本
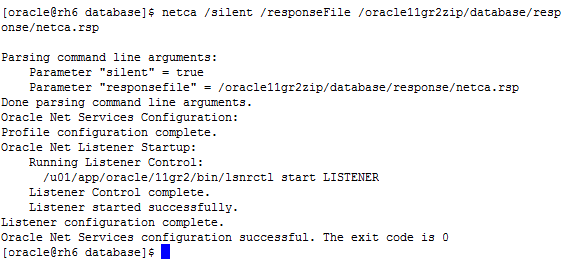
5、执行静默安装监听命令
不需要修改应答文件内容,直接使用介质中的netca.rsp文件
[oracle@rh6 database]$ netca /silent /responseFile /oracle11gr2zip/database/resp
onse/netca.rsp
三、 静默安装Oracle数据库
1、编辑dbca.rsp
更改以下内容,其他不需要改,标橙色的内容需结合自己实际环境修改
RESPONSEFILE_VERSION = "11.2.0"
OPERATION_TYPE = "createDatabase"
GDBNAME = "orcl"
SID = "orcl"
TEMPLATENAME = "General_Purpose.dbc"
SYSPASSWORD = "p@ssw0rd"
SYSTEMPASSWORD = "p@ssw0rd"
EMCONFIGURATION = "LOCAL"
SYSMANPASSWORD = "p@ssw0rd"
DBSNMPPASSWORD = "p@ssw0rd"
STORAGETYPE=FS
CHARACTERSET = "ZHS16GBK"
NATIONALCHARACTERSET= "AL16UTF16"
MEMORYPERCENTAGE = "40"
TOTALMEMORY = "1024"
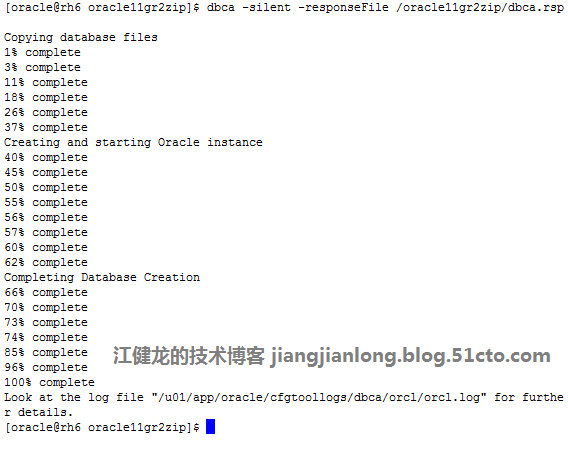
2、执行静默安装数据库命令
$dbca -silent -responseFile /oracle11gr2zip/dbca.rsp
四、安装完成后检查
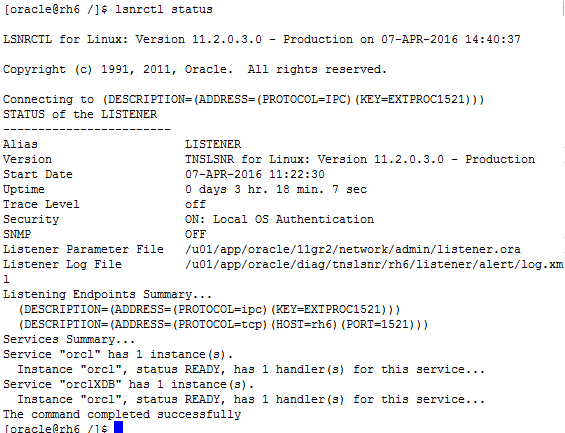
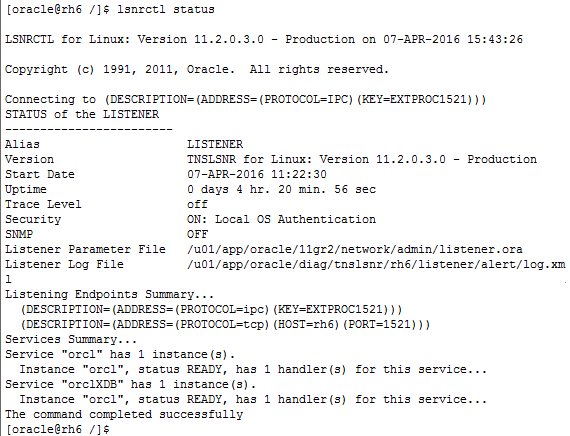
1、检查监听状态
$ lsnrctl status
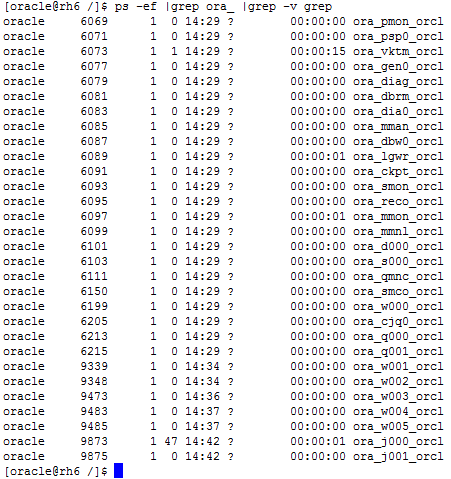
2、检查Oracle进程
$ ps -ef |grep ora_ |grep -v grep
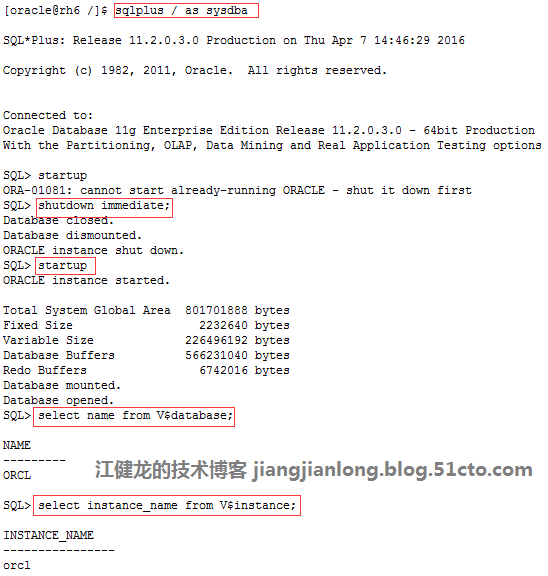
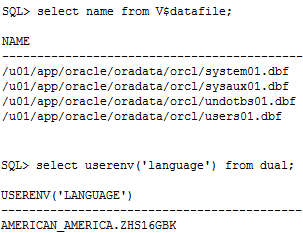
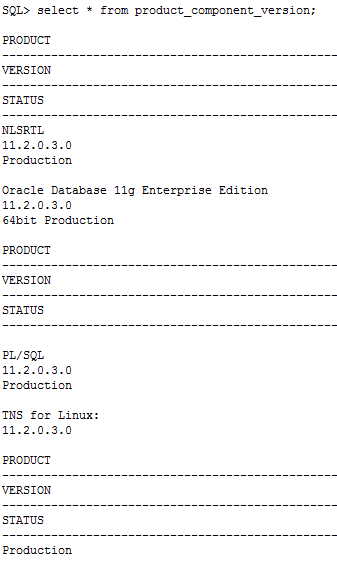
3、登录Oracle数据库并执行常见查询命令
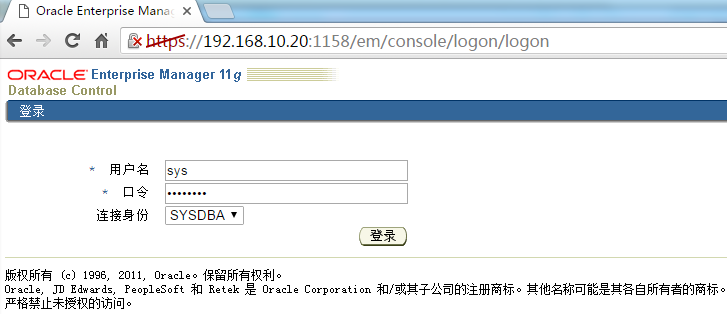
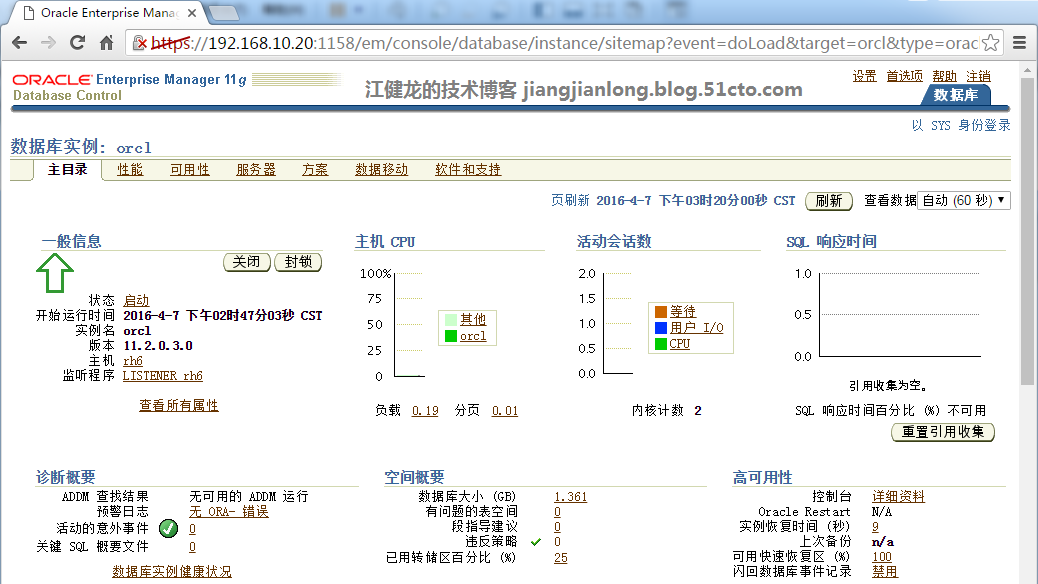
4、登录EM
五、配置Oracle开机自动启动
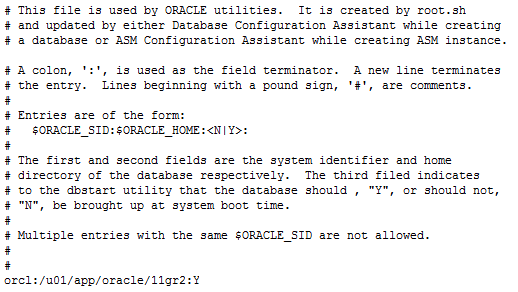
1、以Oracle登录,编辑oratab
vi /etc/oratab,将N改为Y
本文原始出处:江健龙的技术博客 http://jiangjianlong.blog.51cto.com/3735273/1832986
2、 root登录,创建脚本
vi /etc/init.d/oracle,创建oracle文件,内容如下:
#!/bin/sh
# chkconfig: 35 80 10
# description: Oracle auto start-stop script.
#
# Set ORACLE_HOME to be equivalent to the $ORACLE_HOME
# from which you wish to execute dbstart and dbshut;
#
# Set ORACLE_OWNER to the user id of the owner of the
# Oracle database in ORACLE_HOME.
ORACLE_HOME=/u01/app/oracle/11gr2
ORACLE_OWNER=oracle
if [ ! -f $ORACLE_HOME/bin/dbstart ]
then
echo "Oracle startup: cannot start"
exit
fi
case "$1" in
'start')
# Start the Oracle databases:
echo "Starting Oracle Databases ... "
echo "-------------------------------------------------" >> /var/log/oracle
date +" %T %a %D : Starting Oracle Databases as part of system up." >> /var/log/oracle
echo "-------------------------------------------------" >> /var/log/oracle
su - $ORACLE_OWNER -c "$ORACLE_HOME/bin/dbstart" >>/var/log/oracle
echo "Done"
# Start the Listener:
echo "Starting Oracle Listeners ... "
echo "-------------------------------------------------" >> /var/log/oracle
date +" %T %a %D : Starting Oracle Listeners as part of system up." >> /var/log/oracle
echo "-------------------------------------------------" >> /var/log/oracle
su - $ORACLE_OWNER -c "$ORACLE_HOME/bin/lsnrctl start" >>/var/log/oracle
echo "Done."
echo "-------------------------------------------------" >> /var/log/oracle
date +" %T %a %D : Finished." >> /var/log/oracle
echo "-------------------------------------------------" >> /var/log/oracle
touch /var/lock/subsys/oracle
;;
'stop')
# Stop the Oracle Listener:
echo "Stoping Oracle Listeners ... "
echo "-------------------------------------------------" >> /var/log/oracle
date +" %T %a %D : Stoping Oracle Listener as part of system down." >> /var/log/oracle
echo "-------------------------------------------------" >> /var/log/oracle
su - $ORACLE_OWNER -c "$ORACLE_HOME/bin/lsnrctl stop" >>/var/log/oracle
echo "Done."
rm -f /var/lock/subsys/oracle
# Stop the Oracle Database:
echo "Stoping Oracle Databases ... "
echo "-------------------------------------------------" >> /var/log/oracle
date +" %T %a %D : Stoping Oracle Databases as part of system down." >> /var/log/oracle
echo "-------------------------------------------------" >> /var/log/oracle
su - $ORACLE_OWNER -c "$ORACLE_HOME/bin/dbshut" >>/var/log/oracle
echo "Done."
echo ""
echo "-------------------------------------------------" >> /var/log/oracle
date +" %T %a %D : Finished." >> /var/log/oracle
echo "-------------------------------------------------" >> /var/log/oracle
;;
'restart')
$0 stop
$0 start
;;
esac
3、赋予脚本权限
4、设置开机启动
5、测试脚本效果
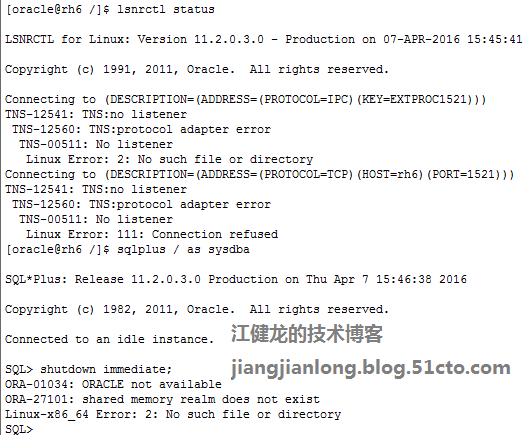
(1)关闭数据库
(2)使用root登录,执行命令service oracle start
(3)登录数据库检查,数据库已在运行,监听也正常
(4)执行service oracle stop
(5)检查监听和数据库都已关闭
本文转自jianlong1990 博客,原文链接: http://blog.51cto.com/jiangjianlong/1832986 如需转载请自行联系原作者
