1前言
轮廓线就是图形的边界,任何封闭的顶点源跳过agg::conv_stroke阶段,将会描绘实心的图形,填充的颜色和边界保持一致。如果不封闭的顶点源一旦跳过agg::conv_stroke就什么也不绘制。agg::conv_stroke就是用来描绘图形边界的。
和agg::trans_affine对比可知,agg::conv_contour是扩展图形的轮廓线,通俗一点就是拓展图形的边界,对图形的边界进行放缩(但是和agg::trans_affine仿射变换不同,这是中心位置不变的缩放)。
2 官方例子
执行examples/conv_stroke例程,提供如下的控制:
1)线段端点的切换
2)线段之间的连接方式
3)线段宽度
3代码分析
头文件:#include"agg/include/agg_conv_stroke.h"
1)线段端点的形状
enum line_cap_e
{
butt_cap,//按钮形状,实际和方形形状并无二致
square_cap,//设置之后,长度比butt_cap长一些
round_cap//半圆形状
};
设置函数:voidline_cap(line_cap_e lc)
2)线段的宽度
设置函数:voidwidth(double w)
3)介绍stroke的默认参数
当然我们可以不调用line_cap,也可以不调用width,因为stroke有默认的构造器,指定了默认的参数如下:
m_width(0.5),
m_width_abs(0.5),
m_width_eps(0.5/1024.0),
m_width_sign(1),
m_miter_limit(4.0),
m_inner_miter_limit(1.01),
m_approx_scale(1.0),
m_line_cap(butt_cap),
m_line_join(miter_join),
m_inner_join(inner_miter)
4)agg::conv_stroke的线段样式
采用的是实线的渲染方式,是否我们可以通过替换她,描述虚线:agg::conv_dash
结果发现:什么也没有渲染出来!!agg::conv_dash会单独描述!!
3 例子
ras.reset();
agg::path_storage ps1;
ps1.move_to(200,200);
ps1.line_to(300,300);
agg::line_cap_e cap = agg::round_cap;//设置线段端点的形状
agg::conv_stroke<agg::path_storage> stroke(ps1);//线段的样式
stroke.line_cap(cap);
stroke.width(50);//设置线段的宽度
ras.add_path(stroke);
agg::render_scanlines_aa_solid(ras,sl,renb,agg::rgba8(255,0,0));
2 agg::conv_contour轮廓变换
1 分析
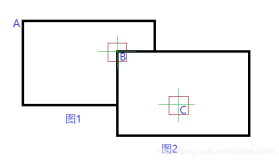
轮廓线是图形的轮廓边界,扩展轮廓线也就是在图形的中心位置不变的情况下,边界进行了放缩,和affine的仿射缩放不同,后者是中心位置也会产生偏移,针对于圆形非常好理解,可以尝试对一个圆形分别进行agg::conv_contour和agg::trans_affine处理,可以看到明显的效果:
agg::conv_contour原地膨胀
agg::trans_affine圆心偏移,并且放缩
3.3 例子回放
//Vertex Source
agg::ellipse ell(100,100,50,50);
// Coordinate conversion pipeline
typedef agg::conv_contour<agg::ellipse> ell_cc_type;
ell_cc_type ccell(ell);
typedef agg::conv_stroke<ell_cc_type> ell_cc_cs_type;
ell_cc_cs_type csccell(ccell);
// Draw
renb.clear(agg::rgba8(255,255,255));
for(int i=0; i<3; i++)
{
ccell.width(i*50);//看清楚,这是对轮廓线的实例进行的操作,而不是stroke实例
ras.add_path(csccell);
agg::render_scanlines_aa_solid(ras,sl,renb,agg::rgba8(255,0,0));
}
分析:当i = 0的时候,并没有进行轮廓的放缩,可以清晰的了解到,进行轮廓放缩的时候,圆形变大了,实际上是圆形的轮廓边界放大的缘故,但是圆心不变!!
3 图形处理流程
网上提供的一般逻辑:
矩阵变换agg::conv_transform
轮廓边界扩展(实际上是边界缩放)agg::conv_contour
转换成多义线(显示轮廓线)agg::conv_stroke
再次重申:agg::conv_contour和agg::conv_stroke作为“坐标转换管道Coordinateconversion pipeline”,conv_contour扩展轮廓线,conv_stroke只显示轮廓线(如果没有conv_stroke就会显示实心圆,可以去掉试试)。
4代码分析
conv_contour实际上是由vcgen_contour
真正实现的!!几乎所有的实现都是调用了vcgen_contour
的generator函数
一个简单的测试例子:
agg::ellipse ell(100,100,50,50);
agg::trans_affine mtx;
mtx.scale(2,1);
typedef agg::conv_transform<agg::ellipse> ell_ct_type;
ell_ct_type ctell(ell, mtx);
/************/
typedef agg::conv_contour<ell_ct_type> ell_cc_type;
ell_cc_type ccell(ctell); // 轮廓变换
ccell.width(6);//nothing happen
/************/
typedef agg::conv_stroke<ell_cc_type> ell_cc_cs_type;
ell_cc_cs_type csccell(ccell);
//csccell.width(6);
ras.add_path(ccell);
agg::render_scanlines_aa_solid(ras,sl,renb,agg::rgba8(255,0,0));
5 auto_detect_orientation函数
正如名称所言:自动检测方向,什么方向,可能很多人不了解,通过AGG邮件了解到几点:扩展轮廓线跟图形的绘制方向有关(也就是move_to,line_to,构成的图形的顺时针,还是逆时针)。如下的两个例子,一个是顺时针绘制矩形,一个是逆时针绘制矩形,然后扩展轮廓线。
例子1逆时针
agg::path_storage ps;
ps.move_to(395.5,200.5);
ps.line_to(295.5,200.5);
ps.line_to(295.5,210.5);
ps.line_to(395.5,210.5);
ps.close_polygon();
agg::conv_contour<agg::path_storage> contour(ps);
//contour.auto_detect_orientation(true);
contour.width(m_slider1.value());//获取滑动条的值
agg::conv_stroke<agg::conv_contour<agg::path_storage> >stroke(contour);
ras.add_path(stroke);
例子2 顺时针
agg::path_storage ps;
ps.move_to(395.5,200.5);
ps.line_to(395.5,210.5);
ps.line_to(295.5,210.5);
ps.line_to(295.5,200.5);
agg::conv_contour<agg::path_storage>contour(ps);
contour.width(m_slider1.value());
agg::conv_stroke<agg::conv_contour<agg::path_storage> >stroke(contour);
ras.add_path(stroke);
结果分析:第二个例子顺利的进行扩展线的放大或缩小,但是第一个例子刚好相反,两个例子之间的区别就是图形绘制的方向不同而已。所以为了解决这种问题,才引入了contour.auto_detect_orientation函数。
把第一个例子的上面函数去掉注释,就可以按照正常的逻辑进行缩放轮廓线。
6 width函数参数意义探究
AGG里面大部分的函数参数都是需要高深的图形计算的知识,探究源码更是需要深厚的功底。所以现在只能够通过函数的调用,然后通过显示的图形,推导出该函数的具体含义。
结论如下:当前是通过规则的圆形来示范发现,当设置width参数为200的时候,半径是增加了100,其中的100都是以像素作为单位。每一个像素代表一个坐标点。
如下是详细的代码:
void TestContourValue()
{
agg::rendering_buffer &rbuf = rbuf_window();
agg::pixfmt_bgr24 pixf(rbuf);
typedef agg::renderer_base<agg::pixfmt_bgr24> renderer_base_type;
renderer_base_type renb(pixf);
typedef agg::renderer_scanline_aa_solid<renderer_base_type>renderder_scanline_type;
renderder_scanline_type rensl(renb);
agg::rasterizer_scanline_aa<> ras;
agg::scanline_u8 sl;
ras.reset();
agg::path_storage ps;
ps.move_to(200,200);
ps.line_to(400,200);
ps.line_to(400,400);
ps.line_to(200,400);
ps.close_polygon();
agg::conv_stroke<agg::path_storage> stroke(ps);
ras.add_path(stroke);
agg::ellipse ell(300,300,100,100);
agg::conv_stroke<agg::ellipse> stroke1(ell);
ras.add_path(stroke1);
ps.remove_all();
ps.move_to(100,100);
ps.line_to(500,100);
ps.line_to(500,500);
ps.line_to(100,500);
ps.close_polygon();
agg::conv_stroke<agg::path_storage> stroke2(ps);
ras.add_path(stroke2);
agg::conv_contour<agg::ellipse> contour(ell);
contour.width(200);
agg::conv_stroke<agg::conv_contour<agg::ellipse> >stroke3(contour);
ras.add_path(stroke3);
ps.remove_all();
ps.move_to(0,0);
ps.line_to(600,0);
ps.line_to(600,600);
ps.line_to(0,600);
ps.close_polygon();
agg::conv_stroke<agg::path_storage> stroke4(ps);
ras.add_path(stroke4);
agg::conv_contour<agg::ellipse> contour1(ell);
contour1.width(400);
agg::conv_stroke<agg::conv_contour<agg::ellipse> >stroke5(contour1);
ras.add_path(stroke5);
agg::render_scanlines_aa_solid(ras,sl,renb,agg::rgba8(0,255,0));
}
7 扩展轮廓的限制
agg::conv_contour无法应用于自交的图形
测试代码:
void DrawIntersectContour()
{
agg::rendering_buffer &rbuf = rbuf_window();
agg::pixfmt_bgr24 pixf(rbuf);
typedef agg::renderer_base<agg::pixfmt_bgr24> renderer_base_type;
renderer_base_type renb(pixf);
typedef agg::renderer_scanline_aa_solid<renderer_base_type>renderder_scanline_type;
renderder_scanline_type rensl(renb);
agg::rasterizer_scanline_aa<> ras;
agg::scanline_u8 sl;
ras.reset();
agg::path_storage ps;
ps.move_to(200,400);
ps.line_to(500,500);
ps.line_to(200,500);
ps.line_to(500,400);
ps.line_to(200,400);
agg::conv_contour<agg::path_storage> contour(ps);
agg::conv_stroke<agg::conv_contour<agg::path_storage> >stroke(contour);
ras.add_path(stroke);
// agg::conv_stroke<agg::path_storage> stroke1(ps);
// ras.add_path(stroke1);
agg::render_scanlines_aa_solid(ras,sl,renb,agg::rgba8(0,255,0));
}
结果分析:尝试绘制一个三角形漏斗,但是通过扩展轮廓线模块,发现没有进行封闭,可通过取消注释,查看具体的情况。实际上AGG提供的例子就是通过渲染a,实际上该字母本身就是自交的,导致了轮廓的放缩非常的奇怪!!
如下是作者的描述:
You can use conv_contour in your vectorpipeline. See
examples/conv_contour.cpp for details. Theonly problem is it won'twork for
self-intersecting contours, because thedirection of the polygons is
essential, but we can't talk about thepolygon direction if itintersects
itself.