源码编译搭建LNMP环境
一:实验目标
实战:源码编译LNMP环境
二:实验环境
服务端:xuegod63.cn IP:192.168.1.63
三:实验代码
概述
LNMP代表的就是:Linux系统下Nginx+MySQL+PHP这种网站服务器架构。
Nginx是一个高性能的HTTP(web)和反向代理服务器,也是一个IMAP/POP3/SMTP代理服务器。
Mysql是一个小型关系型数据库管理系统。
PHP是一种在服务器端执行的嵌入HTML文档的脚本语言。
这四种软件均为免费开源软件,组合到一起,成为一个免费、高效、扩展性强的网站服务系统。
优点
作为 Web 服务器:相比 Apache,Nginx 使用更少的资源,支持更多的并发连接,体现更高的效率。
作为负载均衡服务器:Nginx 既可以在内部直接支持Rails和PHP,也可以支持作为 HTTP代理服务器对外进行服务。Nginx 用C编写,不论是系统资源开销还是CPU使用效率都比Perlbal要好的多。
作为邮件代理服务器:Nginx同时也是一个非常优秀的邮件代理服务器(最早开发这个产品的目的之一也是作为邮件代理服务器),Last/fm 描述了成功并且美妙的使用经验。
Nginx 安装非常的简单,配置文件非常简洁(还能够支持perl语法)。Nginx支持平滑加载新的配置,还能够在不间断服务的情况下进行软件版本的升级。
Tengine是由淘宝网发起的Web服务器项目。它在Nginx的基础上,针对大访问量网站的需求,添加了很多高级功能和特性。Tengine的性能和稳定性已经在大型的网站如淘宝网,天猫商城等得到了很好的检验。
源码编译安装nginx:
1)解压数据包
[root@xuegod63 ~]# tar -zxvf nginx-1.2.8.tar.gz
[root@xuegod63 ~]# cd nginx-1.2.8
[root@xuegod63 nginx-1.2.8]# ./configure --prefix=/server/nginx-1.2.8 --with-http_dav_module --with-http_stub_status_module --with-http_addition_module --with-http_sub_module --with-http_flv_module --with-http_mp4_module
查看参数:
[root@xuegod63 nginx-1.2.8]# ./configure --help | grep mp4
报错:
checking for PCRE library in /opt/local/ ... not found
./configure: error: the HTTP rewrite module requires the PCRE library.
You can either disable the module by using --without-http_rewrite_module
option, or install the PCRE library into the system, or build the PCRE library
statically from the source with nginx by using --with-pcre=<path> option.
解决方法:
[root@xuegod63 website]# cd /mnt/Packages/
[root@xuegod63 Packages]# rpm -ivh pcre-7.8-3.1.el6.x86_64.rpm
[root@xuegod63 Packages]# rpm -ivh pcre-devel-7.8-3.1.el6.x86_64.rpm
扩展: 安装源码编译相关的软件包
[root@xuegod63 ~]# yum install -y gcc gcc-c++ autoconf automake
[root@xuegod63 Packages]# yum install -y zlib zlib-devel openssl openssl-devel pcre-devel
zlib:nginx提供gzip模块,需要zlib库支持
openssl:nginx提供ssl功能
pcre:支持地址重写rewrite功能
[root@xuegod63 ~]# ./configure --prefix=/server/nginx-1.2.8 --with-http_dav_module --with-http_stub_status_module --with-http_addition_module --with-http_sub_module --with-http_flv_module --with-http_mp4_module
2)编译和安装:
[root@xuegod63 ~]#make -j 4
[root@xuegod63 ~]#make install
3)生成运行nginx的用户:
[root@xuegod63 nginx-1.2.8]# useradd -u 8000 -s /sbin/nologin nginx
[root@xuegod63 nginx-1.2.8]# id !$
[root@xuegod63 ~]#id nginx
uid=8000(nginx) gid=8000(nginx) groups=8000(nginx)
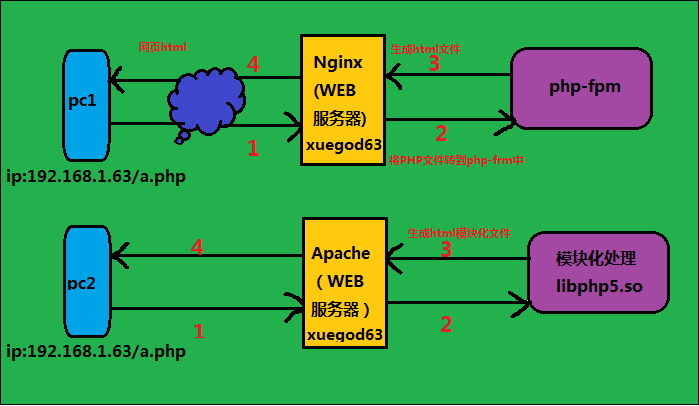
nginx和apache处理PHP文件过程的区别:
nginx ---> php-fpm --->php
apache + libphp5.so---模块化处理
4)修改配置文件
[root@xuegod63 nginx-1.2.8]# vim /server/nginx-1.2.8/conf/nginx.conf
user nginx nginx;
location ~ \.php$ {
root html;
fastcgi_pass 127.0.0.1:9000;
fastcgi_index index.php;
fastcgi_param SCRIPT_FILENAME /server/nginx-1.2.8/html$fastcgi_script_name;
include fastcgi_params;
}
5)启动nginx:
[root@xuegod63 nginx-1.2.8]# /server/nginx-1.2.8/sbin/nginx #启动
6)开机启动:
[root@xuegod63 nginx-1.2.8]# echo '/server/nginx-1.2.8/sbin/nginx & ' >> /etc/rc.local
7)测试配置文件是否正确:
[root@xuegod63 nginx-1.2.8]# /server/nginx-1.2.8/sbin/nginx -t
nginx: the configuration file /server/nginx-1.2.8/conf/nginx.conf syntax is ok
nginx: configuration file /server/nginx-1.2.8/conf/nginx.conf test is successful
8)重新加载配置文件
[root@xuegod63 nginx-1.2.8]# /server/nginx-1.2.8/sbin/nginx -s reload
============================================================
安装msyql: 安装mysql 方法同LAMP
msyql源码包:MySQL-5.5.30-1.el6.src.rpm
1)安装前,如果不存在mysql 用户,则建立
[root@xuegod63 ~]# useradd -s /sbin/nologin mysql
[root@xuegod63 Desktop]# vim /etc/passwd #不让mysql用户登录系统
改成: mysql:x:501:501::/home/mysql:/sbin/nologin
2)解压安装
[root@xuegod63 ~]# tar zxvf mysql-5.5.30.tar.gz -C /usr/local/src/
[root@xuegod63 src]# cd /usr/local/src/mysql-5.5.30/
3)Mysql 5.5.15使用了新的cmake编译方式,所以先安装cmake
cmake是什么?
CMake是一个跨平台的安装(编译)工具,可以用简单的语句来描述所有平台的安装(编译过程)。他能够输出各种各样的makefile或者project文件,能测试编译器所支持的C++特性,类似UNIX下的automake。
安装cmake:
[root@uplook mysql-5.5.30]# yum install -y cmake
#cmake-2.6.4-5.el6.x86_64.rpm软件包,RHEL系统自带,配置好yum源,
4)开始编译:
[root@xuegod63 mysql-5.5.30]# mkdir /server/
[root@xuegod63 mysql-5.5.30]# cmake -DCMAKE_INSTALL_PREFIX=/server/mysql-5.5 -DMYSQL_UNIX_ADDR=/tmp/mysql.sock -DDEFAULT_CHARSET=utf8 -DDEFAULT_COLLATION=utf8_general_ci -DWITH_EXTRA_CHARSETS=all -DWITH_MYISAM_STORAGE_ENGINE=1 -DWITH_INNOBASE_STORAGE_ENGINE=1 -DWITH_MEMORY_STORAGE_ENGINE=1 -DWITH_READLINE=1 -DENABLED_LOCAL_INFILE=1 -DMYSQL_DATADIR=/server/mysql/data -DMYSQL_USER=mysql
cmake 编译选项含意:
-DCMAKE_INSTALL_PREFIX=/server/mysql-5.5
#指定mysql安装的根目录,只要/server目录存在就可以了,mysql-5.5在安装时,会自动创建。这个值可以在服务器启动时,通过--basedir来设置。
-DMYSQL_UNIX_ADDR=/tmp/mysql.sock
#mysql服务器用于监听的套接字,这个必需是一个绝对路径,默认是/tmp/mysql.sock。在服务器启动时,可通过--socket 来改变。
-DDEFAULT_CHARSET=utf8
设置mysql默认使用utf8字符集,不指定,默认使用latin1 西欧字符集。
-DDEFAULT_COLLATION=utf8_general_ci #默认字符校对。 db.opt
DWITH_EXTRA_CHARSETS=all #指定mysql扩展字符集支持所有的字符集,默认mysql支持所有字符集
-DWITH_MYISAM_STORAGE_ENGINE=1
-DWITH_INNOBASE_STORAGE_ENGINE=1
-DWITH_MEMORY_STORAGE_ENGINE=1
#静态编译Myisam、Innobase、Memory存储引擎到mysql服务器。这样mysql服务器就支持这三种存储引擎了。
-DWITH_READLINE=1 #支持readline库。
-DENABLED_LOCAL_INFILE=1 #允许从本地导入数据,启用加载本地数据
-DMYSQL_DATADIR=/server/mysql/data#mysql数据库存放数据的目录
-DMYSQL_USER=mysql #指定运行mysql服务的用户
注:具体编译参数参考:
http://dev.mysql.com/doc/refman/5.5/en/source-configuration-options.ht ml
最终会像configure一样生成Makefile。
5)安装:
[root@xuegod63 mysql-5.5.30]# make -j 4
#注:-j 用来指定CPU核心数,可加快编译速度。
[root@xuegod63 mysql-5.5.30]# make install
在编译时,查看CPU使用情况:
top-》P 查看CPU使用情况:
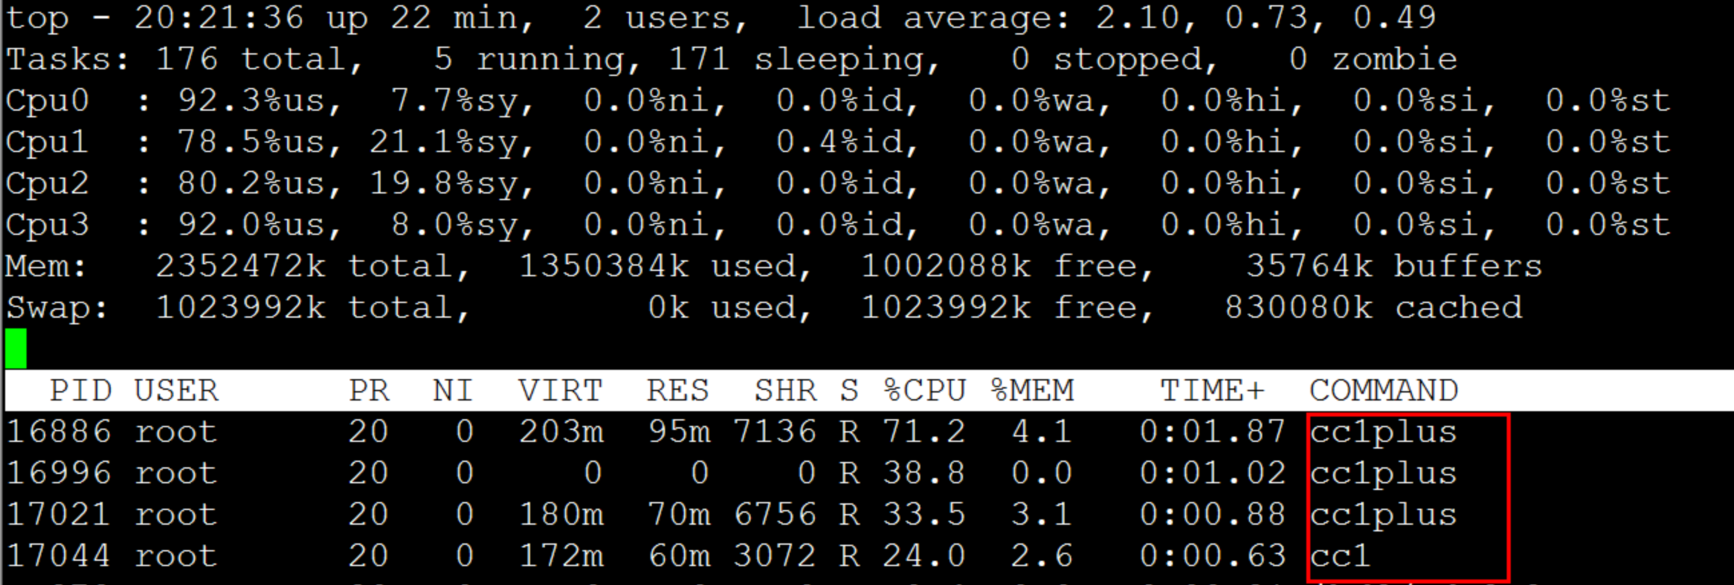 cc1plus #cc1plus是C++编译器程序,用于该软件对C++程序的编译功能。
扩展:
gcc是GNU Compiler Collection,它的意思是“GNU的编译器集合”,而不是“GNU C Compiler”.gcc就是所谓的front -end -driver, 由它驱动相应的编译器、汇编器、链接器来完成整个由源代码到可执行文件的处理过程。CC程序叫做C Compiler。在linux中CC是gcc的一软链接。
[root@xuegod63 mysql-5.5.30]# which cc
/usr/bin/cc
[root@xuegod63 mysql-5.5.30]# ll /usr/bin/cc
lrwxrwxrwx. 1 root root 3 Dec 18 2012 /usr/bin/cc -> gcc
6)配置mysql运行环境:
[root@xuegod63 mysql-5.5.30]# chown -R mysql:mysql /server/mysql-5.5#修改mysql安装目录权限,允许mysql用户对mysql数据库文件夹读写。
复制mysql配置文件
[root@xuegod63 mysql-5.5.30]# cp /usr/local/src/mysql-5.5.30/support-files/my-large.cnf /etc/my.cnf
设置mysqld5.5服务开机启动:
[root@xuegod63~]#cp/usr/local/src/mysql-5.5.30/support-files/mysql.server /etc/init.d/mysqld5.5
[root@xuegod63 ~]# chmod +x /etc/init.d/mysqld5.5
7)复制mysql开机启动文件,以后可以使用service命令来启动和关闭mysql
[root@xuegod63 ~]# vim /etc/init.d/mysqld5.5(编辑此文件,查找并修改以下变量内容:)
将原文件中:
basedir=
datadir=
修改成:
basedir=/server/mysql-5.5 #mysql安装目录
datadir=/server/mysql-5.5/data #mysql数据库存放数据的目录
加入开机启动项:
[root@xuegod63 Desktop]# chkconfig mysqld5.5 on
[root@xuegod63 Desktop]# chkconfig --list mysqld5.5
mysqld5.5 0:off 1:off 2:on 3:on 4:on 5:on 6:off
8)初始化编译mysql数据库:
[root@xuegod63 scripts]# pwd
/usr/local/src/mysql-5.5.30/scripts
[root@xuegod63 scripts]# chmod +x mysql_install_db
[root@xuegod63 scripts]# ./mysql_install_db --defaults-file=/etc/my.cnf --basedir=/server/mysql-5.5 --datadir=/server/mysql-5.5/data --user=mysql #类似于 rpm包
安装的mysql数据库,第一次启动弹出的消息
........
You can test the MySQL daemon with mysql-test-run.pl
cd /server/mysql-5.5/mysql-test ; perl mysql-test-run.pl
Please report any problems with the /server/mysql-5.5/scripts/mysqlbug script!
[root@xuegod63 scripts]#
9)开启mysql
[root@xuegod63 scripts]# /etc/init.d/mysqld5.5 start
Starting MySQL.... [ OK ]
10)测试登录:
[root@xuegod63 scripts]# mysql
11)设置mysqlroot密码:
[root@xuegod63 Desktop]# mysqladmin -uroot password '123456'
[root@xuegod63 Desktop]# mysql -u root -p123456
12)设置mysql只允许局域组中的服务器和本地回环口连接3306端口:
[root@xuegod63 Desktop]# iptables -A INPUT -s 192.168.1.0/255.255.255.0 -p tcp --dport 3306 -j ACCEPT
[root@xuegod63 Desktop]# iptables -A INPUT -s 127.0.0.1 -p tcp --dport 3306 -j ACCEPT
[root@xuegod63 Desktop]# iptables -A INPUT ! -s 127.0.0.1 -p tcp --dport 3306 -j DROP
保存规则:
[root@wt1 mysql-5.5.24]# /etc/init.d/iptables save
LAMP 都运行在一台机器上
============================================================
安装:PHP
1)准备工作:
给PHP添加扩展模块: libmcrypt-2.5.8.tar.gz
1、 让PHP编译支持这个功能
2、 生成扩展模块
3、 --with-mcrypt=/usr/local/
2)安装libmcrypt库:
[root@xuegod63 ~]# tar -zxvf libmcrypt-2.5.8.tar.gz
[root@xuegod63 ~]# cd libmcrypt-2.5.8
[root@xuegod63 libmcrypt-2.5.8]# ./configure --prefix=/usr/local/
[root@xuegod63 libmcrypt-2.5.8]# make -j 4 && make install
3)准备安装php库的环境
[root@xuegod63 libmcrypt-2.5.8]# yum install -y php-pear
添加库文件路径:
[root@xuegod63 libmcrypt-2.5.8]# ls /server/mysql-5.5/lib/libmysqlclient.so.18
/server/mysql-5.5/lib/libmysqlclient.so.18
添加以下库路径
[root@xuegod63 libmcrypt-2.5.8]# vim /etc/ld.so.conf
include ld.so.conf.d/*.conf
/server/mysql-5.5/lib
重新加载模块
[root@xuegod63 libmcrypt-2.5.8]# ldconfig # 修改配置文件后,重新加载模块
[root@xuegod63 libmcrypt-2.5.8]# vim /etc/rc.local # 开机自动加模块
#!/bin/sh
touch /var/lock/subsys/local
ldconfig
或者
root@xuegod63 ~]# echo "ldconfig" >> /etc/rc.local
如果不添加,在执行php源码变异的时候./configure可以通过但是make 时报以下错误:
lxml2 -lz -lm -lxml2 -lz -lm -lcrypt -o sapi/cgi/php-cgi
Generating phar.php
/usr/local/src/php-5.4.14/sapi/cli/php: error while loading shared libraries: libmysqlclient.so.18: cannot open shared object file: No such file or directory
make: *** [ext/phar/phar.php] Error 127
/usr/lib64 /usr/lib
到此为止,所有环境已经准备好:
4)解压过php源代码
[root@xuegod63 php-5.4.14]# tar jxvf php-5.4.14.tar.bz2 -C /usr/local/src #如果已经解压过php源代码,先把以前的源代码删除
[root@xuegod63 php-5.4.14]# cd /usr/local/src/php-5.4.14
[root@xuegod63 php-5.4.14]# ./configure --prefix=/server/php-5.4-nginx --with-config-file-path=/server/php-5.4-nginx --with-mysql=/server/mysql-5.5/ --with-mysqli=/server/mysql-5.5/bin/mysql_config --with-iconv-dir --with-freetype-dir --with-jpeg-dir --with-png-dir --with-zlib --with-libxml-dir=/usr --enable-xml --disable-rpath --enable-bcmath --enable-shmop --enable-sysvsem --enable-inline-optimization --with-curl --with-curlwrappers --enable-mbregex --enable-fpm --enable-mbstring --with-gd --enable-gd-native-ttf --with-openssl --with-mhash --enable-pcntl --enable-sockets --with-xmlrpc --enable-zip --enable-soap --with-mcrypt=/usr/local/
注释
--with-iconv-dir #字符集转换 需要的扩展模块
–without-iconv 关闭iconv函数,种字符集间的转换
–with-freetype-dir 打开对freetype字体库的支持 –with-jpeg-dir 打开对jpeg图片的支持 –with-png-dir 打开对png图片的支持
–with-libxml-dir 打开libxml2库的支持 –disable-rpath 关闭额外的运行库文件 –enable-bcmath 打开图片大小调整,用到zabbix监控的时候用到了这个模块
在上述环境中编译时,再次报错
configure: error: jpeglib.h not found.
解决方法
[root@xuegod63 ~]# rpm -ivh /mnt/Packages/libjpeg-turbo-1.2.1-1.el6.x86_64.rpm
[root@xuegod63 ~]# rpm -ivh /mnt/Packages/libjpeg-turbo-devel-1.2.1-1.el6.x86_64.
5)安装并编译:
[root@xuegod63 php-5.4.14]# make -j 4
[root@xuegod63 php-5.4.14]# make install echo¥?
6)生成配置文件: php.ini
[root@xuegod63 php-5.4-nginx]# cp /usr/local/src/php-5.4.14/php.ini-production /server/php-5.4-nginx/php.ini
7)创建php-fpm配置文件:
[root@xuegod63 php-5.4-nginx]#cp /server/php-5.4-nginx/etc/php-fpm.conf.default /server/php-5.4-nginx/etc/php-fpm.conf
8)生成php-fpm启动脚本:
[root@xuegod63 php-5.4.14]# cp /usr/local/src/php-5.4.14/sapi/fpm/init.d.php-fpm /etc/init.d/php-fpm
[root@xuegod63 php-5.4.14]# chmod +x /etc/init.d/php-fpm
9)启动php-fam:
[root@xuegod63 ~]# /etc/init.d/php-fpm start
Starting php-fpm done
[root@xuegod63 ~]# netstat -antup | grep 9000
tcp 0 0 127.0.0.1:9000 0.0.0.0:* LISTEN 28238/php-fpm
10)测试是否支持PHP:
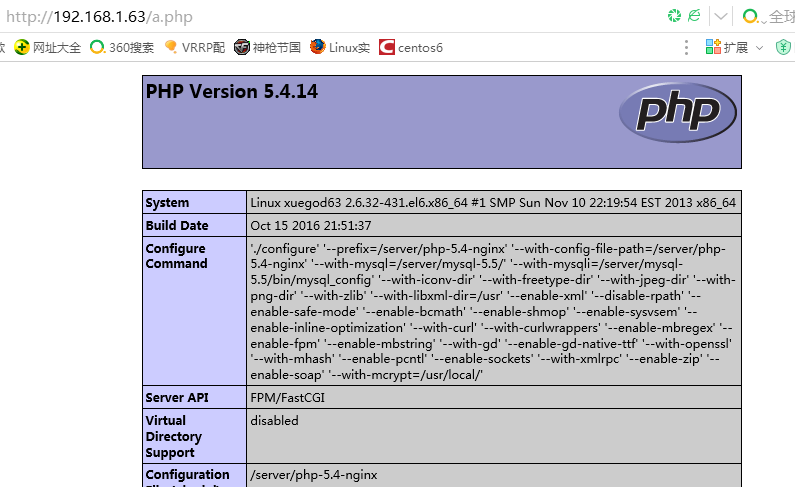
[root@xuegod63 php-5.4.14]# vim /server/nginx-1.2.8/html/a.php
<?php
phpinfo();
?>
http://192.168.1.63/a.php
