介绍几种特殊的灰度算法滤镜,将彩色图像转换为灰度图像。其中涉及到的有基于阈值的图
像二值化,弗洛伊德.斯坦德伯格抖动算法,基于阈值的部分灰度化
基础知识- 怎么把RGB转换为单色的[0 ~256]之间的灰度,最常用的转换公式如下:
Gray = 0.299 * red + 0.587 * green + 0.114 * blue;
1. 基于像素平均值的图像阈值二值化算法:
处理流程:
a. 首先将彩色图像转换为灰度图像
b. 计算灰度图像的算术平均值– M
c. 以M为阈值,完成对灰度图二值化( 大于阈值M,像素点赋值为白色,否则赋值为黑
色)
图像效果:

关键代码:
- public BufferedImage filter(BufferedImage src, BufferedImage dest) {
- int width = src.getWidth();
- int height = src.getHeight();
- if ( dest == null )
- dest = createCompatibleDestImage( src, null );
- src = super.filter(src, dest);
- int[] inPixels = new int[width*height];
- int[] outPixels = new int[width*height];
- getRGB(src, 0, 0, width, height, inPixels );
- // calculate means of pixel
- int index = 0;
- double redSum = 0, greenSum = 0, blueSum = 0;
- double total = height * width;
- for(int row=0; row<height; row++) {
- int ta = 0, tr = 0, tg = 0, tb = 0;
- for(int col=0; col<width; col++) {
- index = row * width + col;
- ta = (inPixels[index] >> 24) & 0xff;
- tr = (inPixels[index] >> 16) & 0xff;
- tg = (inPixels[index] >> 8) & 0xff;
- tb = inPixels[index] & 0xff;
- redSum += tr;
- greenSum += tg;
- blueSum +=tb;
- }
- }
- int means = (int)(redSum / total);
- System.out.println(" threshold average value = " + means);
- // dithering
- for(int row=0; row<height; row++) {
- int ta = 0, tr = 0, tg = 0, tb = 0;
- for(int col=0; col<width; col++) {
- index = row * width + col;
- ta = (inPixels[index] >> 24) & 0xff;
- tr = (inPixels[index] >> 16) & 0xff;
- tg = (inPixels[index] >> 8) & 0xff;
- tb = inPixels[index] & 0xff;
- if(tr >=means) {
- tr = tg = tb = 255;
- } else {
- tr = tg = tb = 0;
- }
- outPixels[index] = (ta << 24) | (tr << 16) | (tg << 8) | tb;
- }
- }
- setRGB( dest, 0, 0, width, height, outPixels );
- return dest;
- }
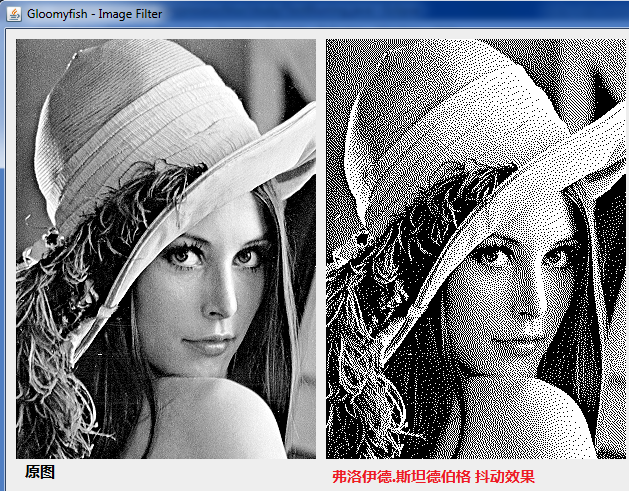
2. 基于错误扩散的Floyd-Steinberg抖动算法
关于什么是Floyd-Steinberg抖动,参见这里
http://en.wikipedia.org/wiki/Floyd–Steinberg_dithering
图像效果:

关键代码:
- @Override
- public BufferedImage filter(BufferedImage src, BufferedImage dest) {
- int width = src.getWidth();
- int height = src.getHeight();
- if ( dest == null )
- dest = createCompatibleDestImage( src, null );
- src = super.filter(src, dest);
- int[] inPixels = new int[width*height];
- int[] outPixels = new int[width*height];
- getRGB( src, 0, 0, width, height, inPixels );
- int index = 0;
- for(int row=0; row<height; row++) {
- for(int col=0; col<width; col++) {
- index = row * width + col;
- int r1 = (inPixels[index] >> 16) & 0xff;
- int g1 = (inPixels[index] >> 8) & 0xff;
- int b1 = inPixels[index] & 0xff;
- int cIndex = getCloseColor(r1, g1, b1);
- outPixels[index] = (255 << 24) | (COLOR_PALETTE[cIndex][0] << 16) | (COLOR_PALETTE[cIndex][1] << 8) | COLOR_PALETTE[cIndex][2];
- int er = r1 - COLOR_PALETTE[cIndex][0];
- int eg = g1 - COLOR_PALETTE[cIndex][1];
- int eb = b1 - COLOR_PALETTE[cIndex][2];
- int k = 0;
- if(row + 1 < height && col - 1 > 0) {
- k = (row + 1) * width + col - 1;
- r1 = (inPixels[k] >> 16) & 0xff;
- g1 = (inPixels[k] >> 8) & 0xff;
- b1 = inPixels[k] & 0xff;
- r1 += (int)(er * kernelData[0]);
- g1 += (int)(eg * kernelData[0]);
- b1 += (int)(eb * kernelData[0]);
- inPixels[k] = (255 << 24) | (clamp(r1) << 16) | (clamp(g1) << 8) | clamp(b1);
- }
- if(col + 1 < width) {
- k = row * width + col + 1;
- r1 = (inPixels[k] >> 16) & 0xff;
- g1 = (inPixels[k] >> 8) & 0xff;
- b1 = inPixels[k] & 0xff;
- r1 += (int)(er * kernelData[3]);
- g1 += (int)(eg * kernelData[3]);
- b1 += (int)(eb * kernelData[3]);
- inPixels[k] = (255 << 24) | (clamp(r1) << 16) | (clamp(g1) << 8) | clamp(b1);
- }
- if(row + 1 < height) {
- k = (row + 1) * width + col;
- r1 = (inPixels[k] >> 16) & 0xff;
- g1 = (inPixels[k] >> 8) & 0xff;
- b1 = inPixels[k] & 0xff;
- r1 += (int)(er * kernelData[1]);
- g1 += (int)(eg * kernelData[1]);
- b1 += (int)(eb * kernelData[1]);
- inPixels[k] = (255 << 24) | (clamp(r1) << 16) | (clamp(g1) << 8) | clamp(b1);
- }
- if(row + 1 < height && col + 1 < width) {
- k = (row + 1) * width + col + 1;
- r1 = (inPixels[k] >> 16) & 0xff;
- g1 = (inPixels[k] >> 8) & 0xff;
- b1 = inPixels[k] & 0xff;
- r1 += (int)(er * kernelData[2]);
- g1 += (int)(eg * kernelData[2]);
- b1 += (int)(eb * kernelData[2]);
- inPixels[k] = (255 << 24) | (clamp(r1) << 16) | (clamp(g1) << 8) | clamp(b1);
- }
- }
- }
- setRGB( dest, 0, 0, width, height, outPixels );
- return dest;
- }
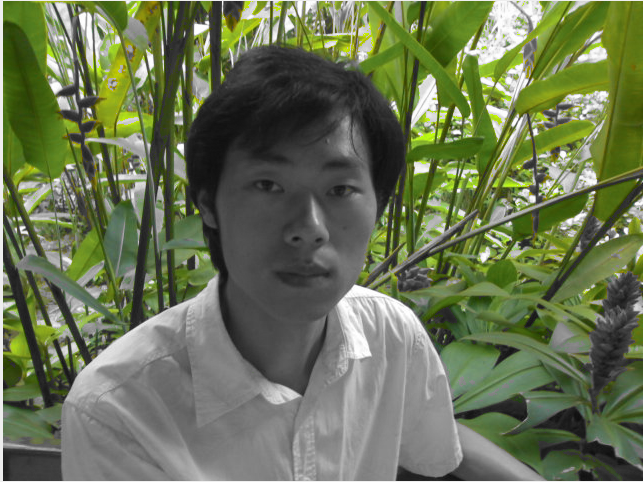
计算选择的颜色与像素灰度颜色之间的几何距离值,跟阈值比较决定是否像素点为灰度
值,可以得到一些让你意想不到的图像处理效果!
图像效果 (Main Color = GREEN, 阈值 = 200)
原图:

处理以后

关键代码:
- public BufferedImage filter(BufferedImage src, BufferedImage dest) {
- int width = src.getWidth();
- int height = src.getHeight();
- if ( dest == null )
- dest = createCompatibleDestImage( src, null );
- int[] inPixels = new int[width*height];
- int[] outPixels = new int[width*height];
- getRGB( src, 0, 0, width, height, inPixels );
- int index = 0;
- for(int row=0; row<height; row++) {
- int ta = 0, tr = 0, tg = 0, tb = 0;
- for(int col=0; col<width; col++) {
- index = row * width + col;
- ta = (inPixels[index] >> 24) & 0xff;
- tr = (inPixels[index] >> 16) & 0xff;
- tg = (inPixels[index] >> 8) & 0xff;
- tb = inPixels[index] & 0xff;
- int gray = (int)(0.299 * (double)tr + 0.587 * (double)tg + 0.114 * (double)tb);
- double distance = getDistance(tr, tg, tb);
- if(distance < threshold) {
- double k = distance / threshold;
- int[] rgb = getAdjustableRGB(tr, tg, tb, gray, (float)k);
- tr = rgb[0];
- tg = rgb[1];
- tb = rgb[2];
- outPixels[index] = (ta << 24) | (tr << 16) | (tg << 8) | tb;
- } else {
- outPixels[index] = (ta << 24) | (gray << 16) | (gray << 8) | gray;
- }
- }
- }
- setRGB( dest, 0, 0, width, height, outPixels );
- return dest;
- }
- 创建新的目标Image
- public BufferedImage createCompatibleDestImage(BufferedImage src, ColorModel dstCM) {
- if ( dstCM == null )
- dstCM = src.getColorModel();
- return new BufferedImage(dstCM, dstCM.createCompatibleWritableRaster(src.getWidth(), src.getHeight()), dstCM.isAlphaPremultiplied(), null);
- }


