api(应用程序编程接口)
API(Application Programming Interface,应用程序编程接口)是一些预先定义的函数,目的是提供应用程序与开发人员基于某软件或硬件得以访问一组例程的能力,而又无需访问源码,或理解内部工作机制的细节。
继承前几篇文章,围绕资产管理搜集的信息,进行这篇文章的api
一、sqlite数据库的基本使用
资产管理的后台数据库用的是sqlite,这个是轻量级的数据库,大家可能对这个数据库很陌生。那么我们就简单的来看看这个数据库是如何使用的?
1、登陆sqlite
|
1
2
3
4
5
6
7
8
9
10
11
12
13
14
15
16
17
|
[root@localhost ~]
# cd Simplecmdb
[root@localhost Simplecmdb]
# ls
Boot_django.sh curl_post_test_v2.sh db.sqlite3 manage.py Simplecmdb
curl_post_test_v1.sh curl_post_test_v3.py hostinfo post_hostinfo.py
[root@localhost Simplecmdb]
# python manage.py shell
/usr/lib/python2
.6
/site-packages/django/db/backends/sqlite3/base
.py:58: RuntimeWarning: SQLite received a naive datetime (2015-03-03 16:18:21.229988)
while
time
zone support is active.
RuntimeWarning)
Python 2.6.6 (r266:84292, Feb 22 2013, 00:00:18)
Type
"copyright"
,
"credits"
or
"license"
for
more
information.
IPython 1.2.1 -- An enhanced Interactive Python.
? -> Introduction and overview of IPython's features.
%quickref -> Quick reference.
help -> Python's own help system.
object? -> Details about
'object'
, use
'object??'
for
extra details.
In [1]:
|
2、查看models.py
文件中有Host和HostGroup两个类,每个类中都定义了字段名和数据类型
|
1
2
3
4
5
6
7
8
9
10
11
12
13
14
15
16
17
18
19
20
21
22
23
|
[root@localhost Simplecmdb]
# cat hostinfo/models.py
from django.db
import
models
# Create your models here.
class Host(models.Model):
hostname
= models.CharField(max_length=50)
ip = models.IPAddressField()
osversion = models.CharField(max_length=50)
memory = models.CharField(max_length=50)
disk = models.CharField(max_length=50)
vendor_id = models.CharField(max_length=50)
model_name = models.CharField(max_length=50)
cpu_core = models.CharField(max_length=50)
product = models.CharField(max_length=50)
Manufacturer = models.CharField(max_length=50)
sn = models.CharField(max_length=50)
def __str__(self):
return
self.
hostname
class HostGroup(models.Model):
groupname = models.CharField(max_length=50)
members = models.ManyToManyField(Host)
|
3、将资产管理数据结构导入到当前的环境中并使用
|
1
2
3
4
5
6
7
8
9
10
11
12
13
14
15
16
17
18
19
20
21
22
23
24
25
26
27
28
29
30
31
32
33
34
35
36
37
38
39
40
41
42
43
44
45
46
47
48
49
50
51
52
53
54
55
|
In [1]: from hostinfo.models
import
*
In [3]: HostGroup.
#有很多方法可以使用
HostGroup.DoesNotExist HostGroup.delete HostGroup.save
HostGroup.MultipleObjectsReturned HostGroup.full_clean HostGroup.save_base
HostGroup.add_to_class HostGroup.members HostGroup.serializable_value
HostGroup.clean HostGroup.mro HostGroup.unique_error_message
HostGroup.clean_fields HostGroup.objects HostGroup.validate_unique
HostGroup.copy_managers HostGroup.pk
HostGroup.date_error_message HostGroup.prepare_database_save
In [3]: HostGroup.objects.all()
#查看类中所有的对象(5个),返回值为列表
Out[3]: [<HostGroup: HostGroup object>, <HostGroup: HostGroup object>, <HostGroup: HostGroup object>, <HostGroup: HostGroup object>, <HostGroup: HostGroup object>]
In [5]: hg = HostGroup.objects.all()[0]
#取第一个对象并赋值为hg
In [6]: hg.
#hg中的方法
hg.DoesNotExist hg.delete hg.objects hg.serializable_value
hg.MultipleObjectsReturned hg.full_clean hg.pk hg.unique_error_message
hg.clean hg.groupname hg.prepare_database_save hg.validate_unique
hg.clean_fields hg.
id
hg.save
hg.date_error_message hg.members hg.save_base
In [6]: hg.groupname
#查看对应的组的名字
Out[6]: u
'nginx'
In [7]: hg.members
#查看成员,返回值是一个对象,是对象就有方法和属性
Out[7]: <django.db.models.fields.related.ManyRelatedManager at 0x2156f10>
In [8]: hg.members.all()
#查看所有成员
Out[8]: [<Host: nginx_master.com>, <Host: nginx_slave.com>]
In [10]: h = hg.members.all()[0]
In [12]: h.
h.DoesNotExist h.delete h.memory h.save
h.Manufacturer h.disk h.model_name h.save_base
h.MultipleObjectsReturned h.full_clean h.objects h.serializable_value
h.clean h.hostgroup_set h.osversion h.sn
h.clean_fields h.
hostname
h.pk h.unique_error_message
h.cpu_core h.
id
h.prepare_database_save h.validate_unique
h.date_error_message h.ip h.product h.vendor_id
In [12]: h.
hostname
Out[12]: u
'nginx_master.com'
In [13]: h.ip
Out[13]: u
'192.168.1.200'
In [14]: h.ip =
'192.168.1.234'
#修改记录
In [15]: h.ip
Out[15]:
'192.168.1.234'
In [16]: h.save()
#保存到数据库中,会在后台admin页面中看到
|
二、api(json)
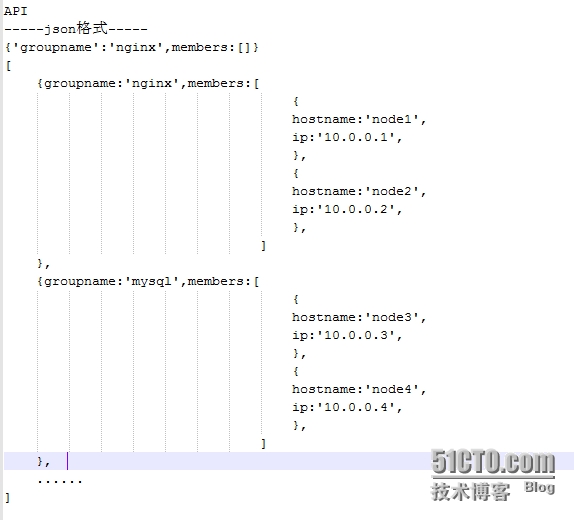
1、实现json格式api的草图
2、在命令行中实现上述效果
|
1
2
3
4
5
6
7
8
9
10
11
12
13
14
15
16
17
18
19
20
21
22
23
24
25
26
27
28
29
30
31
32
33
34
35
36
37
38
|
[root@localhost Simplecmdb]
# python manage.py shell
/usr/lib/python2
.6
/site-packages/django/db/backends/sqlite3/base
.py:58: RuntimeWarning: SQLite received a naive datetime (2015-03-03 16:36:45.158750)
while
time
zone support is active.
RuntimeWarning)
Python 2.6.6 (r266:84292, Feb 22 2013, 00:00:18)
Type
"copyright"
,
"credits"
or
"license"
for
more
information.
IPython 1.2.1 -- An enhanced Interactive Python.
? -> Introduction and overview of IPython's features.
%quickref -> Quick reference.
help -> Python's own help system.
object? -> Details about
'object'
, use
'object??'
for
extra details.
In [1]: from hostinfo.models
import
*
In [2]: d = []
In [3]: hg = HostGroup.objects.all()
In [4]:
for
g
in
hg:
...: ret = {
'groupname'
:g.groupname,
'members'
:[]}
...:
for
h
in
g.members.all():
...: ret_h = {
'hostname'
:h.
hostname
,
'ip'
:h.ip}
...: ret[
'members'
].append(ret_h)
...: d.append(ret)
...:
In [5]: print d
[{
'groupname'
: u
'nginx'
,
'members'
: [{
'ip'
: u
'192.168.1.234'
,
'hostname'
: u
'nginx_master.com'
}, {
'ip'
: u
'192.168.1.201'
,
'hostname'
: u
'nginx_slave.com'
}]}, {
'groupname'
: u
'mongodb'
,
'members'
: [{
'ip'
: u
'192.168.1.121'
,
'hostname'
: u
'mongodb.com'
}]}, {
'groupname'
: u
'db'
,
'members'
: [{
'ip'
: u
'192.168.1.105'
,
'hostname'
: u
'mysql_master.com'
}, {
'ip'
: u
'192.168.1.106'
,
'hostname'
: u
'mysql_slave.com'
}]}, {
'groupname'
: u
'tomcat'
,
'members'
: [{
'ip'
: u
'192.168.1.109'
,
'hostname'
: u
'tomcat_node1.com'
}, {
'ip'
: u
'192.168.1.110'
,
'hostname'
: u
'tomcat_node2.com'
}, {
'ip'
: u
'192.168.1.111'
,
'hostname'
: u
'tomcat_node3.com'
}, {
'ip'
: u
'192.168.1.112'
,
'hostname'
: u
'tomcat_node4.com'
}]}, {
'groupname'
: u
'memcached'
,
'members'
: [{
'ip'
: u
'192.168.1.120'
,
'hostname'
: u
'memory.com'
}]}]
对上述列表遍历能看的更清楚
In [6]:
for
i
in
d:
...: print i
...:
{
'groupname'
: u
'nginx'
,
'members'
: [{
'ip'
: u
'192.168.1.234'
,
'hostname'
: u
'nginx_master.com'
}, {
'ip'
: u
'192.168.1.201'
,
'hostname'
: u
'nginx_slave.com'
}]}
{
'groupname'
: u
'mongodb'
,
'members'
: [{
'ip'
: u
'192.168.1.121'
,
'hostname'
: u
'mongodb.com'
}]}
{
'groupname'
: u
'db'
,
'members'
: [{
'ip'
: u
'192.168.1.105'
,
'hostname'
: u
'mysql_master.com'
}, {
'ip'
: u
'192.168.1.106'
,
'hostname'
: u
'mysql_slave.com'
}]}
{
'groupname'
: u
'tomcat'
,
'members'
: [{
'ip'
: u
'192.168.1.109'
,
'hostname'
: u
'tomcat_node1.com'
}, {
'ip'
: u
'192.168.1.110'
,
'hostname'
: u
'tomcat_node2.com'
}, {
'ip'
: u
'192.168.1.111'
,
'hostname'
: u
'tomcat_node3.com'
}, {
'ip'
: u
'192.168.1.112'
,
'hostname'
: u
'tomcat_node4.com'
}]}
{
'groupname'
: u
'memcached'
,
'members'
: [{
'ip'
: u
'192.168.1.120'
,
'hostname'
: u
'memory.com'
}]}
|
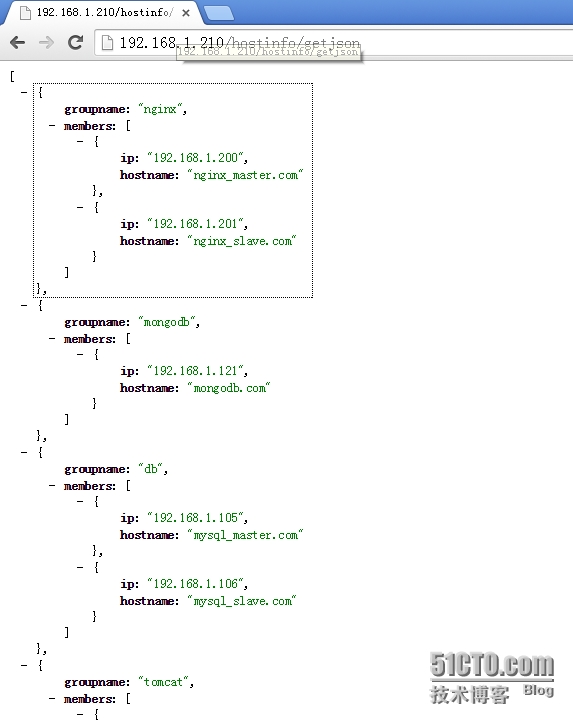
3、api(json)
3.1、添加访问的api的url
|
1
2
3
4
5
6
7
8
9
10
11
12
13
14
15
16
|
[root@localhost Simplecmdb]
# vim Simplecmdb/urls.py
from django.conf.urls
import
patterns, include, url
from django.contrib
import
admin
admin.autodiscover()
urlpatterns = patterns(
''
,
# Examples:
# url(r'^$', 'Simplecmdb.views.home', name='home'),
# url(r'^blog/', include('blog.urls')),
url(r
'^admin/'
, include(admin.site.urls)),
url(r
'^hostinfo$'
,
'hostinfo.views.index'
),
url(r
'^hostinfo/getjson$'
,
'hostinfo.views.getjson'
),
)
|
3.2、定义响应请求的视图文件
|
1
2
3
4
5
6
7
8
9
10
11
12
13
14
15
16
17
18
19
20
21
22
23
24
25
26
27
28
29
30
31
32
33
34
35
36
37
38
39
40
41
42
43
44
45
46
47
48
49
50
51
52
53
54
55
56
|
[root@localhost Simplecmdb]
# vim hostinfo/views.py
from django.shortcuts
import
render
from django.http
import
HttpResponse
from hostinfo.models
import
Host
from hostinfo.models
import
HostGroup
import
pickle
import
json
# Create your views here.
def index(req):
if
req.method ==
'POST'
:
pick_obj = json.loads(req.body)
hostname
= pick_obj[
'hostname'
]
ip = pick_obj[
'ip'
]
osversion = pick_obj[
'osversion'
]
memory = pick_obj[
'memory'
]
disk = pick_obj[
'disk'
]
vendor_id = pick_obj[
'vendor_id'
]
model_name = pick_obj[
'model_name'
]
cpu_core = pick_obj[
'cpu_core'
]
product = pick_obj[
'product'
]
Manufacturer = pick_obj[
'Manufacturer'
]
sn = pick_obj[
'sn'
]
try:
host = Host.objects.get(
hostname
=
hostname
)
except:
host = Host()
host.
hostname
=
hostname
host.ip = ip
host.osversion = osversion
host.memory = memory
host.disk = disk
host.vendor_id = vendor_id
host.model_name = model_name
host.cpu_core = cpu_core
host.product = product
host.Manufacturer = Manufacturer
host.sn = sn
host.save()
return
HttpResponse(
'ok'
)
else
:
return
HttpResponse(
'no data'
)
#添加如下行
def getjson(req):
hg = HostGroup.objects.all()
d = []
for
g
in
hg:
ret = {
'groupname'
:g.groupname,
'members'
:[]}
for
h
in
g.members.all():
ret_h = {
'hostname'
:h.
hostname
,
'ip'
:h.ip}
ret[
'members'
].append(ret_h)
d.append(ret)
return
HttpResponse(json.dumps(d))
|
3.3、浏览器访问(需要注意,必须启动JSONView才能如下显示)
三、api(shell)
1、实现json格式api的草图
|
1
2
3
4
5
|
API
-----shell格式-----
web node1 192.168.1.10
web node2 192.168.1.11
db node3 192.168.1.11
|
2、api(shell)
2.1、添加访问的api的url
|
1
2
3
4
5
6
7
8
9
10
11
12
13
14
15
16
17
|
[root@localhost Simplecmdb]
# vim Simplecmdb/urls.py
from django.conf.urls
import
patterns, include, url
from django.contrib
import
admin
admin.autodiscover()
urlpatterns = patterns(
''
,
# Examples:
# url(r'^$', 'Simplecmdb.views.home', name='home'),
# url(r'^blog/', include('blog.urls')),
url(r
'^admin/'
, include(admin.site.urls)),
url(r
'^hostinfo$'
,
'hostinfo.views.index'
),
url(r
'^hostinfo/getjson$'
,
'hostinfo.views.getjson'
),
url(r
'^hostinfo/gettxt$'
,
'hostinfo.views.gettxt'
),
)
|
2.2、定义响应请求的视图文件
|
1
2
3
4
5
6
7
8
9
10
11
12
13
14
15
16
17
18
19
20
21
22
23
24
25
26
27
28
29
30
31
32
33
34
35
36
37
38
39
40
41
42
43
44
45
46
47
48
49
50
51
52
53
54
55
56
57
58
59
60
61
62
63
64
65
|
[root@localhost Simplecmdb]
# vim hostinfo/views.py
from django.shortcuts
import
render
from django.http
import
HttpResponse
from hostinfo.models
import
Host
from hostinfo.models
import
HostGroup
import
pickle
import
json
# Create your views here.
def index(req):
if
req.method ==
'POST'
:
pick_obj = json.loads(req.body)
hostname
= pick_obj[
'hostname'
]
ip = pick_obj[
'ip'
]
osversion = pick_obj[
'osversion'
]
memory = pick_obj[
'memory'
]
disk = pick_obj[
'disk'
]
vendor_id = pick_obj[
'vendor_id'
]
model_name = pick_obj[
'model_name'
]
cpu_core = pick_obj[
'cpu_core'
]
product = pick_obj[
'product'
]
Manufacturer = pick_obj[
'Manufacturer'
]
sn = pick_obj[
'sn'
]
try:
host = Host.objects.get(
hostname
=
hostname
)
except:
host = Host()
host.
hostname
=
hostname
host.ip = ip
host.osversion = osversion
host.memory = memory
host.disk = disk
host.vendor_id = vendor_id
host.model_name = model_name
host.cpu_core = cpu_core
host.product = product
host.Manufacturer = Manufacturer
host.sn = sn
host.save()
return
HttpResponse(
'ok'
)
else
:
return
HttpResponse(
'no data'
)
def getjson(req):
hg = HostGroup.objects.all()
d = []
for
g
in
hg:
ret = {
'groupname'
:g.groupname,
'members'
:[]}
for
h
in
g.members.all():
ret_h = {
'hostname'
:h.
hostname
,
'ip'
:h.ip}
ret[
'members'
].append(ret_h)
d.append(ret)
return
HttpResponse(json.dumps(d))
#添加如下行
def gettxt(req):
str =
''
hg = HostGroup.objects.all()
for
g
in
hg:
for
h
in
g.members.all():
str += g.groupname + h.
hostname
+
' '
+ h.ip +
' '
+
'\n'
return
HttpResponse(str)
|
2.3 浏览器访问
2.4 命令行访问
|
1
2
3
4
5
6
7
8
9
10
11
|
[root@localhost ~]
# curl http://192.168.1.210/hostinfo/gettxt
nginxnginx_master.com 192.168.1.234
nginxnginx_slave.com 192.168.1.201
mongodbmongodb.com 192.168.1.121
dbmysql_master.com 192.168.1.105
dbmysql_slave.com 192.168.1.106
tomcattomcat_node1.com 192.168.1.109
tomcattomcat_node2.com 192.168.1.110
tomcattomcat_node3.com 192.168.1.111
tomcattomcat_node4.com 192.168.1.112
memcachedmemory.com 192.168.1.120
|
本文转自zys467754239 51CTO博客,原文链接:http://blog.51cto.com/467754239/1616904
,如需转载请自行联系原作者


