nagios安装配置:
Nagios官网 http://www.nagios.org
环境搭建:
centos6.6 192.168.11.30 做服务端
centos6.6 192.168.11.100 做客户端
1. Nagios安装 - 服务端(192.168.11.30)
Centos6默认的yum源里没有nagios相关的rpm包,但是我们可以安装一个epel的扩展源:
|
1
|
yum
install
-y epel-release
|
安装nagios相关的包
|
1
|
yum
install
-y httpd nagios nagios-plugins nagios-plugins-all nrpe nagios-plugins-nrpe
|
设置登录nagios后台的用户和密码:
|
1
|
htpasswd -c
/etc/nagios/passwd
nagiosadmin
|
nagios -v /etc/nagios/nagios.cfg 检测配置文件是否有错误
启动服务:
|
1
2
|
service httpd start
service nagios start
|
浏览器访问: http://192.168.11.30/nagios/
弹出认证对话框,需要输入nagiosadmin及密码,登录nagios界面;
左侧hosts列出服务端或监控主机列表;
services列出监控的8个服务项目(系统负载、用户、HTTP、ping、磁盘分区、SSH、swap交换分区、系统进程)
2. Nagios安装 - 客户端(192.168.11.100)
在客户端机器上
|
1
2
|
yum
install
-y epel-release
yum
install
-y nagios-plugins nagios-plugins-all nrpe nagios-plugins-nrpe
|
编辑配置文件:
vim /etc/nagios/nrpe.cfg
找到“allowed_hosts=127.0.0.1” 改为 “allowed_hosts=127.0.0.1,192.168.11.30” 后面的ip为服务端ip
找到” dont_blame_nrpe=0” 改为 “dont_blame_nrpe=1”
启动客户端
|
1
|
/etc/init
.d
/nrpe
start
|
3. 监控中心服务端(192.168.11.30)添加被监控主机(192.168.11.100)
服务端进行下面的操作:
cd /etc/nagios/conf.d/
vim 192.168.11.100.cfg //加入:
|
1
2
3
4
5
6
7
8
9
10
11
12
13
14
15
16
17
18
19
20
21
22
23
24
25
26
27
28
29
30
31
32
33
34
|
define host{
use linux-server
host_name 192.168.11.100
alias
11.100
address 192.168.11.100
}
define service{
use generic-service
host_name 192.168.11.100
service_description check_ping
check_command check_ping!100.0,20%!200.0,50%
max_check_attempts 5
normal_check_interval 1
}
define service{
use generic-service
host_name 192.168.11.100
service_description check_ssh
check_command check_ssh
max_check_attempts 5
# ;当nagios检测到问题时,一共尝试检测5次都有问题才会告警,如果该数值为1,那么检测到问题立即告警
normal_check_interval 1
# ;重新检测的时间间隔,单位是分钟,默认是3分钟
notification_interval 60
# ;在服务出现异常后,故障一直没有解决,nagios再次对使用者发出通知的时间。单位是分钟。如果你认为,所有的事件只需要一次通知就够了,可以把这里的选项设为0。
}
define service{
use generic-service
host_name 192.168.11.100
service_description check_http
check_command check_http
max_check_attempts 5
normal_check_interval 1
}
|
以上服务不依赖于客户端nrpe服务,我们可以想象,我们在自己电脑上可以使用ping或者telnet探测远程任何一台机器是否存活、是否开启某个端口或服务。 而当我们想要检测客户端上的某个具体服务的情况时,就需要借助于nrpe了,比如想知道客户端机器的负责或磁盘使用情况。
4. 继续添加服务
服务端:vim /etc/nagios/objects/commands.cfg
增加:
|
1
2
3
4
|
define
command
{
command_name check_nrpe
command_line $USER1$
/check_nrpe
-H $HOSTADDRESS$ -c $ARG1$
}
|
继续编辑 vim /etc/nagios/conf.d/192.168.11.100.cfg
增加如下内容:
|
1
2
3
4
5
6
7
8
9
10
11
12
13
14
15
16
17
18
19
20
21
22
23
24
|
define service{
use generic-service
host_name 192.168.11.100
service_description check_load
check_command check_nrpe!check_load
max_check_attempts 5
normal_check_interval 1
}
define service{
use generic-service
host_name 192.168.11.100
service_description check_disk_hda1
check_command check_nrpe!check_hda1
max_check_attempts 5
normal_check_interval 1
}
define service{
use generic-service
host_name 192.168.11.100
service_description check_disk_hda2
check_command check_nrpe!check_hda2
max_check_attempts 5
normal_check_interval 1
}
|
说明: check_nrpe!check_load :这里的check_nrpe就是在commands.cfg刚刚定义的,check_load是远程主机上的一个检测脚本;
在监控客户机机上vim /etc/nagios/nrpe.cfg 搜索check_load,这行就是在服务端上要执行的脚本了,我们可以手动执行这个脚本
把check_hda1更改一下:/dev/hda1 改为 /dev/sda1
再加一行command[check_hda2]=/usr/lib/nagios/plugins/check_disk -w 20% -c 10% -p /dev/sda2
客户端上重启一下nrpe服务: service nrpe restart
服务端也重启一下nagios服务: service nagios restart
重启之后在web界面会出现192.168.11.100的监控信息:
service是脚本定义的服务名;DISK(87% inode=99%)表示磁盘剩余空间比例87%,inode剩余99%;
5. 配置告警
vim /etc/nagios/objects/contacts.cfg //增加:
|
1
2
3
4
5
6
7
8
9
10
11
12
13
14
15
16
17
|
define contact{
contact_name 123
use generic-contact
alias
aaa
email aaa@163.com
}
define contact{
contact_name 456
use generic-contact
alias
bbb
email bbb@163.com
}
define contactgroup{
contactgroup_name common
alias
common
members 123,456
}
|
然后在要需要告警的服务里面加上contactgroup
vi /etc/nagios/conf.d/192.168.11.100.cfg 增加下面的内容:
|
1
2
3
4
5
6
7
8
9
10
11
12
13
14
15
|
define service{
use generic-service,srv-pnp
host_name 192.168.11.100
service_description check_load
check_command check_nrpe!check_load
max_check_attempts 5
normal_check_interval 1
contact_groups common
notifications_enabled 1
# ;是否开启提醒功能。1为开启,0为禁用。一般,这个选项会在主配置文件(nagios.cfg)中定义,效果相同。
notification_period 24x7
# ;发送提醒的时间段。非常重要的主机(服务)我定义为7×24,一般的主机(服务)就定义为上班时间。如果不在定义的时间段内,无论什么问题发生,都不会发送提醒。
notification_optionsc
# ;这个是service的状态。w为waning, u为unknown, c为critical, r为recover(恢复了),可以写多个状态,使用逗号隔开,类似的还有一个 host对应的状态:d,u,r d = 状态为DOWN, u = 状态为UNREACHABLE , r = 状态恢复为OK,需要加入到host的定义配置里。
}
|
配置告警邮件:
要想收到邮件,需要安装sendmail包 yum install -y sendmail;
安装后启动sendmail服务;/etc/init.d/sendmail start
并且关闭postfix # /etc/init.d/postfix stop
netstat -nlp 查看sendmail服务是否被监听
告警邮箱地址不能写QQ邮箱,因为会拦截sendmail发出的邮件,显示550错误;可以填写163的邮箱;
/var/log/maillog 查看mail日志
并且保持hostname一致;可以自定义一个域名;
|
1
2
|
/etc/sysconfig/network
HOSTNAME=localhost.localdomain
|
|
1
2
3
4
5
|
# cat /etc/hosts
127.0.0.1 localhost localhost.localdomain
::1 localhost localhost.localdomain
192.168.11.30 rfyy.net rfyy
127.0.0.1 rfyy.net rfyy
|
登录163邮箱——设置——反垃圾\黑白名单——白名单 添加nagios@rfyy.net 自己定义的后缀域名;
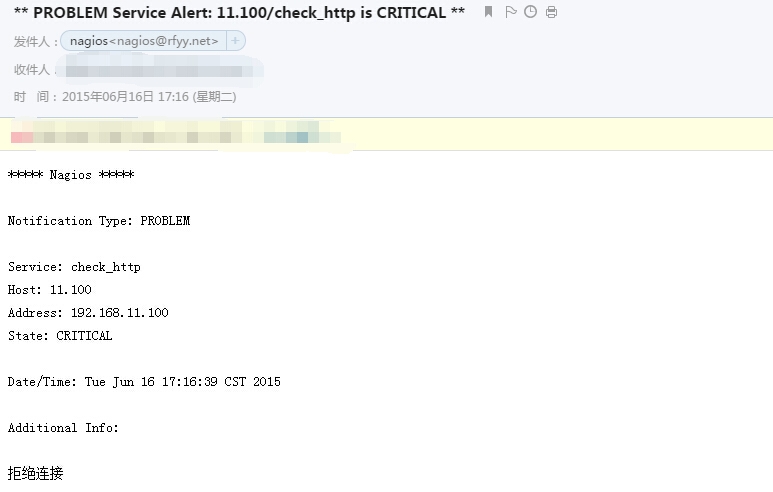
重启机器,启动各项服务,发现hostname变为rfyy.net,查看日志发送邮件名也变为自定义的;163也收到告警邮件了;
|
1
2
|
[root@rfyy ~]
# hostname
rfyy.net
|
|
1
2
3
|
Jun 16 17:16:43 rfyy sendmail[1225]: t5G9GdAd001223: to=<xxx@163.com>, ctladdr=<
nagios@rfyy.net
> (497
/498
), delay=00:00:03, xdelay=00:00:03, mailer=esmtp, pri=120678, relay=163mx01.mxmail.netease.com. [220.181.14.136], dsn=2.0.0, stat=Sent (Mail OK queued as mx12,PsCowEBZ4UJBeX9VOdmmBw--.5481S3 1434417474)
|
本文转自 模范生 51CTO博客,原文链接:http://blog.51cto.com/mofansheng/1662250,如需转载请自行联系原作者


