|
1
2
3
4
5
6
7
8
9
10
11
12
13
14
15
16
17
18
19
20
21
22
23
24
25
26
27
28
29
30
31
32
33
34
35
36
37
38
39
40
41
42
43
44
45
46
47
48
49
50
51
52
53
54
55
56
57
58
59
60
61
62
63
64
65
66
67
68
69
70
71
72
73
74
75
76
77
78
79
80
81
82
83
84
85
86
87
88
89
90
91
92
93
94
95
96
97
98
99
100
101
102
103
104
105
106
107
108
109
110
111
112
113
114
115
116
117
118
119
120
121
122
123
124
125
126
127
128
129
130
131
132
133
134
135
136
137
138
139
140
141
142
143
144
145
146
147
148
149
150
151
152
153
154
155
156
157
158
159
160
161
162
163
164
165
166
167
168
169
170
171
172
173
174
175
176
177
178
179
180
181
182
183
184
185
186
187
188
189
190
191
192
193
194
195
196
197
198
199
200
201
202
203
204
205
206
207
208
209
210
211
212
213
214
215
216
217
218
219
220
221
222
223
224
225
226
227
228
229
230
231
232
233
234
235
236
237
238
239
240
241
242
243
244
245
246
247
248
249
250
251
252
253
254
255
256
257
258
259
260
261
262
263
264
265
266
267
268
269
270
271
272
273
274
275
276
277
278
279
280
281
282
283
284
285
286
287
288
289
290
291
292
293
294
295
296
297
298
299
300
301
302
303
304
305
306
307
308
309
310
311
312
313
314
315
316
317
318
319
320
321
322
323
324
325
326
327
328
329
330
331
332
333
334
335
336
337
338
339
340
341
342
343
344
345
346
347
348
349
350
351
352
353
354
355
356
357
358
359
360
361
362
363
364
365
366
367
368
369
370
371
|
我的博客已迁移到xdoujiang.com请去那边和我交流
dnsmasq(DNS解析)
postfix(邮件发送服务器)
sasl(smtp认证)
tls(加密)
dovecot(邮件接收服务器)
一、基础环境
1、内核
cat
/etc/debian_version
7.8
2、版本
uname
-r
3.2.0-4-amd64
3、IP(eth0)
serverA 10.1.10.185 dnsmasq postfix sasl tls dovecot
clientB 10.1.10.117
clientC 10.1.10.131(windows)
二、安装dns服务器
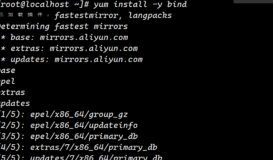
1、安装dnsmasq包(serverA)
apt-get
install
dnsmasq -y
2、配置(serverA)
1)备份
/etc/dnsmasq
.conf
cp
/etc/dnsmasq
.conf
/etc/dnsmasq
.conf.bak
2)修改
/etc/dnsmasq
.conf
sed
-i
's!#listen-address=.*!listen-address=10.1.10.185!g'
/etc/dnsmasq
.conf
echo
"address=/mail.8888.com/10.1.10.185"
>>
/etc/dnsmasq
.conf
3)在
/etc/hosts
添加1条记录
echo
"10.1.10.185 mail.8888.com"
>>
/etc/hosts
4)修改
/etc/resolv
.conf
echo
"nameserver 10.1.10.185"
>>
/etc/resolv
.conf
3、重启dnsmasq服务(serverA)
/etc/init
.d
/dnsmasq
restart
4、查看端口和进程(serverA)
1)查看进程
ps
-ef |
grep
dnsmasq
dnsmasq 2489 1 0 09:11 ? 00:00:00
/usr/sbin/dnsmasq
-x
/var/run/dnsmasq/dnsmasq
.pid -u dnsmasq -7
/etc/dnsmasq
.d,.dpkg-dist,.dpkg-old,.dpkg-new
2)查看监听端口
netstat
-tupnl |
grep
dnsmasq
tcp 0 0 0.0.0.0:53 0.0.0.0:* LISTEN 2699
/dnsmasq
tcp6 0 0 :::53 :::* LISTEN 2699
/dnsmasq
udp 0 0 0.0.0.0:53 0.0.0.0:* 2699
/dnsmasq
udp6 0 0 :::53 :::* 2699
/dnsmasq
5、设置开机启动,默认已经添加好了(serverA)
ll
/etc/rc2
.d/ |
grep
dnsmasq
lrwxrwxrwx 1 root root 17 Sep 9 09:11 S02dnsmasq -> ..
/init
.d
/dnsmasq
6、测试(clientB)
1)安装host nsloopup等命令
apt-get
install
dnsutils -y
2)备份
cp
/etc/resolv
.conf
/etc/resolv
.conf.bak
3)
echo
"nameserver 10.1.10.185"
>
/etc/resolv
.conf
4)使用
nslookup
命令测试
nslookup
mail.8888.com
Server: 10.1.10.185
Address: 10.1.10.185
#53
Name: mail.8888.com
Address: 10.1.10.185
5)使用host命令测试
host mail.8888.com
mail.8888.com has address 10.1.10.185
三、安装postfix服务器
1、安装postfix(serverA)
apt-get -y
install
postfix
2、配置(serverA)
1)自行创建
/etc/postfix/main
.cf文件 并追加以下内容
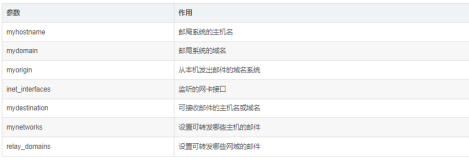
myhostname = mail.8888.com
mydomain = 8888.com
myorigin = $mydomain
inet_interfaces = 10.1.10.185
mydestination = $myhostname,$mydomain,localhost,localhost.localdomain,localhost
mynetworks = 127.0.0.0
/8
,10.1.0.0
/16
,192.168.0.0
/16
,10.18.0.0
/16
alias_maps =
hash
:
/etc/aliases
alias_database =
hash
:
/etc/aliases
home_mailbox = Maildir/
PS:相关配置文件模板在
/usr/share/postfix/main
.cf.debian
3、重启postfix服务(serverA)
/etc/init
.d
/postfix
restart
[ ok ] Stopping Postfix Mail Transport Agent: postfix.
[ ok ] Starting Postfix Mail Transport Agent: postfix.
4、查看端口和进程(serverA)
1)查看端口
netstat
-tupnl |
grep
master
tcp 0 0 10.1.10.185:25 0.0.0.0:* LISTEN 9708
/master
2)查看进程
ps
-ef |
grep
postfix
root 3872 1 0 09:17 ? 00:00:00
/usr/lib/postfix/master
postfix 3876 3872 0 09:17 ? 00:00:00 pickup -l -t fifo -u -c
postfix 3877 3872 0 09:17 ? 00:00:00 qmgr -l -t fifo -u
5、生成
/etc/aliases
.db文件(serverA)
cd
/etc
&& newaliases
6、创建测试用户mailtest并设置密码(serverA)
1)创建用户
useradd
-s
/bin/false
-m mailtest
2)设置密码
echo
mailtest:redhat |chpasswd
7、设置开机启动,默认已经添加好了(serverA)
ll
/etc/rc2
.d/ |
grep
postfix
lrwxrwxrwx 1 root root 17 Sep 9 09:17 S03postfix -> ..
/init
.d
/postfix
8、测试发送本域及外域邮件(clientB)
1)安装telnet命令
apt-get -y
install
telnet
2)使用telnet测试(本域)
telnet 10.1.10.185 25
Trying 10.1.10.185...
Connected to 10.1.10.185.
Escape character is
'^]'
.
220 mail.8888.com ESMTP Postfix
helo 8888.com
250 mail.8888.com
mail from:10.1.10.117
250 2.1.0 Ok
rcpt to:mailtest@8888.com
250 2.1.5 Ok
data
354 End data with <CR><LF>.<CR><LF>
subject:mailtest1111
mailtest1111
.
250 2.0.0 Ok: queued as A223D20317
quit
221 2.0.0 Bye
Connection closed by foreign host.
2)使用telnet测试(外域)
telnet 10.1.10.185 25
Trying 10.1.10.185...
Connected to 10.1.10.185.
Escape character is
'^]'
.
220 mail.8888.com ESMTP Postfix
helo 8888.com
250 mail.8888.com
mail from:10.1.10.117
250 2.1.0 Ok
rcpt to:85646830@163.com
250 2.1.5 Ok
data
354 End data with <CR><LF>.<CR><LF>
subject:mailtest2222
mailtest2222
.
250 2.0.0 Ok: queued as 4A22220316
quit
221 2.0.0 Bye
Connection closed by foreign host.
PS:在163的邮箱里有收到这封邮件了
9、看到具体存放邮件的文件了(serverA)
ll
/home/mailtest/Maildir/new
-rw------- 1 mailtest mailtest 300 Sep 9 09:20 1441761618.V801I7a5M331730.debian
10、查看信件信息(serverA)
cat
/home/mailtest/Maildir/new/1441761618
.V801I7a5M331730.debian
Return-Path: <10.1.10.117@8888.com>
X-Original-To: mailtest@8888.com
Delivered-To: mailtest@8888.com
Received: from 8888.com (unknown [10.1.10.117])
by mail.8888.com (Postfix) with SMTP
id
D01CE20316
for
<mailtest@8888.com>; Wed, 9 Sep 2015 09:19:44 +0800 (CST)
subject:mailtest1111
mailtest1111
11、查看日志(serverA)
cat
/var/log/mail
.log
Sep 9 09:17:49 debian postfix
/master
[3872]: daemon started -- version 2.9.6, configuration
/etc/postfix
Sep 9 09:19:33 debian postfix
/smtpd
[3908]: connect from unknown[10.1.10.117]
Sep 9 09:19:51 debian postfix
/smtpd
[3908]: D01CE20316: client=unknown[10.1.10.117]
Sep 9 09:20:18 debian postfix
/cleanup
[3911]: D01CE20316: message-
id
=<>
Sep 9 09:20:18 debian postfix
/qmgr
[3877]: D01CE20316: from=<10.1.10.117@8888.com>, size=205, nrcpt=1 (queue active)
Sep 9 09:20:18 debian postfix
/local
[3912]: D01CE20316: to=<mailtest@8888.com>, relay=
local
, delay=34, delays=34
/0
.01
/0/0
.02, dsn=2.0.0, status=sent (delivered to maildir)
Sep 9 09:20:18 debian postfix
/qmgr
[3877]: D01CE20316: removed
Sep 9 09:20:19 debian postfix
/smtpd
[3908]: disconnect from unknown[10.1.10.117]
Sep 9 09:20:36 debian postfix
/smtpd
[3908]: connect from unknown[10.1.10.117]
Sep 9 09:20:55 debian postfix
/smtpd
[3908]: 19B0520316: client=unknown[10.1.10.117]
Sep 9 09:21:12 debian postfix
/cleanup
[3911]: 19B0520316: message-
id
=<>
Sep 9 09:21:12 debian postfix
/qmgr
[3877]: 19B0520316: from=<10.1.10.117@8888.com>, size=204, nrcpt=1 (queue active)
Sep 9 09:21:13 debian postfix
/smtpd
[3908]: disconnect from unknown[10.1.10.117]
Sep 9 09:21:18 debian postfix
/smtp
[3913]: 19B0520316: to=<85646830@163.com>, relay=163mx02.mxmail.netease.com[220.181.14.146]:25, delay=28, delays=22
/0
.01
/5
.6
/0
.96, dsn=2.0.0, status=sent (250 Mail OK queued as mx19,RcCowEBJpEKMie9VpH4lAw--.339S2 1441761678)
Sep 9 09:21:18 debian postfix
/qmgr
[3877]: 19B0520316: removed
四、配置sasl
1、安装包(serverA)
apt-get -y
install
libsasl2-2 libsasl2-modules sasl2-bin libsasl2-dev
2、配置(serverA)
1)备份配置
cp
/etc/default/saslauthd
/etc/default/saslauthd
.bak
2)修改
/etc/default/saslauthd
sed
-i
's!START=.*!START=yes!g'
/etc/default/saslauthd
sed
-i
's!^OPTIONS=.*!OPTIONS="-c -m /var/spool/postfix/var/run/saslauthd"!g'
/etc/default/saslauthd
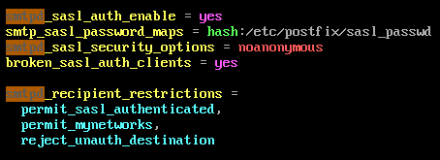
3)开启postfix使用sasl验证功能
echo
"smtpd_sasl_auth_enable = yes"
>>
/etc/postfix/main
.cf
4)新建这个文件
/etc/postfix/sasl/smtpd
.conf并添加以下内容
pwcheck_method: saslauthd
mech_list: PLAIN LOGIN
log_level: 5
3、重启postfix和saslauthd服务(serverA)
/etc/init
.d
/postfix
restart
[ ok ] Stopping Postfix Mail Transport Agent: postfix.
[ ok ] Starting Postfix Mail Transport Agent: postfix.
/etc/init
.d
/saslauthd
start
[ ok ] Stopping SASL Authentication Daemon: saslauthd.
[ ok ] Starting SASL Authentication Daemon: saslauthd.
4、查看下saslauthd进程
ps
-ef |
grep
sasl
root 9078 1 0 16:23 ? 00:00:00
/usr/sbin/saslauthd
-a pam -c -m
/var/spool/postfix/var/run/saslauthd
-n 5
root 9080 9078 0 16:23 ? 00:00:00
/usr/sbin/saslauthd
-a pam -c -m
/var/spool/postfix/var/run/saslauthd
-n 5
root 9081 9078 0 16:23 ? 00:00:00
/usr/sbin/saslauthd
-a pam -c -m
/var/spool/postfix/var/run/saslauthd
-n 5
root 9082 9078 0 16:23 ? 00:00:00
/usr/sbin/saslauthd
-a pam -c -m
/var/spool/postfix/var/run/saslauthd
-n 5
root 9083 9078 0 16:23 ? 00:00:00
/usr/sbin/saslauthd
-a pam -c -m
/var/spool/postfix/var/run/saslauthd
-n 5
5、在linux下需要将账户和密码转换成base64才能登陆(serverA)
echo
-n mailtest|openssl base64
bWFpbHRlc3Q=
echo
-n redhat|openssl base64
cmVkaGF0
6、需要将postfix用户添加到sasl组里 否则会出现permission deny情况(serverA)
usermod
-G sasl postfix
7、测试sasl功能(serverB)
telnet 10.1.10.185 25
Trying 10.1.10.185...
Connected to 10.1.10.185.
Escape character is
'^]'
.
220 mail.8888.com ESMTP Postfix
helo 8888.com
250 mail.8888.com
auth login
334 VXNlcm5hbWU6
bWFpbHRlc3Q=
334 UGFzc3dvcmQ6
cmVkaGF0
235 2.7.0 Authentication successful
mail from:10.1.10.117
250 2.1.0 Ok
rcpt to:85646830@163.com
250 2.1.5 Ok
data
354 End data with <CR><LF>.<CR><LF>
subject:mailtest2222222
mailtest2222222
.
250 2.0.0 Ok: queued as 46B1F20305
quit
221 2.0.0 Bye
Connection closed by foreign host.
8、查看日志(serverA)
cat
/var/log/mail
.log
Sep 9 16:52:35 debian postfix
/smtpd
[9184]: connect from unknown[10.1.10.117]
Sep 9 16:53:21 debian postfix
/smtpd
[9184]: 46B1F20305: client=unknown[10.1.10.117], sasl_method=login, sasl_username=mailtest
Sep 9 16:53:45 debian postfix
/cleanup
[9187]: 46B1F20305: message-
id
=<>
Sep 9 16:53:45 debian postfix
/qmgr
[8975]: 46B1F20305: from=<10.1.10.117@8888.com>, size=210, nrcpt=1 (queue active)
Sep 9 16:53:46 debian postfix
/smtpd
[9184]: disconnect from unknown[10.1.10.117]
Sep 9 16:53:48 debian postfix
/smtp
[9188]: 46B1F20305: to=<85646830@163.com>, relay=163mx02.mxmail.netease.com[220.181.14.146]:25, delay=33, delays=30
/0
.05
/1
.3
/2
, dsn=2.0.0, status=sent (250 Mail OK queued as mx19,RcCowEBZ53eZ8+9VOWtRAw--.6743S2 1441788828)
Sep 9 16:53:48 debian postfix
/qmgr
[8975]: 46B1F20305: removed
Sep 9 17:00:10 debian postfix
/pickup
[8973]: 01C8C20313: uid=0 from=<root>
Sep 9 17:00:10 debian postfix
/cleanup
[9197]: 01C8C20313: message-
id
=<20150909090010.01C8C20313@mail.8888.com>
Sep 9 17:00:10 debian postfix
/qmgr
[8975]: 01C8C20313: from=<root@8888.com>, size=561, nrcpt=1 (queue active)
Sep 9 17:00:10 debian postfix
/local
[9199]: 01C8C20313: to=<root@8888.com>, orig_to=<root>, relay=
local
, delay=0.03, delays=0.02
/0/0/0
.01, dsn=2.0.0, status=sent (delivered to maildir)
Sep 9 17:00:10 debian postfix
/qmgr
[8975]: 01C8C20313: removed
五、配置tls(serverA)
1、修改
/etc/postfix/main
.cf配置
echo
"smtpd_tls_key_file = /etc/ssl/private/ssl-cert-snakeoil.key"
>>
/etc/postfix/main
.cf
echo
"smtpd_tls_cert_file = /etc/ssl/certs/ssl-cert-snakeoil.pem"
>>
/etc/postfix/main
.cf
echo
"smtpd_use_tls = yes"
>>
/etc/postfix/main
.cf
2、修改
/etc/postfix/master
.cf配置
1)备份下
cp
/etc/postfix/master
.cf
/etc/postfix/master
.cf.bak
2)使用
diff
命令来查看下这里修改了3行内容
diff
/etc/postfix/master
.cf
/etc/postfix/master
.cf.bak
24,26c24,26
<
# -o smtpd_tls_wrappermode=yes
<
# -o smtpd_sasl_auth_enable=yes
<
# -o smtpd_client_restrictions=permit_sasl_authenticated,reject
---
> -o smtpd_tls_wrappermode=
yes
> -o smtpd_sasl_auth_enable=
yes
> -o smtpd_client_restrictions=permit_sasl_authenticated,reject
3、重启postfix服务(serverA)
/etc/init
.d
/postfix
restart
[ ok ] Stopping Postfix Mail Transport Agent: postfix.
[ ok ] Starting Postfix Mail Transport Agent: postfix.
4、查看端口
netstat
-tupnl |
grep
master
tcp 0 0 10.1.10.185:465 0.0.0.0:* LISTEN 9533
/master
tcp 0 0 10.1.10.185:25 0.0.0.0:* LISTEN 9533
/master
六、安装dovecot服务器(serverA)
1、安装包
apt-get -y
install
dovecot-common dovecot-imapd dovecot-pop3d
2、配置(serverA)
1)备份配置
cp
/etc/dovecot/conf
.d
/10-auth
.conf
/etc/dovecot/conf
.d
/10-auth
.conf.bak
cp
/etc/dovecot/conf
.d
/10-mail
.conf
/etc/dovecot/conf
.d
/10-mail
.conf.bak
2)修改配置
sed
-i
's!#disable_plaintext_auth = .*!disable_plaintext_auth = no!g'
/etc/dovecot/conf
.d
/10-auth
.conf
sed
-i
's!^mail_location = .*!mail_location = maildir:~/Maildir!g'
/etc/dovecot/conf
.d
/10-mail
.conf
3、重启dovecot服务(serverA)
/etc/init
.d
/dovecot
restart
[ ok ] Restarting IMAP
/POP3
mail server: dovecot.
4、查看端口和进程(serverA)
1)查看端口
netstat
-tupnl |
grep
dovecot
tcp 0 0 0.0.0.0:110 0.0.0.0:* LISTEN 10528
/dovecot
tcp 0 0 0.0.0.0:143 0.0.0.0:* LISTEN 10528
/dovecot
tcp 0 0 0.0.0.0:993 0.0.0.0:* LISTEN 10528
/dovecot
tcp 0 0 0.0.0.0:995 0.0.0.0:* LISTEN 10528
/dovecot
tcp6 0 0 :::110 :::* LISTEN 10528
/dovecot
tcp6 0 0 :::143 :::* LISTEN 10528
/dovecot
tcp6 0 0 :::993 :::* LISTEN 10528
/dovecot
tcp6 0 0 :::995 :::* LISTEN 10528
/dovecot
2)查看进程
ps
-ef |
grep
dovecot
root 10528 1 0 09:12 ? 00:00:00
/usr/sbin/dovecot
-c
/etc/dovecot/dovecot
.conf
dovecot 10541 10528 0 09:12 ? 00:00:00 dovecot
/anvil
root 10542 10528 0 09:12 ? 00:00:00 dovecot
/log
root 10545 10528 0 09:12 ? 00:00:00 dovecot
/config
5、设置开机启动,默认已经添加好了(serverA)
ll
/etc/rc2
.d/ |
grep
dovecot
lrwxrwxrwx 1 root root 17 Sep 9 20:10 S02dovecot -> ..
/init
.d
/dovecot
6、测试(clientB)
telnet 10.1.10.185 110
Trying 10.1.10.185...
Connected to 10.1.10.185.
Escape character is
'^]'
.
+OK Dovecot ready.
user mailtest
+OK
pass redhat
+OK Logged
in
.
list
+OK 0 messages:
.
quit
+OK Logging out.
Connection closed by foreign host.
7、查看日志(serverA)
cat
/var/log/mail
.log
Sep 9 20:12:11 debian dovecot: pop3-login: Login: user=<mailtest>, method=PLAIN, rip=10.1.10.117, lip=10.1.10.185, mpid=14663, session=<0mVtZE8fsgAKAQp1>
八、windows上使用outlook测试
1、
|


|
1
2
3
4
5
6
7
8
9
10
11
12
13
14
15
16
17
18
19
20
21
22
23
24
25
26
27
28
29
30
31
32
33
34
35
36
37
38
39
40
41
|
2、查看日志(serverA)
Sep 9 20:14:00 debian dovecot: pop3-login: Login: user=<mailtest>, method=PLAIN, rip=10.1.10.131, lip=10.1.10.185, mpid=14669, session=<dHbnak8fMAAKAQqD>
Sep 9 20:14:00 debian dovecot: pop3(mailtest): Disconnected: Logged out
top
=0
/0
, retr=0
/0
, del=0
/0
, size=0
Sep 9 20:14:00 debian postfix
/smtpd
[14670]: connect from unknown[10.1.10.131]
Sep 9 20:14:00 debian postfix
/smtpd
[14670]: 2D06B1FDD7: client=unknown[10.1.10.131], sasl_method=LOGIN, sasl_username=mailtest
Sep 9 20:14:00 debian postfix
/cleanup
[14674]: 2D06B1FDD7: message-
id
=<>
Sep 9 20:14:00 debian postfix
/qmgr
[10486]: 2D06B1FDD7: from=<mailtest@8888.com>, size=510, nrcpt=1 (queue active)
Sep 9 20:14:00 debian postfix
/smtpd
[14670]: disconnect from unknown[10.1.10.131]
Sep 9 20:14:00 debian postfix
/local
[14675]: 2D06B1FDD7: to=<mailtest@8888.com>, relay=
local
, delay=0.13, delays=0.08
/0
.02
/0/0
.02, dsn=2.0.0, status=sent (delivered to maildir)
Sep 9 20:14:00 debian postfix
/qmgr
[10486]: 2D06B1FDD7: removed
Sep 9 20:14:50 debian dovecot: pop3-login: Login: user=<mailtest>, method=PLAIN, rip=10.1.10.131, lip=10.1.10.185, mpid=14678, TLS, session=<8c
/vbU8fQAAKAQqD
>
Sep 9 20:14:50 debian dovecot: pop3(mailtest): Disconnected: Logged out
top
=0
/0
, retr=0
/0
, del=0
/1
, size=611
Sep 9 20:14:50 debian postfix
/smtpd
[14670]: connect from unknown[10.1.10.131]
Sep 9 20:14:50 debian postfix
/smtpd
[14670]: DFD471FDD7: client=unknown[10.1.10.131], sasl_method=LOGIN, sasl_username=mailtest
Sep 9 20:14:50 debian postfix
/cleanup
[14674]: DFD471FDD7: message-
id
=<>
Sep 9 20:14:50 debian postfix
/qmgr
[10486]: DFD471FDD7: from=<mailtest@8888.com>, size=511, nrcpt=1 (queue active)
Sep 9 20:14:50 debian postfix
/local
[14675]: DFD471FDD7: to=<mailtest@8888.com>, relay=
local
, delay=0.05, delays=0.04
/0/0/0
, dsn=2.0.0, status=sent (delivered to maildir)
Sep 9 20:14:50 debian postfix
/qmgr
[10486]: DFD471FDD7: removed
Sep 9 20:14:50 debian postfix
/smtpd
[14670]: disconnect from unknown[10.1.10.131]
Sep 9 20:14:59 debian dovecot: pop3-login: Login: user=<mailtest>, method=PLAIN, rip=10.1.10.131, lip=10.1.10.185, mpid=14680, TLS, session=<RVhzbk8fRgAKAQqD>
Sep 9 20:14:59 debian dovecot: pop3(mailtest): Disconnected: Logged out
top
=0
/0
, retr=0
/0
, del=0
/2
, size=1223
Sep 9 20:14:59 debian postfix
/smtpd
[14670]: connect from unknown[10.1.10.131]
Sep 9 20:14:59 debian postfix
/smtpd
[14670]: 82B721FDD7: client=unknown[10.1.10.131], sasl_method=LOGIN, sasl_username=mailtest
Sep 9 20:14:59 debian postfix
/cleanup
[14674]: 82B721FDD7: message-
id
=<>
Sep 9 20:14:59 debian postfix
/qmgr
[10486]: 82B721FDD7: from=<mailtest@8888.com>, size=511, nrcpt=1 (queue active)
Sep 9 20:14:59 debian postfix
/smtpd
[14670]: disconnect from unknown[10.1.10.131]
Sep 9 20:14:59 debian postfix
/local
[14675]: 82B721FDD7: to=<mailtest@8888.com>, relay=
local
, delay=0.06, delays=0.05
/0/0/0
.01, dsn=2.0.0, status=sent (delivered to maildir)
Sep 9 20:14:59 debian postfix
/qmgr
[10486]: 82B721FDD7: removed
Sep 9 20:15:05 debian dovecot: pop3-login: Login: user=<mailtest>, method=PLAIN, rip=10.1.10.131, lip=10.1.10.185, mpid=14685, TLS, session=<Hy7Jbk8fSQAKAQqD>
Sep 9 20:15:05 debian dovecot: pop3(mailtest): Disconnected: Logged out
top
=0
/0
, retr=3
/1883
, del=0
/3
, size=1835
Sep 9 20:15:10 debian postfix
/pickup
[10485]: 37A3B20364: uid=0 from=<root>
Sep 9 20:15:10 debian postfix
/cleanup
[14674]: 37A3B20364: message-
id
=<20150909121510.37A3B20364@mail.8888.com>
Sep 9 20:15:10 debian postfix
/qmgr
[10486]: 37A3B20364: from=<root@8888.com>, size=570, nrcpt=1 (queue active)
Sep 9 20:15:10 debian postfix
/local
[14675]: 37A3B20364: to=<root@8888.com>, orig_to=<root>, relay=
local
, delay=0.02, delays=0.01
/0/0/0
, dsn=2.0.0, status=sent (delivered to maildir)
Sep 9 20:15:10 debian postfix
/qmgr
[10486]: 37A3B20364: removed
九、参考文章
http:
//www
.postfix.org
http:
//www
.postfix.org
/TLS_README
.html
http:
//wiki
.ubuntu.org.cn
/Postfix
https:
//help
.ubuntu.com
/community/Postfix
|
本文转自 xdoujiang 51CTO博客,原文链接:http://blog.51cto.com/7938217/1693252,如需转载请自行联系原作者