|
1
2
3
4
5
6
7
8
9
10
11
12
13
14
15
16
17
18
19
20
21
22
23
24
25
26
27
28
29
30
31
32
33
34
35
36
37
38
39
40
41
42
43
44
45
46
47
48
49
50
51
52
53
54
55
56
57
58
59
60
61
62
63
64
65
66
67
68
69
70
71
72
73
74
75
76
77
78
79
80
81
82
83
84
85
86
87
88
89
90
91
92
93
94
95
96
97
98
99
100
101
102
103
104
105
106
107
108
109
110
111
112
113
114
115
116
117
118
119
120
121
122
123
124
125
126
127
128
129
130
131
132
133
134
135
136
137
138
139
140
141
142
143
144
145
146
147
148
149
150
151
152
153
154
155
156
157
158
159
160
161
162
163
164
165
166
167
168
169
170
171
172
173
174
175
176
177
178
179
180
181
182
183
184
185
186
187
188
189
190
191
192
193
194
195
196
197
198
199
200
201
202
203
204
205
206
207
208
209
210
211
212
213
214
215
216
217
218
219
220
221
222
223
224
225
226
227
228
229
230
231
232
233
234
235
236
237
238
239
240
241
242
243
244
245
246
247
248
249
|
我的博客已迁移到xdoujiang.com请去那边和我交流
FAI(Fully Automatic Installation,完全自动安装)是一种无须交互就可以完成那些重复性枯燥乏味的、
常常需要手动完成的Linux安装、自定义以及管理任务的自动化系统。现如今,FAI被用户维护假根环境
(chroot environments),虚拟机以及服务器。它可以完成从几个独立系统到基于大规模基础设施和有数千个系统组成的集群系统的部署和安装。
系统管理员可以利用配置空间在FAI中定义硬盘布局、文件系统、软件包、键盘布局、时区、用户帐号等等
一、基础环境
1、角色、ip、版本、内核
serverA 192.168.1.20 3.2.0-4-amd64 7.8
fai-quickstart 4.0.8
isc-dhcp-server 4.2.2
tftpd-hpa 5.2-4
nfs-kernel-server 1:1.2.6-4
apache2 2.2.22-13
二、搭建本地源
1、安装apache2(其他
ftp
也可以,这里走apache2)
apt-get -y
install
apache2-mpm-prefork
2、配置虚拟主机
1)关闭默认站点
cd
/etc/apache2/sites-available
&& a2dissite default && a2dissite default-ssl
Site default disabled.
To activate the new configuration, you need to run:
service apache2 reload
Site default-ssl already disabled
2)删除默认index.html文件
cd
/var/www
&&
rm
-f index.html
3)复制模板
cp
/etc/apache2/sites-available/default
/etc/apache2/sites-available/debian7
4)开启debian7站点
cd
/etc/apache2/sites-available
&& a2ensite debian7
Enabling site debian7.
To activate the new configuration, you need to run:
service apache2 reload
5)网站快捷方式
ln
-s
/opt/debian7/mirror/debian
.ustc.edu.cn
/debian
debian7
6)重启apache2服务
/etc/init
.d
/apache2
restart
[....] Restarting web server: apache2apache2: Could not reliably determine the server's fully qualified domain name, using 192.168.1.20
for
ServerName
... waiting apache2: Could not reliably determine the server's fully qualified domain name, using 192.168.1.20
for
ServerName
. ok
3、使用apt-mirror同步镜像源(debian7)
1)安装包
apt-get -y
install
apt-mirror
2)配置
cat
/etc/apt/mirror
.list
set
base_path
/opt/debian7
set
mirror_path $base_path
/mirror
set
skel_path $base_path
/skel
set
var_path $base_path
/var
set
cleanscript $var_path
/clean
.sh
set
defaultarch <running host architecture>
set
postmirror_script $var_path
/postmirror
.sh
set
run_postmirror 0
set
nthreads 20
set
_tilde 0
deb-amd64 http:
//debian
.ustc.edu.cn
/debian/
wheezy main contrib non-
free
deb-amd64 http:
//debian
.ustc.edu.cn
/debian/
wheezy-updates main contrib non-
free
clean http:
//debian
.ustc.edu.cn
/debian/
3)执行同步(时间比较长 大概需要花费1个晚上时间)
apt-mirror
三、安装fai
1、安装fai-quickstart的时候会将nfs-kernel-server tftpd-hpa isc-dhcp-server等服务安装上的
apt-get
install
fai-quickstart -y
Reading package lists... Done
Building dependency tree
Reading state information... Done
The following extra packages will be installed:
debconf-utils debootstrap fai-client fai-doc fai-server genisoimage isc-dhcp-server libapt-pkg-perl libarchive12 libevent-2.0-5 libfile-copy-recursive-perl libgpgme11
libgraph-perl libgssglue1 libheap-perl libnettle4 libnfsidmap2 libproc-daemon-perl libproc-processtable-perl libpth20 libtirpc1 libxml2 nfs-common nfs-kernel-server openbsd-inetd
python python-minimal python2.7 python2.7-minimal reprepro rpcbind sgml-base tftpd-hpa update-inetd xml-core
Suggested packages:
logtail debmirror grub perl-tk wodim cdrkit-doc isc-dhcp-server-ldap gpgsm gnupg2
open
-iscsi watchdog python-doc python-tk python2.7-doc binutils binfmt-support gnupg-agent
inoticoming lzip sgml-base-doc syslinux-common debhelper
The following NEW packages will be installed:
debconf-utils debootstrap fai-client fai-doc fai-quickstart fai-server genisoimage isc-dhcp-server libapt-pkg-perl libarchive12 libevent-2.0-5 libfile-copy-recursive-perl
libgpgme11 libgraph-perl libgssglue1 libheap-perl libnettle4 libnfsidmap2 libproc-daemon-perl libproc-processtable-perl libpth20 libtirpc1 libxml2 nfs-common nfs-kernel-server
openbsd-inetd python python-minimal python2.7 python2.7-minimal reprepro rpcbind sgml-base tftpd-hpa update-inetd xml-core
0 upgraded, 36 newly installed, 0 to remove and 15 not upgraded.
Need to get 11.0 MB of archives.
After this operation, 30.1 MB of additional disk space will be used.
2、配置dhcp
1)先备份下原来配置
cp
/etc/dhcp/dhcpd
.conf
/etc/dhcp/dhcpd
.conf.bak
2)修改配置
cat
/etc/dhcp/dhcpd
.conf
subnet 192.168.1.0 netmask 255.255.255.0 {
range 192.168.1.22 192.168.1.24;
option routers 192.168.1.1;
default-lease-
time
600;
max-lease-
time
7200;
next-server 192.168.1.20;
filename
"fai/pxelinux.0"
;
}
3、配置tftp
1)备份下配置
cp
/etc/default/tftpd-hpa
/etc/default/tftpd-hpa
.ba
2)修改配置
sed
-i
's/0.0.0.0:69/192.168.1.20:69/'
/etc/default/tftpd-hpa
4、配置fai
1)先备份下原来配置
cp
/etc/fai/apt/sources
.list
/etc/fai/apt/sources
.list.bak
2)修改客户端的源
echo
"deb http://192.168.1.20/debian7 wheezy main contrib non-free"
>
/etc/fai/apt/sources
.list
3)先备份下原来配置
cp
/etc/fai/fai
.conf
/etc/fai/fai
.conf.bak
4)修改配置
echo
"LOGUSER=fai"
>>
/etc/fai/fai
.conf
echo
"FAI_CONFIG_SRC=nfs://192.168.1.20/srv/fai/debian7"
>>
/etc/fai/fai
.conf
5)先备份下原来配置
cp
/etc/fai/nfsroot
.conf
/etc/fai/nfsroot
.conf.bak
6)修改配置
cat
/etc/fai/nfsroot
.conf
FAI_CONFIGDIR=
/srv/fai/debian7
FAI_DEBOOTSTRAP=
"wheezy http://192.168.1.20/debian7"
FAI_ROOTPW=
'$1$kBnWcO.E$djxB128U7dMkrltJHPf6d1'
NFSROOT_ETC_HOSTS=
"192.168.1.20"
NFSROOT=
/srv/fai/nfsroot
TFTPROOT=
/srv/tftp/fai
NFSROOT_HOOKS=
/etc/fai/nfsroot-hooks/
FAI_DEBOOTSTRAP_OPTS=
"--exclude=dhcp-client,info"
5、改名
mv
/srv/fai/config/
/srv/fai/debian7
6、使用fai-setup命令使配置生效
fai-setup -
v
Initializing package states...
Writing extended state information...
Reading task descriptions...
install_packages: executing chroot
/srv/fai/nfsroot
apt-get clean
install_packages: executing chroot
/srv/fai/nfsroot
dpkg --configure --pending
install_packages: executing chroot
/srv/fai/nfsroot
dpkg -C
install_packages: executing chroot
/srv/fai/nfsroot
apt-get clean
install_packages
exit
code: 0
`
/srv/fai/nfsroot/boot/vmlinuz-3
.2.0-4-amd64
' -> `/srv/tftp/fai/vmlinuz-3.2.0-4-amd64'
`
/srv/fai/nfsroot/boot/initrd
.img-3.2.0-4-amd64
' -> `/srv/tftp/fai/initrd.img-3.2.0-4-amd64'
TFTP environment prepared. To use it,
enable
the dhcpd and start a TFTP daemon on root
/srv/tftp/fai
.
FAI packages inside the nfsroot:
fai-client 4.0.8~deb7u1
fai-nfsroot 4.0.8~deb7u1
fai-setup-storage 4.0.8~deb7u1
FAI related packages inside the nfsroot:
dracut 020-2
dracut-network 020-2
Waiting
for
background jobs to finish
[1] Done
nice
rm
-rf $deldir/../.will-now-be-deleted (wd: ~)
[2]+ Running
nice
xz -q $NFSROOT
/var/tmp/base
.
tar
& (wd:
/srv/fai/nfsroot
)
fai-
make
-nfsroot finished properly.
Log
file
written to
/var/log/fai/fai-make-nfsroot
.log
Adding line to
/etc/exports
:
/srv/fai/debian7
192.168.1.20
/24
(async,ro,no_subtree_check)
Adding line to
/etc/exports
:
/srv/fai/nfsroot
192.168.1.20
/24
(async,ro,no_subtree_check,no_root_squash)
Re-exporting directories
for
NFS kernel daemon....
FAI setup finished.
Log
file
written to
/var/log/fai/fai-setup
.log
7、接下来生成default文件
1)fai-chboot -IBv -u nfs:
//192
.168.1.20
/srv/fai/debian7
default
Booting kernel vmlinuz-3.2.0-4-amd64
append initrd=initrd.img-3.2.0-4-amd64 ip=dhcp
FAI_FLAGS=verbose,sshd,reboot FAI_CONFIG_SRC=nfs:
//192
.168.1.20
/srv/fai/debian7
default has no IP
in
hex default
Writing
file
/srv/tftp/fai/pxelinux
.cfg
/default
for
default
2)参数说明
-B Set default values
for
FAI_FLAGS.This is the same as -f verbose,sshd,reboot
-I Same as -i but also sets FAI_ACTION=
install
.So a fully automatic installation will be performed.
ATTENTION!This will erase most of the data on the
local
disks of the
install
clients.
-
v
Create verbose output.
-u URL Set FAI_CONFIG_SRC to URL.If not
set
the value from fai.conf inside the nfsroot will be used.
8、修改default配置文件
cat
/srv/tftp/fai/pxelinux
.cfg
/default
default 0
prompt 1
timeout 60
label 0
localboot 0
label debian7
kernel vmlinuz-3.2.0-4-amd64
append initrd=initrd.img-3.2.0-4-amd64 ip=dhcp root=
/dev/nfs
nfsroot=
/srv/fai/nfsroot
aufs FAI_FLAGS=verbose,sshd,reboot FAI_CONFIG_SRC=nfs:
//192
.168.1.20
/srv/fai/debian7
FAI_ACTION=
install
9、添加1个共享目录 这个是nfs的BUG
echo
"/srv/nfs4 134.95.9.128/25(fsid=0,ro,no_subtree_check)"
>>
/etc/exports
10、定义磁盘分区和启动标记等
1)备份配置
cp
/srv/fai/debian7/disk_config/FAIBASE
/srv/fai/debian7/disk_config/FAIBASE
.bak
2)修改配置
cat
/srv/fai/debian7/disk_config/FAIBASE
# example of new config file for setup-storage
#
# <type> <mountpoint> <size> <fs type> <mount options> <misc options>
disk_config disk1 disklabel:msdos bootable:1 fstabkey:uuid
primary / 25G ext4 rw,noatime,errors=remount-ro
logical swap 8G swap sw
logical
/opt
100-100% ext4 rw,noatime,nosuid,nodev createopts=
"-L home -m 1"
tuneopts=
"-c 0 -i 0"
11、定义客户端需要安装的软件包
1)备份配置
cp
/srv/fai/debian7/package_config/FAIBASE
/srv/fai/debian7/package_config/FAIBASE
.bak
2)修改配置
cat
/srv/fai/debian7/package_config/FAIBASE
PACKAGES aptitude DEBIAN
cron
debconf-utils
file
hdparm
less
linuxlogo
rdate
openssh-client openssh-server
strace
time
procinfo
nullmailer
eject
locales
console-setup kbd
pciutils usbutils
vim
wget
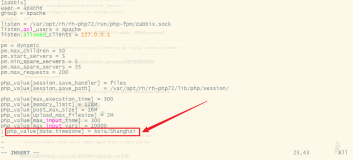
12、修改时区
cp
/srv/fai/debian7/class/FAIBASE
.var
/srv/fai/debian7/class/FAIBASE
.var.bak
sed
-i
"s/TIMEZONE=.*/TIMEZONE=Asia\/Shanghai/g"
/srv/fai/debian7/class/FAIBASE
.var
13、重启所有服务
1)重启dhcp服务
/etc/init
.d
/isc-dhcp-server
restart
[FAIL] Stopping ISC DHCP server: dhcpd failed!
[ ok ] Starting ISC DHCP server: dhcpd.
2)重启tftpd服务
/etc/init
.d
/tftpd-hpa
restart
[ ok ] Restarting HPAs tftpd:
in
.tftpd.
3)重启nfs
/etc/init
.d
/nfs-kernel-server
restart
[ ok ] Stopping NFS kernel daemon: mountd nfsd.
[ ok ] Unexporting directories
for
NFS kernel daemon....
[....] Exporting directories
for
NFS kernel daemon...exportfs: Failed to stat
/srv/nfs4
: No such
file
or directory
. ok
[ ok ] Starting NFS kernel daemon: nfsd mountd.
四、安装client
点F12进入pxe网络引导模式在boot提示下输入debian7开始安装
|
 (默认密码是fai 在cat /srv/fai/debian7/class/FAIBASE.var这个文件中也可以看到默认密码是fai)


|
1
2
3
4
5
6
7
8
9
10
11
12
13
|
五、相关日志
1、查看相关日志
cat
/var/log/syslog
Oct 8 16:42:15 debian dhcpd: DHCPDISCOVER from 00:0c:29:7a:e6:5f via eth0
Oct 8 16:42:15 debian dhcpd: DHCPOFFER on 192.168.1.22 to 00:0c:29:7a:e6:5f ((none)) via eth0
Oct 8 16:42:15 debian dhcpd: DHCPREQUEST
for
192.168.1.22 (192.168.1.20) from 00:0c:29:7a:e6:5f ((none)) via eth0
Oct 8 16:42:15 debian dhcpd: DHCPACK on 192.168.1.22 to 00:0c:29:7a:e6:5f ((none)) via eth0
六、参考文章
http:
//fai-project
.org
/fai-guide
.html
http:
//fai-project
.org
http:
//fai-project
.org
/doc/man/fai-chboot
.html
https:
//wiki
.debian.org
/DebianEdu/HowTo/FaiInstallDebianEdu
|
本文转自 xdoujiang 51CTO博客,原文链接:http://blog.51cto.com/7938217/1701161,如需转载请自行联系原作者