一、安装Rabbit MQ
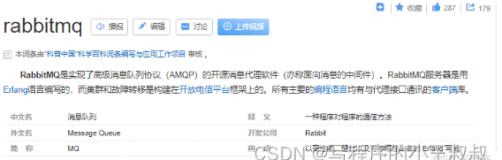
Rabbit MQ 是建立在强大的Erlang OTP平台上,因此安装Rabbit MQ的前提是安装Erlang。通过下面两个连接下载安装3.2.3 版本:
- 下载并安装 Eralng OTP For Windows (vR16B03)
- 运行安装 Rabbit MQ Server Windows Installer (v3.2.3)
- 具体操作步骤参考:在 Windows 上安装Rabbit MQ 指南
- 本人遇到的问题
  当安装RabbitMQ后,使用rabbitmqctl,rabbitmq-plugins等相应的命令,出现如下错误:
  * connected to epmd (port 4369) on mqmaster
  * epmd reports node 'rabbit' running on port 25672
  * TCP connection succeeded but Erlang distribution failed
  * suggestion: hostname mismatch?
  * suggestion: is the cookie set correctly?
  * suggestion: is the Erlang distribution using TLS?
原因是,安装 Rabbit MQ的过程中没有使用默认的安装路径。重新安装并使用默认的安装路径就没有问题了。如果使用自定义路径,需要同步 Erlang Cookies。具体解释请参考官网中的解释:http://www.rabbitmq.com/install-windows-manual.html (在Finding Command Scripts and App Data 标题下)。
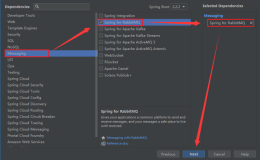
二、Spring集成Rabbit MQ示例1
1.创建一个新的maven工程demo1。
2.pom文件依赖如下。


    <dependency>
      <groupId>junit</groupId>
      <artifactId>junit</artifactId>
      <version>4.12</version>
      <scope>test</scope>
    </dependency>
    <dependency>
        <groupId>org.springframework.amqp</groupId>
        <artifactId>spring-rabbit</artifactId>
        <version>1.6.1.RELEASE</version>
    </dependency>
    <dependency>
        <groupId>org.springframework</groupId>
        <artifactId>spring-beans</artifactId>
        <version>4.3.1.RELEASE</version>
    </dependency>
    <dependency>
        <groupId>org.springframework</groupId>
        <artifactId>spring-test</artifactId>
        <version>4.3.1.RELEASE</version>
    </dependency>
3.创建application.properties文件。
#mq
mq.username=guest
mq.password=guest
mq.addresses=127.0.0.1:5672
4.创建spring公共配置文件applicationContext.xml。
<?xml version="1.0" encoding="UTF-8"?>
<beans xmlns="http://www.springframework.org/schema/beans"
       xmlns:xsi="http://www.w3.org/2001/XMLSchema-instance"
       xmlns:context="http://www.springframework.org/schema/context"
       xsi:schemaLocation="http://www.springframework.org/schema/beans http://www.springframework.org/schema/beans/spring-beans-4.0.xsd
        http://www.springframework.org/schema/context http://www.springframework.org/schema/context/spring-context-4.0.xsd"
       default-lazy-init="true">

    <description>Spring公共配置</description>

    <bean id="propertyConfigurer"
        class="org.springframework.beans.factory.config.PropertyPlaceholderConfigurer">
        <property name="locations">
            <list>
                <value>classpath*:application.properties</value>
            </list>
        </property>
    </bean>

    <bean id="configProperties"
        class="org.springframework.beans.factory.config.PropertiesFactoryBean">
        <property name="locations">
            <list>
                <value>classpath*:application.properties</value>
            </list>
        </property>
    </bean>

    <context:component-scan base-package="com.hjz.rabbit" />
</beans>
5.创建Rabbit MQ的配置文件。
<?xml version="1.0" encoding="UTF-8"?>
<beans xmlns="http://www.springframework.org/schema/beans"
    xmlns:xsi="http://www.w3.org/2001/XMLSchema-instance"
    xmlns:context="http://www.springframework.org/schema/context"
    xmlns:rabbit="http://www.springframework.org/schema/rabbit"
    xsi:schemaLocation="http://www.springframework.org/schema/beans
    http://www.springframework.org/schema/beans/spring-beans.xsd
    http://www.springframework.org/schema/context
    http://www.springframework.org/schema/context/spring-context.xsd
    http://www.springframework.org/schema/rabbit
    http://www.springframework.org/schema/rabbit/spring-rabbit-1.4.xsd">

    <description>rabbitmq 连接服务配置</description>
    <!-- 连接配置 -->
    <rabbit:connection-factory id="connectionFactory" addresses="${mq.addresses}"  username="${mq.username}" password="${mq.password}" />
    <rabbit:admin connection-factory="connectionFactory"/>

    <!-- spring template声明-->
    <rabbit:template id="amqpTemplate" exchange="test-mq-exchange"  connection-factory="connectionFactory"  message-converter="jsonMessageConverter" />

    <!-- 消息对象json转换类 -->
    <bean id="jsonMessageConverter" class="org.springframework.amqp.support.converter.Jackson2JsonMessageConverter" />
    <!--
        消息队列Queue
        durable:是否持久化
        exclusive: 仅创建者可以使用的私有队列,断开后自动删除
        auto_delete: 当所有消费客户端连接断开后,是否自动删除队列
    -->
    <rabbit:queue id="test_queue_id" name="test_queue_name" durable="true" auto-delete="false" exclusive="false" />

    <!--
        交换机定义
        rabbit:direct-exchange:定义exchange模式为direct,意思就是消息与一个特定的路由键完全匹配,才会转发。
        rabbit:binding:设置消息queue匹配的key
        打印的消息实体:(Body:'{"id":"02cf5aee-d56d-4b54-ad76-a7ec6d4720b6","type":null,"params":null,"body":"大家好,我是hjzgg!!!"}' MessageProperties [headers={__TypeId__=com.hjz.rabbit.common.MqMessage}, timestamp=null, messageId=null, userId=null, receivedUserId=null, appId=null, clusterId=null, type=null, correlationId=null, correlationIdString=null, replyTo=null, contentType=application/json, contentEncoding=UTF-8, contentLength=0, deliveryMode=null, receivedDeliveryMode=PERSISTENT, expiration=null, priority=0, redelivered=false, receivedExchange=, receivedRoutingKey=test_queue_name, receivedDelay=null, deliveryTag=1, messageCount=0, consumerTag=amq.ctag-HyePMBO-c59W3z9q9DRaug, consumerQueue=test_queue_name])
        key 对应的就是  receivedRoutingKey 对应的值, 而这个值就是在 amqpTemplate.convertAndSend(queueName, message) 中的 queueName。如果rabbit:template 不配置 exchange属性,那么 receivedRoutingKey 就是 队列的 name值
    -->
    <rabbit:direct-exchange name="test-mq-exchange" durable="true" auto-delete="false" id="test-mq-exchange">
        <rabbit:bindings>
            <rabbit:binding queue="test_queue_name" key="test_queue_routing_key"/>
        </rabbit:bindings>
    </rabbit:direct-exchange>
    <!--
        监听配置
        queues:监听的队列,多个的话用逗号(,)分隔
        ref:监听器
    -->
    <rabbit:listener-container connection-factory="connectionFactory" acknowledge="auto">
        <rabbit:listener queues="test_queue_name" ref="queueListenter"/>
    </rabbit:listener-container>
</beans>
6.新建MQ消息实体类(MqMessage.java)。
public class MqMessage implements Serializable {
    private static final long serialVersionUID = -6791105187137215924L;

    private String id;
    private String type;
    //保留参数
    private Object params;
    private Object body;

    public String getId() {
        return id;
    }
    public void setId(String id) {
        this.id = id;
    }
    public String getType() {
        return type;
    }
    public void setType(String type) {
        this.type = type;
    }
    public Object getBody() {
        return body;
    }
    public void setBody(Object body) {
        this.body = body;
    }
    public Object getParams() {
        return params;
    }
    public void setParams(Object params) {
        this.params = params;
    }

}
7.新建MQ消息发送接口 (MQSender.java)。
import com.hjz.rabbit.common.MqMessage;
public interface MQSender {
    /**
     * 发送消息到指定队列
     * @param message
     * @param queueName
     */
    void sendMessage(MqMessage message, String queueName);
}
8.新建MQ消息发送实现类 MQSenderImpl.java。
import java.util.UUID;

import org.springframework.amqp.core.AmqpTemplate;
import org.springframework.beans.factory.annotation.Autowired;
import org.springframework.stereotype.Component;

import com.hjz.rabbit.api.MQSender;
import com.hjz.rabbit.common.MqMessage;

@Component
public class MQSenderImpl implements MQSender {

    @Autowired
    private AmqpTemplate amqpTemplate;

    @Override
    public void sendMessage(MqMessage message, String queueName) {
        if(message==null){
            System.out.println("消息发送失败:消息为null");
            return;
        }
        if(message.getId()==null){
            message.setId(UUID.randomUUID().toString());
        }
        amqpTemplate.convertAndSend(queueName, message);
    }
}

/*
    convertAndSend:将Java对象转换为消息发送到匹配Key的交换机中Exchange,由于配置了JSON转换,这里是将Java对象转换成JSON字符串的形式。
  原文:Convert a Java object to an Amqp Message and send it to a default exchange with a specific routing key.
*/
9.创建消息监听器QueueListenter.java。
import org.springframework.amqp.core.Message;
import org.springframework.amqp.core.MessageListener;
import org.springframework.stereotype.Component;

@Component("queueListenter")
public class QueueListenter implements MessageListener {

    @Override
    public void onMessage(Message msg) {
        try{
            System.out.print(msg.toString());
        }catch(Exception e){
            e.printStackTrace();
        }
    }

}
10.终于到最后一步了,新建测试类。
import org.junit.Test;
import org.junit.runner.RunWith;
import org.springframework.beans.factory.annotation.Autowired;
import org.springframework.test.context.ContextConfiguration;
import org.springframework.test.context.junit4.SpringJUnit4ClassRunner;

import com.hjz.rabbit.api.MQSender;
import com.hjz.rabbit.common.MqMessage;

@RunWith(value = SpringJUnit4ClassRunner.class)
@ContextConfiguration(locations = {"classpath*:applicationContext.xml", "classpath*:applicationContext-mq.xml"})
public class TestQueue{
    @Autowired
    private MQSender mqSender;

    final String queueName = "test_queue_routing_key";

    @Test
    public void send(){
        MqMessage message = new MqMessage();
        message.setBody("大家好,我是hjzgg!!!");
        mqSender.sendMessage(message, queueName);
    }
}
11.最终结果,消息监听器中的输出如下。
(Body:'{"id":"723db571-1b0e-4ea5-aad4-dbfed01d158a","type":null,"params":null,"body":"大家好,我是hjzgg!!!"}' MessageProperties [headers={__TypeId__=com.hjz.rabbit.common.MqMessage}, timestamp=null, messageId=null, userId=null, receivedUserId=null, appId=null, clusterId=null, type=null, correlationId=null, correlationIdString=null, replyTo=null, contentType=application/json, contentEncoding=UTF-8, contentLength=0, deliveryMode=null, receivedDeliveryMode=PERSISTENT, expiration=null, priority=0, redelivered=false, receivedExchange=test-mq-exchange, receivedRoutingKey=test_queue_routing_key, receivedDelay=null, deliveryTag=1, messageCount=0, consumerTag=amq.ctag-PSySAf57jb5fU99UgoG2kA, consumerQueue=test_queue_name])
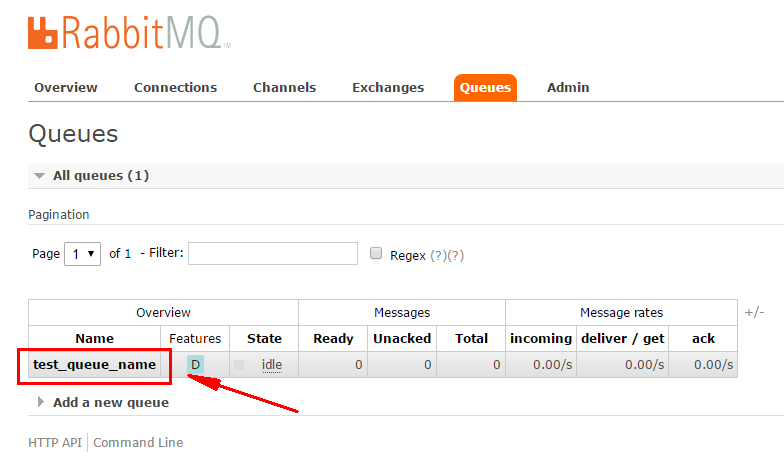
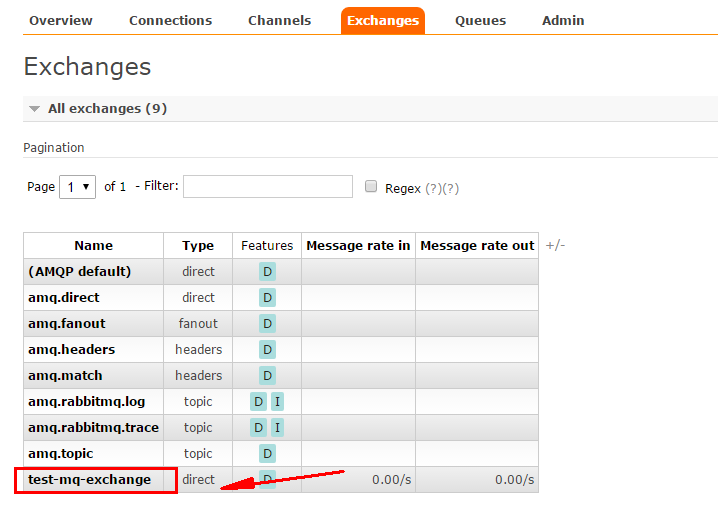
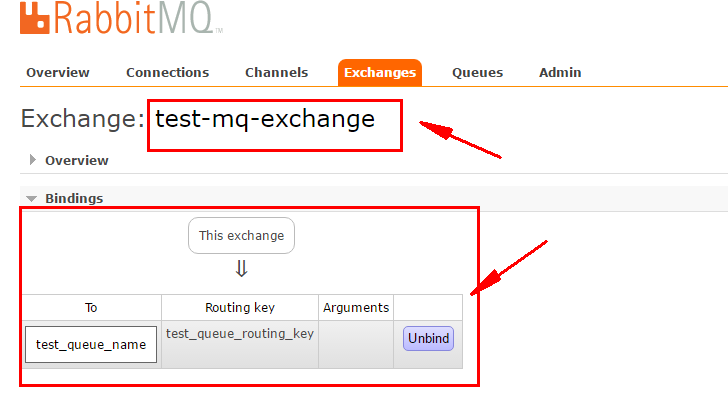
12.浏览器中输入“http://localhost:15672/”,进入 Rabbit MQ的管理系统,查看 queue和exchange对应的相关信息如下。
三、Spring集成Rabbit MQ示例2
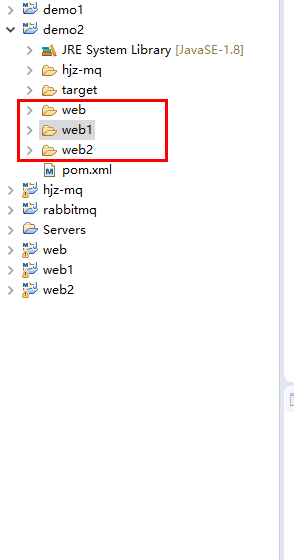
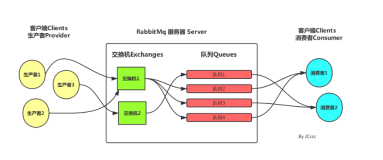
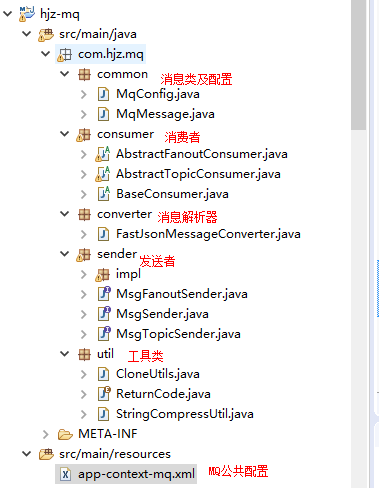
1.对MQ的生产者和消费者做了一些简单的封装,同一放到了一个工程下面里。无论是生产者还是消费者,只需要依赖上这个工程对应的jar就可以了。另外就是依赖上这个工程中MQ对应的XML文件。工程的基本结构如下所示。
2.XML文件如下。
<?xml version="1.0" encoding="UTF-8"?>
<beans xmlns="http://www.springframework.org/schema/beans"
    xmlns:xsi="http://www.w3.org/2001/XMLSchema-instance"
    xmlns:context="http://www.springframework.org/schema/context"
    xmlns:rabbit="http://www.springframework.org/schema/rabbit"
    xsi:schemaLocation="http://www.springframework.org/schema/beans
    http://www.springframework.org/schema/beans/spring-beans.xsd
    http://www.springframework.org/schema/context
    http://www.springframework.org/schema/context/spring-context.xsd
    http://www.springframework.org/schema/rabbit
    http://www.springframework.org/schema/rabbit/spring-rabbit-1.4.xsd">

    <!-- 连接服务配置  -->
    <rabbit:connection-factory id="myConnectionFactory" addresses="${mq.addresses}"  username="${mq.username}" password="${mq.password}" publisher-confirms="false"/>
    <!-- spring amqp默认的是jackson 的一个插件,目的将生产者生产的数据转换为json存入消息队列,由于fastjson的速度快于jackson,这里替换为fastjson的一个实现 -->
    <bean id="myJsonMessageConverter" class="com.hjz.mq.converter.FastJsonMessageConverter"></bean>
    <bean id="myRetryConnTemplate" class="org.springframework.retry.support.RetryTemplate">
        <property name="backOffPolicy">
            <bean class="org.springframework.retry.backoff.ExponentialBackOffPolicy">
                <property name="initialInterval" value="500"/>
                <property name="multiplier" value="10.0"/>
                <property name="maxInterval" value="5000"/>
            </bean>
        </property>
    </bean>
    <bean id="myRabbitAdmin" class="org.springframework.amqp.rabbit.core.RabbitAdmin">
        <constructor-arg ref="myConnectionFactory" />
    </bean>
    <bean id="myRabbitTemplate"  class="org.springframework.amqp.rabbit.core.RabbitTemplate">
        <constructor-arg ref="myConnectionFactory"></constructor-arg>
        <property name="messageConverter" ref="myJsonMessageConverter"></property>
    </bean>

    <!-- 消费端用于监听 -->
    <!-- <bean id="myListenerContainer"  class="org.springframework.amqp.rabbit.listener.SimpleMessageListenerContainer">
        <property name="connectionFactory" ref="myConnectionFactory"></property>
    </bean>  -->

    <!-- 发送端 -->
    <bean id="msgSender" class="com.hjz.mq.sender.impl.MsgSenderImpl" />

    <!--
        <rabbit:queue id="dev_spot_queue_ack" name="dev_spot_queue_ack" durable="true" auto-delete="false" exclusive="false"/>
        <rabbit:listener-container connection-factory="connectionFactory" acknowledge="manual">
            <rabbit:listener queues="dev_spot_queue_ack" ref="xxx"/>
        </rabbit:listener-container>
     -->
</beans>
3.消费者。
package com.hjz.mq.consumer;

import javax.annotation.Resource;

import org.apache.commons.lang3.ArrayUtils;
import org.slf4j.Logger;
import org.slf4j.LoggerFactory;
import org.springframework.amqp.core.AcknowledgeMode;
import org.springframework.amqp.core.Message;
import org.springframework.amqp.core.MessageProperties;
import org.springframework.amqp.core.Queue;
import org.springframework.amqp.rabbit.core.ChannelAwareMessageListener;
import org.springframework.amqp.rabbit.core.RabbitAdmin;
import org.springframework.amqp.rabbit.core.RabbitTemplate;
import org.springframework.amqp.rabbit.listener.SimpleMessageListenerContainer;
import org.springframework.beans.factory.DisposableBean;
import org.springframework.beans.factory.InitializingBean;

import com.alibaba.fastjson.JSON;
import com.hjz.mq.common.MqMessage;
import com.rabbitmq.client.Channel;

public abstract class BaseConsumer implements  InitializingBean,ChannelAwareMessageListener,DisposableBean {
    protected static Logger logger = LoggerFactory.getLogger(BaseConsumer.class);
    @Resource(name="myRabbitAdmin")
    private RabbitAdmin rabbitAdmin;
    @Resource(name="myRabbitTemplate")
    private RabbitTemplate rabbitTemplate;
    //@Resource(name="myListenerContainer")
    private SimpleMessageListenerContainer listenerContainer;

    private static final String EXCHANGE_NAME = "directExchange";

    public static final String DEFAULT_CHARSET = "UTF-8";

    public void afterPropertiesSet(){
        String[] queueNames = this.getQueueNames();
        if(ArrayUtils.isEmpty(queueNames)){
            //throw new RuntimeException("请设置需要消费的队列");
            logger.warn("没有设置需要消费的队列");
            return;
        }
        // 声明交换器
        /*DirectExchange exchange = new DirectExchange(EXCHANGE_NAME);
        rabbitAdmin.declareExchange(exchange);

        Binding binding = BindingBuilder.bind(queue).to(exchange).with(getRoutingKey());
        rabbitAdmin.declareBinding(binding);*/
        //声明一个监听容器
        listenerContainer = new SimpleMessageListenerContainer();
        listenerContainer.setConnectionFactory(rabbitTemplate.getConnectionFactory());
        Queue[] queues = new Queue[queueNames.length];
        //注册监听
        for(int i=0,len=queueNames.length;i<len;i++){
            String queueName = queueNames[i];
            Queue queue = new Queue(queueName,true,false,false);
            rabbitAdmin.declareQueue(queue);
            queues[i] = queue;
        }
        listenerContainer.addQueues(queues);
        listenerContainer.setPrefetchCount(1);
        listenerContainer.setAcknowledgeMode(AcknowledgeMode.MANUAL);
        listenerContainer.setMessageListener(this);
        listenerContainer.start();
    }

    public void destroy(){
        logger.debug("关闭监听...");
        if(listenerContainer!=null){
            listenerContainer.stop();
        }
    }

    @Override
    public void onMessage(Message message, Channel channel) throws Exception {
        String msg = new String(message.getBody(), DEFAULT_CHARSET);
        logger.debug("接收到消息:"+msg);
        MessageProperties msgProps = message.getMessageProperties();
        //确认接收到消息
        channel.basicAck(msgProps.getDeliveryTag(), false);
        try{
            MqMessage mqMessage = JSON.parseObject(msg, MqMessage.class);
            if(mqMessage==null || mqMessage.getBody() == null){
                logger.error("消息体为空,舍弃!");
                return;
            }
            doConsumeMsg(mqMessage);
            logger.debug("消息消费完成");
        }catch(Exception ex){
            logger.error("消息消费失败:",ex);
        }
    }
    protected abstract void doConsumeMsg(MqMessage mqMessage);

    protected abstract String[] getQueueNames();

//    protected abstract String[] getRoutingKey();
}
4.生产者。
package com.hjz.mq.sender.impl;

import java.util.HashSet;
import java.util.Set;
import java.util.UUID;
import javax.annotation.Resource;
import org.slf4j.Logger;
import org.slf4j.LoggerFactory;
import org.springframework.amqp.core.Queue;
import org.springframework.amqp.rabbit.core.RabbitAdmin;
import org.springframework.amqp.rabbit.core.RabbitTemplate;

import com.hjz.mq.common.MqMessage;
import com.hjz.mq.sender.MsgSender;

public class MsgSenderImpl implements MsgSender {
    private Logger logger = LoggerFactory.getLogger(MsgSenderImpl.class);
    @Resource(name="myRabbitAdmin")
    private RabbitAdmin rabbitAdmin;
    @Resource(name="myRabbitTemplate")
    private RabbitTemplate rabbitTemplate;
    private static final String defaultRouteKey = "";
    private static final String utf8Encode = "UTF-8";

    private static Set<String> queueHashSet=new HashSet<String>();

    /**
     * appcode:exchange
     * businessCode:routekey
     */
    @Override
    public void sendMessage(MqMessage message, String queueName) {
        if(message==null){
            logger.warn("消息发送失败:消息为null");
            return;
        }
        if(!queueHashSet.contains(queueName)){
            Queue queue = new Queue(queueName,true,false,false);
            rabbitAdmin.declareQueue(queue);
            //添加到集合中用于判断
            queueHashSet.add(queueName);
        }
        if(message.getId()==null){
            message.setId(UUID.randomUUID().toString());
        }
        rabbitTemplate.convertAndSend(queueName, message);
    }
}
示例中去掉了 Exchange,可以在完整项目中查看关于Exchange的配置。
5.消费者web2工程
继承封装过的MQ消费者抽象类,实现为实现的方法,将消息放入全局application对象中。
package com.hjz.rabbit.consumer;

import java.util.ArrayList;
import java.util.List;
import javax.servlet.ServletContext;
import org.springframework.beans.factory.annotation.Autowired;
import org.springframework.stereotype.Component;
import com.hjz.mq.common.MqConfig;
import com.hjz.mq.common.MqMessage;
import com.hjz.mq.consumer.BaseConsumer;

@Component
public class Consumer extends BaseConsumer {

    @Autowired
    private ServletContext application;

//    private ServletContext application = ContextLoader.getCurrentWebApplicationContext().getServletContext();

    @SuppressWarnings("unchecked")
    @Override
    protected void doConsumeMsg(MqMessage mqMessage) {
        if(application.getAttribute("MQ_MESSAGE") == null) {
            application.setAttribute("MQ_MESSAGE", new ArrayList<Object>());
        }
        ((List<Object>)application.getAttribute("MQ_MESSAGE")).add(mqMessage.getBody());
    }

    @Override
    protected String[] getQueueNames() {
        return new String[] {MqConfig.MQ_QUEUE_ADD, MqConfig.MQ_QUEUE_SAVE, MqConfig.MQ_QUEUE_UPDATE};
    }
}
从全局application对象中获取消息并返回。
package com.hjz.rabbit.web;

import java.util.ArrayList;
import java.util.List;

import javax.servlet.ServletContext;

import org.springframework.beans.factory.annotation.Autowired;
import org.springframework.stereotype.Controller;
import org.springframework.web.bind.annotation.RequestMapping;
import org.springframework.web.bind.annotation.ResponseBody;

import com.alibaba.fastjson.JSONObject;
import com.hjz.mq.util.CloneUtils;
import com.hjz.mq.util.ReturnCode;

@Controller
@RequestMapping("consumer")
public class MQConsumer {

    @Autowired
    private ServletContext application;

    @SuppressWarnings("unchecked")
    @RequestMapping("process")
    @ResponseBody
    public JSONObject consumer() {
        JSONObject ans = new JSONObject();
        try {
            if(application.getAttribute("MQ_MESSAGE") == null) {
                application.setAttribute("MQ_MESSAGE", new ArrayList<Object>());
            }
            List<Object> data = (List<Object>) application.getAttribute("MQ_MESSAGE");
            ans.put("code", ReturnCode.SUCCESS.getValue());
            ans.put("data", CloneUtils.clone(data));
            data.clear();
        } catch(Exception e) {
            e.printStackTrace();
            ans.put("code", ReturnCode.FAILURE.getValue());
            ans.put("msg", e.getMessage().matches(ReturnCode.REGEX_CHINESE.getValue()) ? e.getMessage() : "内部异常");
        }
        return ans;
    }
}
spring公共配置文件中<beans/>属相中加入如下配置。
default-lazy-init="false"
6.生产者web1工程
package com.hjz.rabbit.web;

import java.util.UUID;

import org.springframework.beans.factory.annotation.Autowired;
import org.springframework.stereotype.Controller;
import org.springframework.web.bind.annotation.RequestMapping;
import org.springframework.web.bind.annotation.ResponseBody;

import com.alibaba.fastjson.JSONObject;
import com.hjz.mq.common.MqConfig;
import com.hjz.mq.common.MqMessage;
import com.hjz.mq.sender.MsgSender;
import com.hjz.mq.util.ReturnCode;

@Controller
@RequestMapping("producer")
public class MQProducer {

    @Autowired
    private MsgSender mqSender;

    @RequestMapping("process")
    @ResponseBody
    public JSONObject producer() {
        JSONObject ans = new JSONObject();
        try {
            String msg = "随机消息 " + UUID.randomUUID().toString();
            MqMessage message = new MqMessage();
            message.setBody(msg);
            mqSender.sendMessage(message, MqConfig.MQ_QUEUE_ADD);
            ans.put("code", ReturnCode.SUCCESS.getValue());
            ans.put("data", msg);
        } catch(Exception e) {
            ans.put("code", ReturnCode.FAILURE.getValue());
            ans.put("msg", e.getMessage().matches(ReturnCode.REGEX_CHINESE.getValue()) ? e.getMessage() : "內部錯誤");
        }
        return ans;
    }
}
7.简单模拟MQ消息发送和接收web工程
<!DOCTYPE html>
<html>
<head>
<meta http-equiv="Content-Type" content="text/html; charset=UTF-8">
<title>消息展示</title>
<script src="/web/scripts/boot.js" type="text/javascript"></script>
<link href="/web/scripts/miniui/themes/default/large-mode.css"
    rel="stylesheet" type="text/css" />
<link href="/web/scripts/miniui/themes/bootstrap/skin.css"
    rel="stylesheet" type="text/css" />

<style>
.container {
    padding: 30px;
}

.container .mini-panel {
    margin-right: 20px;
    margin-bottom: 20px;
}
</style>
</head>
<body>
    <div class="container">
        <div class="mini-clearfix ">
            <div class="mini-col-6">
                <div class="mini-panel" title="发送消息" width="auto" height="auto"
                    showCollapseButton="true" showCloseButton="false">
                    <div id="panel_send" class="mini-panel" title="模拟消息发送"
                        iconCls="icon-upload" style="width: 600px; height: 300px;"
                        showToolbar="false" showCollapseButton="true" showFooter="false"
                        allowResize="true" collapseOnTitleClick="true"></div>
                </div>
            </div>
            <div class="mini-col-6">
                <div class="mini-panel mini-panel-primary" title="接收消息" width="auto"
                    showCollapseButton="true" showCloseButton="false">
                    <div id="panel_receive" class="mini-panel mini-panel-primary"
                        title="模拟消息接收" iconCls="icon-download"
                        style="width: 600px; height: 300px;" showToolbar="false"
                        showCollapseButton="true" showFooter="false" allowResize="true"
                        collapseOnTitleClick="true"></div>
                </div>
            </div>
        </div>
    </div>
</body>
<script type="text/javascript">
    mini.parse();
    var panel_send = mini.get('panel_send');
    var panel_receive = mini.get('panel_receive');
    $(function() {
        var myInterval = setInterval(function() {
            $.ajax({
                type : "GET",
                url : "http://localhost:8080/web1/producer/process",
                //data : "{}",
                //contentType : "application/json; charset=utf-8",
                dataType : "json",
                success : function(data) {
                    if(data.code == 'success') {
                        $(panel_send.getBodyEl()).append('<p>' + data.data + '</p>');
                    } else {
                        report(data.msg);
                    }
                },
                error : function(msg) {
                    report(msg);
                }
            });

            $.ajax({
                type : "GET",
                url : "http://localhost:8080/web2/consumer/process",
                dataType : "json",
                success : function(data) {
                    if(data.code == 'success') {
                        var div = $('<div></div>');
                        data.data.forEach(function(value) {
                            div.append('<p>' + value + '</p>');
                        });
                        $(panel_receive.getBodyEl()).append(div);
                    } else {
                        report(data.msg);
                    }
                },
                error : function(msg) {
                    report(msg);
                }
            });
        }, 3000);

        function report(msg) {
            clearInterval(myInterval);
            mini.showMessageBox({
                showModal: false,
                title: "提示",
                iconCls: "mini-messagebox-warning",
                message: typeof msg === 'object' ? JSON.stringify(msg) : msg,
                timeout: 3000,
            });
        }

    })
</script>
</html>
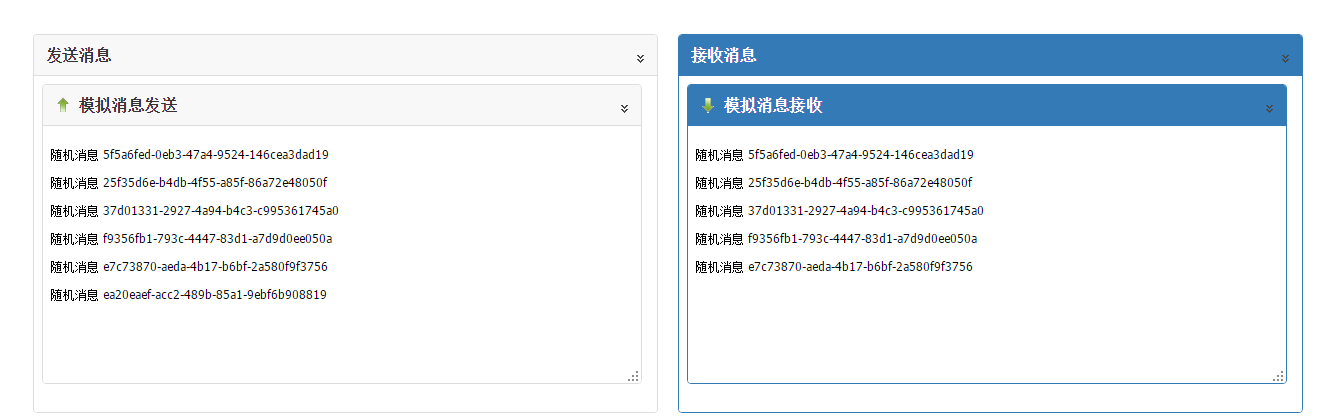
8.tomcat下启动demo2中的web,web1,web2三个工程。浏览器中输入:http://127.0.0.1:port/web,参看 MQ 模拟示例。