LAMP平台搭建
一,环境搭建
1,安装libxml
使用libxml2解析xml文件,提供函数库
|
1
2
3
4
5
6
|
[root@test3 bin]
# cd /usr/src/
[root@test3 src]
# tar xvf libxml2-2.9.0.tar.gz
[root@test3 src]
# cd libxml2-2.9.0
[root@test3 libxml2-2.9.0]
# ./configure --prefix=/usr/local/libxml2
[root@test3 libxml2-2.9.0]
# make
[root@test3 libxml2-2.9.0]
# make install
|
编译遇到的问题/bin/rm:cannotremove`libtoolt':Nosuchfileordirectory
解决:
1、确认libtool是否已经安装,如果没有安装的话,则先安装libtool
#yum-yinstalllibtool
2、分别执行以下三条命令:
#autoreconf--force--install
#libtoolize--automake--force
#automake--force--add-missing
再重新编译安装,问题解决!
这时直接打开configure,把$RM“$cfgfile”那行删除掉,重新再运行./configure就可以了
2,安装libmcrypt
libmcrypt是加密算法扩展库。支持DES,3DES,RIJNDAEL,Twofish,IDEA,GOST,CAST-256,ARCFOUR,SERPENT,SAFER+等算法。
编译安装libmcrypt之前要先安装如下编译工具和支持包libltdl
yuminstallgccgcc-c++
|
1
2
3
4
5
6
|
[root@test3 bin]
# cd /usr/src/
[root@test3 src]
# tar xvf libmcrypt-2.5.8.tar.gz
[root@test3 src]
# cd libmcrypt-2.5.8
[root@test3 libmcrypt-2.5.8]
# ./configure --prefix=/usr/local/libmcrypt
[root@test3 libmcrypt-2.5.8]
# make
[root@test3 libmcrypt-2.5.8]
# make install
|
安装完成libmcrypt库以后,不同的linux系统版本有可能还要安装一下libltdl库。安装方法和前面的步骤相同,可以进入到解压缩的目录/usr/local/src/libmcrypt-2.5.8下,找到libltdl库源代码所在的目录libltdl,进入这个目录按照下面几个命令配置、编译、安装就可以了。
|
1
2
3
4
5
|
[root@test3 libltdl]
# pwd
/usr/local/src/libmcrypt-2
.5.8
/libltdl//
进入软件源代码目录
[root@test3 libltdl]
# ./configure --enable-ltdl-install //配置ltdl库的安装
[root@test3 libltdl]
# make //编译
[root@test3 libltdl]
# make install //安装
|
3,安装zlib
zlib是提供数据压缩用的函式库
|
1
2
3
4
5
|
[root@test3 src]
# tar xvf zlib-1.2.7.tar.gz
[root@test3 src]
# cd zlib-1.2.7
[root@test3 zlib-1.2.7]
# ./configure
[root@test3 zlib-1.2.7]
# make
[root@test3 zlib-1.2.7]
# make install
|
4,安装libpng
libpng是一套免费的、公开源代码的程序库,支持对PNG图形文件的创建、读写等操作。可以到www.libpng.org上下载源代码。libpng使用zlib程序库作为压缩引擎,zlib也是著名的gzip(GNUzip)所采用的压缩引擎。zlib是通用的压缩库,提供了一套in-memory压缩和解压函数,并能检测解压出来的数据的完整性(integrity)。zlib也支持读写gzip(.gz)格式的文件这些都是免费和公开的
|
1
2
3
4
5
|
[root@test3 src]
# tar xvf libpng-1.5.14.tar.gz
[root@test3 src]
# cd libpng-1.5.14
[root@test3 libpng-1.5.14]
# ./configure --prefix=/usr/local/libpng
[root@test3 libpng-1.5.14]
# make
[root@test3 libpng-1.5.14]
# make install
|
5,安装jpeg8
利用jpeg库实现多种图片格式安装GD2库前所需的jpeg8库文件,需要自己手动创建安装需要的目录,它们在安装时不能自动创建
|
1
2
3
4
5
6
7
8
9
10
|
[root@test3 src]
# mkdir /usr/local/jpeg8 //软件安装目录
[root@test3 src]
# mkdir /usr/local/jpeg8/bin //命令目录
[root@test3 src]
# mkdir /usr/local/jpeg8/lib //库函数的目录
[root@test3 src]
# mkdir /usr/local/jpeg8/include //建立存放头文件目录
[root@test3 src]
# mkdir -p /usr/local/jpeg8/man/man1 //帮助手册
[root@test3 src]
# tar xvfz jpegsrc.v8b.tar.gz
[root@test3 src]
# cd jpeg-8b/
[root@test3 jpeg-8b]
# ./configure --prefix=/usr/local/jpeg8/ --enable-shared --enable-static
[root@test3 jpeg-8b]
# make
[root@test3 jpeg-8b]
# make install
|
6,安装freet
|
1
2
3
4
5
6
|
#tar zxvf freetype-2.4.10.tar.gz //解压包到freetype-2.4.10目录
#cd freetype-2.4.10 //进入目录freetype-2.4.10中
#./configure --prefix=/usr/local/freetype
//
选项--prefix=
/usr/local/freetype
,是在安装时将软件安装到
/usr/local/freetype
目录下
#make //对软件源代码文件进行编译
#make install //开始安装freetype库文件
|
7,安装atuoconf
|
1
2
3
4
5
|
[root@test3 src]
# tar xvf autoconf-2.69.tar.gz
[root@test3 src]
# cd autoconf-2.69
[root@test3 autoconf-2.69]
# ./configure
[root@test3 autoconf-2.69]
# make
[root@test3 autoconf-2.69]
# make install
|
8,安装GD
在php中使用gd库来对图像进行操作,GD为是一个动态的开放的创建图像的源代码公开的函数库。可以从官方网站www.boutell.com/gd处下载,目前GD库支持gif,png,jpeg,wbmp,xbm等多种图像格式。GD库通常用于对图像的处理。
解压gd包
[root@test3src]#tarxvfzgd-2.0.35.tar.gz
vigd_png.c
找到#include"png.h"改成#include"/usr/local/libpng/include/png.h"
否则报错:
make[2]:***[gd_png.lo]Error1
make[2]:Leavingdirectory`/tmp/gd-2.0.35'
make[1]:***[all-recursive]Error1
make[1]:Leavingdirectory`/tmp/gd-2.0.35'
make:***[all]Error2
编译安装GD
|
1
2
3
4
|
[root@test3 src]
# cd gd-2.0.35
[root@test3 gd-2.0.35]
# ./configure --prefix=/usr/local/gd --with-jpeg=/usr/local/jpeg8/ --with-png=/usr/local/libpng/ --with-freetype=/usr/local/freetype/
[root@test3 gd-2.0.35]
# make
[root@test3 gd-2.0.35]
# make install
|
二,编译安装apache
1,安装apr和apr-util
APR(ApacheportableRun-timelibraries,Apache可移植运行库)的目的如其名称一样,主要为上层的应用程序提供一个可以跨越多操作系统平台使用的底层支持接口库。首先卸载系统中安装的apr和apr-util
[root@test3src]#rpm-eapr--nodeps
[root@test3src]#rpm-eapr-util--nodeps
编译安装apr和apr-util
|
1
2
3
4
5
6
7
8
9
10
|
[root@test3 src]
# tar xvf apr-1.4.6.tar.gz
[root@test3 src]
# cd apr-1.4.6
[root@test3 apr-1.4.6]
# ./configure --prefix=/usr/local/apr-httpd
[root@test3 apr-1.4.6]
# make
[root@test3 apr-1.4.6]
# make install
[root@test3 src]
# tar xvf apr-util-1.5.1.tar.gz
[root@test3 src]
# cd apr-util-1.5.1
[root@test3 apr-util-1.5.1]
# ./configure --prefix=/usr/local/apr-util-httpd/ --with-apr=/usr/local/apr-httpd/
[root@test3 apr-util-1.5.1]
# make
[root@test3 apr-util-1.5.1]
# make install
|
2,安装PCRE
PCRE(PerlCompatibleRegularExpressions)是一个Perl库,包括perl兼容的正规表达式库
|
1
2
3
4
5
|
unzip -o pcre-8.32.zip
#cd pcre-8.32
#./configure --prefix=/usr/local/pcre
#make
#make install
|
3,正式安装apache
|
1
2
3
4
5
6
7
8
9
10
11
12
13
14
15
16
17
18
19
20
21
22
|
[root@test3 src]#tar xvfz httpd-
2.4
.
3
.tar.gz
[root@test3 src]#cd httpd-
2.4
.
3
[root@test3 httpd-
2.4
.
3
]# ./configure \
> --prefix=/usr/local/apache2 \
> --enable-mods-shared=all \
> --enable-deflate \
> --enable-speling \
> --enable-cache \
> --enable-file-cache \
> --enable-disk-cache \
> --enable-mem-cache \
> --enable-so \
> --enable-expires=shared \
> --enable-rewrite=shared \
> --enable-
static
-support \
> --sysconfdir=/etc/httpd \
> --
with
-z=/usr/local/zlib/ \
> --
with
-apr=/usr/local/apr-httpd/ \
> --
with
-apr-util=/usr/local/apr-util-httpd/ \
> --
with
-pcre=/usr/local/pcre/ \
> --disable-userdir
[root@test3 httpd-
2.4
.
3
]#make && make install
|
启动apache,如果出现如下图就说明apache可以正常工作了
[root@test3httpd-2.4.3]#/usr/local/apache2/bin/apachectlstart
A3Z4)RA.jpg")
三,mysql数据库的编译安装
mysql-5.1.70编译
依赖包:
ncurses-devel
编译安装MySQL5.1.70
[root@test4~]#yuminstalllibtermcaplibtermcap-develimakeautoconfautomakelibtoolm4
libstdc++-develgcc-c++zlib-develncurses-devel
[root@test4~]#useradd-M-s/sbin/nologinmysql
[root@test4~]#mkdir/usr/local/mysql
[root@test4mysql-5.1.70]#./configure--prefix=/usr/local/mysql\mysql的安装目录
--enable-assembler\
--with-client-ldflags=-all-static\
--with-unix-socket-path=/tmp/mysql.sock\
--with-charset=utf8\
--enable-thread-safe-client\
--with-pthread\
--without-debug\
--with-big-tables\
--enable-community-features\
--enable-profiling\
--enable-local-infile\
--with-fast-mutexes\
--with-plugins=partition,federated,ndbcluster,innobase,csv,blackhole,myisam,innodb_plugin
四,php安装编译
编译之前,先处理一下mysql的库,默认查找libmysqlclient_r.so,可是mysql默认为libmysqlclient.so,内容完全一样,做个链接即可.但是如果有libmysqlclient_r.so就不用这么做了
#cd/usr/local/mysql/lib/mysql/
#ln-slibmysqlclient.so.16.0.0libmysqlclient_r.so
|
1
2
3
4
5
6
7
8
9
10
11
12
13
14
15
16
17
18
19
|
[root@test3 src]
# tar xvfz php-5.4.11.tar.gz
[root@test3 php-5.4.11]
# ./configure \
> --prefix=
/usr/local/php
\
> --with-config-
file
-path=
/usr/local/php/etc
\
> --with-apxs2=
/usr/local/apache2/bin/apxs
\
> --with-mysql=
/usr/local/mysql/
\
> --with-libxml-
dir
=
/usr/local/libxml2/
\
> --with-png-
dir
=
/usr/local/libpng/
\
> --with-jpeg-
dir
=
/usr/local/jpeg8/
\
> --with-freetype-
dir
=
/usr/local/freetype/
\
> --with-gd=
/usr/local/gd/
\
> --with-zlib-
dir
=
/usr/local/zlib/
\
> --with-mcrypt=
/usr/local/libmcrypt/
\
> --with-mysqli=
/usr/local/mysql/bin/mysql_config
\
> --
enable
-soap \
> --
enable
-mbstring=all \
> --
enable
-sockets
[root@test3 php-5.4.11]
#make
[root@test3 php-5.4.11]
#make install
|
报错1,make:***[ext/gd/gd.lo]Error1这个错误是php5.4的一个bug
解决方法
vi/usr/local/gd/include/gd_io.h
gdIOCtx结构中增加void*data;
typedefstructgdIOCtx
{
int(*getC)(structgdIOCtx*);
int(*getBuf)(structgdIOCtx*,void*,int);
void(*putC)(structgdIOCtx*,int);
int(*putBuf)(structgdIOCtx*,constvoid*,int);
/*seekmustreturn1onSUCCESS,0onFAILURE.Unlikefseek!*/
int(*seek)(structgdIOCtx*,constint);
long(*tell)(structgdIOCtx*);
void(*gd_free)(structgdIOCtx*);
void(*data);
}
报错2,libltdl.so.3:cannotopensharedobjectfile:Nosuchfileordirectory
make:***[ext/phar/phar.php]Error127
解决方法:
ln-s/usr/local/lib/libltdl.so.3/usr/lib/libltdl.so.3
[root@test3~]#cd/usr/local/libpng/lib/
[root@test3lib]#ls
libpng15.alibpng15.solibpng15.so.15.10.0libpng.lapkgconfig
libpng15.lalibpng15.so.15libpng.alibpng.so
可以看到libpng15.so.15
然后修改/etc/ld.so.conf文件:vi/etc/ld.so.conf
在第一行下面追加/usr/local/libpng/lib这个路径。
安装完成后,需要建立PHP配置文件。在使用configure命令安装配置时使用“--with-config-file-path=/usr/local/php/etc/”选项,指定了配置文件的位置。将源码包下面的php.ini-development文件复制到/usr/local/php/etc/中,并改名为php.ini即可,如下示:
[root@test3php-5.4.11]#cpphp.ini-development/usr/local/php/etc/php.ini
修改php.ini把;date.timezone前面的分号去掉,改成date.timezone="PRC"
整合Apache与PHP,上面编译之前,我们使用configure命令安装配置时,使用--with-apxs2=/usr/local/apache242/bin/apxs选项以使Apache2将PHP作为功能模块使用。但我们还要修改Apahce配置文件,添加PHP的支持,告诉Apache将哪些后缀作为PHP解析。例如,让Apache把.php或.phtml后缀名解析为PHP.使用vi打开Apache的配置文件/etc/httpd/httpd.conf,找到AddTypeapplication/x-gzip.gz.tgz指令选项,并在其下方添加一条指令AddTypeapplication/x-httpd-php.php.phtml。也可以将任何后缀的文件解析为PHP,只要在添加的语句中加入并用空格分开,这里以多添加一个.phtml来示例,如下示:
#IftheAddEncodingdirectivesabovearecommented-out,thenyou
#probablyshoulddefinethoseextensionstoindicatemediatypes:
AddTypeapplication/x-compress.Z
AddTypeapplication/x-gzip.gz.tgz
AddTypeapplication/x-httpd-php.php.phtml
测试PHP环境是否可以正常运行,在/usr/local/apache243/htdocs目录下建一个test.php或test.phtml的文件,内容如下示:
<?php
phpinfo();
?>
9UAQ5135Z%WB0L45S%23.jpg")
五,phpMyAdmin的安装
1、进入软件源码所在的目录/usr/local/src/中,并解压软件包phpMyAdmin-3.5.6-all-languages.tar.gz到当前目录phpMyAdmin-3.5.6-all-languages下。
2、把解压的目录phpMyAdmin-3.5.6-all-languages下的文件,全部复制到Apache的/usr/local/apache243/htdocs下,并新建一个名为phpmyadmin的目录下面,即安装完成。
[root@localhostsrc]#cp-aphpMyAdmin-3.5.6-all-languages/usr/local/apache243/htdocs/phpmyadmin
3、在使用phpmyadmin之前,也需要先配置一下。配置的方法是通过对phpmyadmin顶层目录下的config.inc.php文件中的几个选项做一些设置即可。默认不存在config.inc.php文件,我们需要手工创建一个,也可以复制config.sample.inc.php模板得到最低限度的配置文件。
[root@localhostsrc]#cd/usr/local/apache243/htdocs/phpmyadmin/
[root@localhostphpmyadmin]#cpconfig.sample.inc.phpconfig.inc.php
phpMyAdmin的配置
我们通过身份验证模式的要求,可以有两种配置方案,一种是http和cookie身份验证模式。在这两种模式下,用户必须先在一个登录窗口里输入MySQL数据库的有效用户名和密码,才能使用phpMyAdmin程序。这种做法有两个明显的好处;首先,因为MySQL数据库的密码没有出现在config.inc.php文件里,所以身份验证过程更加安全;其次,允许以不同的用户身份登录对自己的数据库进行管理。这两种身份验证模式尤其适合数据库中多个用户账号的情况。
第二种方案是,config身份验证模式。这种情况下,密码以明文形式保存在config.inc.php文件里。只需要把MySQL用户名和密码直接写入到config.inc.php文件即可。这样,在登录phpMyAdmin时就不会提示输入用户名和密码了,而只直接用config.inc.php文件里写入的用户登录。如果只是在一个本地测试系统上使用phpMyAdmin,可以使用这种模式。
1、http身份验证模式
如果想让phpMyAdmin使用HTTP身份验证模式,首先需要在config.inc.php文件做如下修改:
$cfg['Servers'][$i]['auth_type']='http';
当完成设置之后,我们启动phpMyAdmin时,屏幕上将弹出一个WEB浏览器对话框,需要在这个对话框里输入MySQL用户名和密码,才能进入phpMyAdmin操作界面。如下图示,在windows客户端用IE浏览器,访问WEB服务器的phpMyAdmin目录下的index.php文件,即可启动phpMyAdmin

2、cookie身份验证模式
cookie身份验证模式是HTTP身份验证模式的补充,不能使用HTTP身份验证模式的场合都可以使用它。cookie身份验证模式要求用户必须允许来自phpMyAdmin的cookie进入自己的计算机。即用户需要在浏览器中开启客户端的cookie功能。
如果想让phpMyAdmin使用cookie身份验证模式,除了必须修改config.inc.php文件里的auth_type语句外,还必须向blowfish_secret参数提供一个字符串。这个字符串可以是任意的,目的是在把登录时使用的用户和密码存储在客户端电脑上的cookie之前,系统将会使用这个字符串对它们进行加密码
$cfg['blowfish_secret']='a8b7c6d';
$cfg['Servers'][$i]['auth_type']='cookie';
H57LUN$AY6]D1A8C3~V5A.jpg")
3、config身份验证模式
如果想让phpMyAdmin使用config身份验证模式,首先需要在config.inc.php文件里做出如下所示的修改。把MySQL数据库的用户名和密码以明文的方式写入,具体修改内容如下
$cfg['Servers'][$i]['auth_type']='config';
/*Serverparameters*/
$cfg['Servers'][$i]['host']='localhost';
$cfg['Servers'][$i]['user']='chen';
$cfg['Servers'][$i]['password']='chen';
和上面启动phpMyAdmin的方式一样,我们在windows客户端使用IE浏览器,访问WEB服务器上的phpMyAdmin目录下的index.php文件。提供MySQL的用户名和密码就可以登录,它是使用config.inc.php中以明文方式写入的用户名和密码登录的
解决不能通过mysql.sock连接MySQL问题的办法phpmyadmin的说明书有说
ForRedHatusers,HaraldLegnersuggeststhisonthemailinglist:
OnmyRedHat-Boxthesocketofmysqlis/var/lib/mysql/mysql.sock.Inyourphp.iniyouwillfindaline
mysql.default_socket=/tmp/mysql.sock
changeitto
mysql.default_socket=/var/lib/mysql/mysql.sock
Thenrestartapacheanditwillwork.
HereisafixsuggestedbyBradUmmerinthephpwizardforum:
First,youneedtodeterminewhatsocketisbeingusedbyMySQL.
Todothis,telnettoyourserverandgototheMySQLbindirectory.Inthisdirectorythereshouldbeafilenamedmysqladmin.Type./mysqladminvariables,andthisshouldgiveyouabunchofinfoaboutyourMySQLserver,includingthesocket(/tmp/mysql.sock,forexample).
Then,youneedtotellPHPtousethissocket.
AssumingyouareusingPHP3.0.10orbetter,youcanspecifythesockettousewhenyouopentheconnection.TodothisinphpMyAdmin,youneedtocompletethesocketinformationintheconfig.inc.php3.
Forexample:$cfg['Servers'][$i]['socket']='/tmp/mysql.sock';
六,安装和使用memcached

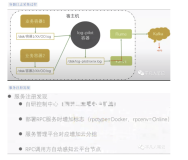
体系结构相当容易理解。我建立了一个Web层,其中包括一些Apache实例。下一层是应用程序本身。这一层通常运行于ApacheTomcat或其他开源应用服务器之上。再下面一层是配置memcached实例的地方—即应用服务器与数据库服务器之间。在使用这种配置时,需要采用稍微不同的方式来执行数据库的读取和写入操作。它可以应对任意多个连接,使用非阻塞的网络IO。由于它的工作机制是在内存中开辟一块空间,然后建立一个HashTable,Memcached自管理这些HashTable。
我执行读取操作的顺序是从Web层获取请求(需要执行一次数据库查询)并检查之前在缓存中存储的查询结果。如果我找到所需的值,则返回它。如果未找到,则执行查询并将结果存储在缓存中,然后再将结果返回给Web层。
将数据写入到数据库中时,首先需要执行数据库写入操作,然后将之前缓存的任何受此写入操作影响的结果设定为无效。此过程有助于防止缓存和数据库之间出现数据不一致性。
Memcache函数库是在PECL(PHPExtensionCommunityLibrary)中,主要作用是搭建大容量的内存数据的临时存放区域,在分布式环境下的作用体现的非常明显。
libevent是安装memcached的唯一前提条件。它是memcached所依赖的异步事件通知库。
|
1
2
3
4
5
6
|
# cd /usr/src
# wget http:
//www.monkey.org/~provos/libevent-1.4.12-stable.tar.gz
# tar vxf libevent-
1.4
.
12
-stable.tar.gz
# cd libevent-
1.4
.
12
# ./configure --prefix=/usr/local/libevent
# make && make install
|
|
1
2
3
4
5
6
7
|
#wget http:
//memcached.googlecode.com/files/memcached-1.4.13.tar.gz
#tar zxvf memcached-
1.4
.
13
.tar.gz
#cd memcached-
1.4
.
13
#./configure --prefix=/usr/local/memcached --
with
-libevent=/usr/local/libevent
#make
#make install
#ln -s /usr/local/memcached/bin/memcached /usr/local/bin/
|
2,安装memcached的php扩展
首先到http://pecl.php.net/package/memcache下载memcache的php扩展最新稳定版本
|
1
2
3
4
5
6
7
8
9
10
11
12
13
14
15
16
17
18
19
20
|
#wget http:
//pecl.php.net/get/memcache-2.2.5.tgz
#tar zxvf memcache-
2.2
.
5
.tgz
编译安装:
[root@Linux ~]#cd memcache-
2.2
.
5
[root@Linux ~]#/usr/local/php/bin/phpize
[root@Linux ~]#./configure --enable-memcache --
with
-php-config=/usr/bin/php-config --
with
-zlib-dir=/usr/local/zlib
[root@Linux ~]#make
[root@Linux ~]#make install
在php.ini文件中添加memcache扩展
[root@Linux ~]#vim /etc/php.d/php.ini
添加以下内容
extension_dir =
"/usr/local/php/lib/php/extensions/no-debug-non-zts-20060922/"
extension=memcache.so
检验memcache安装
[root@Linux ~]#php -m
[...]
memcache
mysql
mysqli
[...
|
可能会遇到error:toofewargumentstofunction‘zend_list_insert’
其实这是个bug
解决:打开memcache.c文件,
将所有的:zend_list_insert(pool,le_memcache_pool);
zend_list_insert(mmc,le_pmemcache);
改为:zend_list_insert(pool,le_memcache_poolTSRMLS_CC);
zend_list_insert(mmc,le_pmemcacheTSRMLS_CC);
保存,退出继续编译,成功搞定!
3,启动memcached
[root@Linux~]#memcached-d-m10-uroot-l127.0.0.1-p11211-c256-P/tmp/memcached
参数说明:
-
-d选项是启动一个守护进程,
-
-m是分配给Memcache使用的内存数量,单位是MB,这里是10MB,
-
-u是运行Memcache的用户,我这里是root,
-
-l是监听的服务器IP地址,如果有多个地址的话,由于是本地开发(非实际运行环境)这里指定了服务器的IP地址127.0.0.1,
-
-p是设置Memcache监听的端口,这里设置了11211,最好是1024以上的端口,
-
-c选项是最大运行的并发连接数,默认是1024,这里设置了256,按照服务器的负载量来设定,
-
-P是设置保存Memcache的pid文件,这里是保存在/tmp/memcached.pid。
#ln-s/usr/local/lib/libevent-2.0.so.5/lib64/libevent-2.0.so.5
#ldd/usr/local/bin/memcached
linux-vdso.so.1=>(0x00007fff8e9ff000)
libevent-2.0.so.5=>/lib64/libevent-2.0.so.5(0x00007fe494e34000)
libpthread.so.0=>/lib64/libpthread.so.0(0x00007fe494c17000)
libc.so.6=>/lib64/libc.so.6(0x00007fe494884000)
librt.so.1=>/lib64/librt.so.1(0x00007fe49467c000)
/lib64/ld-linux-x86-64.so.2(0x00007fe495087000)
ok,重新启动memcached
本文转自陈仲阳0 51CTO博客,原文链接:http://blog.51cto.com/wolfword/1293881