1.确认是否安装VNC服务
|
1
2
3
|
[root@justin ~]
# rpm -q vnc-server
package vnc-server is not installed
[root@justin ~]
#
|
2.安装vnc服务
系统安装盘里都有安装程序,或者直接到官网下载:点击进入下载页面
|
1
2
3
4
5
6
7
8
9
10
11
12
13
14
|
[root@justin ~]
# mount /dev/cdrom /mnt/cdrom/
mount
: block device
/dev/sr0
is write-protected, mounting
read
-only
[root@justin ~]
# cd /mnt/cdrom/Packages/
[root@justin Packages]
# find . -name "*vnc*"
.
/gtk-vnc-0
.3.10-3.el6.i686.rpm
.
/gtk-vnc-python-0
.3.10-3.el6.i686.rpm
.
/libvncserver-0
.9.7-4.el6.i686.rpm
.
/tigervnc-1
.0.90-0.17.20110314svn4359.el6.i686.rpm
.
/tigervnc-server-1
.0.90-0.17.20110314svn4359.el6.i686.rpm
[root@justin Packages]
# rpm -ivh tigervnc-server-1.0.90-0.17.20110314svn4359.el6.i686.rpm
warning: tigervnc-server-1.0.90-0.17.20110314svn4359.el6.i686.rpm: Header V3 RSA
/SHA256
Signature, key ID fd431d51: NOKEY
Preparing...
########################################### [100%]
1:tigervnc-server
########################################### [100%]
[root@justin Packages]
#
|
3.启动VNC服务vncserver :1
|
1
2
3
4
5
6
7
8
9
10
11
12
13
14
15
16
|
[root@justin Packages]
# vncserver :1
You will require a password to access your desktops.
Password:
Password must be at least 6 characters - try again
Password:
Verify:
Passwords don't match - try again
Password:
Verify:
xauth: creating new authority
file
/root/
.Xauthority
xauth: (stdin):1: bad display name
"justin:1"
in
"add"
command
New
'justin:1 (root)'
desktop is justin:1
Creating default startup script
/root/
.vnc
/xstartup
Starting applications specified
in
/root/
.vnc
/xstartup
Log
file
is
/root/
.vnc
/justin
:1.log
[root@justin Packages]
# chkconfig --level 35 vncserver on
|
说明:设置的密码保存在用户主目录下的/root/.vnc/passwd中;同时在用户主目录下的.vnc子目录中为用户自动建立xstartup配置文件(/root/.vnc/xstartup),在每次启动VND服务时,都会读取该文件中的配置信息,/root/.vnc/目录下还有一个“testdb:1.pid”文件,这个文件记录着启动VNC后对应后天操作系统的进程号,用于停止VNC服务时准确定位进程号。
VNC服务使用的端口号与桌面号相关,VNC使用TCP端口从5900开始,对应关系如下:
桌面号为“1” ---- 端口号为5901
桌面号为“2” ---- 端口号为5902
桌面号为“3” ---- 端口号为5903 ……
基于Java的VNC客户程序Web服务TCP端口从5800开始,也是与桌面号相关,对应关系如下
桌面号为“1” ---- 端口号为5801
桌面号为“2” ---- 端口号为5802
桌面号为“3” ---- 端口号为5803
如果Linux开启了防火墙功能,就需要手工开启相应的端口,如果防火墙里未开放此端口在链接的时候会报10065 10060等错误:
|
1
2
3
4
5
6
7
8
9
10
11
12
13
14
|
[root@justin ~]
# iptables -I INPUT -p tcp --dport 5901 -j ACCEPT
[root@justin ~]
# iptables -I INPUT -p tcp --dport 5801 -j ACCEPT
[root@justin ~]
# /etc/rc.d/init.d/iptables save
iptables:将防火墙规则保存到
/etc/sysconfig/iptables
: [确定]
[root@justin ~]
# iptables -L
Chain INPUT (policy ACCEPT)
target prot opt
source
destination
ACCEPT tcp -- anywhere anywhere tcp dpt:5801
ACCEPT tcp -- anywhere anywhere tcp dpt:5901
Chain FORWARD (policy ACCEPT)
target prot opt
source
destination
Chain OUTPUT (policy ACCEPT)
target prot opt
source
destination
[root@justin ~]
#
|
至此在客户端安装好vnc后就可以通过windows系统控制linux,如果之前未安装桌面环境只能通过shell操作,我这里在安装系统时候已经安装了桌面环境所以链接上来就直接到桌面


无论服务器的运行级别是3还是5,只要安装了桌面环境VNC上去都可以到桌面环境。
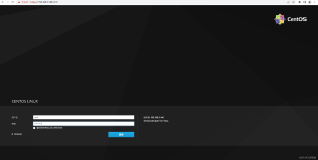
如果未安装出现的界面如下:

如果安装了图形界面vnc仍然显示以上命令界面,修改远程桌面显示配置文件,修改后的文件内容应该如下:
|
1
2
3
4
5
6
7
8
9
10
11
12
13
|
[root@localhost ~]
# vim /root/.vnc/xstartup
#!/bin/sh
# Add the following line to ensure you always have an xterm available.
# Uncomment the following two lines for normal desktop:
unset
SESSION_MANAGER
exec
/etc/X11/xinit/xinitrc
[ -x
/etc/vnc/xstartup
] &&
exec
/etc/vnc/xstartup
[ -r $HOME/.Xresources ] && xrdb $HOME/.Xresources
xsetroot -solid grey
vncconfig -iconic &
xterm -geometry 80x24+10+10 -
ls
-title
"$VNCDESKTOP Desktop"
&
#twm &
gnome-session &
|
取消上面第三行第四行前的#符号,如果你想进入VNC服务器时看到的是图形界面,那就还需要把最后面的那行注释掉,并加上gnome-session $.
4.vnc服务重启:
|
1
2
3
|
[root@justin Packages]
# vncserver -kill :1
Killing Xvnc process ID 3706
[root@justin Packages]
#
|
此时就无法再链接,提示10061的错误

再次启动服务后即可
|
1
2
3
4
5
6
|
[root@justin Packages]
# vncserver :1
xauth: (stdin):1: bad display name
"justin:1"
in
"add"
command
New
'justin:1 (root)'
desktop is justin:1
Starting applications specified
in
/root/
.vnc
/xstartup
Log
file
is
/root/
.vnc
/justin
:1.log
[root@justin Packages]
#
|

5.vnc密码修改:
|
1
2
3
4
|
[root@justin Packages]
# vncpasswd
Password:
Verify:
[root@justin Packages]
#
|
6.补充:
如果需要设置多个登陆账户需要对/etc/sysconfig/vncservers进行配置(安装的时候不是一定会生成配置文件/etc/sysconfig/vncservers)去掉VNCSERVERS和VNCSERVERARGS[1]前面的注释号,设置需要登陆的用户名和登陆桌面环境
VNCSERVERS="1:root"这个是配置远程桌面登录的用户名,如果两个用户,使用NCSERVERS="1:user1 2:user2",中间用空格隔开,依次类推,默认情况下,1:user1对应5901,2:user2对应5902(VNC的默认监听端口是5900,监听端口590+usernumber,如VNCSERVERS="usernumber:myusername" )
VNCSERVERARGS[1]=""这项配置为登录桌面配置,其中的“1”为用户序号,800x600为分辨率,-nolisten tcp为阻止tcp包,-localhost代表只监听本地,VNCSERVERARGS[1]="-geometry 800x600 -nolisten tcp -localhost"如果想阻止http包,可以使用如下配置VNCSERVERARGS[1]="-geometry 800x600 -nolisten tcp -nohttpd -localhost"

修改以后需要重新启动服务
这里在安装oracle时候用oracle运行xclocl时候报错了,后来执行./runinstaller时候提示缺少了libxp,用yum安装即可解决
重启VNC时候出现类似以下报错:
Starting VNC server: 1:root xauth: (stdin):1: bad display name "BETA5:1" in "add" command
其中BETA5是主机名,需要在/etc/hosts中将对应项修改成该主机名
|
1
2
3
4
5
6
|
[root@BETA5 ~]
# cat /etc/hosts
# Do not remove the following line, or various programs
# that require network functionality will fail.
127.0.0.1 BETA5 localhost.localdomain localhost
10.15.98.119 BETA1
[root@BETA5 ~]
#
|
如果需要安装桌面环境,可以配置本地yum源来安装,配置本地yum源可以参考之前的文章
|
1
2
|
[root@justin ~]
# yum groupinstall "X Window System"
[root@justin ~]
# yum groupinstall "Desktop"
|
or
|
1
|
[root@BETA5 ~]
# yum groupinstall "GNOME Desktop Environment" "X Window System"
|
安装完以后直接使用rpm安装我提示我们依赖关系,只是我们使用yum来安装
|
1
|
[root@localhost media]
# yum -y install vnc-server
|
后面配置和上面一致
本文转自 justin_peng 51CTO博客,原文链接:http://blog.51cto.com/ityunwei2017/1337556,如需转载请自行联系原作者