Run Hyper-V in a Virtual Machine with Nested Virtualization(使用嵌套虚拟化的虚拟机运行hyper - v)
Nested virtualization is a feature that allows you to run Hyper-V inside of a Hyper-V virtual machine. In other words, with nested virtualization, a Hyper-V host itself can be virtualized. Some use cases for nested virtualization would be to run a Hyper-V Container in a virtualized container host, set-up a Hyper-V lab in a virtualized environment, or to test multi-machine scenarios without the need for individual hardware. This document will detail software and hardware prerequisites, configuration steps, and limitations.
嵌套虚拟化是允许您在Hyper - V虚拟机内运行Hyper - V的特点。换句话说,使用嵌套虚拟化,hyper - v主机本身可以被虚拟化。一些用于嵌套虚拟化的用例将是在虚拟容器主机上运行hyper - v容器,在虚拟化环境中设置hyper - v实验室,或者在不需要单独硬件的情况下测试多机场景。本文档将详细介绍软件和硬件的先决条件、配置步骤和限制。
Prerequisites
-
A Hyper-V host running Windows Server 2016 or Windows 10 Anniversary Update.
-
A Hyper-V VM running Windows Server 2016 or Windows 10 Anniversary Update.
-
A Hyper-V VM with configuration version 8.0 or greater.
-
An Intel processor with VT-x and EPT technology.
先决条件
一个运行Windows Server 2016或Windows 10周年更新的hyper - v主机。
一个hyper - v VM运行Windows Server 2016或Windows 10周年更新。
配置版本8.0或更高版本的hyper - v VM。
一个带有vt - x和EPT技术的英特尔处理器。
Configure Nested Virtualization(配置嵌套虚拟化)
-
Create a virtual machine. See the prerequisites above for the required OS and VM versions.创建一个虚拟机。请参阅上面有关所需OS和VM版本的先决条件。
-
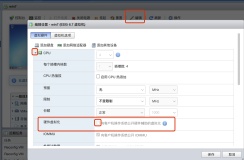
While the virtual machine is in the OFF state, run the following command on the physical Hyper-V host. This enables nested virtualization for the virtual machine.当虚拟机处于OFF状态时,在物理hyper - v主机上运行以下命令。这为虚拟机提供了嵌套虚拟化。
none
Set-VMProcessor -VMName <VMName> -ExposeVirtualizationExtensions $true
-
Start the virtual machine.虚拟机开机。
-
Install Hyper-V within the virtual machine, just like you would for a physical server. For more information on installing Hyper-V see, Install Hyper-V.在虚拟机中安装hyper - v,就像物理服务器一样。有关安装hyper - v的更多信息,请安装hyper - v。
Disable Nested Virtualization禁用嵌套虚拟化
You can disable nested virtualization for a stopped virtual machine using the following PowerShell command:您可以使用下面的PowerShell命令禁用嵌套虚拟机,使用以下PowerShell命令:
none
Set-VMProcessor -VMName <VMName> -ExposeVirtualizationExtensions $false
Dynamic Memory and Runtime Memory Resize动态内存和运行时内存大小
When Hyper-V is running inside a virtual machine, the virtual machine must be turned off to adjust its memory. This means that even if dynamic memory is enabled, the amount of memory will not fluctuate. For virtual machines without dynamic memory enabled, any attempt to adjust the amount of memory while it's on will fail.
Note that simply enabling nested virtualization will have no effect on dynamic memory or runtime memory resize. The incompatibility only occurs while Hyper-V is running in the VM.
当hyper - v在虚拟机中运行时,必须关闭虚拟机以调整其内存。这意味着即使启用了动态内存,内存容量也不会波动。对于启用了动态内存的虚拟机,任何试图在其运行时调整内存数量的尝试都将失败。
注意,仅仅启用嵌套虚拟化对动态内存或运行时内存大小没有影响。当hyper - v在VM中运行时,无法兼容。
Networking Options网络选项
There are two options for networking with nested virtual machines: MAC address spoofing and NAT mode.有两个选项可以使用嵌套虚拟机:MAC地址欺骗和NAT模式。
MAC Address SpoofingMAC地址欺骗
In order for network packets to be routed through two virtual switches, MAC address spoofing must be enabled on the first level of virtual switch. This is completed with the following PowerShell command.为了通过两个虚拟交换机路由网络数据包,必须在虚拟交换机的第一级上启用MAC地址欺骗。这是用下面的PowerShell命令完成的。
none
Get-VMNetworkAdapter -VMName <VMName> | Set-VMNetworkAdapter -MacAddressSpoofing On
Network Address Translation网络地址转换
The second option relies on network address translation (NAT). This approach is best suited for cases where MAC address spoofing is not possible, like in a public cloud environment.
First, a virtual NAT switch must be created in the host virtual machine (the "middle" VM). Note that the IP addresses are just an example, and will vary across environments:
第二种选择依赖于网络地址转换(NAT)。这种方法最适合MAC地址欺骗不可能的情况,比如在公共云环境中。
首先,虚拟NAT开关必须在主机虚拟机(“中间”VM)中创建。请注意,IP地址只是一个示例,并将在不同的环境中变化:
none
New-VMSwitch -Name VmNAT -SwitchType Internal
New-NetNat –Name LocalNAT –InternalIPInterfaceAddressPrefix “192.168.100.0/24”
Next, assign an IP address to the net adapter:接下来,为网卡分配一个IP地址:
none
Get-NetAdapter "vEthernet (VmNat)" | New-NetIPAddress -IPAddress 192.168.100.1 -AddressFamily IPv4 -PrefixLength 24
Each nested virtual machine must have an IP address and gateway assigned to it. Note that the gateway IP must point to the NAT adapter from the previous step. You may also want to assign a DNS server:每个嵌套虚拟机必须有一个IP地址和分配给它的网关。注意,网关IP必须从上一步指向NAT适配器。您可能还需要分配一个DNS服务器:
none
Get-NetAdapter "Ethernet" | New-NetIPAddress -IPAddress 192.168.100.2 -DefaultGateway 192.168.100.1 -AddressFamily IPv4 -PrefixLength 24
Netsh interface ip add dnsserver “Ethernet” address=<my DNS server>
3rd Party Virtualization Apps第三方虚拟化应用程序
Virtualization applications other than Hyper-V are not supported in Hyper-V virtual machines, and are likely to fail. This includes any software that requires hardware virtualization extensions.
在hyper - v虚拟机中,除了hyper - v之外的虚拟化应用程序不受支持,而且很可能会失败。这包括任何需要硬件虚拟化扩展的软件。
本文转自成杭 51CTO博客,原文链接:http://blog.51cto.com/hangtc/1965782,如需转载请自行联系原作者