在Linux系统上安装Domino Server是一个小小的挑战,其实并没有大家想想的复杂,既然是商业性的软件,OEM早就为我们解决了安装的难度,还有就是选择自己熟悉的Linux发行版,各个发行版操作上还是有一定的区别的,这里选择最新的Ubuntu Server 13.04,尽量在Server版本的Ubuntu上安装,虽然说Desktop版本也可以。

安装 Unbuntu server 13.4
下载Ubuntu server镜像
http://releases.ubuntu.mirrors.uk2.net//raring/ubuntu-13.04-server-amd64.iso 选择国内的镜像源
接下来就是安装了,安装也就是step by step,接下来用简单的文字和截图说明
选择语言

选择安装的类型
MAAS – Metal as a Service:他大概的功能是进行大规模服务和服务器部署,使得服务部署极具扩展性,在这里不需要它,就安装Ubuntu服务器版

确认安装的语言

确认键盘配置

按照提示输入所示字母

如出现下图,选择是,还会有几次敲键盘的机会,总之有点儿绕

默认即可

因为我环境内有DHCP,所以提示以下选择

如果没有DHCP服务这儿显示失败,继续选择 手工 填写吧


网关:

DNS服务器

主机名

域名(可填可不填)

管理员的用户名和口令,口令还会被要求确认一次


确认主目录是否要加密

时钟设置;选择“否”,因为当前提示时区为:ASLA/HARBIN


磁盘分区,默认

确认将配置写入磁盘


进入安装过程

询问是否设置http代理,选择不使用,不必填写

不选择自动更新

选择要安装的服务,只选择openssh就可以

将grub安装mbr上

安装后重启

至此Ubuntu server 13.04安装完毕
需要修改以下设置(日常命令)
从 用户切换至root sudu -s
查看ip地址:ifconfig ip address show
查看网关: route –n ip route show
添加上传工具:apt-get install lrzsz
可以通过ftp、mount进行文件上传
Netstat –anlpt | grep 110 查看110端口是否使用
‘/’’’’类似于windows中 netstat –an | find “110”
Ctrl+l 清屏
yy –复制 p 粘贴
修改IP
Vim /etc/network/network/interface
Iface etho inet static
address 192.168.220.100
gateway 192.168.220.1
netmask 255.255.255.0
network 192.168.220.0
broadcast 192.168.220.255
修改DNS
Sudo vim /etc/resolv.conf
service networking restart 重启网卡
如果在真实环境内不建议关闭防火墙,我们需要设置防火墙的入站规则
iptables -I INPUT -p tcp -m multiport --dport 25,80,110,143,443,995,465,993 -m state --state new --syn -j ACCEPT
iptables -L -v -n
/etc/init.d/iptables save
为domino 9配置Ubuntu
使用ssh工具,putty或secureCRT连接到服务器
首先确认服务器的smtp,pop,imap,http服务没有被占用,当然我们在安装服务器的时候没有选择安装其它的服务,可以省略

编辑 /etc/hosts文件
添加domino1.contoso.com domino1 domino1/contoso 到 172.16.20.50的解析
Sudo vim /etc/hosts下的文件时,进去后无法写入东西,需要按键“i”切换成编辑模式,编辑完成后按键“esc”退出编辑模式在做保存

:wq
保存并退出
如果是环境内第一台Linux for domino server的话需要单独创建notes用户及密码;
如果是附加服务器的话跳过哦此步骤
为 Domino 创建notes用户并设置密码
![]()

修改最大句柄数,即domino可以打开的文件数
![]()
在末尾处添加两行
notes soft nofile 30000
notes hard nofile 49152
![]()
:wq
保存退出
因为在下面的domino启动脚本里,是root以su的方式进行启动domino的,所以要让设置的打开文件数生效,就需要在/etc/pam.d/su 里面添加:
session required pam_limits.so
/etc/pam.d/su 中已存在这一行,但是被注释掉的,把#号删除
Sudo vim /etv/.pam.d/su(以sudo的方式打开意思就是以管理员运行)
![]()
![]()
因为装的得中文的ubuntu系统,而且要装的是英文版的domino 9,所以在setup的时候会出问题,所以要将ubuntu改为英文环境
![]()

保存并退出
执行 sudo locale-gen
修改/etc/default/locale
![]()

保存并退出
重启系统,是设置生效
Sudo reboot
Sudo Shutdown –h now 立即关机
Sudo Shutdown –r now 立即重启
因为我在真实环境中一半将domino的安装目录及数据目录会单独放在一个磁盘中,所以我也准备通过添加一块磁盘来存放domino的安装程序及数据库。
首先是挂载一块单独的磁盘:30G

通过fdisk –l命令查看所挂载磁盘是否生效;如果没有生效通过reboot命令将系统重启
以下是我重启后的结果哦

磁盘分区;我们要将新添加的磁盘分成两个区,分别存放安装程序及数据库
我们发现新磁盘所在目录/dev/sdb
创建磁盘分区 sudo fdisk /dev/sdb

通过M来显示fdisk的相关命令;我们需要添加一个新的分区,所以选择N

然后提示创建分区类型;p为主分区、e为扩展分区;默认创建主分区,然后选择分区大小:+5既为5G,回车即可

新建完我们通过fdisk -l显示当前分区;已经创建一个sdb1的主分区5G

接下来我们创建第二个分区

我们查看两个分区都要已经创建完成;sdb1 sdb2

W 保存及 退出

查看系统所有分区

格式化分区格式为:ext4(磁盘类型)
Sudo mkfs.ext4 /dev/sdb1
Sudo mkfs.ext4 /dev/sdb2


接下来我们创建两个目录:
sudo mkdir /opt/domino-install
sudo mkdir /opt/domino-data

将两个分区分别挂载到改目录
Sudo mount /dev/sdb1 /opt/domino-install
Sudo mount /dev/sdb1 /opt/domino-data

因为以上挂载只是临时挂载,系统重启后会失效,所以为了保证系统每次重启后自动挂载,我们需要修改以下参数;
vi /etc/fs
/dev/sdb1 /opt/domino-install ext4 defaults 0 0
/dev/sdb1 /opt/domino-install ext4 defaults 0 0

安装Domino 9
说道安装首先要将linux for domino安装包拷贝或者挂载到linux下才能执行安装;具体我们有两种方式:方法我们上面已经介绍了,接下来直接安装:
1. 通过安装lsasz工具上传(上传文件格式zip);
2. 通过mount命令挂载windows下共享的安装 程序;具体见下:
我们首先将加将domino安装包拷贝在192.168.220.254的C盘根目录下

然后将安装文件通过7zip解压缩工具压缩zip格式

通过执行apt-get lrasz进行安装工具
因为我通过sudo –s命令切换成root权限了,如果不是root的话,需要通过sudo apt-get lrasz

安装完成后,我们运行rz进行开始上传
Rz
sudo

选择domino安装包的压缩文件,确认

开始上传

因为我们上传的是压缩文件,需要安装解压工具
Sudo apt-get install unzip

安装完成解压工具后,我们开始解压刚才上传的domino安装文件
Unzip domino.zip

解压完成后,我们通过ls查看解压后的结果

我们发现目录多了一个domino目录

接下来我们通过mount的方式挂载windows上共享的domino 安装包
通过mount挂载windows上共享的domino for linux 安装包
我之前在192.168.220.254 的c盘下创建了一个命名为domino-install的目录
Sudo mount //192.168.220.254/domino-install /mnt –o username=gawain@dsgrd.com
通过windows共享挂载需要安装samba文件
Sudo apt-get install samba4-client cifs-utils


安装完后通过mount挂载
Sudo mount //192.168.220.254/domino-install /mnt /-o user=gawain,dom=dsgrd.com
如果没有共享目录的话也可以使用$参数,例如我安装包放在c盘或D盘命令如下
Sudo mount //192.168.220.254/c$/mnt /-o user=gawain,dom=dsgrd.com
![]()
挂载完成后,我们通过ls查你看挂载后的文件,发现/mnt目录下有linuxx64的路径

然后我们通过cd目录进入linuxx64目录,然后在通过ls查看domino目录 ,同理通过cd进入domino目录,通过ls查看可执行的文件,install;
通过sudo –s ./install 执行安装。

将安装文件放到任意目录
并给与755的权限就是普通用户具有可执行权限
![]()
到domino安装目录下执行 install安装脚本

默认是yes,回车

回车
输入 1,回车

默认为1 回车
![]()
默认0是安装全部,回车
![]()
默认1,回车,继续下一步
选择安装路径,默认为/opt/ibm/domino
我们也可以修改默认路径:/opt/domino-install

默认回车
确认是否安装分区服务器,选择no,默认为no,直接回车

![]()
默认为1,回车继续
选择 数据的存放目录,默认为:/local/notesdata回车
如果需要修改/opt/domino-data

默认为1,回车继续
确认用户名:默认为notes,我们已经创建,回车

默认组名,在创建notes用户时已经自动创建,回车继续
![]()
默认为1, 回车继续
选择完成后,配置服务器的方式,因为没有图形界面,所以选择 remote的方式,输入2
回车继续

再次回车继续:remote

![]()
默认为1,回车继续
选择安装的服务类型,默认为3 Domino Enterprise Server,回车继续

![]()
默认为1,回车继续
回车,确认安装信息

默认为1,回车继续
开始安装

默认为3 回车,结束安装

配置Domino9
切换到 notes用户下
![]()
切换时需要输入notes的密码
把目录切换到 domino的数据目录下 /local/notesdata
![]()
执行:/opt/ibm/domino/bin/server –listen

登录到一台安装有domino administrator的客户端下,进行远程配置domino server


安装的administrator确认勾选了 “remote server 安装”
如果是组织中第一台domino server,就选择第一项,如果是额外添加一台就选择第二项,这里选择组织中第一台

设置服务器的名字和主题

设置组织名称和组织验证者的密码

设置domino domain的名字,这里跟组织的名字一致

设置管理员的名字和密码,并选择id文件的存放位置,默认为红色标示的路径

选择默认要启用的服务:

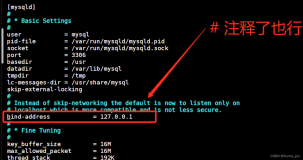
Domino网络设置:

将server.id cert.id admin.id 拷贝出一份存到管理


开始设置过程:
配置启动脚本
下载启动脚本:
Wget https://raw.github.com/ddellaquila/dd-repo/master/lotus-domino/domino_rc-script

注:如果下载不成功,通过其他电脑打开后,粘贴内容即可:
#!/bin/sh
#
#
# Lotus Domino rc-script /etc/init.d/domino
# For Debian GNU/Linux, but also usable on other distributions.
#
# Usage:
# /etc/init.d/domino {start|stop|restart|kill|help}
#
# Written by Jens Vogel in 2004 - 2007
# Inspired by written IBM documentation
#
# Modified by Danilo Dellaquila in 2007
# K-Gigas Computers S.L. <ddellaquila@gmail.com>
# Thanks Jens for your script.
# I've just put some chkconfig stuff,
# and added the Spanish language support.
#
#############################################################################
#
# This program is free software; you can redistribute it and/or modify
# it under the terms of the GNU General Public License as published by
# the Free Software Foundation; either version 2 of the License, or
# (at your option) any later version.
#
# This program is distributed in the hope that it will be useful,
# but WITHOUT ANY WARRANTY; without even the implied warranty of
# MERCHANTABILITY or FITNESS FOR A PARTICULAR PURPOSE. See the
# GNU General Public License for more details.
#
# You should have received a copy of the GNU General Public License
# along with this program; if not, write to the Free Software
# Foundation, Inc., 51 Franklin St, Fifth Floor, Boston, MA 02110-1301 USA
#
#############################################################################
#
# chkconfig: 345 95 5
# description: This script is used to start the domino
# server as a background process.
#
# http://www.desktux.nl/
# desktux@desktux.nl
# Variables
###########
# Remember to adapt everyting to your installation!
# The values below work only on default installations!
domino_user="notes"
domino_group="notes"
data_dir="/local/notesdata"
if [ -d "/opt/lotus/bin" ]; then
bin_dir="/opt/lotus/bin" # For Domino 6.5.x or older
elif [ -d "/opt/ibm/lotus/bin" ]; then
bin_dir="/opt/ibm/lotus/bin" # For Domino 7
else
bin_dir="/usr/local/bin" # If your bin_dir is somwhere else
fi
# Uncomment just one of the following
# NOTE: if you use a logfile and wish to rotate the logfile you *must* use the
# logrotate-option "copytruncate" or stop the server before rotating!
output="/dev/tty12"
#output="/var/log/domino.log"
# The password file must exist and have the permissions
# 0400 $domino_user:$domino_group!
# If you have no server password just touch an empty file.
passwd_file="${data_dir}/.domino.pwd"
# Thanks to Giorgio Fedon for pointing this out:
# In case you didn't set up your language environment correctly and have
# problems with characters specific to your language, uncomment one of the
# following or enter your own value.
#LANG="de_DE@euro"
#LANG="fr_FR@euro"
#LANG="it_IT@euro"
#LANG="nl_NL@euro"
#LANG="es_ES@euro"
export LANG
# See how we are called and take action
#######################################
function start() {
# Check for the password file
if [ ! -f $passwd_file ]; then
echo -e "\aFatal error: no password file ${passwd_file} found!"
exit 1
fi
# Just preventive: correct the rights
chmod 0400 $passwd_file
chown $domino_user:$domino_group $passwd_file
# Start the server
echo -n "Starting Domino server: "
su - $domino_user -c "cd ${data_dir}; cat ${passwd_file}|${bin_dir}/server" >> $output 2>&1 &
echo "done. Output is redirected to ${output}."
}
function stop() {
# Stop the server
echo "Stopping Domino server:"
su - $domino_user -c "cd ${data_dir}; ${bin_dir}/server -q"
echo "Done."
}
case $1 in
start)
start;;
stop)
stop;;
restart)
stop
start
;;
kill)
# Kill the server if stopping soesn't work.
# Also write an NSD file.
echo -n "Killing Domino server: "
su - $domino_user -c "cd ${data_dir}; ${bin_dir}/nsd -kill"
echo "Done."
;;
help)
# Give help for those in need...
echo -e "\nLotus Domino rc-script"
echo -e "/etc/init.d/domino {start|stop|restart|kill|help}\n"
echo "Options:"
echo "--------"
echo -e "start\tStarts the Domino Server."
echo -e "stop\tStops the Domino Server."
echo -e "restart\tRestarts the Domino Server."
echo -e "kill\tKills the Domino Server if 'stop' doesn't work.\n\tAlso writes a nsd logfile in ${data_dir}."
echo -e "help\tShow this message.\n"
echo -e "Remember to adapt the variables to your installation if you didn't run a default\nDomino installation!\n"
;;
*)
# Small usage instructions
echo "Usage: /etc/init.d/domino {start|stop|restart|kill|help}"
;;
esac
exit 0
修改脚本,修改成如下所示,
将/bin/sh 改为 /bin/bash
![]()

退出并保存
将脚本拷入到 /etc/init.d/目录,并重命名成domino,更改拥有主和拥有组为root,赋予755的权限
![]()
并注册为随机启动
sudo update-rc.d domino start 99 2 3 4 5 . stop 01 0 1 6 .

在 /local/notesdata下创建 .domino.pwd文件,内容为空
sudo touch /local/notesdata/.domino.pwd
sudo chown notes.notes /local/notesdata/.domino.pwd
sudo chmod 400 /local/notesdata/.domino.pwd

至此设置完毕
重启服务器
sudo reboot
脚本里设置的是将控制台信息放到 tty12,即第12控制台。如果是物理机,按alt+F12即可登录到tty12
如果是在vmware虚拟机里,先按着 ctrl + alt 按一下space键然后松开,再按F12就可以了

本文转自 高文龙 51CTO博客,原文链接:http://blog.51cto.com/gaowenlong/1275891,如需转载请自行联系原作者