本文模拟试验如下:
===============================================
1.Gns3连接vps
2.Gns3连接虚拟机
3.Gns3连接真机
4.Gns3将vps,虚拟机,真机互通
5.Gns3实验PBR策略路由
===============================================
实验1:Gns3连接vps
Topology

VPC1配置:

R1配置:
R1#conf t
Enter configuration commands, one per line. End with CNTL/Z.
R1(config)#int fa 0/0
R1(config-if)#ip add 192.168.1.254 255.255.255.0
R1(config-if)#no sh
R1(config-if)#do ping 192.1
*Mar 1 00:06:56.147: %LINK-3-UPDOWN: Interface FastEthernet0/0, changed state to up
*Mar 1 00:06:57.147: %LINEPROTO-5-UPDOWN: Line protocol on Interface FastEthernet0/0, changed state to up
R1(config-if)#do ping 192.168.1.2
Type escape sequence to abort.
Sending 5, 100-byte ICMP Echos to 192.168.1.2, timeout is 2 seconds:
.!!!!
Success rate is 80 percent (4/5), round-trip min/avg/max = 8/15/32 ms
Ok,实验1结束.
---------------------------------------------------------------------------------------
实验2:Gns3连接虚拟机(将虚拟机网卡设置在VMnet1上)
Topology

虚拟机:
root@badboy-virtual-machine:/home/badboy# ifconfig eth0
eth0 Link encap:Ethernet HWaddr 00:0c:29:a4:0c:45
inet addr:192.168.2.2 Bcast:192.168.2.255 Mask:255.255.255.0
inet6 addr: fe80::20c:29ff:fea4:c45/64 Scope:Link
UP BROADCAST RUNNING MULTICAST MTU:1500 Metric:1
RX packets:1280 errors:0 dropped:0 overruns:0 frame:0
TX packets:1239 errors:0 dropped:0 overruns:0 carrier:0
collisions:0 txqueuelen:1000
RX bytes:121102 (121.1 KB) TX bytes:126756 (126.7 KB)
Interrupt:19 Base address:0x2000
R1配置:
R1#conf t
Enter configuration commands, one per line. End with CNTL/Z.
R1(config)#int fa 0/0
R1(config-if)#ip add 192.168.2.254 255.255.255.0
R1(config-if)#no sh
R1测试
R1(config-if)#do ping 192.1
*Mar 1 00:03:32.319: %LINK-3-UPDOWN: Interface FastEthernet0/0, changed state to up
*Mar 1 00:03:33.319: %LINEPROTO-5-UPDOWN: Line protocol on Interface FastEthernet0/0, changed state to up
R1(config-if)#do ping 192.168.2.2
Type escape sequence to abort.
Sending 5, 100-byte ICMP Echos to 192.168.2.2, timeout is 2 seconds:
!!!!!
Success rate is 100 percent (5/5), round-trip min/avg/max = 8/13/20 ms
虚拟机测试:
root@badboy-virtual-machine:/home/badboy# ping 192.168.2.254
PING 192.168.2.254 (192.168.2.254) 56(84) bytes of data.
64 bytes from 192.168.2.254: icmp_req=1 ttl=255 time=17.6 ms
64 bytes from 192.168.2.254: icmp_req=2 ttl=255 time=29.4 ms
64 bytes from 192.168.2.254: icmp_req=3 ttl=255 time=20.3 ms
64 bytes from 192.168.2.254: icmp_req=4 ttl=255 time=30.6 ms
64 bytes from 192.168.2.254: icmp_req=5 ttl=255 time=10.6 ms
^C
--- 192.168.2.254 ping statistics ---
5 packets transmitted, 5 received, 0% packet loss, time 4034ms
rtt min/avg/max/mdev = 10.637/21.732/30.605/7.478 ms
OK,实验2结束.
-----------------------------------------------------------------------------------
实验3:Gns3连接真机(仅能用Loopback接口)
Topology

真实机配置loopback口:

R1配置:
R1(config)#int fa 0/0
R1(config-if)#ip add 192.168.3.254 255.255.255.0
R1(config-if)#no shut
R1(config-if)#
R1测试:
R1(config-if)#do ping 192.168.3.2
Type escape sequence to abort.
Sending 5, 100-byte ICMP Echos to 192.168.3.2, timeout is 2 seconds:
.!!!!
Success rate is 80 percent (4/5), round-trip min/avg/max = 4/16/28 ms
真实机测试:
C:\Users\badboy>ping 192.168.3.254
正在 Ping 192.168.3.254 具有 32 字节的数据:
来自 192.168.3.254 的回复: 字节=32 时间=36ms TTL=255
来自 192.168.3.254 的回复: 字节=32 时间=32ms TTL=255
来自 192.168.3.254 的回复: 字节=32 时间=9ms TTL=255
来自 192.168.3.254 的回复: 字节=32 时间=10ms TTL=255
192.168.3.254 的 Ping 统计信息:
数据包: 已发送 = 4,已接收 = 4,丢失 = 0 (0% 丢失),
往返行程的估计时间(以毫秒为单位):
最短 = 9ms,最长 = 36ms,平均 = 21ms
OK,实验3结束
-----------------------------------------------------------------------------
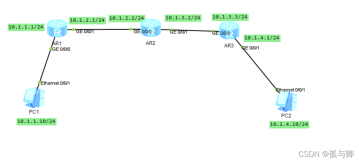
实验4:Gns3将vps,虚拟机,真机互通
Topology

R1配置:
R1(config)#int fa 0/0
R1(config-if)#ip add 192.168.3.254 255.255.255.0
R1(config-if)#no sh
R1(config-if)#int fa
*Mar 1 00:01:27.387: %LINK-3-UPDOWN: Interface FastEthernet0/0, changed state to up
*Mar 1 00:01:28.387: %LINEPROTO-5-UPDOWN: Line protocol on Interface FastEthernet0/0, changed state to up
R1(config-if)#int fa 1/0
R1(config-if)#ip add 192.168.2.254 255.255.255.0
R1(config-if)#no sh
R1(config-if)#int fa 2/0
*Mar 1 00:01:45.655: %LINK-3-UPDOWN: Interface FastEthernet1/0, changed state to up
*Mar 1 00:01:46.655: %LINEPROTO-5-UPDOWN: Line protocol on Interface FastEthernet1/0, changed state to up
R1(config-if)#int fa 2/0
R1(config-if)#ip add 192.168.1.254 255.255.255.0
R1(config-if)#no sh
R1(config-if)#
vpc配置看实验1,虚拟机配置看实验2,真机配置看实验3.
R1测试:
R1(config-if)#do ping 192.168.1.2
Type escape sequence to abort.
Sending 5, 100-byte ICMP Echos to 192.168.1.2, timeout is 2 seconds:
!!!!!
Success rate is 100 percent (5/5), round-trip min/avg/max = 16/27/36 ms
R1(config-if)#do ping 192.168.2.2
Type escape sequence to abort.
Sending 5, 100-byte ICMP Echos to 192.168.2.2, timeout is 2 seconds:
!!!!!
Success rate is 100 percent (5/5), round-trip min/avg/max = 8/18/32 ms
R1(config-if)#do ping 192.168.3.2
Type escape sequence to abort.
Sending 5, 100-byte ICMP Echos to 192.168.3.2, timeout is 2 seconds:
!!!!!
Success rate is 100 percent (5/5), round-trip min/avg/max = 8/18/32 ms
OK,实验4结束.
------------------------------------------------------------------------------
为何要花这么长时间来折腾呢?因为很多复杂的实验都需要我们将vpc和虚拟机及真实机混合起来,所以我们需要点时间来把基础的东西好好练习练习....
来把,搞点复杂的实验.
实验5:Gns3实验PBR策略路由
Topology

第1步,先将vpc,真实机,虚拟机,路由器配置对应ip
第2步,R1,R2,R3,R4添加静态路由器
R1
Gateway of last resort is not set
C 192.168.4.0/24 is directly connected, FastEthernet1/0
C 192.168.5.0/24 is directly connected, FastEthernet2/0
S 192.168.2.0/24 [1/0] via 192.168.5.253
C 192.168.3.0/24 is directly connected, FastEthernet0/0
R2
Gateway of last resort is not set
C 192.168.4.0/24 is directly connected, FastEthernet0/0
C 192.168.6.0/24 is directly connected, FastEthernet1/0
S 192.168.2.0/24 [1/0] via 192.168.6.254
S 192.168.3.0/24 [1/0] via 192.168.4.254
R3
Gateway of last resort is not set
C 192.168.5.0/24 is directly connected, FastEthernet0/0
C 192.168.7.0/24 is directly connected, FastEthernet1/0
S 192.168.2.0/24 [1/0] via 192.168.7.254
S 192.168.3.0/24 [1/0] via 192.168.5.254
R4
Gateway of last resort is not set
C 192.168.6.0/24 is directly connected, FastEthernet1/0
C 192.168.7.0/24 is directly connected, FastEthernet0/0
C 192.168.2.0/24 is directly connected, FastEthernet2/0
S 192.168.3.0/24 [1/0] via 192.168.7.253
[1/0] via 192.168.6.253
测试真实机/VPC到虚拟机-server

如果想让路由从R2走,那么只需要将R1将去往192.168.2.0的下一跳指到R2的接口上,便可以了.
但这个实验,不是我们想要的,我们需要的是将真实机访问虚拟机Server的80走R2,SSH走R3.
VPC 30这个ip走R2,40这个ip走R3.
添加ACL
R1(config)#access-list 100 permit tcp any any eq 80
R1(config)#access-list 101 permit tcp any any eq 22
R1(config)#route-map myPBR permit 10
R1(config-route-map)#match ip address 100
R1(config-route-map)#set ip next-hop 192.168.4.253
R1(config-route-map)#exit
R1(config)#route-map myPBR permit 20
R1(config-route-map)#match ip address 101
R1(config-route-map)#set ip next-hop 192.168.5.253
R1(config-route-map)#exit
R1(config)#int fa 0/0
R1(config-if)#ip policy route-map myPBR
以上就定义了80应用走R2,22应用走R3,如何测试呢.
还好,我装了wireshark
我们在访问80的时候,可以通过抓取R2连接R4之间的链路,再尝试telnet 22端口,是通的,但没有抓取到包,说明访问22走的是R3那条路.

那么,我们还需要试验VPC走不同的路噢.
R1(config)#access-list 1 permit 192.168.3.30 0.0.0.0
R1(config)#access-list 2 permit 192.168.3.40 0.0.0.0
R1(config)#route-map myPBR permit 10
R1(config-route-map)#match ip address 1
R1(config-route-map)#match ip address 100
R1(config-route-map)#set ip next-hop 192.168.4.253
R1(config-route-map)#exit
R1(config)#route-map myPBR permit 20
R1(config-route-map)#match ip address 2
R1(config-route-map)#match ip address 101
R1(config-route-map)#set ip next-hop 192.168.5.253
R1(config-route-map)#exit
R1(config)#int fa 0/0
R1(config-if)#ip policy route-map myPBR
R1(config-if)#exit
测试

到此,我的GNS3测试结束.