上节我们讲述了用户管理,本节我们讲述一下短消息管理,先看一下C#版本的界面
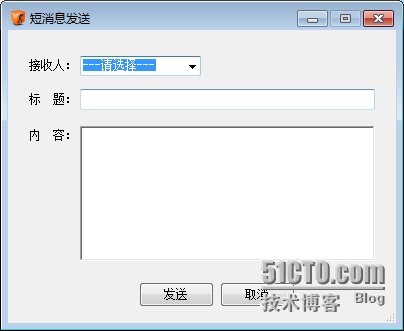
今天就是要将这个翻译成Android版本,不过这个C#版本只是将数据存到数据库,等用户登录的时候,如果发现有新消息,就会在屏幕的下方弹出短消息提示,并且播放声音“您有新短消息,请注意查收”,这个在本节不会讲到,请关注下节。
我们先看一下Android的界面,还是不错的,本次的测试机是小米2A,老婆的机子,我可怜是几年前买的Nokia 510。
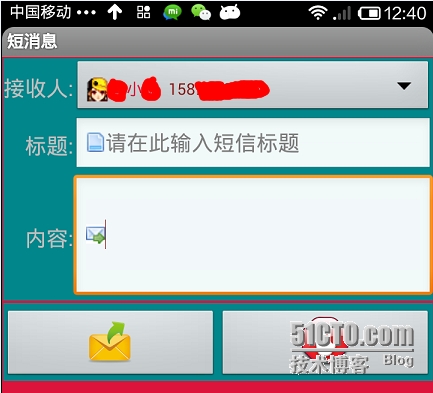
这个界面的功能是用户在界面选择一个别的用户,然后在输入标题和内容,点击发送按钮,发送短信到选择的用户的手机上,并同时将发送的数据插入数据库中,今天我们只看手机发送这部分。
首先我们先看一下WebService端,如下,我们新增了一个获取其他user信息的webservice
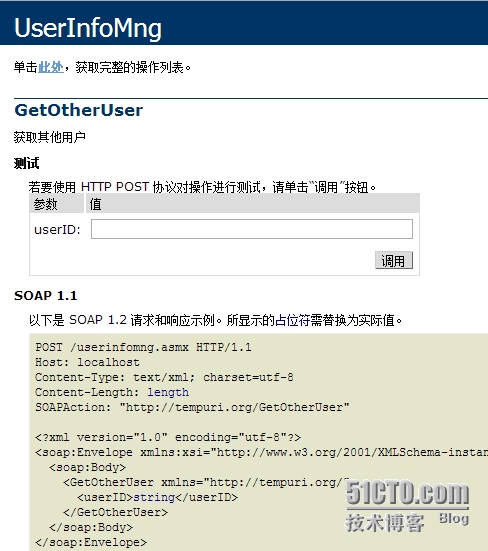
代码如下,首先是WebService
|
1
2
3
4
5
|
[WebMethod(Description =
"获取其他用户"
)]
public
List<UserInfoEntity> GetOtherUser(
string
userID)
{
return
UserInfoBiz.GetInstance().GetOtherUser(userID);
}
|
接下来是Biz层
|
1
2
3
4
|
public
List<UserInfoEntity> GetOtherUser(
string
userID)
{
return
UserInfoMngDAL.GetInstance().GetOtherUser(userID);
}
|
最后是DAL层
|
1
2
3
4
5
6
7
8
9
10
11
12
13
14
15
16
17
18
19
20
21
22
23
24
25
|
public
List<UserInfoEntity> GetOtherUser(
string
userID)
{
using
(BonusEntities bonusEntities =
new
BonusEntities())
{
List<UerInfo> userInfoList = bonusEntities.UerInfo.AsEnumerable().Where(u => u.UseNo != userID
&& !
string
.IsNullOrWhiteSpace(u.Name)
&& u.RUserTel !=
null
&& !
string
.IsNullOrWhiteSpace(u.RUserTel.TelNumber))
.ToList();
List<UserInfoEntity> otherUserInfoList =
new
List<UserInfoEntity>();
userInfoList.ForEach(u =>
{
otherUserInfoList.Add(
new
UserInfoEntity()
{
UserNo = u.UseNo,
UserName = u.Name,
TelNumber = u.RUserTel.TelNumber
});
});
return
otherUserInfoList;
}
}
|
OK,在这里我们新增了一张表,是UserInfo和UserTel的关系表
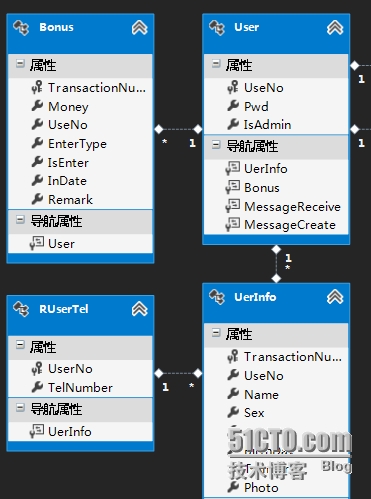
所以上面的WebService是查询出除当前user以外所有的有姓名并且有电话号码的用户,在这里我们做的是1对多的关系,当然了,也有可能某些用户是多个手机。这里为了方便,就1对多。
WebService端看完了,我们看一下Android客户端,先看布局吧,我们在layout下面新增一个布局文件叫sendmessage.xml
|
1
2
3
4
5
6
7
8
9
10
11
12
13
14
15
16
17
18
19
20
21
22
23
24
25
26
27
28
29
30
31
32
33
34
35
36
37
38
39
40
41
42
43
44
45
46
47
48
49
50
51
52
53
54
55
56
|
<?
xml
version
=
"1.0"
encoding
=
"utf-8"
?>
<
LinearLayout
xmlns:android
=
"http://schemas.android.com/apk/res/android"
android:layout_width
=
"fill_parent"
android:layout_height
=
"fill_parent"
android:background
=
"@color/red1"
android:orientation
=
"vertical"
>
<
TableLayout
android:layout_width
=
"fill_parent"
android:layout_margin
=
"1dp"
android:layout_height
=
"wrap_content"
android:stretchColumns
=
"1"
android:shrinkColumns
=
"1"
android:background
=
"@color/teal"
>
<
TableRow
>
<
TextView
android:text
=
"@string/labReceiveUser"
android:layout_gravity
=
"center_vertical"
android:textSize
=
"8pt"
></
TextView
>
<
Spinner
android:id
=
"@+id/spOtherUser"
android:layout_gravity
=
"center_vertical"
></
Spinner
>
</
TableRow
>
<
TableRow
>
<
TextView
android:text
=
"@string/labMsgTitle"
android:layout_gravity
=
"center_vertical"
android:gravity
=
"right"
android:textSize
=
"8pt"
></
TextView
>
<
EditText
android:id
=
"@+id/txtMsgTitle"
android:singleLine
=
"true"
android:layout_gravity
=
"center_vertical"
android:drawableLeft
=
"@drawable/msgtitle"
android:hint
=
"@string/hintMsgInput"
android:maxLength
=
"100"
></
EditText
>
</
TableRow
>
<
TableRow
>
<
TextView
android:text
=
"@string/labMsgContent"
android:gravity
=
"right"
android:layout_gravity
=
"center_vertical"
android:textSize
=
"8pt"
></
TextView
>
<
EditText
android:id
=
"@+id/txtMsgContent"
android:layout_gravity
=
"center_vertical"
android:layout_width
=
"wrap_content"
android:lines
=
"4"
android:maxLines
=
"4"
android:textColor
=
"@color/purplered"
android:drawableLeft
=
"@drawable/message"
android:maxLength
=
"1000"
></
EditText
>
</
TableRow
>
</
TableLayout
>
<
LinearLayout
android:orientation
=
"horizontal"
android:background
=
"@color/teal"
android:layout_margin
=
"1dp"
android:layout_width
=
"fill_parent"
android:layout_height
=
"wrap_content"
>
<
ImageButton
android:id
=
"@+id/btnSend"
android:layout_marginTop
=
"5dp"
android:layout_width
=
"wrap_content"
android:layout_height
=
"60dp"
android:src
=
"@drawable/sendmessage"
android:layout_weight
=
"1"
android:scaleType
=
"centerInside"
></
ImageButton
>
<
ImageButton
android:id
=
"@+id/btnCancel"
android:layout_marginTop
=
"5dp"
android:layout_width
=
"wrap_content"
android:layout_height
=
"60dp"
android:src
=
"@drawable/cancel"
android:layout_weight
=
"1"
android:scaleType
=
"centerInside"
></
ImageButton
>
</
LinearLayout
>
</
LinearLayout
>
|
还是Table布局,出来的效果就是第一幅图,在这个布局中,我们发现TableLayout的stretchColumns="1"并且shrinkColumns也是1。为什么么设置呢,因为如果不这样设置。文本框中的字会将文本框的宽度撑大,撑到屏幕外面去。所以,加上这两个属性,既可以保证铺满,又可以保证不超出屏幕。
接下来我们看一下后台,在页面创建完成后,有一个InitReceiveUser方法,这个方法就是获取其他userf信息并加载到Spinner的方法,我们来看一下
|
1
2
3
4
5
6
7
8
9
10
11
12
13
14
15
16
17
18
19
20
21
22
23
24
25
26
27
28
29
30
31
32
33
34
35
36
37
38
39
40
41
42
43
44
45
46
47
48
49
50
51
52
53
54
|
private
void
InitReceiveUser() {
Bundle bundle = getIntent().getExtras();
String userNo = bundle.getString(
"userNo"
);
SoapObject soapObject =
this
.GetOtherUserList(userNo);
for
(
int
i =
0
; i < soapObject.getPropertyCount(); i++) {
SoapObject soapObj = (SoapObject) soapObject.getProperty(i);
userInfoEntity =
new
UserInfoEntity();
userInfoEntity.setProperty(
0
, soapObj.getProperty(
"UserNo"
));
userInfoEntity.setProperty(
1
, soapObj.getProperty(
"UserName"
));
userInfoEntity.setProperty(
7
, soapObj.getProperty(
"TelNumber"
));
userInfoEntityList.add(userInfoEntity);
}
CustomArrayAdapter customAdapter =
new
CustomArrayAdapter(
this
,
userInfoEntityList);
spOtherUser.setAdapter(customAdapter);
spOtherUser.setPrompt(
"请选择接收人"
);
spOtherUser.setOnItemSelectedListener(
new
OnItemSelectedListener() {
@Override
public
void
onNothingSelected(AdapterView<?> parent) {
// TODO Auto-generated method stub
}
@Override
public
void
onItemSelected(AdapterView<?> arg0, View arg1,
int
position,
long
arg3) {
if
(!isFirstLoad) {
isFirstLoad =
true
;
return
;
}
// TODO Auto-generated method stub
UserInfoEntity userInfoEntity = userInfoEntityList
.get(position);
String userName = userInfoEntity.getProperty(
1
).toString();
String telNumber = userInfoEntity.getProperty(
7
).toString();
Toast toast = Toast.makeText(getApplicationContext(),
"姓名:"
+ userName +
",电话:"
+ telNumber, Toast.LENGTH_LONG);
toast.setGravity(Gravity.CENTER,
0
,
0
);
LinearLayout toastContentView = (LinearLayout) toast.getView();
ImageView imgToast =
new
ImageView(getApplicationContext());
imgToast.setImageResource(R.drawable.receiveuser);
toastContentView.addView(imgToast,
0
);
toast.show();
}
});
}
|
首先我们会拿到index界面传过来的userNo,然后调用webService得到一个UserInfoEntityList,这一步相当于我们已经有了数据源。接下来我们看到了CustomArrayAdapter类,这个类是干什么的,记得上篇文章我说过,Spinner可以像Silverlight中的ComboBox一样设置模版,来显示比较复杂的内容。我们先看一下效果图
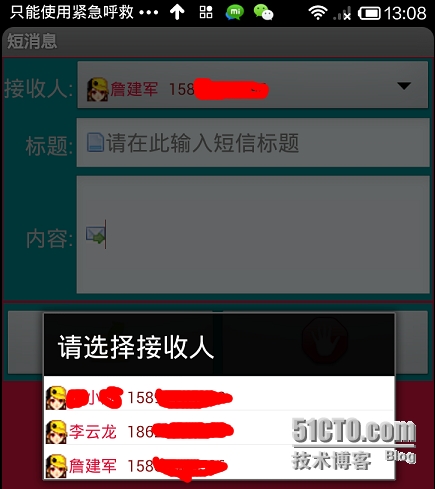
我们发现这个内容比上篇文章中的性别绚丽多了,不错,这就是要通过自定义适配器实现。
|
1
2
3
4
5
6
7
8
9
10
11
12
13
14
15
16
17
18
19
20
21
22
23
24
25
26
27
28
29
30
31
32
33
34
35
36
37
38
39
40
41
42
43
44
|
public
class
CustomArrayAdapter
extends
BaseAdapter {
private
List<UserInfoEntity> userInfoEntities;
private
Context context;
public
CustomArrayAdapter(Context context, List<UserInfoEntity> userInfoEntities) {
this
.context = context;
this
.userInfoEntities = userInfoEntities;
}
@Override
public
int
getCount() {
return
userInfoEntities.size();
}
@Override
public
Object getItem(
int
position) {
return
userInfoEntities.get(position);
}
@Override
public
long
getItemId(
int
position) {
return
position;
}
//@Override
public
View getView(
int
position, View contentView, ViewGroup parent) {
LayoutInflater _LayoutInflater = LayoutInflater.from(context);
contentView = _LayoutInflater.inflate(R.layout.spinner_userinfotemplate,
null
);
if
(contentView !=
null
) {
TextView txtUserName = (TextView)contentView
.findViewById(R.id.txtUserName);
TextView txtTelNumber = (TextView)contentView
.findViewById(R.id.txtTelNumber);
txtUserName.setText(userInfoEntities.get(position).getProperty(
1
).toString());
txtTelNumber.setText(userInfoEntities.get(position).getProperty(
7
).toString());
}
return
contentView;
}
}
|
OK,就是上面的这个自定义Adapter。意思就是将传递进来的数据源绑定到各个模版控件,这个上篇也讲过,这里不再赘述。OK,我们看一下模版(R.layout.spinner_userinfotemplate)的定义。
|
1
2
3
4
5
6
7
8
9
10
11
12
|
<?
xml
version
=
"1.0"
encoding
=
"utf-8"
?>
<
LinearLayout
xmlns:android
=
"http://schemas.android.com/apk/res/android"
android:layout_width
=
"match_parent"
android:layout_height
=
"match_parent"
>
<
TextView
android:id
=
"@+id/txtUserName"
android:layout_width
=
"wrap_content"
android:layout_height
=
"wrap_content"
android:drawableLeft
=
"@drawable/userhint"
android:textColor
=
"@color/red1"
android:paddingRight
=
"8dp"
android:paddingTop
=
"8dp"
android:textSize
=
"6pt"
/>
<
TextView
android:id
=
"@+id/txtTelNumber"
android:layout_width
=
"wrap_content"
android:layout_height
=
"wrap_content"
android:textSize
=
"6pt"
android:textColor
=
"@color/purplered"
>
</
TextView
>
</
LinearLayout
>
|
OK,正是这两个文本框来负责下拉选项的展示。所以我们将适配器应用于Spinner,效果就出来了。
|
1
2
3
|
CustomArrayAdapter customAdapter =
new
CustomArrayAdapter(
this
,
userInfoEntityList);
spOtherUser.setAdapter(customAdapter);
|
再往下看的话,就到了setOnItemSelectedListener事件,这个事件顾名思义,就是选择了选项之后触发,但是必须是在选择了和当前呈现的选项不同的选项之后才会触发,类似于Silverlight中的SelectionChanged事件。OK,在这个事件中,我们根据当前点击的行号,拿到对象,再取出姓名和手机号码。渲染一个toast并显示。效果如下
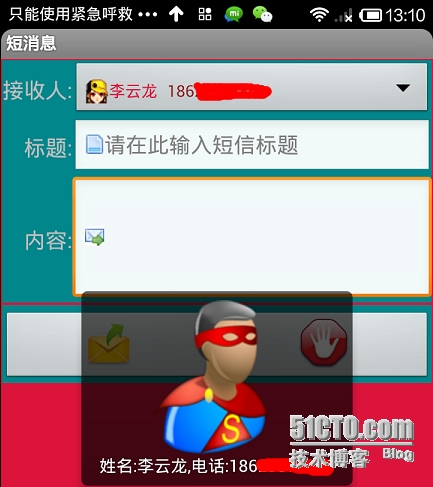
我靠,超人。在这里,你如果想让这些超人在界面上停留的事件长点,就设置这句
|
1
|
Toast.LENGTH_LONG
|
|
1
2
|
Toast toast = Toast.makeText(getApplicationContext(),
"姓名:"
+ userName +
",电话:"
+ telNumber, Toast.LENGTH_LONG);
|
如果你想让他停留的短的话,就设置成Toast.LENGTH_SHORT。
这部分看完之后,就到了我们的重头戏,发送短信。就是左边那个按钮,右边那个是退出按钮
|
1
2
3
4
5
6
|
btnCancel.setOnClickListener(
new
OnClickListener() {
public
void
onClick(View view) {
sendmessage.
this
.setResult(RESULT_OK);
sendmessage.
this
.finish();
}
});
|
我们看一下发送按钮的代码
|
1
2
3
4
5
6
7
8
9
10
11
12
13
14
15
16
17
18
19
20
21
22
23
24
25
26
27
28
29
30
31
32
33
34
35
36
37
38
|
btnSend.setOnClickListener(
new
OnClickListener() {
public
void
onClick(View view) {
SmsManager smsManager = SmsManager.getDefault();
UserInfoEntity userInfoEntity = (UserInfoEntity) spOtherUser
.getSelectedItem();
String messageAddress = userInfoEntity.getProperty(
7
)
.toString();
// 电话号码
String messageContent = txtContent.getText().toString().trim();
if
(messageAddress.trim().length() !=
0
&& messageContent.trim().length() !=
0
) {
try
{
PendingIntent pintent = PendingIntent.getBroadcast(
sendmessage.
this
,
0
,
new
Intent(),
0
);
if
(messageContent.length() >
70
) {
List<String> messageList = smsManager
.divideMessage(messageContent);
for
(String strMsg : messageList) {
smsManager.sendTextMessage(messageAddress,
null
, strMsg, pintent,
null
);
}
}
else
{
smsManager.sendTextMessage(messageAddress,
null
,
messageContent, pintent,
null
);
}
}
catch
(Exception e) {
e.printStackTrace();
}
Toast.makeText(getApplicationContext(),
"发送成功"
,
Toast.LENGTH_LONG).show();
}
}
});
|
在这里要使用SmsManager类,注意这个类需要引用的包名是import android.telephony.SmsManager;如果你引用的是android.telephony.gsm的话,意味着你的这个功能不能支持CDMA手机。android.telephony.SmsManager这个类是可以同时支持CDMA和GSM的。接着看,这段代码先拿到Spinner中选择的用户的手机号码,再从界面上拿到短消息的内容。然后就是这个pendingIntent,这个东西是对Intent的再包装,它不是立刻执行某个行为,而是满足某些条件或触发某些事件后才执行指定的行为。
这个等后面逐渐深入了,再讨论这个问题。PendingIntent构造好了之后,判断输入的短信是否大于70个字,如果大于70个字,是要分开发送的。最后调用发送短信的方法
sendTextMessage(destinationAddress, scAddress, text, sentIntent, deliveryIntent);
第一个参数:destinationAddress 对方手机号码
第二个参数:scAddress短信中心号码 设置为空
第三个参数:text短信内容
第四个参数:sentIntent判断短信是否发送成功,如果你没有插入SIM卡,或者网络中断,则可以通过这个intent来判断。注意强调的是“发送”的动作是否成功。那么至于对于对方是否收到,另当别论
第五个参数:deliveryIntent当短信发送到收件人时,会收到这个deliveryIntent。即强调了“发送”后的结果
为了简单起见,我先不做这个发送后收到回执的功能。
就是说是在"短信发送成功"和"对方收到此短信"才会激活 sentIntent和deliveryIntent这两个Intent。这也相当于是延迟执行了Intent
OK,我们发送一下试试,因为这里的标题是用来存入数据库的,所以在这里不输入
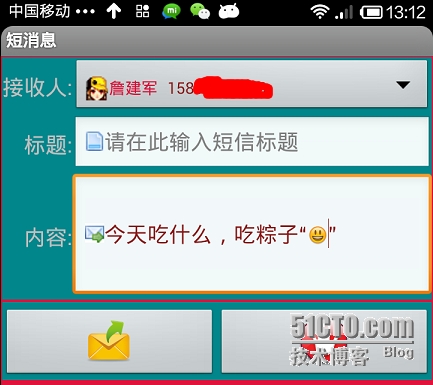
点击发送,小米会弹出是否发送的安全确认,点击确认试试,还完了说了最后一步,要把权限打开
在AndroidManifest.xml文件中,新增如下的节点,允许调用发短信功能
|
1
|
<
uses-permission
android:name
=
"android.permission.SEND_SMS"
/>
|
成功了还是没有呢
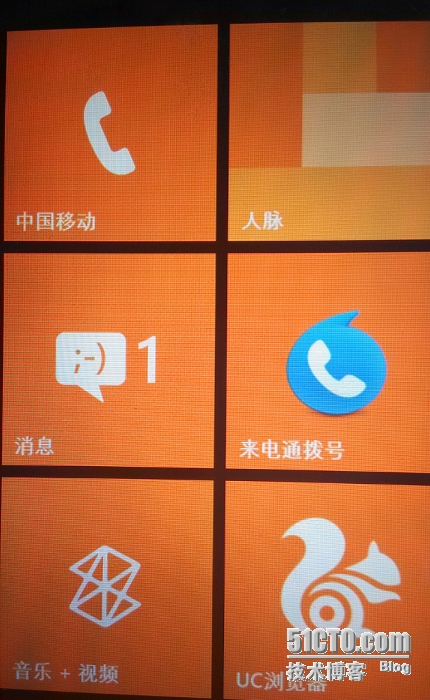
这是老夫的windows phone Nokia 510。看来是成功了,进去看看是不是刚才那条短信
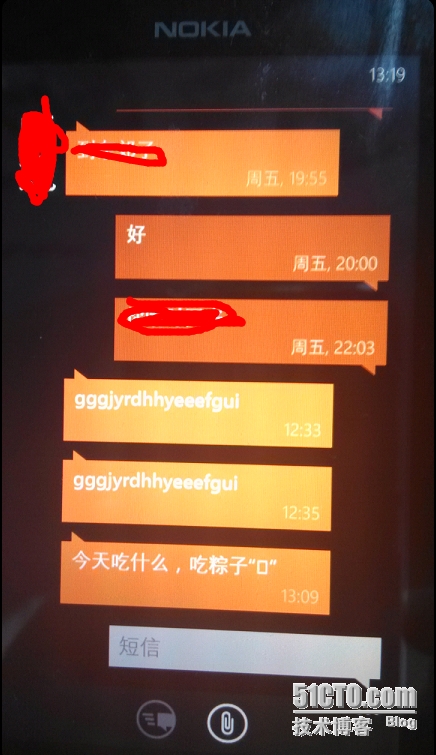
这个是我拍的照,果然成功了,就是那个笑脸么出来。好吧,今天就到这里,下节主要就是短消息管理了,敬请期待。
本文转自 BruceAndLee 51CTO博客,原文链接:http://blog.51cto.com/leelei/1420248,如需转载请自行联系原作者