这篇文章主要介绍一些在Keras中需要的常见操作。这些常见操作包括:如何保存模型并在稍后使用它们进行预测,显示数据集中的图像以及从系统中加载图像并预测其类别。
训练模型是一个循序渐进的过程,十分缓慢。但是,在这里,我们需要训练我们的模型一次,然后保存,这样我们就可以随时加载,并用它来预测新的图像。Keras将模型保存为.h5格式,如果你在作者发布的第一个教程中已经安装过h5py,请跳过,如果没有,请运行:
pip3 install h5py
我们还需要matplotlib来形象化我们的图像,因此,运行:
pip3 install matplotlib这是第一个小例子的代码:
import keras
from keras.datasets import mnist
from keras.layers import Dense
from keras.models import Sequential
from keras.optimizers import SGD
(train_x, train_y) , (test_x, test_y) = mnist.load_data()
#train_x = train_x.astype('float32') / 255
#test_x = test_x.astype('float32') / 255
print(train_x.shape)
print(train_y.shape)
print(test_x.shape)
print(test_y.shape)
train_x = train_x.reshape(60000,784)
test_x = test_x.reshape(10000,784)
train_y = keras.utils.to_categorical(train_y,10)
test_y = keras.utils.to_categorical(test_y,10)
model = Sequential()
model.add(Dense(units=128,activation="relu",input_shape=(784,)))
model.add(Dense(units=128,activation="relu"))
model.add(Dense(units=128,activation="relu"))
model.add(Dense(units=10,activation="softmax"))
model.compile(optimizer=SGD(0.001),loss="categorical_crossentropy",metrics=["accuracy"])
model.fit(train_x,train_y,batch_size=32,epochs=10,verbose=1)
accuracy = model.evaluate(x=test_x,y=test_y,batch_size=32)
print("Accuracy: ",accuracy[1])
想保存模型,需要在model.fit()之后添加:
model.save("mnist-model.h5")
2.推理:
推理是指使用我们的模型预测新图像的过程。在你的代码中,注释上:model.fit
用以替换以下的内容:model.load_weights("mnistmodel.h5")
我们的代码现在看起来像这样:
import keras
from keras.datasets import mnist
from keras.layers import Dense
from keras.models import Sequential
from keras.optimizers import SGD
(train_x, train_y) , (test_x, test_y) = mnist.load_data()
#train_x = train_x.astype('float32') / 255
#test_x = test_x.astype('float32') / 255
print(train_x.shape)
print(train_y.shape)
print(test_x.shape)
print(test_y.shape)
train_x = train_x.reshape(60000,784)
test_x = test_x.reshape(10000,784)
train_y = keras.utils.to_categorical(train_y,10)
test_y = keras.utils.to_categorical(test_y,10)
model = Sequential()
model.add(Dense(units=128,activation="relu",input_shape=(784,)))
model.add(Dense(units=128,activation="relu"))
model.add(Dense(units=128,activation="relu"))
model.add(Dense(units=10,activation="softmax"))
model.compile(optimizer=SGD(0.001),loss="categorical_crossentropy",metrics=["accuracy"])
model.load_weights("mnist-model.h5")
#model.fit(train_x,train_y,batch_size=32,epochs=10,verbose=1)
#model.save("mnistmodel.h5")
accuracy = model.evaluate(x=test_x,y=test_y,batch_size=32)
print("Accuracy: ",accuracy[1])
我们在这里所做的是从保存的模型文件中加载出模型的参数,评估函数在测试数据集上运行预测,并给出预测的准确性。
截止到目前,以上演示了如何保存模型并使用它们进行预测。真正需要解决的问题是加载出一个特定的图像,并确定它是属于什么类型的。
第一步是添加下面的代码来获得测试中的特定图像的预测:
img = test_x[130]
test_img = img.reshape((1,784))
img_class = model.predict_classes(test_img)
prediction = img_class[0]
classname = img_class[0]
print("Class: ",classname)
在这里,我们只是选择一个随机图像,在这种情况下,在测试集的索引130处,我们创建一个平整的副本,重新整形:(1,784)。
我们将这个副本加入到我们的模型中,然后我们获得预测并打印出来。
在代码中注释掉model.evaluate,添加上面的代码并运行它。
你将会输出 class :6
现在我们已经预测了,接下来我们就需要使用matplolib来显示图像及其预测的类型:
img = img.reshape((28,28))
plt.imshow(img)
plt.title(classname)
plt.show()这些操作是非常必要的,因为使用matplotlib将会非常直观的显示我们的预测结果是否正确。
这样我们的代码就会变成:
import keras
from keras.datasets import mnist
from keras.layers import Dense
from keras.models import Sequential
from keras.optimizers import SGD
import matplotlib.pyplot as plt
(train_x, train_y) , (test_x, test_y) = mnist.load_data()
train_x = train_x.reshape(60000,784)
test_x = test_x.reshape(10000,784)
train_y = keras.utils.to_categorical(train_y,10)
test_y = keras.utils.to_categorical(test_y,10)
model = Sequential()
model.add(Dense(units=128,activation="relu",input_shape=(784,)))
model.add(Dense(units=128,activation="relu"))
model.add(Dense(units=128,activation="relu"))
model.add(Dense(units=10,activation="softmax"))
model.compile(optimizer=SGD(0.001),loss="categorical_crossentropy",metrics=["accuracy"])
model.load_weights("mnistmodel.h5")
img = test_x[130]
test_img = img.reshape((1,784))
img_class = model.predict_classes(test_img)
prediction = img_class[0]
classname = img_class[0]
print("Class: ",classname)
img = img.reshape((28,28))
plt.imshow(img)
plt.title(classname)
plt.show()
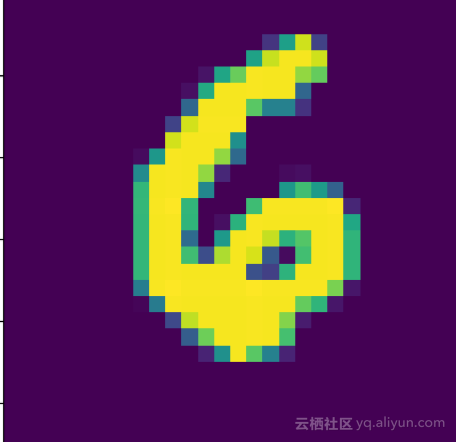
运行这段代码,你的输出应该是下面这张图片,这意味着我们已经建立了一个基本的数字识别系统,你也可以尝试不同的测试图像索引,看看将得到些什么。
但是,如果想引入测试集中没有的图像,那么你需要将以下图像保存到你的系统中,并将其复制到python文件所在的目录中。
运行下面的代码:
import keras
from keras.datasets import mnist
from keras.layers import Dense
from keras.models import Sequential
from keras.optimizers import SGD
import matplotlib.pyplot as plt
from keras.preprocessing import image
(train_x, train_y) , (test_x, test_y) = mnist.load_data()
train_x = train_x.reshape(60000,784)
test_x = test_x.reshape(10000,784)
train_y = keras.utils.to_categorical(train_y,10)
test_y = keras.utils.to_categorical(test_y,10)
model = Sequential()
model.add(Dense(units=128,activation="relu",input_shape=(784,)))
model.add(Dense(units=128,activation="relu"))
model.add(Dense(units=128,activation="relu"))
model.add(Dense(units=10,activation="softmax"))
model.compile(optimizer=SGD(0.001),loss="categorical_crossentropy",metrics=["accuracy"])
model.load_weights("mnistmodel.h5")
img = image.load_img(path="testimage.png",grayscale=True,target_size=(28,28,1))
img = image.img_to_array(img)
test_img = img.reshape((1,784))
img_class = model.predict_classes(test_img)
prediction = img_class[0]
classname = img_class[0]
print("Class: ",classname)
img = img.reshape((28,28))
plt.imshow(img)
plt.title(classname)
plt.show()
你可能会注意到我们使用了一些新的东西,首先我们从Keras.preprocessing中导入了图像,然后加了:
img = image.load_img(path="testimage.png",grayscale=True,target_size=(28,28,1))
img = image.img_to_array(img)
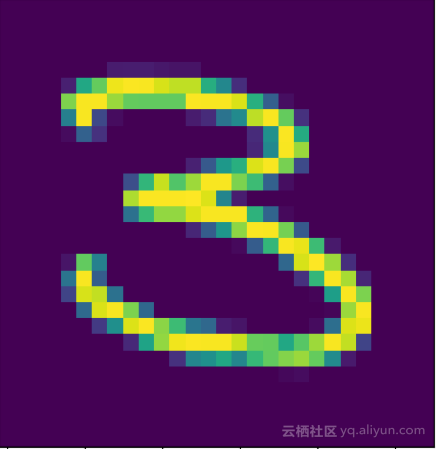
在第一行中,我们从磁盘加载图像,并指定它应该调整大小为28*28*1,请记住,这是原始mnist图像的尺寸,它的作用是让我们保持图像识别过程中的稳定。接下来,我们将图像转换为一个像素数组,这才是我们真正要识别的。运行它并自己检查结果,预测其结果是否是3。
本文由北邮@爱可可-爱生活 老师推荐,阿里云云栖社区组织翻译。
文章原标题《Basics of image classification with Keras》
译者:乌拉乌拉,审校:袁虎。
文章为简译,更为详细的内容,请查看原文文章