《Windows Azure Platform 系列文章目录》
在开始此次教学之前,我强烈建议大家先学习Windows Azure中文博客:Windows Azure 入门教学系列(八),使用Windows Azure Drive。
入门教学的例子非常简单:Windows Azure平台提供了Drive的功能,就是把Windows Azure Blob Storage变成Azure 托管服务器的一个本地盘符(比如F盘),并且支持NTFS文件系统。也就是说应用程序可以利用现有的文件管理API(包含System.IO的类型)来访问Windows Azure Drive中的文件夹与文件数据,并且这些数据会保存在Windows Azure数据中心内。这样我们可以方便的把已有的Web应用程序快速迁移到Windows Azure平台之上而不需要做很大的改动。
那为什么我们不能将文件直接保存到Windows Azure的计算节点上呢?
这是因为Windows Azure计算节点的硬盘不是一个持久化的存储,如果发生了硬件故障(比如断电、内存出错)等情况下,无法保证保存在Azure计算节点上的磁盘内容同时被迁移。也就是说,如果保存在Azure计算节点,可能会造成文件的丢失。
Azure Drive的原理如下:
当程序向Azure Drive的虚拟硬盘写入数据时,Windows Azure会同时将数据写入本地的硬盘资源(Local Storage,下面会有说明)和Blob的VHD文件。
而在应用程序从Cloud Drive中读取文件时,Windows Azure会首先查看本地缓存是否有对应的数据,如果有则直接返回给应用程序。而如果本地缓存中没有所需要的数据,那么Windows Azure将会读取BLOB中的VHD文件,然后将数据返回给应用程序,同时在本地缓存保存一个副本。
在这里我还要强调一下Azure Drive的局限性:
1)Windows Azure Drive支持的Web Role Instance Count只有1个。如果有两个实例,并且要让两个实例共享一个"Azure Drive"的话,Windows Azure Drive将不能正常工作。因为对于同一个Blob同时只能有一个Web Role Mount。
2)Mount成功的Azure Drive,返回的本地盘符路径是随机的。也就是说,在部署完Windows Azure Drive Web App的托管服务,运行成功后相对于Windows Azure 云计算平台的本地盘符路径也许是F盘。但一旦重新部署了更新版本的托管服务,Windows Azure Drive也许就是G盘了。(当然微软提供了API可以查看所有Azure Drive)。
3)存入Azure Drive的二进制文件无法使用REST API来直接访问。
Windows Azure中文博客介绍的例子一次只能挂载上一个Azure Drive。如果我们已经写好的本地应用程序要访问多个Azure Drive应该怎么办?
幸运的是有一位叫jeff00seattle的外国网友写了一个XDrive.cs类库。方便我们一次创建多个Azure Drive,并且能设置Azure Drive的ContainerName, Drive的名称, Drive的磁盘大小和缓存的大小等。英语比较好的朋友可以直接浏览jeff00seattle的网站:点这里查看。
我在jeff00seattle开发的XDrive.cs类上做了一定的修改(因为他写的有个BUG,至于具体在哪里,我卖个关子,呵呵),大家可以在这里下载我修改后的XDrive.cs类。
接下来的内容我将向大家介绍如何使用XDrive挂载多个Azure Drive。
首先我们新建一个Azure Project,名称叫做MountDrive,添加一个Web Role(过程略)。
然后我们把XDrive.cs类复制到WebRole工程目录之下,并且添加对它的引用(过程略)。
1.修改WebRole.cs文件
打开WebRole工程,修改WebRole.cs的函数,具体如下

public class WebRole : RoleEntryPoint

{
private XDrives m_XDrive = new XDrives();
public override bool OnStart()

{

Trace.Listeners.Add(new DefaultTraceListener() { LogFileName = "webrole-trace.log" });

// 当用配置文件中ConfigurationSettings时必须调用CloudStorageAccount.SetConfigurationSettingPublisher
// 来说明当配置文件在发布后被更改时将采取何种操作
            CloudStorageAccount.SetConfigurationSettingPublisher((configName, configSetter) =>

{

configSetter(RoleEnvironment.GetConfigurationSettingValue(configName));

RoleEnvironment.Changed += (sender, arg) =>

{
if (arg.Changes.OfType<RoleEnvironmentConfigurationSettingChange>()


.Any((change) => (change.ConfigurationSettingName == configName)))

{
if (!configSetter(RoleEnvironment.GetConfigurationSettingValue(configName)))

{

RoleEnvironment.RequestRecycle();

}

}

};

});

RoleEnvironment.Changing += RoleEnvironmentChanging;
// For information on handling configuration changes
// see the MSDN topic at http://go.microsoft.com/fwlink/?LinkId=166357.

//挂载Azure Drive
            m_XDrive.MountXDrives();

return base.OnStart();

}
private void RoleEnvironmentChanging(object sender, RoleEnvironmentChangingEventArgs e)

{
// If a configuration setting is changing
            if (e.Changes.Any(change => change is RoleEnvironmentConfigurationSettingChange))

{
// Set e.Cancel to true to restart this role instance
                e.Cancel = true;

}

}


public override void OnStop()

{
//卸载Azure Drive
            m_XDrive.UnmountXDrives();
base.OnStop();

}

}
2.修改Global.asax.cs文件
打开Web Role下的Global.asax.cs,修改Application_Start()函数
  private XDrives m_XDrive = new XDrives();
void Application_Start(object sender, EventArgs e)

{
//System.Diagnostics.Debugger.Break();
// Code that runs on application startup
//读取XDrives的配置函数
            m_XDrive.SetXDrivesEnvironmentVariable();

}
3.修改ServiceConfiguration.cscfg配置文件
选择MountDrive-->Roles-->WebRole-->右键-->属性
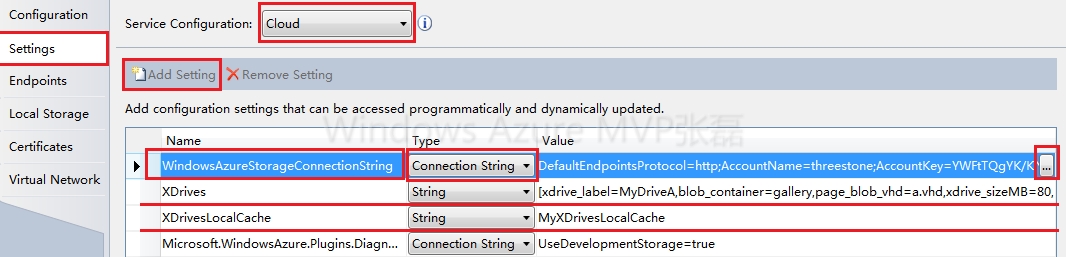
选择Settings,Service Configuration选择Cloud,然后点击Add Setting,步骤如下
1)添加Name为WindowsAzureStorageConnectionString(大小写必须一致),Type选择Connection String,在Value里选择"...",然后再弹出窗口里输入Azure Storage Account Name和主访问密钥(辅助访问密钥)。因为之前一章我们已经创建了名为threestone的Azure Storage Account,所以我们输入相关信息。注意Connection选择Use default HTTP endpoints。

2)添加Name为XDrives,Type选择String。然后输入
[xdrive_label=MyDriveA,blob_container=gallery,page_blob_vhd=a.vhd,xdrive_sizeMB=80,mount_cache_sizeMB=20,create=Yes];[xdrive_label=MyDriveB,blob_container=gallery,page_blob_vhd=b.vhd,xdrive_sizeMB=180,mount_cache_sizeMB=20,create=Yes];
上面的红色部分是可以由开发人员自己配置的,我在这里简单介绍一下:
a.我这个例子可以挂载2个Azure Drive,显示名称分别是MyDriveA和MyDriveB
如果需要挂载3个Azure Drive,我们就这样修改:
[xdrive_label=MyDriveA,blob_container=gallery,page_blob_vhd=a.vhd,xdrive_sizeMB=80,mount_cache_sizeMB=20,create=Yes];
[xdrive_label=MyDriveB,blob_container=gallery,page_blob_vhd=b.vhd,xdrive_sizeMB=180,mount_cache_sizeMB=20,create=Yes];
[xdrive_label=MyDriveC,blob_container=gallery,page_blob_vhd=c.vhd,xdrive_sizeMB=280,mount_cache_sizeMB=20,create=Yes];
b.blob_container表示Azure Blob Storage的ContainerName, ContainerName可以使用不同的名称。
page_blob_vhd表示blob的名称(为了强调这个例子是Azure Drive,我把blob名称后缀改成了.vhd,大家可以按照自己的喜好修改blob名称,但是要注意命名规则,具体请参考Windows Azure Platform (七) Windows Azure Storage Service存储服务里的相关内容)
c.xdrive_sizeMB表示创建的Azure Drive盘符的大小,我这里设置2个Azure Drive分别是80M和180M
d.mount_cache_sizeMB表示创建的Azure Drive的缓存大小,我这里都设置成20M
e.create=Yes表示我对于Azure Drive的操作权限是读写操作。
3)添加Name为XDrivesLocalCache, Type为String, Value设置成MyXDrivesLocalCache
修改后的配置文件如下
4)选择Local Storage,点击"Add Local Storage",在Name里面输入MyXDrivesLocalCache, Size设置为1000。如下图

设置完成,保存项目。
4.修改Default.aspx页面,可以到这里下载
核心代码如下:
//查询到所有已经挂载成功的Azure Drive
//string表示Azure Drive的盘符,比如F: G:等
//Uri表示可以访问的Azure Blob Uri
 IDictionary<string, Uri> dicMountedDrives = CloudDrive.GetMountedDrives();

foreach (KeyValuePair<string, Uri> mountDrive in dicMountedDrives)

{
if (mountDrive.Key == DrpMountedDrives.SelectedItem.ToString())

{

DrpMountedUrl.SelectedValue = mountDrive.Value.ToString();
return;

}

}
最后我们可以重新编译整个Azure Drive项目,并部署到微软的云计算平台。
可以通过http://leiazuredrive.cloudapp.net/来访问


我们可以看到
1)第一个Azure Drive在NTFS文件系统里盘符是B盘,对于Azure Blob Storage来说URL是
http://threestone.blob.core.windows.net/gallery/a.vhd
2)第二个Azure Drive在NTFS文件系统里盘符是F盘,对于Azure Blob Storage来说URL是
http://threestone.blob.core.windows.net/gallery/b.vhd
那我们已经写好的的Web应用程序就可以通过Azure Drive快速且方便地迁移到Windows Azure平台之上而不需要进行大量的修改。已有的System.IO的API(比如创建文件、创建文件夹、复制文件)等的操作,其实就是对于Azure Blob的操作。
我们通过Azure的远程桌面连接(后面几章我会做详细的介绍),也能看到本地已经挂载上的Azure Drive。且盘符的大小就是我们之前指定的80M和180M

参考网站:http://www.codeproject.com/Articles/81413/Windows-Azure-Drives-Part-1-Configure-and-Mounting


