学习 Neutron 系列文章:
(2)Neutron OpenvSwitch + VLAN 虚拟网络
(3)Neutron OpenvSwitch + GRE/VxLAN 虚拟网络
(4)Neutron OVS OpenFlow 流表 和 L2 Population
(9)Neutron FWaas 和 Nova Security Group
(10)Neutron VPNaas
(11)Neutron DVR
(12)Neutron VRRP
1. 基础知识
1.1 负载均衡的概念
负载均衡(Load Balancing)是将来访的网络流量在运行相同应用的多个服务器之间进行分发的一种核心网络服务。它的功能由负载均衡器(load balancer)提供。负载均衡器可以是一个硬件设备,也可以由软件实现。它充当反向代理,在多个服务器之间分发网络或者应用流量。它常用来增加应用的访问容量(并发用户数)和可靠性,它也会通过降低服务器的负载来提高应用的总体性能。

(1)负载均衡器的分类
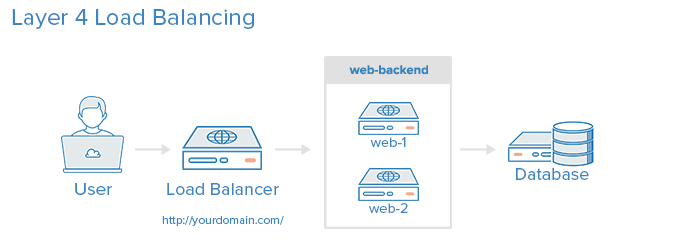
负载均衡器一般可以分为两类:第4层负载均衡器和第7层负载均衡器。
第 4 层负载平衡器:基于网络和传输层协议(IP,TCP,FTP,UDP等)来均衡负载。
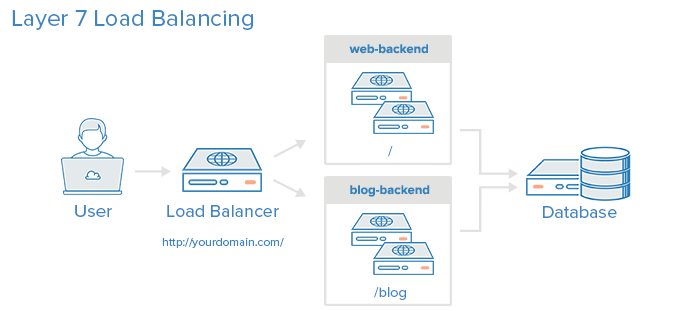
第7层的负载均衡器:基于应用层协议比如 HTTP, SMTP, SNMP, FTP, Telnet 等均衡负载。比如对 HTTP 来说,第七层的负载均衡器能根据应用的特定数据比如 HTTP 头,cookies 或者应用消息中的数据来做进一步的请求分发。
(2)负载分发算法
两种类型的负载均衡器都能接收请求,然后根据特定的算法将请求分发到特定的服务器。一些行业标准的算法是:
- 轮询 (Round robin):轮流分发到各个(活动)服务器
- 加权轮循 (Weighted round robin):每个服务器有一定的加权(weight),轮询时考虑加权。
- 最少连接 (Least connections):转发到有最少连接数的服务器
- 最少响应时间 (Least response time):转发到响应时间最短的服务器
(3)可靠性和可用性
负载均衡器通过监控应用的健康状态来确保可靠性和可用性,并且只转发请求到能及时做出响应的服务和应用。
(4)Session persistence (会话保持)
会话保持表示在一个会话期间,转发一个用户的请求到同一个后端服务器。这对购物车或者付款类的请求非常重要。 常用的方法包括:
- Source IP:相同来源的请求转发到同一个服务器
- HTTP Cookie:该模式下,loadbalancer 为客户端的第一次连接生成 cookie,后续携带该 cookie 的请求会被某个 member 处理
- APP Cookie:该模式下,依靠后端应用服务器生成的 cookie 决定被某个 member 处理
(5)常见的开源软件负载均衡器
- HAProxy
-
Linux Virtual Servers (LVS) - 包括在许多Linux发行版中的简单快速的4层负载均衡软件
-
Nginx - 一个快速可靠的web服务器也能当作代理和负载均衡器使用。它常常和 HAProxy一起用于缓存和压缩。
1.2 三种部署模式
1.2.1 tow-arms (双臂)模式
也称为 in-line 模式,或者 bridge mode 模式,或者 transparent mode。此时,所以前端访问后端的网络都需要经过 LB,它本身也成为了一种 router。可见,此时的 LB 需要两个网卡,分别连接前端和后端。
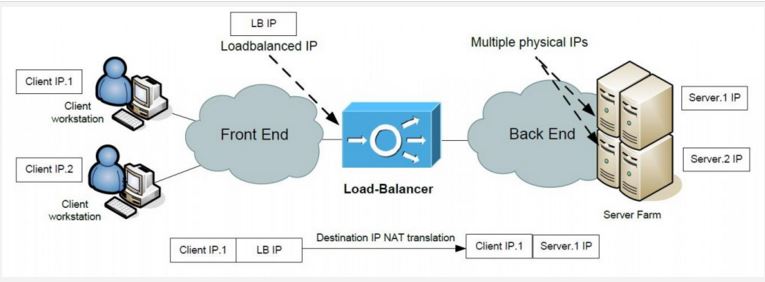
来看一个具体的 IP 地址配置示例:
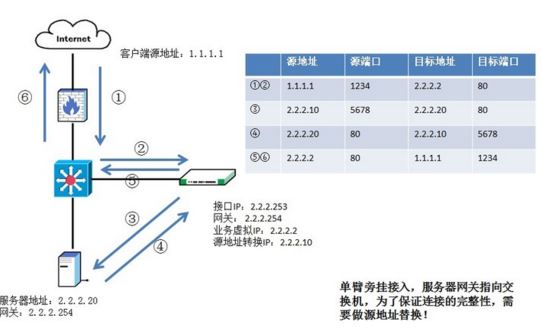
1.2.2 One-arm (单臂)模式

该模式中,LB 不处于前端和后端的通道上,而是在旁边。此时,LB 只使用一块网卡,而且该网卡和后端服务器处于同一个二层网络中。该 LB 的网卡将会被分配一个 virtual load-balanced IP (VIP)。需要注意的是,此时的 LB 需要对进来的网络包做 Source 和 Dest NAT 然后再交给某个后端服务器,使得后端服务器返回的网络包将会到达 LB 而不是直接到达前端,再由 LB 转交给前端。因为使用了 SNAT,因此后端看不到网络包的源IP,这在某些需要审计功能的情况下可能无法满足要求。
来看一个具体的 IP 地址配置示例:
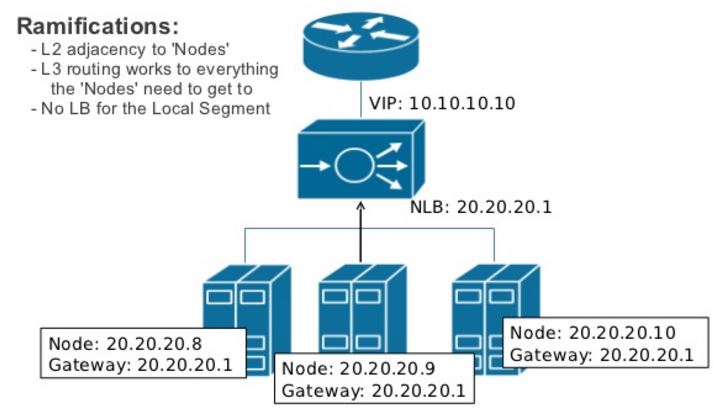
1.2.3 Direct Server Response 模式

这种模式下,LB 只接收进来的网络包,转给后端服务器后,后端服务器直接将返回包发回给客户端。这种模式的好处是,可以提高网络的吞吐量,坏处是配置较为复杂。
注:以上信息来自 Basic Load-Balancer Scenarios Explained。
1.3 High Availability Proxy(HAProxy)
HAProxy 是个著名的开源的软件 TCP(四层)/HTTP(七层) 负载均衡器和代理(proxy)软件,可以运行在 Linux,Solaris 和 FreeBSD 等系统上。它最常用的用途是通过在多个服务器(比如 web服务器,应用,数据库等)之间分发负载来改善一个服务器系统的性能和可靠性。目前,它已经被许多大公司采用,包括GitHub, Imgur, Instagram, and Twitter 等。它类似 Nginx 的,采用了单进程和事件驱动模型;它使用的内存量低而且稳定,能够处理大量并发请求。这篇文章 讲述了怎样使用 HAProxy。
主要概念:
- Frontend:定义请求如何被转发到 backend。
- Backend:一组接收转发的请求的服务器。其定义包括分发算法和一组服务器的地址和端口。
支持的分发算法:
- Round robin:平均的将网络流量分发到多个 member。
- Source IP:从某一个特定 IP 发来的网络请求,总是发到特定的 member。
- Least connections:将收到的网络请求,发给当前负载均衡池中连接数最少的 member。如果所有的 member 连接数一样,则遵循 Round robin 的方式。
一个 HAProxy + Keepalived 配置实例:

Health Check(健康检查):
HAProxy 使用 Health Check 来确定一个 backend server 能不能接收转发的请求。这避免了在服务器不可用时需要手工删除它。默认的 Health Check 是试着去和一个server 建立一个 TCP 连接,比如,检查该 backend server 是否在配置的 IP 和 端口上监听。你可以指定 health check 方法,包括 tcp,http,ping 等。
当一个 backend server 检查失败时,它就无法接受请求了,它就会自动被禁用,请求也不会被转发到该服务器上,直到它重新变为可用。如果一个 backend 内的所有服务器都 health check 失败,其对应的服务就会变得不可用。
配置文件:
HAProxy 的核心在于其配置文件(etc/haproxy/haproxy.cfg)。Neutron 的 LBaas 其实也就是生成了该配置文件,然后由 HAProxy 去执行。

global #全局配置,基本不需要修改
        log /dev/log    local0
        log /dev/log    local1 notice
        chroot /var/lib/haproxy
        stats socket /run/haproxy/admin.sock mode 660 level admin
        stats timeout 30s
        user haproxy
        group haproxy
        daemon

        # Default SSL material locations
        ca-base /etc/ssl/certs
        crt-base /etc/ssl/private

        # Default ciphers to use on SSL-enabled listening sockets.
        # For more information, see ciphers(1SSL).
        ssl-default-bind-ciphers kEECDH+aRSA+AES:kRSA+AES:+AES256:RC4-SHA:!kEDH:!LOW:!EXP:!MD5:!aNULL:!eNULL

defaults
        log     global
        mode    http
        option  httplog
        option  dontlognull
        timeout connect 5000
        timeout client  50000
        timeout server  50000
        errorfile 400 /etc/haproxy/errors/400.http
        errorfile 403 /etc/haproxy/errors/403.http
        errorfile 408 /etc/haproxy/errors/408.http
        errorfile 500 /etc/haproxy/errors/500.http
        errorfile 502 /etc/haproxy/errors/502.http
        errorfile 503 /etc/haproxy/errors/503.http
        errorfile 504 /etc/haproxy/errors/504.http

frontend localnodes #where HAProxy listens to connections
    bind *:80              #HAProxy 在所有网卡的 80 端口上监听 HTTP 请求
    mode http              #监听 HTTP 请求,这时它作为一个七层负载均衡器
    default_backend nodes  #所使用的后端服务器

backend nodes #Where HAPoxy sends incoming connections
    mode http          #转发 HTTP 包给后端服务器
    balance roundrobin #分发算法
    option forwardfor  #在 HTTP 头中添加 X-Forwarded-For 头,使得后端服务器可以获取原始请求的来源地址
    http-request set-header X-Forwarded-Port %[dst_port] #在 HTTP 头中添加 X-Forwarded-Port 头从而使得后端服务器可以知道原始的 HTTP Port
    http-request add-header X-Forwarded-Proto https if { ssl_fc } #在使用 SSL 时添加 X-Forwarded-Proto头
    option httpchk HEAD / HTTP/1.1\r\nHost:localhost #使用 health check 来检查后端服务器的可达性
    server web01 127.0.0.1:9000 check #后端服务器。”check“表示做 health check。
    server web02 127.0.0.1:9001 check
    server web03 127.0.0.1:9002 check

listen stats *:1936 #用于监控 HAProxy
    stats enable
    stats uri /
    stats hide-version
    stats auth someuser:password
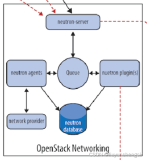
2. Neutron 中的虚拟负载均衡器
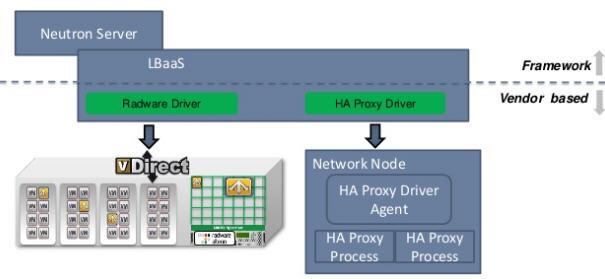
Neutron LBaas (load-balancer-as-a-service)扩展(extension)提供向在多个 Nova 虚机中运行的应用提供负载均衡的方法。它还提供 API 来快速方便地部署负载均衡器。 它早在 OpenStack 的 Grizzly 版本就集成到 Neutron 中。自集成到 Neutron 以来,LBaaS 经历过几次大的变化。目前,在最新发布的 Kilo 版本中,LBaas 代码从 Neutron 中抽离,直接由独立的项目管理,以及实现了 LBaaS V2。本文是基于 Juno 版本的 LBaas 进行分析。 OpenStack Neutron 默认以 HAProxy 为负载均衡的 driver,同时也支持 A10 network(参考链接)、netscaler、radware (参考文档)等作为 driver。
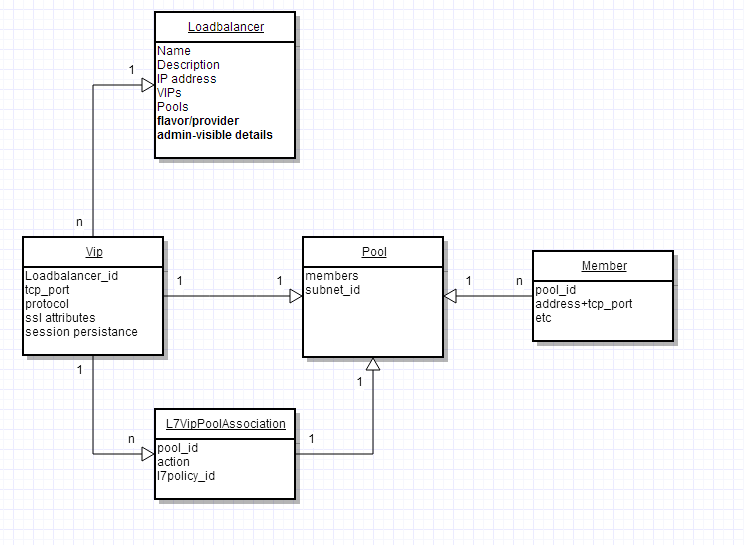
2.1 LBaas 中的概念
LBaas 可以看做 OpenStack Neutron 对各种物理负载均衡器的虚拟化。它的概念可以和 HAProxy 中的概念进行类比:
| HAProxy 的概念 | LBaas 的概念 | 说明 |
| Driver | LBaas 也是采取 driver 模型来支持多种物理的负载均衡器。LBaas 默认实现了 HAProxy driver,同时,它也支持多个其他 Vendor driver。 |
|
| Frontend | VIP(Virturl IP address) | LBaas 对外提供服务的地址。VIP 有自己的 IP 地址,而且一般都能通过公网进行访问。VIP 负责将网络流量分发到各个 member。 |
| Backend | Pool | 代表负载后端的虚拟机池。在以 HAProxy 为 Driver 的情况下,一个 Pool 对应着在一个独立的 network namespace 中运行的 HAProxy 进程所管理的 backend。目前一个 pool 只能有一个 VIP。 |
| Backend server | Member | Member 对应的是 pool 里面处理网络请求的一个 OpenStack Nova 虚机。 |
| Health check | Health monitor | 它用来监测 pool 里面 member 的状态,支持 HTTP, TCP, 和 ping 等多种检测方法。在 Nuetron 中这是可选的,如果没有 Health monitor,pool 会一直认为所有的 member 都是 ACTIVE 状态,这样所有的 member 会一直出现在 VIP 的分发列表中,哪怕 member 对应的实例不能响应网络请求。这在实际应用中会造成负载均衡的响应异常。 |
LBaas driver 模型:
基本概念:

基本概念之间的联系:
2.2 LBaas HAProxy 部署实例
2.2.1 安装
不同的 LBaas drive 支持不同的部署模式。社区实现 LBaas HAPorxy driver 只支持 one-arm 模式。你可以部署LBaas Agent 在network 节点上,也可以部署在别的节点上。本实例中,将 neutron-lbaas-agent 安装在 network 节点上。你可以部署多个 LBaas 节点(agent),每个 agent 上运行不同的物理负载均衡器。

网络节点上:
apt-get install neutron-lbaas-agent
apt-get install haproxy
修改 /etc/neutron/lbaas_agent.ini:
interface_driver = neutron.agent.linux.interface.OVSInterfaceDriver
device_driver = neutron.services.loadbalancer.drivers.haproxy.namespace_driver.HaproxyNSDriver
修改/etc/neutron/neutron.conf
service_plugins = router,lbaas
启动 service:
service neutron-lbaas-agent restart
lbaas-agent 进程:
neutron 18890 1 5 06:53 ? 00:00:01 /usr/bin/python /usr/bin/neutron-lbaas-agent --config-file=/etc/neutron/lbaas_agent.ini --config-file=/etc/neutron/neutron.conf --log-file=/var/log/neutron/lbaas-agent.log
Controller 节点上:
修改/etc/neutron/neutron.conf
service_plugins = router,lbaas
service neutron-server restart
修改/etc/openstack-dashboard/local_settings.py:
OPENSTACK_NEUTRON_NETWORK = {
'enable_router': True,
'enable_quotas': True,
'enable_ipv6': True,
'enable_distributed_router': False,
'enable_ha_router': False,
'enable_lb': True
2.2.2 配置
(1)Create pool
s1@controller:~$ neutron lb-pool-list
+--------------------------------------+-------+----------+-------------+----------+----------------+--------+
| id | name | provider | lb_method | protocol | admin_state_up | status |
+--------------------------------------+-------+----------+-------------+----------+----------------+--------+
| 3b9d8ebd-9eea-4925-b14e-593a6111ff33 | pool1 | haproxy | ROUND_ROBIN | HTTP | True | ACTIVE |
+--------------------------------------+-------+----------+-------------+----------+----------------+--------+
不太理解创建 pool 时候选的 subnet 是什么用途。
(2)Create members
s1@controller:~$ neutron lb-member-list
+--------------------------------------+-------------+---------------+--------+----------------+--------+
| id | address | protocol_port | weight | admin_state_up | status |
+--------------------------------------+-------------+---------------+--------+----------------+--------+
| 1f74a288-937d-4804-9ded-472a5d1110dc | 81.1.180.13 | 80 | 1 | True | ACTIVE |
| 944ff4a0-4070-40e4-8189-20f385755113 | 91.1.180.14 | 80 | 1 | True | ACTIVE |
| c5bd3138-9635-4588-889f-d08fcd364ed4 | 81.1.180.12 | 80 | 1 | True | ACTIVE |
+--------------------------------------+-------------+---------------+--------+----------------+--------+
似乎对 member 自身没什么限制,只要是 pool 所在的 tenant 内的虚机都可以加入。
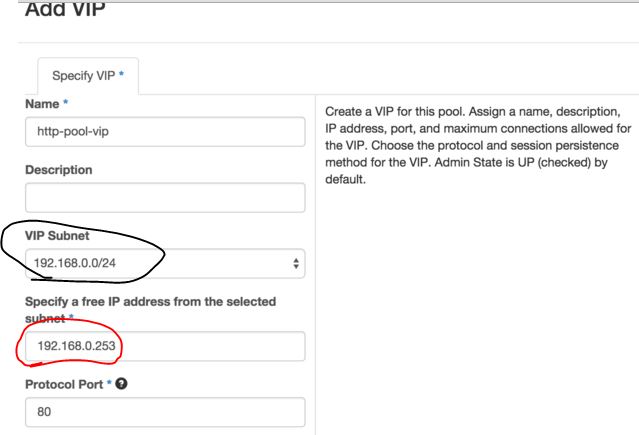
(3)Create VIP for pool
s1@controller:~$ neutron lb-vip-list
+--------------------------------------+------+-------------+----------+----------------+--------+
| id | name | address | protocol | admin_state_up | status |
+--------------------------------------+------+-------------+----------+----------------+--------+
| 0c32d37d-f84a-4309-9e01-72d9f0bac69e | vip2 | 81.1.180.81 | HTTP | True | ACTIVE |
+--------------------------------------+------+-------------+----------+----------------+--------+
VIP 的 subnet 也可以和 pool 的subnet 不一致,主要是在指定的 subnet 内创建一个 port。
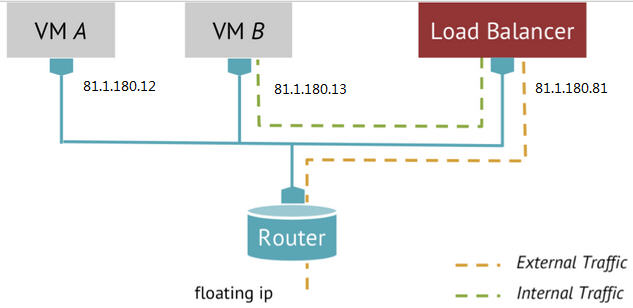
注意:这里的 VIP 从字面上看具有一定的迷惑性。VIP (virtual ip) 必须创建在 pool 所在的 subnet 中,所以它本身只是一个和 pool member 的 fixed ip 一样的 fixed ip address。如果要从外网访问该 lb pool 的话,则还需要创建一个 floating ip 并且把它关联到 lb pool 的 vip 上。这也是 one-arm 单臂的由来,也就是说 haproxy 所在的namespace 其实只有一个IP地址,分别接收外部连接以及和成员之间的连接。
从 Horizon 中看创建 VIP 的情景:
(4)Create health monitor
s1@controller:~$ neutron lb-healthmonitor-list
+--------------------------------------+------+----------------+
| id | type | admin_state_up |
+--------------------------------------+------+----------------+
| df1fcdd1-c0b5-4e14-a2fe-2d0789fc26a5 | PING | True |
+--------------------------------------+------+----------------+
(5) associate health monitor with pool
s1@controller:~$ neutron lb-healthmonitor-associate df1fcdd1-c0b5-4e14-a2fe-2d0789fc26a5 3b9d8ebd-9eea-4925-b14e-593a6111ff33
Associated health monitor df1fcdd1-c0b5-4e14-a2fe-2d0789fc26a5
以上步骤后的 pool 的详细配置:
s1@controller:~$ neutron lb-pool-show 3b9d8ebd-9eea-4925-b14e-593a6111ff33
+------------------------+--------------------------------------------------------------------------------------------------------+
| Field | Value |
+------------------------+--------------------------------------------------------------------------------------------------------+
| admin_state_up | True |
| description | |
| health_monitors | df1fcdd1-c0b5-4e14-a2fe-2d0789fc26a5 |
| health_monitors_status | {"monitor_id": "df1fcdd1-c0b5-4e14-a2fe-2d0789fc26a5", "status": "ACTIVE", "status_description": null} |
| id | 3b9d8ebd-9eea-4925-b14e-593a6111ff33 |
| lb_method | ROUND_ROBIN |
| members | 1f74a288-937d-4804-9ded-472a5d1110dc |
| | 944ff4a0-4070-40e4-8189-20f385755113 |
| | c5bd3138-9635-4588-889f-d08fcd364ed4 |
| name | pool1 |
| protocol | HTTP |
| provider | haproxy |
| status | ACTIVE |
| status_description | |
| subnet_id | 4ec65731-35a5-4637-a59b-a9f2932099f1 |
| tenant_id | 74c8ada23a3449f888d9e19b76d13aab |
| vip_id | 19e16b0b-f48b-4f90-803c-d3afaf26c697 |
+------------------------+--------------------------------------------------------------------------------------------------------+
关于 pool,vip,member 的 subnet,在我的测试环境中,三者之间没什么限制,各自都可以处于不同的 subnet 中,只要subnet 之间配置好了 router。这个 ticket 倒是提出来要限制 member 和 vip 都在 pool 的subnet 中,但是有人认为目前没什么必要。但是,lb-pool-create 的 help 信息中,subnet 指 ”The subnet on which the members of the pool will be located.“这个说明就和代码实现就有矛盾了。
2.2.3 验证
在 vm1 81.1.180.12 上,运行 while true; do echo -e 'HTTP/1.0 200 OK\r\n\r\nserver_151' | sudo nc -l -p 80 ; done
在 vm2 81.1.180.13 上,运行 while true; do echo -e 'HTTP/1.0 200 OK\r\n\r\nserver_153' | sudo nc -l -p 80 ; done
在vm3 上使用 wget http://81.1.180.12 和 wget http://81.1.180.13 ,能够返回结果,显示上面的命令成功运行。
再在 vm3 两次使用 wget http://81.1.180.81,结果分别显示 server_153 和 server_151,显示轮询分发成功。

2.2.4 LBaas 的实现
网络节点上,neutron-lbaas-agent:
(1)为每个带有 active VIP 的 pool 创建了一个 network namespace,它以 qlbaas-<pool UUID> 命名:ip netns add qlbaas-3b9d8ebd-9eea-4925-b14e-593a6111ff33
root@network:/home/s1# ip netns list
qlbaas-3b9d8ebd-9eea-4925-b14e-593a6111ff33
root@network:/home/s1# ip netns exec qlbaas-3b9d8ebd-9eea-4925-b14e-593a6111ff33 ip addr
50: tap2d1b74fe-68: <BROADCAST,UP,LOWER_UP> mtu 1500 qdisc noqueue state UNKNOWN group default
    link/ether fa:16:3e:7c:e5:ce brd ff:ff:ff:ff:ff:ff
    inet 81.1.180.81/24 brd 81.1.180.255 scope global tap2d1b74fe-68 #该 interface 的IP 地址为 VIP 的 IP 地址
       valid_lft forever preferred_lft forever
    inet6 fe80::f816:3eff:fe7c:e5ce/64 scope link
       valid_lft forever preferred_lft forever
该 interface 挂载 OVS br-int 上并被打上了它所在的 network(pool -> subnet -> network) 对应的本地 VLAN ID:
Bridge br-int
        Port "tap2d1b74fe-68"
            tag: 4
            Interface "tap2d1b74fe-68"
                type: internal
完整的 network namespace 操作过程为:
ovs-vsctl --if-exists del-port tapd9de9e84-23 --add-port br-int tapd9de9e84-23 --set Interface tapd9de9e84-23 type=internal --set Interface tapd9de9e84-23 external-ids:iface-id=d9de9e84-23ad-4f57-b85a-aea99abf409d --set Interface tapd9de9e84-23 external-ids:iface-status=active --set Interface tapd9de9e84-23 external-ids:attached-mac=fa:16:3e:f4:8f:ae

ip link set tapd9de9e84-23 address fa:16:3e:f4:8f:ae


ip netns add qlbaas-3b9d8ebd-9eea-4925-b14e-593a6111ff33

ip netns exec qlbaas-3b9d8ebd-9eea-4925-b14e-593a6111ff33 sysctl -w net.ipv4.conf.all.promote_secondaries=1

ip link set tapd9de9e84-23 netns qlbaas-3b9d8ebd-9eea-4925-b14e-593a6111ff33
ip netns exec qlbaas-3b9d8ebd-9eea-4925-b14e-593a6111ff33 ip link set lo up
ip link set tapd9de9e84-23 netns qlbaas-3b9d8ebd-9eea-4925-b14e-593a6111ff33
ip netns exec qlbaas-3b9d8ebd-9eea-4925-b14e-593a6111ff33 ip link set tapd9de9e84-23 up
ip netns exec qlbaas-3b9d8ebd-9eea-4925-b14e-593a6111ff33 ip addr show tapd9de9e84-23 permanent scope global
ip netns exec qlbaas-3b9d8ebd-9eea-4925-b14e-593a6111ff33 ip -4 addr add 91.1.180.180/24 brd 91.1.180.255 scope global dev tapd9de9e84-23
ip netns exec qlbaas-3b9d8ebd-9eea-4925-b14e-593a6111ff33 ip route list dev tapd9de9e84-23 scope link
ip netns exec qlbaas-3b9d8ebd-9eea-4925-b14e-593a6111ff33 route add default gw 91.1.180.1
ip netns exec qlbaas-3b9d8ebd-9eea-4925-b14e-593a6111ff33 arping -U -I tapd9de9e84-23 -c 3 91.1.180.180
(2)生成 haproxy 配置文件
global  #global 中除了 group 都是 hard coded 的
        daemon
        user nobody
        group nogroup  #可以由配置项 user_group 指定,默认为 nogroup
        log /dev/log local0
        log /dev/log local1 notice
        stats socket /var/lib/neutron/lbaas/3b9d8ebd-9eea-4925-b14e-593a6111ff33/sock mode 0666 level user


defaults #都是 hard coded 的
        log global retries 3 option redispatch timeout connect 5000 timeout client 50000 timeout server 50000
 frontend 0c32d37d-f84a-4309-9e01-72d9f0bac69e option tcplog bind 81.1.180.81:80 #VIP.IP:port mode http #pool1.Protocol default_backend 3b9d8ebd-9eea-4925-b14e-593a6111ff33 maxconn 100 # VIP.ConnectionLimit option forwardfor # 当 mode 为 ”http“时,设置 forwardfor,使得通过 X-Forward-For 头来保存原始的源 IP 地址
 backend 3b9d8ebd-9eea-4925-b14e-593a6111ff33 mode http #pool.protocol balance roundrobin #pool1.Load_Balancing_Method option forwardfor timeout check 5s # Monitor.timeout(5)当 inter 和 timeout 都设置时,超时时间取两者中的短者 server 1f74a288-937d-4804-9ded-472a5d1110dc 81.1.180.13:80 weight 1 check inter 5s fall 3 #member1 的配置,包括 ip,port(member 提供服务的端口,因此此时没有指定check port,因此也是健康检查的TCP端口),weight;check 指定做健康检查;inter 指定两次连续检查之间的间隔,默认2s (5s);fall 指定Max Retries 或者连续几次检查失败即认为member 是 DOWN 的次数 (3)
 server 944ff4a0-4070-40e4-8189-20f385755113 91.1.180.14:80 weight 1 check inter 5s fall 3 #member 2 的配置 server c5bd3138-9635-4588-889f-d08fcd364ed4 81.1.180.12:80 weight 1 check inter 5s fall 3 #member 3 的配置
HAProxy 做健康检查一些别的细节:
- HAProxy 不支持 PING 做健康检查。详细见官网 Health checking。
- TCP port:可以使用 check port 来指定健康检查 TCP 连接所使用的端口,比如指定 80端口: server srv1 10.0.0.1:443 check port 80;如果不指定的话,则使用负载均衡端口,也就是使用 443:server srv1 10.0.0.1:443。
 option httpchk
 server srv1 10.0.0.1:80 check
 server srv1 10.0.0.1:80 check
- 还可以使用其它检查方式,包括
-
Checking a SSL port
Checking a LDAP service
Checking a MySql service
Checking a PgSQL service
Checking a redis service
Checking a SMTP service
Checking any service
Neutron LBaaS HAProxy agent health monitor 的一些细节:
- 只支持 TCP, HTTP, HTTPS,选择 PING 等同于选择 TCP。参见这个 bug。
- TCP 不能显式指定用于健康检查的端口,而是使用负载均衡端口。
- 由 ACTIVE 变为 INACTIVE 状态的过程需要经过 min(timeout, inter) * fall 时长,也就是需要多次检查失败才行。
- 由 INACTIVE 变为 ACTIVE 状态的过程,只需要 min(timeout, inter) 时长,也就是一次检查成功就可以了
- 一个 Pool 可以关联多个 health monitor 执行不同类型的检查。只有当全部的 monitor 认为一个member 是 active 时,该 member 的状态才是 ACTIVE,否则都会是 INACTIVE。
- 使用 HTTP 的一个例子
-
        timeout check 3s
        option httpchk GET /
        http-check expect rstatus 200
        server 7015f0d6-12bf-4b68-8455-7c601408dfec 20.0.0.122:80 weight 1 check inter 3s fall 2
- 使用 HTTPS 的一个例子。与 HTTP 相比,只是增加了 "option ssl-hello-chk"。
-
        timeout check 3s
        option httpchk GET /
        http-check expect rstatus 200
        option ssl-hello-chk
        server 7015f0d6-12bf-4b68-8455-7c601408dfec 20.0.0.122:80 weight 1 check inter 3s fall 2
- 代码(源代码):
-
server_addon = ' check inter %(delay)ds fall %(max_retries)d' % monitor
    opts = [
        'timeout check %ds' % monitor['timeout']
    ]

    if monitor['type'] in (constants.HEALTH_MONITOR_HTTP,
                           constants.HEALTH_MONITOR_HTTPS):
        opts.append('option httpchk %(http_method)s %(url_path)s' % monitor)
        opts.append(
            'http-check expect rstatus %s' %
            '|'.join(_expand_expected_codes(monitor['expected_codes']))
        )

    if monitor['type'] == constants.HEALTH_MONITOR_HTTPS:
        opts.append('option ssl-hello-chk')
一个使用 TCP 健康监视器时一个 member 状态变化的简单例子:
- (0)环境:负载均衡服务为80端口上的 HTTP,使用 TCP health monitor
- (1)将一个member 加入 pool,在 member 上不启动 HTTP 服务,则在 neutron lb-member-list 中其状态为 INACTIVE
- (2)登录该member,启动 HTTP 服务,经过很短的时间,member 的状态变为 ACTIVE
- (3)再次登录该 member,停止 HTTP 服务,经过相对较长的时间,member 的状态变为 INACTIVE
(3)在 network namespace 中 启动了一个 haproxy 进程,使用生成的配置文件:
ip netns exec qlbaas-3b9d8ebd-9eea-4925-b14e-593a6111ff33 haproxy -f /var/lib/neutron/lbaas/3b9d8ebd-9eea-4925-b14e-593a6111ff33/conf -p /var/lib/neutron/lbaas/3b9d8ebd-9eea-4925-b14e-593a6111ff33/pid

root@network:/home/s1# ps -ef | grep haproxy
nobody 22625 1 0 07:29 ? 00:00:02 haproxy -f /var/lib/neutron/lbaas/3b9d8ebd-9eea-4925-b14e-593a6111ff33/conf -p /var/lib/neutron/lbaas/3b9d8ebd-9eea-4925-b14e-593a6111ff33/pid -sf 22365
(4)在 lbaas 的 interface 上抓包,看看几个机器之间的交互过程
从 81.1.180.14 上 wget 81.1.180.81,VIP 从 81.1.180.12 获取数据
# 81.1.180.14 通过 ARP 得到 81.1.180.81 的 MAC
10:20:33.070752 fa:16:3e:82:37:03 > ff:ff:ff:ff:ff:ff, ethertype ARP (0x0806), length 42: Ethernet (len 6), IPv4 (len 4), Request who-has 81.1.180.81 tell 81.1.180.14, length 28
10:20:33.070779 fa:16:3e:7c:e5:ce > fa:16:3e:82:37:03, ethertype ARP (0x0806), length 42: Ethernet (len 6), IPv4 (len 4), Reply 81.1.180.81 is-at fa:16:3e:7c:e5:ce, length 28

#发起 81.1.180.14.41882 到 81.1.180.81.80 的 TCP 连接(三次握手)
10:20:33.073829 fa:16:3e:82:37:03 > fa:16:3e:7c:e5:ce, ethertype IPv4 (0x0800), length 74: (tos 0x0, ttl 64, id 24973, offset 0, flags [DF], proto TCP (6), length 60)
    81.1.180.14.41882 > 81.1.180.81.80: Flags [S], cksum 0x380e (correct), seq 2662307254, win 14600, options [mss 1460,sackOK,TS val 62523 ecr 0,nop,wscale 2], length 0
10:20:33.073884 fa:16:3e:7c:e5:ce > fa:16:3e:82:37:03, ethertype IPv4 (0x0800), length 74: (tos 0x0, ttl 64, id 0, offset 0, flags [DF], proto TCP (6), length 60)
    81.1.180.81.80 > 81.1.180.14.41882: Flags [S.], cksum 0x0a91 (incorrect -> 0xc0ae), seq 1950187908, ack 2662307255, win 28960, options [mss 1460,sackOK,TS val 19810369 ecr 62523,nop,wscale 7], length 0
10:20:33.078375 fa:16:3e:82:37:03 > fa:16:3e:7c:e5:ce, ethertype IPv4 (0x0800), length 66: (tos 0x0, ttl 64, id 24974, offset 0, flags [DF], proto TCP (6), length 52)
    81.1.180.14.41882 > 81.1.180.81.80: Flags [.], cksum 0x5257 (correct), seq 1, ack 1, win 3650, options [nop,nop,TS val 62525 ecr 19810369], length 0

# HTTP 数据从 81.1.180.14.41882 发到 81.1.180.81.80
10:20:33.079796 fa:16:3e:82:37:03 > fa:16:3e:7c:e5:ce, ethertype IPv4 (0x0800), length 140: (tos 0x0, ttl 64, id 24975, offset 0, flags [DF], proto TCP (6), length 126)
    81.1.180.14.41882 > 81.1.180.81.80: Flags [P.], cksum 0x1a1e (correct), seq 1:75, ack 1, win 3650, options [nop,nop,TS val 62525 ecr 19810369], length 74
10:20:33.079902 fa:16:3e:7c:e5:ce > fa:16:3e:82:37:03, ethertype IPv4 (0x0800), length 66: (tos 0x0, ttl 64, id 51655, offset 0, flags [DF], proto TCP (6), length 52)
    81.1.180.81.80 > 81.1.180.14.41882: Flags [.]^C, cksum 0x0a89 (incorrect -> 0x5f6a), seq 1, ack 75, win 227, options [nop,nop,TS val 19810371 ecr 62525], length 0

#发起 81.1.180.81.49215 > 81.1.180.12.80 的连接
10:20:33.080106 fa:16:3e:7c:e5:ce > fa:16:3e:2b:3e:2a, ethertype IPv4 (0x0800), length 74: (tos 0x0, ttl 64, id 49199, offset 0, flags [DF], proto TCP (6), length 60)
    81.1.180.81.49215 > 81.1.180.12.80: Flags [S], cksum 0x0a8f (incorrect -> 0xb04a), seq 2295826540, win 29200, options [mss 1460,sackOK,TS val 19810371 ecr 0,nop,wscale 7], length 0
10:20:33.080936 fa:16:3e:2b:3e:2a > fa:16:3e:7c:e5:ce, ethertype IPv4 (0x0800), length 74: (tos 0x0, ttl 64, id 0, offset 0, flags [DF], proto TCP (6), length 60)
    81.1.180.12.80 > 81.1.180.81.49215: Flags [S.], cksum 0xeeb5 (correct), seq 1301661959, ack 2295826541, win 14480, options [mss 1460,sackOK,TS val 2352200 ecr 19810371,nop,wscale 2], length 0
10:20:33.081056 fa:16:3e:7c:e5:ce > fa:16:3e:2b:3e:2a, ethertype IPv4 (0x0800), length 66: (tos 0x0, ttl 64, id 49200, offset 0, flags [DF], proto TCP (6), length 52)
    81.1.180.81.49215 > 81.1.180.12.80: Flags [.], cksum 0x0a87 (incorrect -> 0x5528), seq 1, ack 1, win 229, options [nop,nop,TS val 19810371 ecr 2352200], length 0

##传送 HTTP 数据
#数据从 81.1.180.81.49215 发到 81.1.180.12.80
10:20:33.081264 fa:16:3e:7c:e5:ce > fa:16:3e:2b:3e:2a, ethertype IPv4 (0x0800), length 170: (tos 0x0, ttl 64, id 49201, offset 0, flags [DF], proto TCP (6), length 156)
    81.1.180.81.49215 > 81.1.180.12.80: Flags [P.], cksum 0x0aef (incorrect -> 0x06d5), seq 1:105, ack 1, win 229, options [nop,nop,TS val 19810371 ecr 2352200], length 104
10:20:33.093515 fa:16:3e:2b:3e:2a > fa:16:3e:7c:e5:ce, ethertype IPv4 (0x0800), length 66: (tos 0x0, ttl 64, id 11584, offset 0, flags [DF], proto TCP (6), length 52)
    81.1.180.12.80 > 81.1.180.81.49215: Flags [.], cksum 0x4781 (correct), seq 1, ack 105, win 3620, options [nop,nop,TS val 2352200 ecr 19810371], length 0

#数据从 81.1.180.12.80 发到 81.1.180.81.49215
10:20:33.110793 fa:16:3e:2b:3e:2a > fa:16:3e:7c:e5:ce, ethertype IPv4 (0x0800), length 96: (tos 0x0, ttl 64, id 11585, offset 0, flags [DF], proto TCP (6), length 82)
    81.1.180.12.80 > 81.1.180.81.49215: Flags [P.], cksum 0xcc98 (correct), seq 1:31, ack 105, win 3620, options [nop,nop,TS val 2352207 ecr 19810371], length 30
10:20:33.110904 fa:16:3e:7c:e5:ce > fa:16:3e:2b:3e:2a, ethertype IPv4 (0x0800), length 66: (tos 0x0, ttl 64, id 49202, offset 0, flags [DF], proto TCP (6), length 52)
    81.1.180.81.49215 > 81.1.180.12.80: Flags [.], cksum 0x0a87 (incorrect -> 0x5494), seq 105, ack 31, win 229, options [nop,nop,TS val 19810378 ecr 2352207], length 0

# HTTP 数据从 81.1.180.81.80 发到 81.1.180.14.41882
10:20:33.111083 fa:16:3e:7c:e5:ce > fa:16:3e:82:37:03, ethertype IPv4 (0x0800), length 96: (tos 0x0, ttl 64, id 51656, offset 0, flags [DF], proto TCP (6), length 82)
    81.1.180.81.80 > 81.1.180.14.41882: Flags [P.], cksum 0x0aa7 (incorrect -> 0xe480), seq 1:31, ack 75, win 227, options [nop,nop,TS val 19810379 ecr 62525], length 30
10:20:33.124295 fa:16:3e:82:37:03 > fa:16:3e:7c:e5:ce, ethertype IPv4 (0x0800), length 66: (tos 0x0, ttl 64, id 24976, offset 0, flags [DF], proto TCP (6), length 52)
    81.1.180.14.41882 > 81.1.180.81.80: Flags [.], cksum 0x51db (correct), seq 75, ack 31, win 3650, options [nop,nop,TS val 62535 ecr 19810379], length 0

#关闭 81.1.180.12.80 > 81.1.180.81.49215 和 81.1.180.81.80 > 81.1.180.14.41882 的连接 (三次挥手。本来是四次,第四次可能有延迟)
10:20:33.124322 fa:16:3e:2b:3e:2a > fa:16:3e:7c:e5:ce, ethertype IPv4 (0x0800), length 66: (tos 0x0, ttl 64, id 11586, offset 0, flags [DF], proto TCP (6), length 52)
    81.1.180.12.80 > 81.1.180.81.49215: Flags [F.], cksum 0x4751 (correct), seq 31, ack 105, win 3620, options [nop,nop,TS val 2352210 ecr 19810378], length 0
10:20:33.124444 fa:16:3e:7c:e5:ce > fa:16:3e:82:37:03, ethertype IPv4 (0x0800), length 66: (tos 0x0, ttl 64, id 51657, offset 0, flags [DF], proto TCP (6), length 52)
    81.1.180.81.80 > 81.1.180.14.41882: Flags [F.], cksum 0x0a89 (incorrect -> 0x5f36), seq 31, ack 75, win 227, options [nop,nop,TS val 19810382 ecr 62535], length 0
10:20:33.173331 fa:16:3e:7c:e5:ce > fa:16:3e:2b:3e:2a, ethertype IPv4 (0x0800), length 66: (tos 0x0, ttl 64, id 49203, offset 0, flags [DF], proto TCP (6), length 52)
    81.1.180.81.49215 > 81.1.180.12.80: Flags [.], cksum 0x0a87 (incorrect -> 0x5480), seq 105, ack 32, win 229, options [nop,nop,TS val 19810394 ecr 2352210], length 0
10:20:33.173567 fa:16:3e:82:37:03 > fa:16:3e:7c:e5:ce, ethertype IPv4 (0x0800), length 66: (tos 0x0, ttl 64, id 24977, offset 0, flags [DF], proto TCP (6), length 52)
    81.1.180.14.41882 > 81.1.180.81.80: Flags [F.], cksum 0x51cd (correct), seq 75, ack 32, win 3650, options [nop,nop,TS val 62544 ecr 19810382], length 0
10:20:33.173756 fa:16:3e:7c:e5:ce > fa:16:3e:82:37:03, ethertype IPv4 (0x0800), length 66: (tos 0x0, ttl 64, id 51658, offset 0, flags [DF], proto TCP (6), length 52)
    81.1.180.81.80 > 81.1.180.14.41882: Flags [.], cksum 0x0a89 (incorrect -> 0x5f20), seq 32, ack 76, win 227, options [nop,nop,TS val 19810394 ecr 62544], length 0
10:20:33.176286 fa:16:3e:7c:e5:ce > fa:16:3e:2b:3e:2a, ethertype IPv4 (0x0800), length 66: (tos 0x0, ttl 64, id 49204, offset 0, flags [DF], proto TCP (6), length 52)
    81.1.180.81.49215 > 81.1.180.12.80: Flags [F.], cksum 0x0a87 (incorrect -> 0x547e), seq 105, ack 32, win 229, options [nop,nop,TS val 19810395 ecr 2352210], length 0
10:20:33.190055 fa:16:3e:2b:3e:2a > fa:16:3e:7c:e5:ce, ethertype IPv4 (0x0800), length 66: (tos 0x0, ttl 64, id 11587, offset 0, flags [DF], proto TCP (6), length 52)
    81.1.180.12.80 > 81.1.180.81.49215: Flags [.], cksum 0x4731 (correct), seq 32, ack 106, win 3620, options [nop,nop,TS val 2352224 ecr 19810395], length 0
看看具体的数据包:
# 81.1.180.14 发送 GET 命令到 81.1.180.81

11:04:16.282603 fa:16:3e:82:37:03 > fa:16:3e:7c:e5:ce, ethertype IPv4 (0x0800), length 140: (tos 0x0, ttl 64, id 53145, offset 0, flags [DF], proto TCP (6), length 126)
    81.1.180.14.41883 > 81.1.180.81.80: Flags [P.], cksum 0xd178 (correct), seq 1:75, ack 1, win 3650, options [nop,nop,TS val 718394 ecr 20466170], length 74
        0x0000:  4500 007e cf99 4000 4006 607e 5101 b40e  E..~..@.@.`~Q...
        0x0010:  5101 b451 a39b 0050 e1b8 39b0 359e 1dfd  Q..Q...P..9.5...
        0x0020:  8018 0e42 d178 0000 0101 080a 000a f63a  ...B.x.........:
        0x0030:  0138 49fa 4745 5420 2f20 4854 5450 2f31  .8I.GET./.HTTP/1
        0x0040:  2e31 0d0a 486f 7374 3a20 3831 2e31 2e31  .1..Host:.81.1.1
        0x0050:  3830 2e38 310d 0a55 7365 722d 4167 656e  80.81..User-Agen
        0x0060:  743a 2057 6765 740d 0a43 6f6e 6e65 6374  t:.Wget..Connect
        0x0070:  696f 6e3a 2063 6c6f 7365 0d0a 0d0a       ion:.close....

#81.1.180.81 转发上面的 GET 请求到 91.1.180.14,可见 Host 已经换成 VIP 的 IP 了,原始 IP 保存在X-Forwarded-For 中。
11:04:16.283954 fa:16:3e:7c:e5:ce > fa:16:3e:87:40:f3, ethertype IPv4 (0x0800), length 170: (tos 0x0, ttl 64, id 19645, offset 0, flags [DF], proto TCP (6), length 156)
    81.1.180.81.46000 > 91.1.180.14.80: Flags [P.], cksum 0x14f1 (incorrect -> 0x41ae), seq 1:105, ack 1, win 229, options [nop,nop,TS val 20466172 ecr 17195073], length 104
        0x0000:  4500 009c 4cbd 4000 4006 d93c 5101 b451  E...L.@.@..<Q..Q
        0x0010:  5b01 b40e b3b0 0050 bc0d 0541 897a 262f  [......P...A.z&/
        0x0020:  8018 00e5 14f1 0000 0101 080a 0138 49fc  .............8I.
        0x0030:  0106 6041 4745 5420 2f20 4854 5450 2f31  ..`AGET./.HTTP/1
        0x0040:  2e31 0d0a 486f 7374 3a20 3831 2e31 2e31  .1..Host:.81.1.1
        0x0050:  3830 2e38 310d 0a55 7365 722d 4167 656e  80.81..User-Agen
        0x0060:  743a 2057 6765 740d 0a43 6f6e 6e65 6374  t:.Wget..Connect
        0x0070:  696f 6e3a 2063 6c6f 7365 0d0a 582d 466f  ion:.close..X-Fo
        0x0080:  7277 6172 6465 642d 466f 723a 2038 312e  rwarded-For:.81.
        0x0090:  312e 3138 302e 3134 0d0a 0d0a            1.180.14....

#91.1.180.14 发回回复消息给 81.1.180.81
11:04:16.288376 fa:16:3e:87:40:f3 > fa:16:3e:7c:e5:ce, ethertype IPv4 (0x0800), length 96: (tos 0x0, ttl 63, id 18031, offset 0, flags [DF], proto TCP (6), length 82)
    91.1.180.14.80 > 81.1.180.81.46000: Flags [P.], cksum 0x0676 (correct), seq 1:31, ack 105, win 3620, options [nop,nop,TS val 17195074 ecr 20466172], length 30
        0x0000:  4500 0052 466f 4000 3f06 e0d4 5b01 b40e  E..RFo@.?...[...
        0x0010:  5101 b451 0050 b3b0 897a 262f bc0d 05a9  Q..Q.P...z&/....
        0x0020:  8018 0e24 0676 0000 0101 080a 0106 6042  ...$.v........`B
        0x0030:  0138 49fc 4854 5450 2f31 2e32 2032 3030  .8I.HTTP/1.2.200
        0x0040:  204f 4b0d 0a0d 0a73 6572 7665 725f 3135  .OK....server_15
        0x0050:  320a                                     2.

#81.1.180.81 将上面的消息转发到 81.1.180.14                               2.
11:04:16.288639 fa:16:3e:7c:e5:ce > fa:16:3e:82:37:03, ethertype IPv4 (0x0800), length 96: (tos 0x0, ttl 64, id 21511, offset 0, flags [DF], proto TCP (6), length 82)
    81.1.180.81.80 > 81.1.180.14.41883: Flags [P.], cksum 0x0aa7 (incorrect -> 0x9ae0), seq 1:31, ack 75, win 227, options [nop,nop,TS val 20466173 ecr 718394], length 30
        0x0000:  4500 0052 5407 4000 4006 dc3c 5101 b451  E..RT.@.@..<Q..Q
        0x0010:  5101 b40e 0050 a39b 359e 1dfd e1b8 39fa  Q....P..5.....9.
        0x0020:  8018 00e3 0aa7 0000 0101 080a 0138 49fd  .............8I.
        0x0030:  000a f63a 4854 5450 2f31 2e32 2032 3030  ...:HTTP/1.2.200
        0x0040:  204f 4b0d 0a0d 0a73 6572 7665 725f 3135  .OK....server_15
        0x0050:  320a                                     2.
3. Neutron LBaas 代码分析
代码在 https://github.com/openstack/neutron-lbaas/tree/stable/juno。代码本身相对简单。
代码分布:

- Extension:负责处理 REST API 请求,并进行 schedule,然后将 REST API 请求转发到 schedule 过程选出的 agent 上的 Plugin。
- Plugin:处理核心逻辑,管理 DB 的读写。
- Agent:处理并响应由 Plugin 发来的请求,管理 Driver。OpenStack Neutron 默认采用 HAProxy 作为 driver。
除此以外,LBaas 还提供提供CLI 和 Horizon 中的 GUI。
控制节点上的 Neutron server:
1. 根据配置文件,导入LBaas extension(service_plugins = *,lbaas,而 lbaas = neutron.services.loadbalancer.plugin:LoadBalancerPlugin)
2. 接到 lb-pool-create REST API 调用:
POST /v2.0/lb/pools.json HTTP/1.1
Route path: '/lb/pools.:(format)', defaults: {'action': u'create', 'controller': <wsgify at 139957175473808 wrapping <function resource at 0x7f4a51b962a8>>}
Match dict: {'action': u'create', 'controller': <wsgify at 139957175473808 wrapping <function resource at 0x7f4a51b962a8>>, 'format': u'json'}
Request body: {u'pool': {u'subnet_id': u'4ac56c61-84f3-4d00-b87a-1ab2441e8437', u'lb_method': u'ROUND_ROBIN', u'protocol': u'HTTP', u'name': u'test2', u'admin_state_up': True}}
3. 根据 Scheduler 算法找到一个放置该 pool 的 LBaas agent
Pool cc719e63-0e84-4c0f-9254-49ba7c67e86d is scheduled to lbaas agent 90c87c01-1cd1-48b0-8369-30f44c058574 schedule
4. 进入 LoadBalancerAgentApi,通过 RPC 调用该 agent 所在节点上的 LBaas Plugin
cast called with arguments (<neutron.context.Context object at 0x7f4a51498590>, {'args': {'driver_name': 'haproxy_ns', 'pool': {'status': 'PENDING_CREATE', 'lb_method': u'ROUND_ROBIN', 'protocol': u'HTTP', 'description': '', 'health_monitors': [], 'members': [], 'status_description': None, 'id': 'cc719e63-0e84-4c0f-9254-49ba7c67e86d', 'vip_id': None, 'name': u'test2', 'admin_state_up': True, 'subnet_id': u'4ac56c61-84f3-4d00-b87a-1ab2441e8437', 'tenant_id': u'74c8ada23a3449f888d9e19b76d13aab', 'health_monitors_status': [], 'provider': 'haproxy'}}, 'namespace': None, 'method': 'create_pool'}) {'topic': u'n-lbaas_agent.network', 'version': None}
关于 Agent scheduler:
一个 OpenStack 环境中可以有多个 LBaas agent,每个 agen 可能支持不同的物理负载均衡器,那么将新建的 pool 对应的物理负载均衡器部署到哪个 Agent 上就需要一个 Schedule 过程。你可以查看pool 所在的 agent:
s1@controller:~$ neutron lb-agent-hosting-pool 3b9d8ebd-9eea-4925-b14e-593a6111ff33
+--------------------------------------+---------+----------------+-------+
| id | host | admin_state_up | alive |
+--------------------------------------+---------+----------------+-------+
| 90c87c01-1cd1-48b0-8369-30f44c058574 | network | True | :-) |
+--------------------------------------+---------+----------------+-------+
Neutron 默认只实现了ChanceScheduler: loadbalancer_pool_scheduler_driver = neutron.services.loadbalancer.agent_scheduler.ChanceScheduler。你也可以实现你的 Scheduler。默认的 ChanceScheduler 从活动的、支持该 Pool Provider(比如 haproxy)的所有 agent 中随机选择一个。
网络节点上的 LBaas Plugin (class LoadBalancerPlugin):
0. 初始化:从配置文件 device_driver 中读取所有drivers
1. 接到 REST API 调用后:
1.1 执行 DB 操作
1.2. 调用 driver 操作
网络节点上的 HAProxy LBaas driver:
1. 接收 RPC 通知,在 vip,pool,member,monitor 有变化时刷新 haproxy 进程
2. 通过 RPC 获取该 pool 的所有逻辑配置
3. 根据逻辑配置生成 haproxy 配置文件
4. 在network namespace 中启动 haproxy 进程
更详细的过程可以参考 官网文章。
本文转自SammyLiu博客园博客,原文链接:http://www.cnblogs.com/sammyliu/p/4656176.html,如需转载请自行联系原作者