1. 背景
正在使用MonkeyRunner当我们经常使用Chimchat下面HierarchyViewer模块获得目标控制的一些信息,以协助我们测试。但在MonkeyRunner官方的说法是没有看到相应的API叙事描述,上面只有三个班API(http://developer.android.com/tools/help/MonkeyDevice.html)
- MonkeyDevice
- MonkeyImage
- MonkeyRunner

所以在这里尝试整理下HierarchyViewer提供的API的使用方法并依据实践作出对应的建议,首先请看该类提供的全部可用的公共方法,内容并不多:

从图中能够看出HierarchyViewer类中提供的方法主要是用来定位控件相关的。包含依据ID取得控件。依据控件取得控件在屏幕的位置等。但另一些其它方法,我们会顺带一并描写叙述,毕竟内容并不多。
本文我们依旧跟上几篇文章一样以SDK自带的NotePad为实验目标。看怎么定位到NotesList以下的Menu Options中的Add note这个Menu Entry。
下面是通过HierarchyViewer这个工具获得的目标设备界面的截图:

2.findViewById(String id)
2.1 演示样例
targetDevice = MonkeyRunner.waitForConnection()
'''
     public ViewNode findViewById(String id)
     * @param id id for the view.
     * @return view with the specified ID, or {@code null} if no view found.
'''
viewer = targetDevice.getHierarchyViewer()
button = viewer.findViewById('id/title')
text = viewer.getText(button)
print text.encode('utf-8')
2.2 分析和建议
此API的目的就是通过控件的ID来获得代表用户控件的一个ViewNode对象。由于这个是第一个演示样例,所以这里有几点须要说明
- 一旦MonkeyRunner连接上设备,会立马获得一个MonkeyDevice的对象代表了目标測试设备。我们就是通过这个设备对象来控制设备的
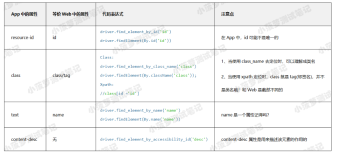
- 注意这里须要填写的id的格式和UIAutomatorViewer获得ResourceId是不一样的,请看下图UIAutomatorViewer截图中ResourceId前面多出了"android:"字串:
- 这种方法返回的一个ViewNode的对象,代表目标控件。拥有大量控件相关的属性,因为篇幅问题这里不详述,往后应该会另外撰文描写叙述它的使用。
在本文里知道它代表了目标控件即可了
- 最后打印的时候须要转换成UTF-8编码的原因跟Jython默认的编码格式有关系。详细描写叙述和Workaround请查看:http://www.haogongju.net/art/1636997

3. findViewById(String id, ViewNode rootNode)
3.1演示样例
'''
     public ViewNode findViewById(String id, ViewNode rootNode)
     * Find a view by ID, starting from the given root node
     * @param id ID of the view you're looking for
     * @param rootNode the ViewNode at which to begin the traversal
     * @return view with the specified ID, or {@code null} if no view found.

'''
iconMenuView = viewer.findViewById('id/icon_menu')
button = viewer.findViewById('id/title',iconMenuView)
print "Button Text:",text.encode('utf-8')
3.2分析
这种方法是上面方法的一个重载,除了须要指定ID之外,还须要指定一个rootNode,该rootNode指的就是已知控件的父控件。父到什么层级就没有限制了。为什么须要这种方法了,我们能够想象下这样的情况:同一界面上存在两个控件拥有同样的ID,可是他们某一个层级父控件開始发生分叉。那么我们就能够把rootNode指定为该父控件(不包括)到目标控件(不包括)路径中的当中一个父控件来精确定位我们须要的目标控件了。
如我们的演示样例就是明白指出我们须要的是在父控件“id/icon_menu"(请看背景的hierarchyviewer截图)以下的那个”id/title"控件。
4 getAbsolutePositionOfView(ViewNode node)
4.1演示样例
'''
    public static Point getAbsoluteCenterOfView(ViewNode node)
     * Gets the absolute x/y center of the specified view node.
     *
     * @param node view node to find position of.
     * @return absolute x/y center of the specified view node.
     */
'''
point = viewer.getAbsoluteCenterOfView(button)
print "Button Absolute Center Position:",point
4.2 分析和建议
这个API的目的是想定位一个已知ViewNode控件的左上角在屏幕上的绝对坐标。对于我们正常的APP里面的控件,本人实践过是没有问题的。
可是有一种情况要特别注意:这个对Menu Options以下的控件是无效的!
以上演示样例最后一段代码的输出是(3,18),事实上这里不用想都知道这个不可能是相对屏幕左上角坐标(0,0)的绝对坐标值了,就偏移这一点点像素,你真的当我的实验机器HTC Incredible S是能够植入脑袋的神器啊。

那么这个数据是怎样获得的呢?事实上依照我的理解(
真的仅仅是我自己的理解。不正确的话就指正吧,但请描写叙述具体点以供我參考)。这个函数的定义应该是“获得从最上层的DecorView(具体DectorView的描写叙述请查看我曾经转载的一篇文章《
Android DecorView浅析》)左上角坐标到目标控件的的偏移坐标”,仅仅是这个最上层的DecorView的坐标一般都是从(0,0)開始而已。例如以下图我觉得最上面的那个FrameLayout就代表了DecorView,或者说整个窗口

那么在如果我的观点是对的情况下,这个就非常好解析了。请看Menu Option的最上层FrameLayout的绝对坐标是(0。683)

而Add note的绝对坐标是(3,701)

两者一相减就是和我们的输出结果绝对吻合的(3,18)了。
5. getAbsoluteCenterOfView(ViewNode node)
5.1 演示样例
'''
    public static Point getAbsoluteCenterOfView(ViewNode node)
     * Gets the absolute x/y center of the specified view node.
     *
     * @param node view node to find position of.
     * @return absolute x/y center of the specified view node.
     */
'''
point = viewer.getAbsoluteCenterOfView(button)
print "Button Absolute Center Position:",point
5.2 分析和建议
这种方法的目的是获得目标ViewNode控件的中间点的绝对坐标值,可是
对Menu Options以下的控件相同不适用。详细请查看第3章节。
下面两个方法都不是用来定位控件的,一并记录下来以供參考。
6. getFocusedWindowName()
6.1 演示样例
'''
    public String getFocusedWindowName()
     * Gets the window that currently receives the focus.
     *
     * @return name of the window that currently receives the focus.
'''
window = viewer.getFocusedWindowName()
print "Window Name:",window.encode('utf-8')
6.2 解析
事实上就是获得当前打开的窗体的packageName/activityName,输出与HierarchyViewer工具检測到的信息一致,所以猜想其用到相同的方法。
输出:


7. visible(ViewNode node)
7.1 演示样例
'''
    public boolean visible(ViewNode node)
      * Gets the visibility of a given element.
     * @param selector selector for the view.
     * @return True if the element is visible.
'''
isVisible = viewer.visible(button)
print "is visible:",isVisible
就是查看下控件是否可见,没什么好解析的了。
8. 測试代码
from com.android.monkeyrunner import MonkeyRunner,MonkeyDevice
from com.android.monkeyrunner.easy import EasyMonkeyDevice,By
from com.android.chimpchat.hierarchyviewer import HierarchyViewer
from com.android.hierarchyviewerlib.models import ViewNode, Window
from java.awt import Point

#from com.android.hierarchyviewerlib.device import

#Connect to the target targetDevice
targetDevice = MonkeyRunner.waitForConnection()

easy_device = EasyMonkeyDevice(targetDevice)  #touch a button by id would need this
targetDevice.startActivity(component="com.example.android.notepad/com.example.android.notepad.NotesList")

#time.sleep(2000)
#invoke the menu options
MonkeyRunner.sleep(6)
targetDevice.press('KEYCODE_MENU', MonkeyDevice.DOWN_AND_UP);

'''
     public ViewNode findViewById(String id)
     * @param id id for the view.
     * @return view with the specified ID, or {@code null} if no view found.
'''
viewer = targetDevice.getHierarchyViewer()
button = viewer.findViewById('id/title')
text = viewer.getText(button)
print text.encode('utf-8')


'''
     public ViewNode findViewById(String id, ViewNode rootNode)
     * Find a view by ID, starting from the given root node
     * @param id ID of the view you're looking for
     * @param rootNode the ViewNode at which to begin the traversal
     * @return view with the specified ID, or {@code null} if no view found.

'''
iconMenuView = viewer.findViewById('id/icon_menu')
button = viewer.findViewById('id/title',iconMenuView)
print "Button Text:",text.encode('utf-8')

'''
    public String getFocusedWindowName()
     * Gets the window that currently receives the focus.
     *
     * @return name of the window that currently receives the focus.
'''
window = viewer.getFocusedWindowName()
print "Window Name:",window.encode('utf-8')

'''
    public static Point getAbsoluteCenterOfView(ViewNode node)
     * Gets the absolute x/y center of the specified view node.
     *
     * @param node view node to find position of.
     * @return absolute x/y center of the specified view node.
     */
'''
point = viewer.getAbsoluteCenterOfView(button)
print "Button Absolute Center Position:",point

'''
    public static Point getAbsolutePositionOfView(ViewNode node)
     * Gets the absolute x/y position of the view node.
     *
     * @param node view node to find position of.
     * @return point specifying the x/y position of the node.
'''
point = viewer.getAbsolutePositionOfView(button)
print "Button Absolute Position:", point

'''
    public boolean visible(ViewNode node)
      * Gets the visibility of a given element.
     * @param selector selector for the view.
     * @return True if the element is visible.
'''
isVisible = viewer.visible(button)
print "is visible:",isVisible
9.附上HierarchyViewer类的源代码方便參照
/*
 * Copyright (C) 2011 The Android Open Source Project
 *
 * Licensed under the Apache License, Version 2.0 (the "License");
 * you may not use this file except in compliance with the License.
 * You may obtain a copy of the License at
 *
 *      http://www.apache.org/licenses/LICENSE-2.0
 *
 * Unless required by applicable law or agreed to in writing, software
 * distributed under the License is distributed on an "AS IS" BASIS,
 * WITHOUT WARRANTIES OR CONDITIONS OF ANY KIND, either express or implied.
 * See the License for the specific language governing permissions and
 * limitations under the License.
 */
package com.android.chimpchat.hierarchyviewer;
import com.android.ddmlib.IDevice;
import com.android.ddmlib.Log;
import com.android.hierarchyviewerlib.device.DeviceBridge;
import com.android.hierarchyviewerlib.device.ViewServerDevice;
import com.android.hierarchyviewerlib.models.ViewNode;
import com.android.hierarchyviewerlib.models.Window;
import org.eclipse.swt.graphics.Point;
/**
 * Class for querying the view hierarchy of the device.
 */
public class HierarchyViewer {
    public static final String TAG = "hierarchyviewer";
    private IDevice mDevice;
    /**
     * Constructs the hierarchy viewer for the specified device.
     *
     * @param device The Android device to connect to.
     */
    public HierarchyViewer(IDevice device) {
        this.mDevice = device;
        setupViewServer();
    }
    private void setupViewServer() {
        DeviceBridge.setupDeviceForward(mDevice);
        if (!DeviceBridge.isViewServerRunning(mDevice)) {
            if (!DeviceBridge.startViewServer(mDevice)) {
                // TODO: Get rid of this delay.
                try {
                    Thread.sleep(2000);
                } catch (InterruptedException e) {
                }
                if (!DeviceBridge.startViewServer(mDevice)) {
                    Log.e(TAG, "Unable to debug device " + mDevice);
                    throw new RuntimeException("Could not connect to the view server");
                }
                return;
            }
        }
        DeviceBridge.loadViewServerInfo(mDevice);
    }
    /**
     * Find a view by id.
     *
     * @param id id for the view.
     * @return view with the specified ID, or {@code null} if no view found.
     */
    public ViewNode findViewById(String id) {
        ViewNode rootNode = DeviceBridge.loadWindowData(
                new Window(new ViewServerDevice(mDevice), "", 0xffffffff));
        if (rootNode == null) {
            throw new RuntimeException("Could not dump view");
        }
        return findViewById(id, rootNode);
    }
    /**
     * Find a view by ID, starting from the given root node
     * @param id ID of the view you're looking for
     * @param rootNode the ViewNode at which to begin the traversal
     * @return view with the specified ID, or {@code null} if no view found.
     */
    public ViewNode findViewById(String id, ViewNode rootNode) {
        if (rootNode.id.equals(id)) {
            return rootNode;
        }
        for (ViewNode child : rootNode.children) {
            ViewNode found = findViewById(id,child);
            if (found != null) {
                return found;
            }
        }
        return null;
    }
    /**
     * Gets the window that currently receives the focus.
     *
     * @return name of the window that currently receives the focus.
     */
    public String getFocusedWindowName() {
        int id = DeviceBridge.getFocusedWindow(mDevice);
        Window[] windows = DeviceBridge.loadWindows(new ViewServerDevice(mDevice), mDevice);
        for (Window w : windows) {
            if (w.getHashCode() == id)
                return w.getTitle();
        }
        return null;
    }
    /**
     * Gets the absolute x/y position of the view node.
     *
     * @param node view node to find position of.
     * @return point specifying the x/y position of the node.
     */
    public static Point getAbsolutePositionOfView(ViewNode node) {
        int x = node.left;
        int y = node.top;
        ViewNode p = node.parent;
        while (p != null) {
            x += p.left - p.scrollX;
            y += p.top - p.scrollY;
            p = p.parent;
        }
        return new Point(x, y);
    }
    /**
     * Gets the absolute x/y center of the specified view node.
     *
     * @param node view node to find position of.
     * @return absolute x/y center of the specified view node.
     */
    public static Point getAbsoluteCenterOfView(ViewNode node) {
        Point point = getAbsolutePositionOfView(node);
        return new Point(
                point.x + (node.width / 2), point.y + (node.height / 2));
    }
    /**
     * Gets the visibility of a given element.
     *
     * @param selector selector for the view.
     * @return True if the element is visible.
     */
    public boolean visible(ViewNode node) {
        boolean ret = (node != null)
                && node.namedProperties.containsKey("getVisibility()")
                && "VISIBLE".equalsIgnoreCase(
                        node.namedProperties.get("getVisibility()").value);
        return ret;
    }
    /**
     * Gets the text of a given element.
     *
     * @param selector selector for the view.
     * @return the text of the given element.
     */
    public String getText(ViewNode node) {
        if (node == null) {
            throw new RuntimeException("Node not found");
        }
        ViewNode.Property textProperty = node.namedProperties.get("text:mText");
        if (textProperty == null) {
            // give it another chance, ICS ViewServer returns mText
            textProperty = node.namedProperties.get("mText");
            if (textProperty == null) {
                throw new RuntimeException("No text property on node");
            }
        }
        return textProperty.value;
    }
}
10. 參考阅读
下面是之前不同框架的控件定位的实践。一并列出来方便直接跳转參考:
- Robotium之Android控件定位实践和建议(Appium/UIAutomator姊妹篇)
- UIAutomator定位Android控件的方法实践和建议(Appium姊妹篇)
- Appium基于安卓的各种FindElement的控件定位方法实践和建议
| 作者 |
自主博客 |
微信 |
CSDN |
| 天地会珠海分舵 |
|
服务号:TechGoGoGo 扫描码: |
http://blog.csdn.net/zhubaitian |
版权声明:本文博客原创文章,博客,未经同意,不得转载。
本文转自mfrbuaa博客园博客,原文链接:http://www.cnblogs.com/mfrbuaa/p/4753880.html,如需转载请自行联系原作者