转自:http://www.cnblogs.com/sunada2005/archive/2013/06/06/3121098.html
最近在使用github,感觉不错。在windows下,可使用github提供的windows客户端(http://windows.github.com/)。很傻瓜,很方便。如何使用?详见:http://www.cr173.com/html/15618_1.html。(有图是王道)最近发现,在公司电脑上安装github的windows客户端时,可能由于公司网络限速和限流量限得太死,怎么也安装不成功。在家的github windows的图形客户端的同步也经常出问题。没办法,也只能通过文本界面来连接github了。如果已在windows系统中成功安装github的客户端,则除了可使用图形客户端外,还可使用github bash这个文本客户端。在我电脑上,当图形客户端同步出现问题时,文客户端还是能同步成功的。如果安装不上github的客户端,还可安装其他的git bash来连接github,如msysgit (http://msysgit.github.io/)等。因为以上软件都是以git为基础的,所以语法与linux使用的命令相同。
在linux下我仅使用了文本界面,所以安装了个文本形式的git客户来连接github。
1. 安装git
我用的是centos系统,在使用yum install git时,系统提示没有找到git包。所以,仅能通过以下方法来安装git。方法详见:http://www.cnblogs.com/Neddy/archive/2011/02/28/1967548.html。以上方法中有一个问题:方法中给出的git的下载源http://www.codemonkey.org.uk/projects/git-snapshots/git/git-latest.tar.gz 似乎无效了,于是,我在网上的这里下载了个git的最新安装包,安装到了centos上。Linux下git的官方网址为:http://git-scm.com/download ,可能因为我网慢打不开,不知道读者您那里如何。如果打不开,可以在网上其他地方找找安装包,应该可以找到的。
2. 使用git连接github
使用git连接github时,需要将linux下产生的一个ssh公钥放到github上。具体步骤详见:http://blog.sina.com.cn/s/blog_6b706e15010199p1.html。主要命令有:
|
1
|
ssh-keygen -t rsa -C
"mail@mail.com"
|
然后系统提示输入文件保存位置等信息,连续敲三次回车即可,生成的SSH key文件保存在中~/.ssh/id_rsa.pub文件中。
用文本编辑工具打开该文件,在linux下可以用cat命令显示id_rsa.pub中的内容(cat ~/.ssh/id_rsa.pub),让后复制其内容。
接着拷贝.ssh/id_rsa.pub文件内的所以内容,将它粘帖到github帐号管理中的添加SSH key界面中。
注意,使用vim读取git_home/.ssh/id_rsa.pub中的公钥内容时,可能会有较多的空格和换行,复制到github网站上时必需删除。所以建议使用cat来读取ssh公钥。将ssh公钥成功加入github后,可使用命令ssh -T git@github.com来验证是否成功。如果出现象:hi xxx. You've successfully authenticated, but GitHub does not provide shell access.则说明连接成功。
如:Warning: Permanently added the RSA host key for IP address '*.*.*.*' to the list of known hosts.
Enter passphrase for key '/home/git/.ssh/id_rsa':
Hi xd502djj! You've successfully authenticated, but GitHub does not provide shell access.
如果未能连接成功。可使用命令ssh -Tv git@github.com来查找failure的原因。通过详细的debug过程,我发现象我把自己的ssh密钥信息放到了/home/admin/.ssh/下,而测试时使用的账户是root,寻找ssh密钥的路径为root/.ssh,所以permission denied的啦。su到admin下,就可以连接成功啦~~
3. 使用git与github管理代码
3.1 新建一个repository
这里就使用github官网上的教程吧。请保证git的版本至少为1.7.10,否则可能无法成功。详细如何使用,请参见:https://help.github.com/articles/set-up-git。linux下无法新建一个repo,只能对github中已有的repo进行修改。所以,当要新建一个repo时,必须在github.com上新建,再通过linux下的git向此repo中新添内容。
3.2 修改repo中的代码
github的官网上也有修改repo代码的教程。详情请参见:https://help.github.com/articles/fork-a-repo。简要步骤如下:
$git clone https:
/
/
github.com
/
username
/
Spoon
-
Knife.git
$cd Spoon
-
Knife
$git add filename.py
#添加文件到版本库
$git commit
-
m
'add filename.py to src'
#提交,产生版本记录,注意代码依然在本地
$vim README.md
#修改Spoon-Knife中的README.md文件内容
$git commit
-
m
'modify the README.md'
#提交,产生版本记录,注意代码依然在本地
$git [remote] rm filename1.py
#删除repo中的filename1.py文件
$git commit
-
m
'delete filename1.py'
#提交,产生版本记录,注意代码依然在本地
$git push origin
#将修改提交到github上<br>
|
3.3 常用git命令


git help                                 #可查看git的常用命令
git config --global user.name "Your Name Here"           #设置commit的署名
git config --global user.email "your_email@example.com"      #设置commit的email
git config [--local|--global|--system] --list/-l          #查看本地的global信息
git config [--local|--global|--system] --unset[-all] user.name  #删除user.name信息。如果user.name对应多个值,可用unset-all来删除
git remote add XXX https://github.com/username/repo_name.git    #设置github的连接

git clone git://github.com/your_account/aimed_repo.git       #复制一个repo到本地

git remote -v                               #查看本地设置的url连接信息

git status                                 #查看当前工作的

branch git branch                             #查看本地所有的

branch git branch -a                           #查看远程的所有分支

git branch -d branch_name                          #删除本地branch_name这一分支

git push origin --delete branch_name                   #删除名为branch_name的远程分支

git checkout branch_name                         #切换到名为branch_name的分支上

git chechout -b branch_name                        #在本地新建一个名为branch_nam的分支

git diff test_branch_name                         #查看当前branch与test_branch_name中代码的区别

git mv filename newfilename                      #文件重命名

git push XXX branch_name                        #上传指定的branch到远端

git pull                                  #将远程上的版本与本地版本进行合并,相当于get fetch + git merge

git reset --hard                             #将刚才进行的git pull所进行的操作取消,恢复本地版本合并前的原貌
4. 如何删除github上的repository
github页面上删除repo的功能比较隐蔽,得在这里表一表。比如,想删除了一个名为python的repo。则需先点击进入“python”,单击“Settings”,找到“Delete this repository”,确认删除即可。注意,github上的repo删除后就不能恢复了哦~~


5. git clone/push时出现错误提示:14090086:SSL routines:SSL3_GET_SERVER_CERTIFICATE:certificate verify failed while accessing ...
这是由于ssl认证出问题引起的错误。有两种简单的解决方法:
1. 使用命令,成功执行后,便可正常使用git clone和git push了
git config --global http.sslVerify
false
|
2. 使用命令,但每次clone 和 push时都需要带上env的部分。
env GIT_SSL_NO_VERIFY=
true
git clone https:
//github.com/XXXX/xxxxx.git
|
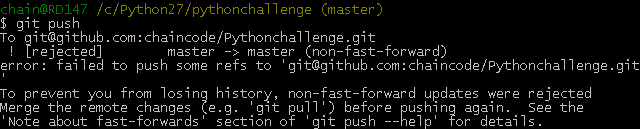
6. git push时出现错误non-fast-forward时怎么办?(来自:http://blog.csdn.net/chain2012/article/details/7476493)
当要push代码到git时,出现提示:
error:failed to push some refs to ...
Dealing with “non-fast-forward” errors
From time to time you may encounter this error while pushing:
- $ git push origin master
- To ../remote/
- ! [rejected] master -> master (non-fast forward)
- error: failed to push some refs to '../remote/'
To prevent you from losing history, non-fast-forward updates were rejected
Merge the remote changes before pushing again. See the 'non-fast forward'
section of 'git push --help' for details.
This error can be a bit overwhelming at first, do not fear. Simply put, git cannot make the change on the remote without losing commits, so it refuses the push. Usually this is caused by another user pushing to the same branch. You can remedy this by fetching and merging the remote branch, or using pull to perform both at once.
In other cases this error is a result of destructive changes made locally by using commands like git commit --amend or git rebase. While you can override the remote by adding --force to the push command, you should only do so if you are absolutely certain this is what you want to do. Force-pushes can cause issues for other users that have fetched the remote branch, and is considered bad practice. When in doubt, don’t force-push.
问题(Non-fast-forward)的出现原因在于:git仓库中已经有一部分代码,所以它不允许你直接把你的代码覆盖上去。于是你有2个选择方式:
1,强推,即利用强覆盖方式用你本地的代码替代git仓库内的内容
git push -f
2,先把git的东西fetch到你本地然后merge后再push
$ git fetch
$ git merge
这2句命令等价于
- $ git pull
可是,这时候又出现了如下的问题:
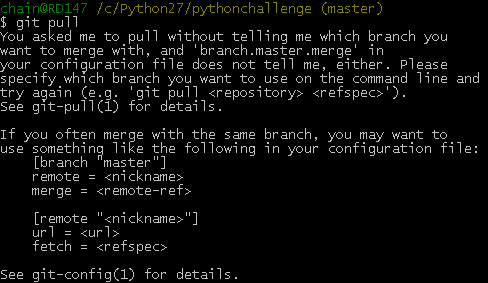
上面出现的 [branch "master"]是需要明确(.git/config)如下的内容
[branch "master"]
remote = origin
merge = refs/heads/master
这等于告诉git2件事:
1,当你处于master branch, 默认的remote就是origin。
2,当你在master branch上使用git pull时,没有指定remote和branch,那么git就会采用默认的remote(也就是origin)来merge在master branch上所有的改变
如果不想或者不会编辑config文件的话,可以在bush上输入如下命令行:
- $ git config branch.master.remote origin
- $ git config branch.master.merge refs/heads/master
之后再重新git pull下。最后git push你的代码吧。it works now~
本文转自茄子_2008博客园博客,原文链接:http://www.cnblogs.com/xd502djj/p/4448491.html,如需转载请自行联系原作者。
