参考资料:
http://docs.opencv.org/modules/core/doc/xml_yaml_persistence.html
#include "opencv2/opencv.hpp"
#include <time.h>
using namespace cv;
using namespace std;
int main(int, char** argv)
{
//打开yml文件,用来写入
FileStorage fs("test.yml", FileStorage::WRITE);
fs << "frameCount" << 5;
time_t rawtime;
time(&rawtime);
fs << "calibrationDate" << asctime(localtime(&rawtime));
Mat cameraMatrix = (Mat_<double>(3,3) << 1000, 0, 320, 0, 1000, 240, 0, 0, 1);
Mat distCoeffs = (Mat_<double>(5,1) << 0.1, 0.01, -0.001, 0, 0);
fs << "cameraMatrix" << cameraMatrix << "distCoeffs" << distCoeffs;
fs << "features" << "[";
for( int i = 0; i < 3; i++ )
{
int x = rand() % 640;
int y = rand() % 480;
uchar lbp = rand() % 256;
fs << "{:" << "x" << x << "y" << y << "lbp" << "[:";
for( int j = 0; j < 8; j++ )
fs << ((lbp >> j) & 1);
fs << "]" << "}";
}
fs << "]";
fs.release();
通过上面的代码,我们可以把文件写入到yaml或xml文件中,写入ymal文件的格式为:
%YAML:1.0
frameCount: 5
calibrationDate: "Sat Nov 30 16:49:41 2013\n"
cameraMatrix: !!opencv-matrix
rows: 3
cols: 3
dt: d
data: [ 1000., 0., 320., 0., 1000., 240., 0., 0., 1. ]
distCoeffs: !!opencv-matrix
rows: 5
cols: 1
dt: d
data: [ 1.0000000000000001e-001, 1.0000000000000000e-002,
-1.0000000000000000e-003, 0., 0. ]
features:
- { x:41, y:227, lbp:[ 0, 1, 1, 1, 1, 1, 0, 1 ] }
- { x:260, y:449, lbp:[ 0, 0, 1, 1, 0, 1, 1, 0 ] }
- { x:598, y:78, lbp:[ 0, 1, 0, 0, 1, 0, 1, 0 ]
写入xml文件后的格式为:
<?xml version="1.0"?>
<opencv_storage>
<frameCount>5</frameCount>
<calibrationDate>"Sat Nov 30 16:50:54 2013
"</calibrationDate>
<cameraMatrix type_id="opencv-matrix">
<rows>3</rows>
<cols>3</cols>
<dt>d</dt>
<data>
1000. 0. 320. 0. 1000. 240. 0. 0. 1.</data></cameraMatrix>
<distCoeffs type_id="opencv-matrix">
<rows>5</rows>
<cols>1</cols>
<dt>d</dt>
<data>
1.0000000000000001e-001 1.0000000000000000e-002
-1.0000000000000000e-003 0. 0.</data></distCoeffs>
<features>
<_><x>41</x>
<y>227</y>
<lbp>
0 1 1 1 1 1 0 1</lbp></_>
<_><x>260</x>
<y>449</y>
<lbp>
0 0 1 1 0 1 1 0</lbp></_>
<_><x>598</x>
<y>78</y>
<lbp>
0 1 0 0 1 0 1 0</lbp></_></features>
</opencv_storage>
下面的代码用来读取xml或者yaml文件:
FileStorage fs2("test.yml", FileStorage::READ);
// 得到xml/yml文件中的信息,第一种方法:用type数组
int frameCount = (int)fs2["frameCount"];
std::string date;
// 第二种方法:用文件操作符 >>
fs2["calibrationDate"] >> date;
Mat cameraMatrix2, distCoeffs2;
fs2["cameraMatrix"] >> cameraMatrix2;
fs2["distCoeffs"] >> distCoeffs2;
cout << "frameCount: " << frameCount << endl
<< "calibration date: " << date << endl
<< "camera matrix: " << cameraMatrix2 << endl
<< "distortion coeffs: " << distCoeffs2 << endl;
FileNode features = fs2["features"];
FileNodeIterator it = features.begin(), it_end = features.end();
int idx = 0;
std::vector<uchar> lbpval;
//用文件节点迭代器
for( ; it != it_end; ++it, idx++ )
{
cout << "feature #" << idx << ": ";
cout << "x=" << (int)(*it)["x"] << ", y=" << (int)(*it)["y"] << ", lbp: (";
(*it)["lbp"] >> lbpval;
for( int i = 0; i < (int)lbpval.size(); i++ )
cout << " " << (int)lbpval[i];
cout << ")" << endl;
}
fs2.release();
return 0;
}
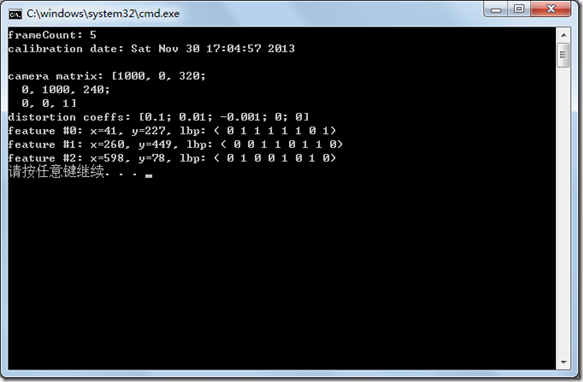
读取的结果显示为:
程序代码:工程FirstOpenCV38
