我现在学的是spring4.2
今天主要学习了Spring MVC注解
引入注解可以减少我们的代码量,优化我们的代码。
@Controller:用于标识是处理器类;
@RequestMapping:请求到处理器功能方法的映射规则;
还是以示例来解释说明
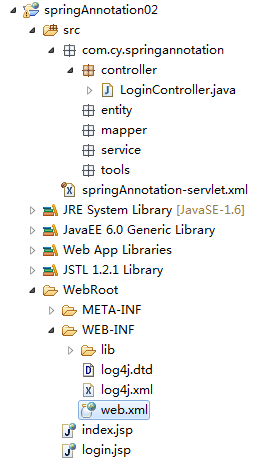
1 创建springAnnotation02项目,导入jar包。
这里的web.xml
<?xml version="1.0" encoding="UTF-8"?>
<web-app xmlns:xsi="http://www.w3.org/2001/XMLSchema-instance" xmlns="http://java.sun.com/xml/ns/javaee" xsi:schemaLocation="http://java.sun.com/xml/ns/javaee http://java.sun.com/xml/ns/javaee/web-app_3_0.xsd" id="WebApp_ID" version="3.0">
  <display-name>springmvc01</display-name>
  <welcome-file-list>
    <welcome-file>index.html</welcome-file>
    <welcome-file>index.htm</welcome-file>
    <welcome-file>index.jsp</welcome-file>
    <welcome-file>default.html</welcome-file>
    <welcome-file>default.htm</welcome-file>
    <welcome-file>default.jsp</welcome-file>
  </welcome-file-list>

<!-- 前端控制器 -->
  <servlet>
    <servlet-name>springAnnotation</servlet-name>
    <servlet-class>org.springframework.web.servlet.DispatcherServlet</servlet-class>


     <!-- 默认情况下:DispatcherServlet会寻找WEB-INF下,命名规范为[servlet-name]-servlet.xml文件。如:在上例中,它就会找/WEB-INF/spring-servlet.xml
                    如果需要修改,需要在web.xml中的<servlet>标记中增加 <init-param>。。。  </init-param>:-->
    <init-param>
       <param-name>contextConfigLocation</param-name>
       <param-value>/WEB-INF/classes/springAnnotation-servlet.xml</param-value>
    </init-param>


    <!-- load-on-startup:表示启动容器时初始化该Servlet; -->
    <load-on-startup>1</load-on-startup>
  </servlet>
  <servlet-mapping>
    <servlet-name>springAnnotation</servlet-name>
    <url-pattern>*.do</url-pattern>
  </servlet-mapping>

  <!-- 动态设置项目的运行路径 -->
    <context-param>
        <param-name>webAppRootKey</param-name>
        <param-value>spring.root</param-value>
    </context-param>

    <!-- 加载LOG4J -->
    <context-param>
        <param-name>log4jConfigLocation</param-name>
        <param-value>/WEB-INF/log4j.xml</param-value>
    </context-param>

    <context-param>
        <param-name>log4jRefreshInterval</param-name>
        <param-value>60000</param-value>
    </context-param>

  <!-- spring Web MVC框架提供了org.springframework.web.filter.CharacterEncodingFilter
用于解决POST方式造成的中文乱码问题 -->
<filter>
    <filter-name>encodingFilter</filter-name>
    <filter-class>org.springframework.web.filter.CharacterEncodingFilter</filter-class>
    <init-param>
      <param-name>encoding</param-name>
      <param-value>UTF-8</param-value>
    </init-param>
    <init-param>
      <param-name>forceEncoding</param-name>
      <param-value>true</param-value>
    </init-param>
  </filter>
  <filter-mapping>
    <filter-name>encodingFilter</filter-name>
    <url-pattern>/*</url-pattern>
  </filter-mapping>


  <!-- 启动log4j日志管理 -->
    <listener>
        <listener-class>org.springframework.web.util.Log4jConfigListener</listener-class>
    </listener>
</web-app>
1 <beans xmlns="http://www.springframework.org/schema/beans"
2 xmlns:xsi="http://www.w3.org/2001/XMLSchema-instance"
3 xmlns:context="http://www.springframework.org/schema/context"
4 xsi:schemaLocation=
5 "http://www.springframework.org/schema/beans
6 http://www.springframework.org/schema/beans/spring-beans-3.0.xsd
7 http://www.springframework.org/schema/context
8 http://www.springframework.org/schema/context/spring-context-3.0.xsd">
修改过后的springAnnotation-servlet.xml。
<beans xmlns="http://www.springframework.org/schema/beans"
xmlns:xsi="http://www.w3.org/2001/XMLSchema-instance"
xmlns:context="http://www.springframework.org/schema/context"
xmlns:mvc="http://www.springframework.org/schema/mvc"
xsi:schemaLocation=
"http://www.springframework.org/schema/beans
http://www.springframework.org/schema/beans/spring-beans-3.0.xsd
http://www.springframework.org/schema/context   http://www.springframework.org/schema/context/spring-context-3.0.xsd
http://www.springframework.org/schema/mvc
http://www.springframework.org/schema/mvc/spring-mvc-3.0.xsd">
使用Spring mvc注解时一个完整的springAnnotation-servlet.xml配置如下:
 1 <?xml version="1.0" encoding="UTF-8"?>
 2 <beans xmlns="http://www.springframework.org/schema/beans"
 3 xmlns:xsi="http://www.w3.org/2001/XMLSchema-instance"
 4 xmlns:context="http://www.springframework.org/schema/context"
 5 xmlns:mvc="http://www.springframework.org/schema/mvc"
 6 xsi:schemaLocation=
 7   "http://www.springframework.org/schema/beans
 8    http://www.springframework.org/schema/beans/spring-beans-3.0.xsd
 9    http://www.springframework.org/schema/context   http://www.springframework.org/schema/context/spring-context-3.0.xsd
10    http://www.springframework.org/schema/mvc
11    http://www.springframework.org/schema/mvc/spring-mvc-3.0.xsd">
12
13 <!--开启注解  -->
14 <mvc:annotation-driven />
15
16 <!--启用自动扫描  -->
17 <context:component-scan base-package="com.cy.springannotation.controller" />
18
19 <!--配置视图解析器  -->
20     <!-- ViewResolver 视图解析器 用于将返回的ModelAndView对象进行分离
21     InternalResourceViewResolver:用于支持Servlet、JSP视图解析;
22        viewClass:JstlView表示JSP模板页面需要使用JSTL标签库,classpath中必须包含jstl的相关jar包;
23        prefix和suffix:查找视图页面的前缀和后缀(前缀[逻辑视图名]后缀),
24        比如传进来的逻辑视图名为WEB-INF/jsp/hello,则该该jsp视图页面应该存放在“WEB-INF/jsp/hello.jsp”; -->
25
26 <bean class="org.springframework.web.servlet.view.InternalResourceViewResolver">
27      <property name="viewClass" value="org.springframework.web.servlet.view.JstlView"></property>
28      <property name="prefix" value="/"></property> <!-- 我这里的视图直接放在WebRoot下的 -->
29      <property name="suffix" value=".jsp"></property>
30 </bean>
31
32 <!-- 为何不配置HandlerMapping?因为基于注解时,会自动使用DefaultAnnotationHandlerMapping -->
33
34 </beans>
接下来,我们完成一个最简单的通过控制实现页面间的跳转。
一个有提交的页面
 1 <%@ page language="java" import="java.util.*" pageEncoding="utf-8" contentType="text/html; charset=utf-8"%>
 2 <%
 3 String path = request.getContextPath();
 4 String basePath = request.getScheme()+"://"+request.getServerName()+":"+request.getServerPort()+path+"/";
 5 %>
 6
 7 <!DOCTYPE HTML PUBLIC "-//W3C//DTD HTML 4.01 Transitional//EN">
 8 <html>
 9   <head>
10     <base href="<%=basePath%>">
11
12     <title>登录页面</title>
13
14     <meta http-equiv="pragma" content="no-cache">
15     <meta http-equiv="cache-control" content="no-cache">
16     <meta http-equiv="expires" content="0">
17     <meta http-equiv="keywords" content="keyword1,keyword2,keyword3">
18     <meta http-equiv="description" content="This is my page">
19     <!--
20     <link rel="stylesheet" type="text/css" href="styles.css">
21     -->
22
23   </head>
24
25   <body>
26   <form action="login.do" method="post">
27     <table>
28        <tr>
29            <td>用户名:</td>
30            <td><input type="text" name="username"/></td>
31        </tr>
32        <tr>
33            <td>班级</td>
34            <td><input type="text" name="clazz"/></td>
35        </tr>
36        <tr>
37            <td colspan="2"> <input type="submit" value="提交"/> </td>
38        </tr>
39     </table>
40   </form>
41   </body>
42 </html>
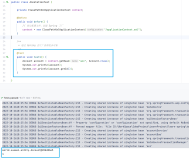
控制器
 1 package com.cy.springannotation.controller;
 2
 3 import org.springframework.stereotype.Controller;
 4 import org.springframework.web.bind.annotation.RequestMapping;
 5
 6 @Controller  // @Controller告知Spring容器这是一个控制器组件
 7 public class LoginController {
 8      @RequestMapping("/login.do")  // @RequestMapping告知该方法是针对/login.do请求的处理方法
 9      public String login(String username){
10          System.out.println(username);
11         return "index";           // 返回的字符串被当做ViewName
12
13
14      }
15 }
以上的代码就可以进行一个简单的页面跳转。
接下来进一步了解@RequestMapping的特性
 1 @Controller
 2 @RequestMapping("/test")
 3 public class login.doController {
 4
 5     @RequestMapping("/login.do")
 6     public String login(){
 7         return "index";
 8     }
 9 }
10
11 //此时代表请求该方法的路径是:/test/login.spring
@RequestMapping(value=“/users/**”) 匹配“/users/abc/abc”;
@RequestMapping(value="/product?") 匹配“/product1”或“/producta”,但不匹配“/product”或“/productaa”;
@RequestMapping(value="/product*") 匹配“/productabc”或“/product”,但不匹配“/productabc/abc”;
@RequestMapping(value="/product/*") 匹配“/product/abc”,但不匹配“/productabc”;
@RequestMapping(value="/login.do",params="flag") 代表请求中必须要有名为flag的提交项
@RequestMapping(value="/login.do",params="!flag") 代表请求中不能有名为flag的提交项
@RequestMapping(value="/login.do",params="flag=hello") 代表请求中必须有名为flag的提交项,且值为hello
@RequestMapping(value="/login.do",params="flag!=hello") 代表请求中如果有名为flag的提交项,其值不能为hello
@RequestMapping(value="/login.do",params={"flag1","flag2=hello"})代表请求中必须有名为flag1的提交项,同时必须有名为flag2的提交项,且flag2的值必须为hello
@RequestMapping(value="/login.do",method=RequestMethod.POST)
@RequestMapping(value="/login.do",method=RequestMethod.GET)
@RequestMapping(value="/login.do", method= {RequestMethod.POST, RequestMethod.GET}"
接下来是:请求处理方法可接收参数