前言
    NS_CLASS_AVAILABLE_IOS(2_0) @interface UIImageView : UIView
    @available(iOS 2.0, *)       public class UIImageView : UIView
需要注意的是,Apple 对 png 格式图片支持最为良好的,对于其他格式支持相对较弱,当图片是 png 格式,那么图片名的后缀 .png 可以不写,但是如果图像只有 @2x 图片,没有一倍图像,则不能忽略 .png,在 iPhone4 以后,苹果采用视网膜屏幕,所以就有了 2 倍像素图像,随着发展现在有了 @3x 图,如果你现在还在用 Xcode5.1 写程序,在适配 iPhone6 以及 6+ 会自动放大即可,但是在 Xcode6 上就需要考虑适配问题,不会自动适配了。
如果不是 png 格式,请务必要加入后缀名,否则可能无法显示。比如目前无法直接加载 gif 图。
1、UIImageView 的创建
-
Objective-C
-
先设置 frame 后添加 image
// 创建一个图片视图,只有图片 image 是显示不出来的,需要 image 放到 imageView 上才能显示出来 UIImageView *imageView = [[UIImageView alloc] initWithFrame:self.view.bounds]; imageView.image = [UIImage imageNamed:@"1"]; [self.view addSubview:imageView]; -
先添加 image 后设置 frame
    UIImageView *imageView = [[UIImageView alloc] initWithImage:[UIImage imageNamed:@"13"]];

    // 可以不设置 frame,不设置时 imageView 的大小 与 image 的大小相同
    imageView.frame = self.view.bounds;

    [self.view addSubview:imageView];
-
-
Swift
-
先设置 frame 后添加 image
// 创建一个图片视图,只有图片 image 是显示不出来的,需要 image 放到 imageView 上才能显示出来 let imageView:UIImageView = UIImageView(frame: self.view.bounds) imageView.image = UIImage(named: "1") self.view.addSubview(imageView) -
先添加 image 后设置 frame
    let imageView:UIImageView = UIImageView(image: UIImage(named: "13"))

    // 可以不设置 frame,不设置时 imageView 的大小 与 image 的大小相同
    imageView.frame = self.view.bounds

    self.view.addSubview(imageView)
-
2、UIImageView 的设置
-
Objective-C
// 设置 frame /* imageView.image.size.width, imageView.image.size.height 可获取 imageView image 中图片的尺寸 */ imageView.frame = CGRectMake(10, 30, [UIScreen mainScreen].bounds.size.width - 20, [UIScreen mainScreen].bounds.size.height - 40); // 设置图片填充方式 /* 当图片小于 imageView 的大小时,处理图片的显示方式 // 缩放图片,使图片充满容器。图片未必保持长宽比例协调,有可能会拉伸至变形。默认 UIViewContentModeScaleToFill, // 在保持长宽比的前提下,缩放图片,使得图片在容器内完整显示出来 UIViewContentModeScaleAspectFit, // 在保持长宽比的前提下,缩放图片,使图片充满容器 UIViewContentModeScaleAspectFill, UIViewContentModeRedraw, UIViewContentModeCenter, UIViewContentModeTop, UIViewContentModeBottom, UIViewContentModeLeft, UIViewContentModeRight, UIViewContentModeTopLeft, UIViewContentModeTopRight, UIViewContentModeBottomLeft, UIViewContentModeBottomRight, */ imageView.contentMode = UIViewContentModeScaleToFill; // 设置透明度 imageView.alpha = 0.5; // 设置 image /* 图片名称为 nil 时,控制台会打印输出 CUICatalog: Invalid asset name supplied: (null) */ // 正常状态时的图片 imageView.image = [UIImage imageNamed:@"18"]; // 高亮状态时的图片 imageView.highlightedImage = [UIImage imageNamed:@"17"]; // 设置是否隐藏 imageView.hidden = YES; // 设置 imageView 的交互属性 /* UIImageView 的交互属性默认是关闭的 */ imageView.userInteractionEnabled = YES; // 为图片添加单击事件 /* 一定要先将 userInteractionEnabled 置为 YES,这样才能响应单击事件 */ [imageView addGestureRecognizer:[[UITapGestureRecognizer alloc] initWithTarget:self action:@selector(singleTapImageView:)]]; -
Swift
    // 设置 frame
    /*
        imageView.image.size.width, imageView.image.size.height 可获取 imageView image 中图片的尺寸
    */
    imageView.frame = CGRectMake(10, 30, UIScreen.mainScreen().bounds.size.width - 20, UIScreen.mainScreen().bounds.size.height - 40)

    // 设置图片填充方式
    /*
        当图片小于 imageView 的大小时,处理图片的显示方式

        // 缩放图片,使图片充满容器。图片未必保持长宽比例协调,有可能会拉伸至变形。默认
        case ScaleToFill

        // 在保持长宽比的前提下,缩放图片,使得图片在容器内完整显示出来
        case ScaleAspectFit

        // 在保持长宽比的前提下,缩放图片,使图片充满容器
        case ScaleAspectFill

        case Redraw
        case Center
        case Top
        case Bottom
        case Left
        case Right
        case TopLeft
        case TopRight
        case BottomLeft
        case BottomRight
     */

    imageView.contentMode = UIViewContentMode.ScaleToFill

    // 设置透明度
    imageView.alpha = 0.5

    // 设置 image
    /*
        图片名称为 nil 时,控制台会打印输出 CUICatalog: Invalid asset name supplied: (null)
    */

        // 正常状态时的图片
        imageView.image = UIImage(named: "18")

        // 高亮状态时的图片
        imageView.highlightedImage = UIImage(named: "17")

    // 设置是否隐藏
    imageView.hidden = true

    // 设置 imageView 的交互属性
    /*
        UIImageView 的交互属性默认是关闭的
    */
    imageView.userInteractionEnabled = true

    // 为图片添加单击事件
    /*
        一定要先将 userInteractionEnabled 置为 YES,这样才能响应单击事件
    */
    imageView.addGestureRecognizer(UITapGestureRecognizer(target:self, action:#selector(UiImageView.singleTapImageView(_:))))
3、UIImageView 播放图片集
-
Objective-C
// 创建图片集 NSMutableArray *imageArray = [NSMutableArray arrayWithCapacity:0]; for (int i = 0; i < 30; i++) { [imageArray addObject:[UIImage imageNamed:[NSString stringWithFormat:@"%d.jpg", i]]]; } // 播放图片集 // 设置播放的图片集(需将图片添加到数组 imageArray 中) imageView.animationImages = imageArray; // 设置播放整个图片集的时间 imageView.animationDuration = 30; // 设置循环播放次数,默认为0 一直循环 imageView.animationRepeatCount = 0; // 开始播放 [imageView startAnimating]; // 停止播放动画 [imageView stopAnimating]; -
Swift
    // 创建图片集
    var imageArray:Array<UIImage> = Array()

    for i in 0 ..< 30 {
        imageArray.append(UIImage(named: String(format: "%d.jpg", i))!)
    }

    // 播放图片集

        // 设置播放的图片集(需将图片添加到数组 imageArray 中)
        imageView.animationImages = imageArray

        // 设置播放整个图片集的时间
        imageView.animationDuration = 30

        // 设置循环播放次数,默认为0 一直循环
        imageView.animationRepeatCount = 0

        // 开始播放
        imageView.startAnimating()

        // 停止播放动画
        imageView.stopAnimating()
4、UIImage 图片的处理
4.1 UIImage 图片的加载方式
-
Assets.xcassets
- Assets.xcassets 在 App 打包后,以 Assets.car 文件的形式出现在 Bundle 中。其作用在于:
- 自动识别 @2x,@3x 图片,对内容相同但分辨率不同的图片统一管理。
- 可以对图片进行剪裁和拉伸处理。
- Assets.xcassets 在 App 打包后,以 Assets.car 文件的形式出现在 Bundle 中。其作用在于:
-
根据是否将创建好的对象缓存入系统内存,有两类创建 UIImage 对象的方法可选
- 1、缓存:imageNamed:,只需传入文件名.扩展名(可选)即可。
- 根据图片文件名在缓存池中查找特定的 UIImage 对象,若存在,将这个对象返回。如果不存在,则从 Bundle 中加载图片数据,创建对象并返回。如果相应的图片数据不存在,返回 nil。
- 2、不缓存:imageWithContentsOfFile:,必须传入文件的全名(全路径+文件名)。
- 1、缓存:imageNamed:,只需传入文件名.扩展名(可选)即可。
-
UIImage 从 Bundle 中加载图片资源
- Assets.xcassets 中的图片资源只能通过 imageNamed: 方法加载,通过 NSBundle 的 pathForResource:ofType: 无法获得图片路径。因此,Assets.xcassets 只适合存放系统常用的,占用内存小的图片资源。
- imageNamed: 方法同样可以加载根目录中的图片资源。
- 要想利用 imageWithContentsOfFile: 方法以不缓存的形式加载图片,必须将图片资源放置在根目录中。
- 相对于 jpg,iOS 对 png 的支持较好,如果从 Assets.xcassets 以外的地方加载 jpg 格式的图片,必须在文件名后加扩展名。
4.2 对图片进行缩放和翻转
-
Objective-C
/* + (UIImage *)imageWithCGImage:(CGImageRef)cgImage scale:(CGFloat)scale orientation:(UIImageOrientation)orientation; cgImage: 图片 scale: 比例: < 1 放大, > 1 缩小 orientation: 翻转方式 UIImageOrientationUp, // 不反转 UIImageOrientationDown, // 逆时针旋转 180 度 UIImageOrientationLeft, // 逆时针旋转 90 度,只垂直方向放大 UIImageOrientationRight, // 顺时针旋转 90 度,只垂直方向放大 UIImageOrientationUpMirrored, // 水平镜像反转 UIImageOrientationDownMirrored, // 垂直镜像反转 UIImageOrientationLeftMirrored, // 水平镜像反转,逆时针旋转 90 度,只垂直方向放大 UIImageOrientationRightMirrored, // 水平镜像反转,顺时针旋转 90 度,只垂直方向放大 */ image = [UIImage imageWithCGImage:image.CGImage scale:0.5 orientation:UIImageOrientationUpMirrored]; -
Swift
    /*
        public init(CGImage cgImage: CGImage, scale: CGFloat, orientation: UIImageOrientation)

        cgImage:       图片
        scale:         比例: < 1 放大, > 1 缩小
        orientation:   翻转方式

        case Up              // 不反转
        case Down            // 逆时针旋转 180 度
        case Left            // 逆时针旋转 90 度,只垂直方向放大
        case Right           // 顺时针旋转 90 度,只垂直方向放大
        case UpMirrored      // 水平镜像反转
        case DownMirrored    // 垂直镜像反转
        case LeftMirrored    // 水平镜像反转,逆时针旋转 90 度,只垂直方向放大
        case RightMirrored   // 水平镜像反转,顺时针旋转 90 度,只垂直方向放大
    */

    image = UIImage(CGImage: image.CGImage!, scale: 0.5, orientation: .UpMirrored)
4.3 设置图片渲染方式
-
Objective-C
/* // Use the default rendering mode for the context where the image is used UIImageRenderingModeAutomatic, // Always draw the original image, without treating it as a template UIImageRenderingModeAlwaysOriginal, // Always draw the image as a template image, ignoring its color information UIImageRenderingModeAlwaysTemplate, */ // 在有些可以添加图片的控件中,需要显示原图,否则图片将以阴影的方式显示 image = [image imageWithRenderingMode:UIImageRenderingModeAlwaysOriginal]; -
Swift
    /*
        // Use the default rendering mode for the context where the image is used
        case Automatic

        // Always draw the original image, without treating it as a template
        case AlwaysOriginal

        // Always draw the image as a template image, ignoring its color information
        case AlwaysTemplate
    */

    // 在有些可以添加图片的控件中,需要显示原图,否则图片将以阴影的方式显示
    image = image.imageWithRenderingMode(.AlwaysOriginal)
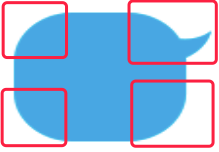
4.4 设置图片拉伸方式
-
设置拉伸方式前后拉伸效果

-
1、只拉伸中间的 1 * 1 的区域
-
Objective-C
/* 设置的区域为不拉伸(保护)的部分,自动计算右侧和下侧保护部分的大小: rightCapWidth = width - leftCapWidth - 1 bottomCapHeight = height - topCapHeight - 1 */ image = [image stretchableImageWithLeftCapWidth:image.size.width * 0.5 topCapHeight:image.size.height * 0.5]; -
Swift
    /*
        设置的区域为不拉伸(保护)的部分,自动计算右侧和下侧保护部分的大小:

            rightCapWidth = width - leftCapWidth - 1
            bottomCapHeight  = height - topCapHeight - 1
    */

    image = image.stretchableImageWithLeftCapWidth(NSInteger(image.size.width * 0.5),
                                      topCapHeight: NSInteger(image.size.height * 0.5))
-
-
2、拉伸指定的区域
-
Objective-C
/* 设置的区域为不拉伸(保护)的部分 拉伸模式: UIImageResizingModeTile 平铺,默认 UIImageResizingModeStretch 直接拉伸 */ // 以默认平铺模式拉伸 image = [image resizableImageWithCapInsets:UIEdgeInsetsMake(30, 30, 30, 30)]; // 以指定拉伸模式拉伸 image = [image resizableImageWithCapInsets:UIEdgeInsetsMake(30, 30, 30, 30) resizingMode:UIImageResizingModeStretch]; -
Swift
    /*
        设置的区域为不拉伸(保护)的部分

        拉伸模式:
            Tile         平铺,默认
            Stretch      直接拉伸
    */

    // 以默认平铺模式拉伸
    image = image.resizableImageWithCapInsets(UIEdgeInsetsMake(30, 30, 30, 30))

    // 以指定拉伸模式拉伸
    image = image.resizableImageWithCapInsets(UIEdgeInsetsMake(30, 30, 30, 30),
                                 resizingMode:.Stretch)
-
-
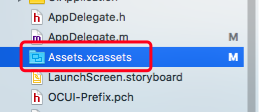
3、Xcode Assets.xcassets 中设置
-
将图片添加到 Assets.xcassets 中
-
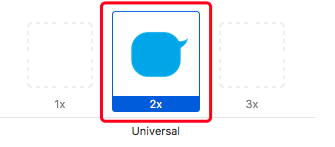
选中需要拉伸的图片
-
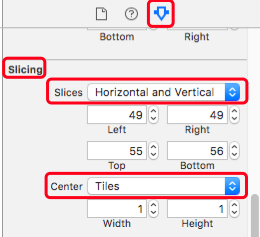
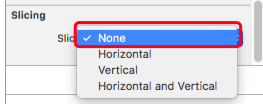
设置拉伸方向和拉伸模式及保护区域大小(会自动计算填充)
-
默认拉伸方向为 None 即不拉伸
-
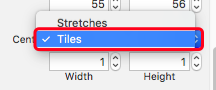
默认拉伸模式为 Tiles 即平铺
-
4.5 重绘图片大小
-
Objective-C
// 添加 UIImage 的分类 ResizeUIImage @implementation UIImage (ResizeUIImage) - (UIImage *)resizeImageToSize:(CGSize)size { // change from UIGraphicsBeginImageContext(size) to suit scale > 1 UIGraphicsBeginImageContextWithOptions(size, false, 0); [self drawInRect:CGRectMake(0, 0, size.width, size.height)]; UIImage *newImage = UIGraphicsGetImageFromCurrentImageContext(); UIGraphicsEndImageContext(); return newImage; } @end // 重新设置图片的大小 image = [image resizeImageToSize:CGSizeMake(100, 200)]; -
Swift
    // 扩展 UIImage 类
    extension UIImage {

        func resizeImageToSize(size: CGSize) -> UIImage {

            // change from UIGraphicsBeginImageContext(size) to suit scale > 1
            UIGraphicsBeginImageContextWithOptions(size, false, 0)
            self.drawInRect(CGRectMake(0, 0, size.width, size.height))
            let newImage = UIGraphicsGetImageFromCurrentImageContext()
            UIGraphicsEndImageContext()

            return newImage
        }
    }

    // 重新设置图片的大小
    image = image?.resizeImageToSize(CGSizeMake(100, 200))
4.6 保存图片到相册
-
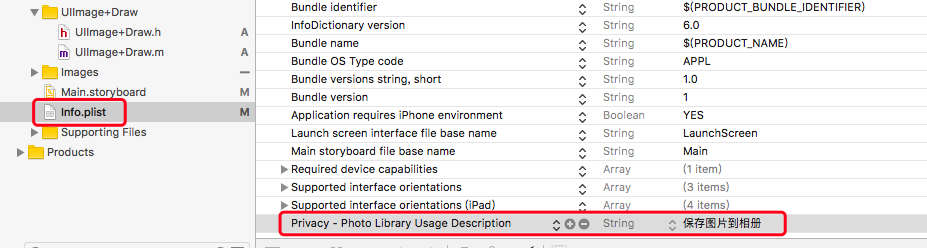
设置系统访问相册权限
-
保存图片到相册
    // 将图片存储到相册中
    UIImageWriteToSavedPhotosAlbum(image, nil, nil, nil);
// 将图片存储到相册中,完成后调用指定的方法 UIImageWriteToSavedPhotosAlbum(image, self, @selector(image:didFinishSavingWithError:contextInfo:), nil); // 保存完成后调用的方法,必须为这个方法 - (void)image:(UIImage *)image didFinishSavingWithError:(NSError *)error contextInfo:(void *)contextInfo { }
5、UIImage 与 NSData 的相互转换
-
Objective-C
// image 转 NSData NSData *data = UIImagePNGRepresentation(image1); // NSData 转 image UIImage *image = [UIImage imageWithData:data]; -
Swift
    // image 转 NSData
    let data:NSData = UIImagePNGRepresentation(image1!)!

    // NSData 转 image
    let image = UIImage(data: data)
6、UIImage 加载 GIF 动图
- Gif 图片是非常常见的图片格式,尤其是在聊天的过程中,Gif 表情使用地很频繁。但是 iOS 没有现成的支持加载和播放 Gif 的类。
6.1 加载本地 GIF 动图
-
1、使用 UIWebView 加载
-
使用 UIWebView 的弊端在于,不能设置 Gif 动画的播放时间,不能自动缩放 Gif 动图。
    // 读取 GIF 图片数据
    NSData *data = [NSData dataWithContentsOfFile:[[NSBundle mainBundle] pathForResource:@"demo3" ofType:@"gif"]];

    // 加载 GIF 动图
    UIWebView *webView = [[UIWebView alloc] initWithFrame:CGRectMake(0, 0, self.view.bounds.size.width, 200)];
    [webView loadData:data MIMEType:@"image/gif" textEncodingName:@"" baseURL:[NSURL URLWithString:@""]];

    [self.view addSubview:webView];
-
-
2、将 Gif 动图拆分成多张图片,使用 UIImageView 播放
-
最好把所需要的 Gif 图片打包到 Bundle 文件内。下拉、上拉加载控件需要一个根据拉动距离设置特定的 Image,一般使用该方法。
    - (NSArray *)animationImages {

        NSFileManager *fielM = [NSFileManager defaultManager];
        NSString *path = [[NSBundle mainBundle] pathForResource:@"Loading" ofType:@"bundle"];
        NSArray *arrays = [fielM contentsOfDirectoryAtPath:path error:nil];

        NSMutableArray *imagesArr = [NSMutableArray array];
        for (NSString *name in arrays) {
            UIImage *image = [UIImage imageNamed:[(@"Loading.bundle") stringByAppendingPathComponent:name]];
            if (image) {
                [imagesArr addObject:image];
            }
        }
        return imagesArr;
    }

    - (void)viewDidLoad {
        [super viewDidLoad];

        UIImageView *gifImageView = [[UIImageView alloc] initWithFrame:frame];
        gifImageView.animationImages = [self animationImages]; // 获取 Gif 图片列表
        gifImageView.animationDuration = 5;                    // 执行一次完整动画所需的时长
        gifImageView.animationRepeatCount = 1;                 // 动画重复次数
        [gifImageView startAnimating];
        [self.view addSubview:gifImageView];
    }
-
-
3、使用 SDWebImage 加载
-
在 SDWebImage 这个库里有一个 UIImage+GIF 的类别,里面为 UIImage 扩展了三个方法。
    @interface UIImage (GIF)
    + (IImage *)sd_animatedGIFNamed:(NSString *)name;
    + (UIImage *)sd_animatedGIFWithData:(NSData *)data;
    - (UIImage *)sd_animatedImageByScalingAndCroppingToSize:(CGSize)size;
    @end
我们要获取处理后的 Gif 图片,其实只要调用前面两个中的其中一个方法就行了,注意,第一个只需要传 Gif 的名字,而不需要带扩展名(如 Gif 图片名字为 001@2x.gif,只需传 001 即可)。
-
我们就使用第二个方法试一试效果:
NSString *path = [[NSBundle mainBundle] pathForResource:@"gifTest" ofType:@"gif"]; NSData *data = [NSData dataWithContentsOfFile:path]; UIImage *image = [UIImage sd_animatedGIFWithData:data]; gifImageView.image = image; -
然后通过断点,我们看下获取到的 image 是个什么样的
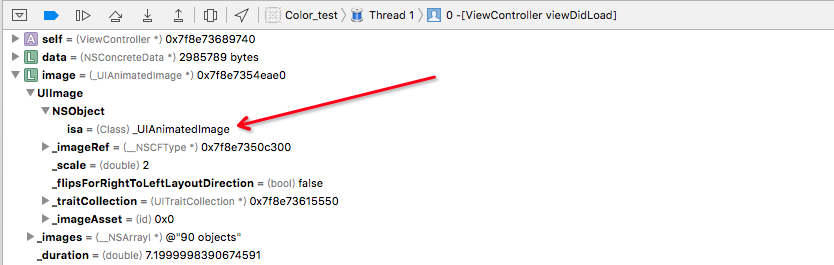
我们发现 image 的 isa 指针指向了
_UIAnimatedImage,说明它是一个叫作_UIAnimatedImage的类(当然,这个_UIAnimatedImage苹果是不会直接让我们使用的)。_images表示这个 Gif 包含了多少张图片。_duration表示执行一次完整动画所需的时长。-
其实,动画执续时间
_duration也可以更改。+ (UIImage *)sd_animatedGIFWithData:(NSData *)data { if (!data) { return nil; } CGImageSourceRef source = CGImageSourceCreateWithData((__bridge CFDataRef)data, NULL); size_t count = CGImageSourceGetCount(source); UIImage *animatedImage; if (count <= 1) { animatedImage = [[UIImage alloc] initWithData:data]; } else { NSMutableArray *images = [NSMutableArray array]; NSTimeInterval duration = 0.0f; for (size_t i = 0; i < count; i++) { CGImageRef image = CGImageSourceCreateImageAtIndex(source, i, NULL); duration += [self sd_frameDurationAtIndex:i source:source]; [images addObject:[UIImage imageWithCGImage:image scale:[UIScreen mainScreen].scale orientation:UIImageOrientationUp]]; CGImageRelease(image); } if (!duration) { duration = (1.0f / 10.0f) * count; } animatedImage = [UIImage animatedImageWithImages:images duration:duration]; } CFRelease(source); return animatedImage; }- 很明显,duration 是可以随意更改的,只不过此方法设置了一个默认值(duration = (1.0f / 10.0f) * count)
-
归根到底,创建新的动态的 Image 其实是调用了系统提供的一个 UIImage 的类方法而已。直接显示 Gif 图片,一般使用该方法。
UIImage *animatedImage = [UIImage animatedImageWithImages:images duration:duration];
-
-
4、使用 QExtension 加载
使用第三方框架 QExtension
-
Objective-C
// 通过名称加载 gif 图片,不需要写扩展名 self.imageView.image = [UIImage q_gifImageNamed:@"demo3"]; // 通过数据加载 gif 图片 NSData *imageData = [NSData dataWithContentsOfFile:[[NSBundle mainBundle] pathForResource:@"demo3" ofType:@"gif"]]; self.imageView.image = [UIImage q_gifImageWithData:imageData]; -
效果

6.2 加载网络 GIF 动图
-
1、使用 SDWebImage 加载
-
加载网络的 Gif 文件就简单多了。最简单的方法,我们只需要使用 SDWebImage 的
sd_setImageWithURL:这个方法传入 Gif 文件是 url 地址即可。NSURL *url = [NSURL URLWithString:@"http://images.cnblogs.com/cnblogs_com/QianChia/934664/o_QExtension31.gif"]; [self.imageView sd_setImageWithURL:url]; - SDWebImage 内部实现大概是以下几个步骤:
- 1、SDWebImage 根据 url 将 Gif 文件下载下来,格式为一个 NSData。
- 2、如果判断是 Gif 格式,则会调用 sd_animatedGIFWithData: 将 Data 转换成我们需要的 Gif 格式。
- 3、通过上面的方法二即可显示出 Gif 图片。
    UIImage *image = [UIImage sd_animatedGIFWithData:data];

    gifImageView.image = image;
-
