前面给SportsStore添加了分页的功能。接着我们添加导航控制,通过左边的菜单来分类显示数据。
首先修改SportsStore.WebUI.Models下的ProductsListViewModel.cs,增加一个CurrentCategory属性public string CurrentCategory{get;set;}。
接着修改List action方法,能够通过传入的CurrentCategory来过滤查询的产品列表。修改后的List action方法如下所示:
public ViewResult List(string category, int page = 1) {

            ProductsListViewModel viewModel = new ProductsListViewModel
            {
                Products = repository.Products.Where(p => category == null || p.Category == category)
                .OrderBy(p => p.ProductID)
                .Skip((page - 1) * PageSize)
                .Take(PageSize),
                PagingInfo = new PagingInfo
                {
                    CurrentPage = page,
                    ItemsPerPage = PageSize,
                    TotalItems = category == null ? repository.Products.Count() : repository.Products.Where(e => e.Category == category).Count()
                }
            };
            return View(viewModel);
}
通过.where扩展方法我们进行了一个纵向的筛选,将指定Category的Product筛选出来。
重定义URL组合
之前我们看到了一种URl是这样的/?category=Soccer.在webform里面这个是常见的,但是在MVC里面,可以有更加优雅的方式来代替。我们需要修改global.asax.cs里面的RegisterRoutes方法。如下所示:
        public static void RegisterRoutes(RouteCollection routes)
        {
            routes.IgnoreRoute("{resource}.axd/{*pathInfo}");

            routes.MapRoute(null,
"",//匹配空的URL
                new { controller = "Product", action = "List", category = (string)null, page = 1 }
                );

            routes.MapRoute(null,
"Page{page}",
new { controller = "Product", action = "List", category = (string)null },
new { page = @"\d+" }//约束:页面必须是数字
                );

            routes.MapRoute(null,
"{category}",//匹配 /Football or /AnythingWithNoSlash
                new { controller = "Product", action = "List", page = 1 }
                );

            routes.MapRoute(null,
"{category}/Page{page}",//匹配 /Football/Page567
                new { controller = "Product", action = "List" },//默认
                new { page = @"\d+" }//必须为数字

                );
            routes.MapRoute(null,
"{category}/Page{page}",//匹配/Football/Page567
                new { controller = "Product", action = "List" },//默认
                new { page = @"\d+" }//约束
                );

            routes.MapRoute(
"Default", // 路由名称
                "{controller}/{action}/{id}", // 带有参数的 URL
                new { controller = "Product", action = "List", id = UrlParameter.Optional } // 参数默认值
            );

        }
上面的集中组合分别代表以下集中URL的组合:
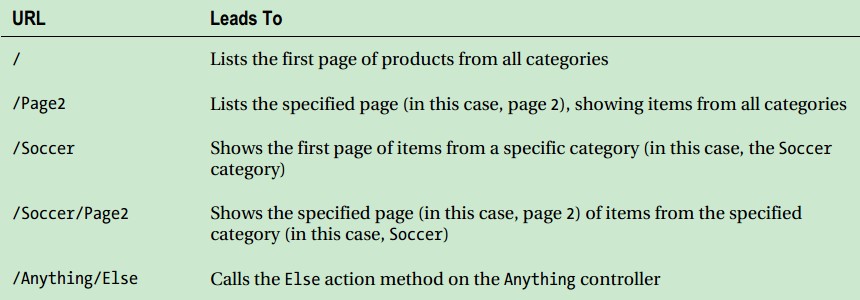
ASP.NET的路由系统(Routing System)被MVC用来处理来自客户端的请求,但是也会请求向外输出的符合我们URL组合的URL,以及我们能嵌入在web pages里面输出的URL。这样就能够保证URL在我们程序里面是一直不变的。对于路由这块,后面的章节有详细的讲解,所以如果我们这里不太明白,也没关系。
Url.Action方法是我们创建对外输出链接(outgoing links)最方便的一种方式,在List.cshtml里面已经使用过。由于我们需要添加支持对Category的筛选并且把数据传递给helper方法。如下所示:
@model SportsStore.WebUI.Models.ProductsListViewModel
@{
    ViewBag.Title = "Products";
}
<h2>
    Product List</h2>
@foreach (var p in Model.Products)
{
@*    <div class="item">
        <h3>@p.Name</h3>
        @p.Description
        <h4>@p.Price.ToString("c")</h4>
    </div> *@
    Html.RenderPartial("ProductSummary", p);
}
<div class="pager">
    @Html.PageLinks(Model.PagingInfo, x => Url.Action("List", new { page = x, category = Model.CurrentCategory }))
</div>
分页的链接是形如:http://<myserver>:<port>/Page2 的,这个表示显示所有Product里面的第2页。http://<myserver>:<port>/Chess/Page2这个就会只显示Category为Chess的Product。
绑定一个Category的导航菜单
我们需要显示一个导航的菜单共用户选择,然后显示对应的Product列表。并且我们会在多个Controller里面使用Category的列表,所以我们需要一个独立的,可重用的这样一个Category的列表。在ASP.NET MVC框架里面有子Action(child actions)的概念,对于创建一个可重用的导航控制菜单来说非常合适。child actions需要使用HTML的辅助方法RenderAction,它能够让我们包含一个对应view的action方法的输出。这里,我们可以创建一个新的Controller:NavController,并创建一个Menu的action方法,用来呈现一个导航菜单,并将来自action方法的输出注入到layout里面。
添加NavController,如下所示:
    public class NavController : Controller
    {
private IProductsRepository repository;
public NavController(IProductsRepository repo)
        {
            repository = repo;
        }

public PartialViewResult Menu(string category=null)
        {
            ViewBag.SelectedCategory = category;//这里使用的ViewBag将选中的Category传递给View。
            IEnumerable<string> categories = repository.Products
                .Select(x => x.Category)
                .Distinct()
                .OrderBy(x => x);
return PartialView(categories);
        }
    }
因为要在所有的页面都使用这个导航菜单,所以需要注入到_layout里面,修改后的_layout如下所示:
<!DOCTYPE html>
<html>
<head>
    <title>@ViewBag.Title</title>
    <link href="@Url.Content("~/Content/Site.css")" rel="stylesheet" type="text/css" />
    <script src="@Url.Content("~/Scripts/jquery-1.5.1.min.js")" type="text/javascript"></script>
</head>
<body>
    <div id="header">
        <div class="title">
            Sports Store</div>
    </div>
    <div id="categories">
        @{Html.RenderAction("Menu", "Nav");}
    </div>
    <div id="content">
        @RenderBody()
    </div>
</body>
</html>
Note:RenderAction()跟RenderPartial()一样,都是直接将内容写入Response Stream。
也就是意味着返回值是void,因此也就不能使用Razor里面的“@”标签,而是将它包括在@{}这样一个闭合的块里面。
如果你不喜欢这样,可以使用action方法来替代。
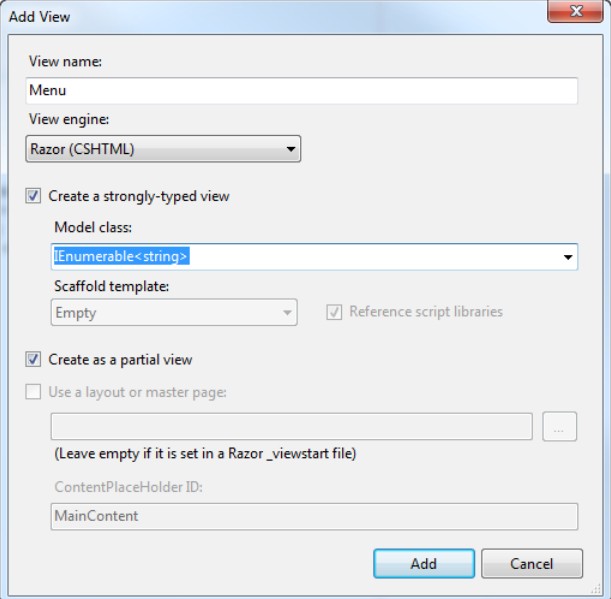
接着添加Menu的view,在Menu Controller上右键添加View,注意:这里的view是一个Partial view,类似webform里面的customer control.如下所示:
@model IEnumerable<string>
@{
    Layout = null;
}
@Html.ActionLink("Home", "List", "Product")
@foreach (var link in Model)
{
    @Html.RouteLink(link, new { controller = "Product", action = "List", category = link, page = 1 },
new { @class = link == ViewBag.SelectedCategory ? "selected" : null })
}
接着添加一个样式,如下所示:

 View Code
DIV#categories A
{
    font: bold 1.1em "Arial Narrow","Franklin Gothic Medium",Arial; display: block;
    text-decoration: none; padding: .6em; color: Black;
    border-bottom: 1px solid silver;
}
DIV#categories A.selected { background-color: #666; color: White; }
DIV#categories A:hover { background-color: #CCC; }
DIV#categories A.selected:hover { background-color: #666; }
在Menu的View里面有这样一个@classe用法,我们在匿名对象里使用@class作为一个新的参数传递给RouteLink方法。这里的“@”不是一个Razor的tag,我们使用了C#里面的一个功能,通过给class添加一个@符合来避免html里面的class和C#里面定义类的关键字class发生冲突。如果这里没有加上@符合,就会被C#编译器认为是定义了一个类。当我们添加了@符合后,编译就知道我们是在匿名类型里面添加的一个参数名为class的参数。这也正好达到了我们的期望。
今天的笔记就到这里。后面会创建简单的购物车,总得来说这个项目实例主要是让我们能够对MVC有一个实际的认识,项目里面一些具体实现,比如分页是全部读出来后分页的。这可能不符合实际的要求,但这不重要。重要的是,通过这个实例对MVC有整体的认识,通过具体操作能够对以后的实际项目的开发积累点经验。如果你是跟着我的笔记操作,出现什么问题,请留言!我是自己已经操作了一遍后,倒过来写笔记的,所以中间的一些步骤我会选择性的舍弃。
晚安!


