利用闪回数据库(flashback)修复Failover后的DG环境
1.1 BLOG文档结构图

1.2 前言部分
1.2.1 导读和注意事项
各位技术爱好者,看完本文后,你可以掌握如下的技能,也可以学到一些其它你所不知道的知识,~O(∩_∩)O~:
① Failover后DG环境的恢复方法(重点)
② DG的基本维护操作
③ GC客户端软件的安装
④ 利用GC快速搭建一套DG环境
⑤ Failover和Switchover的区别
⑥ 其它维护操作
Tips:
① 本文在itpub(http://blog.itpub.net/26736162)、博客园(http://www.cnblogs.com/lhrbest)和微信公众号(xiaomaimiaolhr)上有同步更新。
② 文章中用到的所有代码、相关软件、相关资料及本文的pdf版本都请前往小麦苗的云盘下载,小麦苗的云盘地址见:http://blog.itpub.net/26736162/viewspace-1624453/。
③ 若网页文章代码格式有错乱,请下载pdf格式的文档来阅读。
④ 在本篇BLOG中,代码输出部分一般放在一行一列的表格中。
⑤ 本文适合于初中级人员阅读,数据库大师请略过本文。
⑥ 不喜勿喷。
本文若有错误或不完善的地方请大家多多指正,您的批评指正是我写作的最大动力。
1.3 本文简介
10月23和24日考完了OCM,感觉过关的法则就是“真题+多练”,练习过10来遍,基本就可以考过了。OCM的考试内容除了GC这块小麦苗没有接触过,其它内容基本都算熟。基本命令熟记于心,不熟的命令可以立马找到官方文档,善用OEM和SQL Developer工具。所以,想快速通过OCM考试的朋友可以私下联系小麦苗,小麦苗会把自己的经验全都教给大家。
好了,废话不多说了。最近小麦苗的DBA宝典微信群里,有朋会友问到了Failover操作后,如何恢复到最初的DG环境。这个问题,小麦苗大概知道利用闪回可以实现,只是没有做过实验,或者曾经做过实验,只是没有记录文档,反正就是年纪大了,想不起来了。好吧,最近就抽个时间把这个实验做一遍。有不对的地方,依然请大家指出。
1.4 相关知识点扫盲
① 物理DG的Switchover切换:http://blog.itpub.net/26736162/viewspace-1753111/
② 物理DG的Failover切换:http://blog.itpub.net/26736162/viewspace-1753130/
③ 利用闪回数据库(flashback)修复Failover后的DG环境:http://blog.itpub.net/26736162/viewspace-2146883/
④ Switchover和Failover的区别:http://blog.itpub.net/26736162/viewspace-2141207/
-------------------------------------------------------------------------
第二章 实验准备
2.1 实验环境介绍
实验环境为练习OCM的虚拟机环境:
| 项目 |
Source DB |
Target DB |
| DB 类型 |
单机 |
单机 |
| DB VERSION |
11.2.0.3.0 |
11.2.0.3.0 |
| DB 存储 |
FS |
FS |
| OS版本及kernel版本 |
OEL linux 5.4 32 |
OEL linux 5.4 32 |
| DB_NAME |
PROD1 |
PROD1 |
| ORACLE_SID |
PROD1 |
SBDB1 |
| ORACLE_HOME |
/u01/app/oracle/product/11.2.0/dbhome_1 |
/u01/app/oracle/product/11.2.0/db_1 |
| hosts文件 |
10.190.104.111 edsir4p1.us.oracle.com edsir4p1 10.190.104.28 edsir1p8.us.oracle.com edsir1p8 |
|
2.2 实验目标
备库执行FAILOVER后,通过闪回数据库技术重新恢复DG环境,而不用重新搭建DG。
2.3 实验过程

2.4 利用GC快速搭建DG环境
小麦苗手头的DG环境是在一个主机上,测试多有不便,刚好,最近练习OCM的环境还在,就用练习OCM的环境来做这个实验吧。若已经有DG环境的朋友可以略过该小节内容。
2.4.1 安装GC客户端软件
1、起动GC服务器,首先确保EMREP数据库处于OPEN状态,监听也已经启动,GC服务器启动日志为:/u01/app/gc_inst/em/EMGC_OMS1/sysman/log/emctl.log
cd /u01/app/oracle/Middleware/oms11g/bin
./emctl start oms
| [oracle@edsir1p8- ~]$ ps -ef|grep pmon oracle 4763 1 0 00:53 ? 00:00:00 ora_pmon_EMREP oracle 11802 11633 0 01:39 pts/2 00:00:00 grep pmon [oracle@edsir1p8- ~]$ cd /u01/app/ gc_inst/ Middleware/ oracle/ oraInventory/ [oracle@edsir1p8- ~]$ cd /u01/app/Middleware/oms11g/bin [oracle@edsir1p8- bin]$ ./emctl start oms Oracle Enterprise Manager 11g Release 1 Grid Control Copyright (c) 1996, 2010 Oracle Corporation. All rights reserved. Starting WebTier... WebTier Successfully Started Starting Oracle Management Server... Oracle Management Server Successfully Started AdminServer Could Not Be Started Oracle Management Server is Up [oracle@edsir1p8- bin]$ more /etc/hosts # Do not remove the following line, or various programs # that require network functionality will fail. 127.0.0.1 localhost.localdomain localhost 10.190.104.28 edsir1p8.us.oracle.com edsir1p8 10.190.104.111 edsir4p1.us.oracle.com edsir4p1 [oracle@edsir1p8- bin]$ ./emctl status oms -details Oracle Enterprise Manager 11g Release 1 Grid Control Copyright (c) 1996, 2010 Oracle Corporation. All rights reserved. Enter Enterprise Manager Root (SYSMAN) Password : Console Server Host : edsir1p8.us.oracle.com HTTP Console Port : 7788 HTTPS Console Port : 7799 HTTP Upload Port : 4889 HTTPS Upload Port : 4900 OMS is not configured with SLB or virtual hostname Agent Upload is locked. OMS Console is locked. Active CA ID: 1
|
2、安装agent
https://10.190.104.28:4900/agent_download/ 从这里下载


右键保存到桌面。
a、在需要安装agent的机器上mkdir /u01/app/agentbase 创建目录,并将agentDownload.linux文件cp到/u01/app/agentbase目录下,并且赋予可执行权限。
b、在服务端OMS启动的情况下,在客户端执行:
./agentDownload.linux -b /u01/app/agentbase -m edsir1p8.us.oracle.com -r 7799 -y
安装过程中要输入偶数机上OMS的密码
c、安装完成要用root执行:
[root@edsir4p1 ~]# sudo /u01/app/agentbase/agent11g/root.sh
没有root密码要使用sudo执行,注意:一定要执行该脚本,它会设置一些文件的权限(该脚本会把$AGENT_HOME/bin/nm*的几个文件的所有者修改为root。)。如果不执行,那么搭建DG可能会报错:“ERROR: NMO not setuid-root (Unix-only)”
d、进入/u01/app/agentbase/agent11g/bin
./emctl status agent 检查同步状态
./emctl upload agent 上传同步
./emctl secure agent 重新注册agent,用于安装时密码输错
过程如下所示:
| [oracle@edsir4p1-PROD2 ~]$ mkdir -p /u01/app/agentbase [oracle@edsir4p1-PROD2 ~]$ cd /u01/app/agentbase [oracle@edsir4p1-PROD2 agentbase]$ cp /home/oracle/Desktop/agentDownload.linux . [oracle@edsir4p1-PROD2 agentbase]$ chmod +x agentDownload.linux [oracle@edsir4p1-PROD2 agentbase]$ ll total 40 -rwxr-xr-x 1 oracle oinstall 38525 Nov 6 01:46 agentDownload.linux [oracle@edsir4p1-PROD2 agentbase]$ ./agentDownload.linux agentDownload.linux invoked on Mon Nov 6 01:46:55 UTC 2017 with Arguments "" agentDownload.linux: Invalid Invocation Usage: agentDownload.linux -b[cdhimnoprtuvxyNR] b - Base installation location for Agent Oracle home d - Do NOT initiate automatic target discovery h - Usage (this message) i - Inventory pointer location file l - To specify as local host (pass -local to runInstaller) m - Management Service host name for downloading the Management Agent software n - Cluster name o - Old Oracle Home location during Upgrade p - Static port list file r - Port for connecting to the Management Service host t - Do NOT start the Agent u - Upgrade v - Inventory directory location x - Debug output c - CLUSTER_NODES N - Do NOT prompt for Agent Registration Password R - To use virtual hostname(ORACLE_HOSTNAME) for this installation. If this is being used along with more than one cluster nodes through -c option, then -l option also needs to be passed. y - Decline Security Updates. [oracle@edsir4p1-PROD2 agentbase]$ ./agentDownload.linux -b /u01/app/agentbase -m edsir1p8.us.oracle.com -r 7799 -y agentDownload.linux invoked on Mon Nov 6 01:49:01 UTC 2017 with Arguments "-b /u01/app/agentbase -m edsir1p8.us.oracle.com -r 7799 -y" Platform=Linux.i686, OS=linux GetPlatform:returned=0, and os is set to: linux, platform=Linux.i686 Creating /u01/app/agentbase/agentDownload11.1.0.1.0Oui ... LogFile for this Download can be found at: "/u01/app/agentbase/agentDownload11.1.0.1.0Oui/agentDownload.linux110617014901.log" Running on Selected Platform: Linux.i686 Installer location: /u01/app/agentbase/agentDownload11.1.0.1.0Oui Downloading Agent install response file ... Downloading Agent install response file ... Executing wget_get_file 。。。。。。。。。。省略部分。。。。。。 Finished Downloading agent_download.rsp with Status=0 Response file check Complete - Success Checking the writable permission for baseDir - passed
Provide the Agent Registration password so that the Management Agent can communicate with Secure Management Service. Note: You may proceed with the installation without supplying the password; however, Management Agent can be secured manually after the installation. If Oracle Management Service is not secured, agent will not be secured, so continue by pressing Enter Key.
Enter Agent Registration Password: <<<<=输入密码 Downloading Oracle Installer ... Executing wget_get_file https://edsir1p8.us.oracle.com:7799/agent_download/11.1.0.1.0/linux/oui/oui_linux.jar using the url https://edsir1p8.us.oracle.com:7799/agent_download/11.1.0.1.0/ to access OMS 。。。。。。。。。。省略部分。。。。。。 Configuration assistant "Agent Configuration Assistant" Succeeded
AgentPlugIn:agent configuration finished with status = true
Running Configuration assistant "Agent Add-on Plug-in"
Configuration assistant "Agent Add-on Plug-in" Succeeded
Querying Agent status: Agent is running Removing the copied stuff..... Removed: /u01/app/agentbase/agentDownload11.1.0.1.0Oui/oui_linux.jar Removed: /u01/app/agentbase/agentDownload11.1.0.1.0Oui/agent_download.rsp Removed:/u01/app/agentbase/agentDownload11.1.0.1.0Oui/Disk1 Log name of installation can be found at: "/u01/app/agentbase/agentDownload.linux110617014901.log" /u01/app/agentbase/agent11g/root.sh needs to be executed by root to complete this installation. [oracle@edsir4p1-PROD2 agentbase]$ sudo /u01/app/agentbase/agent11g/root.sh [oracle@edsir4p1-PROD2 agentbase]$ ll total 80 drwxr-xr-x 40 oracle oinstall 4096 Nov 6 01:53 agent11g drwxr-xr-x 2 oracle oinstall 4096 Nov 6 01:53 agentDownload11.1.0.1.0Oui -rwxr-xr-x 1 oracle oinstall 38525 Nov 6 01:46 agentDownload.linux -rw-r--r-- 1 oracle oinstall 78 Nov 6 01:46 agentDownload.linux110617014655.log -rw-r--r-- 1 oracle oinstall 24908 Nov 6 01:53 agentDownload.linux110617014901.log [oracle@edsir4p1-PROD2 agentbase]$ cd agent11g/bin/ [oracle@edsir4p1-PROD2 bin]$ ./emctl status agent Oracle Enterprise Manager 11g Release 1 Grid Control 11.1.0.1.0 Copyright (c) 1996, 2010 Oracle Corporation. All rights reserved. --------------------------------------------------------------- Agent Version : 11.1.0.1.0 OMS Version : 11.1.0.1.0 Protocol Version : 11.1.0.0.0 Agent Home : /u01/app/agentbase/agent11g Agent binaries : /u01/app/agentbase/agent11g Agent Process ID : 26954 Parent Process ID : 26914 Agent URL : https://edsir4p1.us.oracle.com:3872/emd/main/ Repository URL : https://edsir1p8.us.oracle.com:4900/em/upload Started at : 2017-11-06 01:53:15 Started by user : oracle Last Reload : 2017-11-06 01:53:15 Last successful upload : 2017-11-06 01:55:13 Total Megabytes of XML files uploaded so far : 17.86 Number of XML files pending upload : 0 Size of XML files pending upload(MB) : 0.00 Available disk space on upload filesystem : 83.54% Last successful heartbeat to OMS : 2017-11-06 01:57:20 --------------------------------------------------------------- Agent is Running and Ready [oracle@edsir4p1-PROD2 bin]$
|
2.4.2 使用GC快速搭建物理备库
从浏览器打开https://10.190.104.28:7799/em/,使用sysman用户进行登录。


使用sys用户登录PROD1数据库。


等待大约10分钟即可自动完成DG的搭建和配置工作。期间,可以查看主库和备库的告警日志以及数据文件夹的大小来预估搭建完成时间。

创建完成后:

2.4.3 启用实时应用


2.5 开启主备库闪回
主库:
| SQL> select name, open_mode, database_role, flashback_on from v$database;
NAME OPEN_MODE DATABASE_ROLE FLASHBACK_ON --------- -------------------- ---------------- ------------------ PROD1 READ WRITE PRIMARY NO SQL> select INSTANCE_NAME,INSTANCE_ROLE from v$instance;
INSTANCE_NAME INSTANCE_ROLE ---------------- ------------------ PROD1 PRIMARY_INSTANCE
|
备库:
| SQL> select name, open_mode, database_role, flashback_on from v$database;
NAME OPEN_MODE DATABASE_ROLE FLASHBACK_ON --------- -------------------- ---------------- ------------------ PROD1 READ ONLY WITH APPLY PHYSICAL STANDBY NO SQL> select INSTANCE_NAME,INSTANCE_ROLE from v$instance;
INSTANCE_NAME INSTANCE_ROLE ---------------- ------------------ SBDB1 PRIMARY_INSTANCE
|
主库开启闪回:
| SQL> alter database flashback on;
Database altered.
SQL> select name, open_mode, database_role, flashback_on from v$database;
NAME OPEN_MODE DATABASE_ROLE FLASHBACK_ON --------- -------------------- ---------------- ------------------ PROD1 READ WRITE PRIMARY YES SQL> select oldest_flashback_scn, to_char(oldest_flashback_time,'yyyy-mm-dd HH24:mi:ss') oldest_flashback_time from v$flashback_database_log;
OLDEST_FLASHBACK_SCN OLDEST_FLASHBACK_TI -------------------- ------------------- 867005 2017-11-06 02:55:59
SQL> show parameter flashback
NAME TYPE VALUE ------------------------------------ ----------- ------------------------------ db_flashback_retention_target integer 1440
====>参数db_flashback_retention_target控制闪回时间范围,数字单位是分钟,默认为1天。这个数字决定了闪回的时间范围,如果设置更长的时间,对应的闪回日志文件大小就会比较大一些。
|
告警日志:
| Mon Nov 06 02:55:55 2017 alter database flashback on Starting background process RVWR Mon Nov 06 02:55:56 2017 RVWR started with pid=37, OS id=1096 Allocated 3981204 bytes in shared pool for flashback generation buffer Flashback Database Enabled at SCN 867006 Completed: alter database flashback on
|
此时,备库并没有开启闪回,需要在备库上手动开启闪回:
| SQL> alter database flashback on; alter database flashback on * ERROR at line 1: ORA-01153: an incompatible media recovery is active
SQL> recover managed standby database cancel; Media recovery complete. SQL> alter database flashback on;
Database altered.
SQL> select name, open_mode, database_role, flashback_on from v$database;
NAME OPEN_MODE DATABASE_ROLE FLASHBACK_ON --------- -------------------- ---------------- ------------------ PROD1 READ ONLY PHYSICAL STANDBY YES
SQL> alter database recover managed standby database using current logfile disconnect from session;
Database altered.
|
第三章 实验1
实验1、PROD1意外宕机,SBDB1执行Failover操作变为主库;然后将PROD1利用闪回数据库功能闪回到SBDB1变为主库的SCN时间点,然后将PROD1转换为备库,最后利用switchover转换为最初的环境。<===PROD1需要开启闪回
3.1 Failover操作
切换之前确保监听使用静态监听、fal_client、fal_server、log_archive_dest_1和log_archive_dest_2参数已正确配置。
主库操作:
| SYS@PROD1> select dbid,name,current_scn,protection_mode,protection_level,database_role,force_logging,open_mode,switchover_status from v$database;
DBID NAME CURRENT_SCN PROTECTION_MODE PROTECTION_LEVEL DATABASE_ROLE FOR OPEN_MODE SWITCHOVER_STATUS ---------- ---------- ----------- -------------------- -------------------- ---------------- --- -------------------- -------------------- 2177200393 PROD1 868787 MAXIMUM PERFORMANCE MAXIMUM PERFORMANCE PRIMARY YES READ WRITE TO STANDBY SYS@PROD1> create table test_bylhr as select * from dba_objects;
Table created.
SYS@PROD1> insert into test_bylhr select * from test_bylhr;
72459 rows created.
SYS@PROD1> commit;
Commit complete.
SYS@PROD1> select count(1) from test_bylhr;
COUNT(1) ---------- 144918
SYS@PROD1> shutdown abort ORACLE instance shut down.
|
备库操作:
| SYS@SBDB1> select count(1) from test_bylhr;
COUNT(1) ---------- 144918
SYS@SBDB1> alter database recover managed standby database cancel;
Database altered.
SYS@SBDB1> alter database recover managed standby database finish;
Database altered.
SYS@SBDB1> set line 9999 SYS@SBDB1> select name, LOG_MODE, OPEN_MODE, database_role, SWITCHOVER_STATUS, db_unique_name from v$database;
NAME LOG_MODE OPEN_MODE DATABASE_ROLE SWITCHOVER_STATUS DB_UNIQUE_NAME --------- ------------ -------------------- ---------------- -------------------- ------------------------------ PROD1 ARCHIVELOG READ ONLY PHYSICAL STANDBY SESSIONS ACTIVE SBDB1
SYS@SBDB1> alter database commit to switchover to primary with session shutdown;
Database altered.
SYS@SBDB1> select name, LOG_MODE, OPEN_MODE, database_role, SWITCHOVER_STATUS, db_unique_name from v$database;
NAME LOG_MODE OPEN_MODE DATABASE_ROLE SWITCHOVER_STATUS DB_UNIQUE_NAME --------- ------------ -------------------- ---------------- -------------------- ------------------------------ PROD1 ARCHIVELOG MOUNTED PRIMARY NOT ALLOWED SBDB1
SYS@SBDB1> alter database open;
Database altered.
|
3.2 Primary重新加入
Failover后的Primary数据库,实际上已经失去了和DG的关联,如果Primary故障严重,是难以保障对应的归档数据可以顺利传输的。如果希望Primary重新回到DG环境,关键就是恢复的时间点。要求Primary回到Standby切换角色的那个时间点,理论上就可以“延续”操作。
3.2.1 查询原备库变为新主库的SCN
在原备库端,查看v$database视图,可以看到这个库成为primary的具体时间。
| SYS@SBDB1> select STANDBY_BECAME_PRIMARY_SCN from v$database;
STANDBY_BECAME_PRIMARY_SCN -------------------------- 869428
SYS@SBDB1> create table test_bylhr2 as select * from dba_objects where rownum<=1000;
Table created.
SYS@SBDB1> alter system switch logfile;
System altered. SYS@SBDB1> select count(1) from test_bylhr2;
COUNT(1) ---------- 1000
SYS@SBDB1> select dbms_flashback.get_system_change_number from dual;
GET_SYSTEM_CHANGE_NUMBER ------------------------ 869833
|
3.2.2 原主库执行闪回操作
| SYS@PROD1> startup mount ORACLE instance started.
Total System Global Area 313860096 bytes Fixed Size 1336232 bytes Variable Size 247467096 bytes Database Buffers 58720256 bytes Redo Buffers 6336512 bytes Database mounted. SYS@PROD1> flashback database to scn 869428;
Flashback complete.
SYS@PROD1> select dbid,name,current_scn,protection_mode,protection_level,database_role,force_logging,open_mode,switchover_status from v$database;
DBID NAME CURRENT_SCN PROTECTION_MODE PROTECTION_LEVEL DATABASE_ROLE FOR OPEN_MODE SWITCHOVER_STATUS ---------- ---------- ----------- -------------------- -------------------- ---------------- --- -------------------- -------------------- 2177200393 PROD1 0 MAXIMUM PERFORMANCE UNPROTECTED PRIMARY YES MOUNTED NOT ALLOWED
|
注意:重新加入的原Primary是不能恢复角色的,而是只能先成为Standby角色。应用后续的日志达到同步。
| SYS@PROD1> alter database convert to physical standby;
Database altered.
SYS@PROD1> startup force; ORACLE instance started.
Total System Global Area 313860096 bytes Fixed Size 1336232 bytes Variable Size 247467096 bytes Database Buffers 58720256 bytes Redo Buffers 6336512 bytes Database mounted. Database opened. SYS@PROD1> select dbid,name,current_scn,protection_mode,protection_level,database_role,force_logging,open_mode,switchover_status from v$database;
DBID NAME CURRENT_SCN PROTECTION_MODE PROTECTION_LEVEL DATABASE_ROLE FOR OPEN_MODE SWITCHOVER_STATUS ---------- ---------- ----------- -------------------- -------------------- ---------------- --- -------------------- -------------------- 2177200393 PROD1 869428 MAXIMUM PERFORMANCE MAXIMUM PERFORMANCE PHYSICAL STANDBY YES READ ONLY TO PRIMARY SYS@PROD1> alter database recover managed standby database using current logfile disconnect from session;
Database altered. SYS@PROD1> select count(1) from test_bylhr2;
COUNT(1) ---------- 1000
|
Oracle DG在发生Failover之后,当主库解决问题,是不可以直接回到DG环境的。这个过程往往需要一些辅助组建的配合。如RMAN、Flashback,都可以简化重回DG的过程时间。
注意:如果原主库查询不到test_bylhr2表的数据,则需要仔细检查监听使用静态监听、fal_client、fal_server、log_archive_dest_1和log_archive_dest_2参数已正确配置。
3.3 执行switchover切换成初始环境
新主库:
| SYS@SBDB1> select name, LOG_MODE, OPEN_MODE, database_role, SWITCHOVER_STATUS, db_unique_name from v$database;
NAME LOG_MODE OPEN_MODE DATABASE_ROLE SWITCHOVER_STATUS DB_UNIQUE_NAME --------- ------------ -------------------- ---------------- -------------------- ------------------------------ PROD1 ARCHIVELOG READ WRITE PRIMARY TO STANDBY SBDB1 SYS@SBDB1> alter database commit to switchover to physical standby with session shutdown;
Database altered.
SYS@SBDB1> shutdown immediate ORA-01507: database not mounted
ORACLE instance shut down. SYS@SBDB1> startup mount ORACLE instance started.
Total System Global Area 313860096 bytes Fixed Size 1336232 bytes Variable Size 239078488 bytes Database Buffers 67108864 bytes Redo Buffers 6336512 bytes Database mounted. SYS@SBDB1> select name, LOG_MODE, OPEN_MODE, database_role, SWITCHOVER_STATUS, db_unique_name from v$database;
NAME LOG_MODE OPEN_MODE DATABASE_ROLE SWITCHOVER_STATUS DB_UNIQUE_NAME --------- ------------ -------------------- ---------------- -------------------- ------------------------------ PROD1 ARCHIVELOG MOUNTED PHYSICAL STANDBY TO PRIMARY SBDB1
|
新备库执行:
| SYS@PROD1> select name, LOG_MODE, OPEN_MODE, database_role, SWITCHOVER_STATUS, db_unique_name from v$database;
NAME LOG_MODE OPEN_MODE DATABASE_ROLE SWITCHOVER_STATUS DB_UNIQUE_NAME ------ ------------ -------------------- ---------------- -------------------- ------------------------------ PROD1 ARCHIVELOG READ ONLY PHYSICAL STANDBY TO PRIMARY PROD1
SYS@PROD1> alter database commit to switchover to primary with session shutdown;
Database altered.
SYS@PROD1> select name, LOG_MODE, OPEN_MODE, database_role, SWITCHOVER_STATUS, db_unique_name from v$database;
NAME LOG_MODE OPEN_MODE DATABASE_ROLE SWITCHOVER_STATUS DB_UNIQUE_NAME ------ ------------ -------------------- ---------------- -------------------- ------------------------------ PROD1 ARCHIVELOG MOUNTED PRIMARY NOT ALLOWED PROD1
SYS@PROD1> alter database open;
Database altered.
SYS@PROD1> select name, LOG_MODE, OPEN_MODE, database_role, SWITCHOVER_STATUS, db_unique_name from v$database;
NAME LOG_MODE OPEN_MODE DATABASE_ROLE SWITCHOVER_STATUS DB_UNIQUE_NAME ------ ------------ -------------------- ---------------- -------------------- ------------------------------ PROD1 ARCHIVELOG READ WRITE PRIMARY RESOLVABLE GAP PROD1 SYS@PROD1> create table test_bylhr3 as select * from dual;
Table created.
|
备库查询:
| SYS@SBDB1> select * from test_bylhr3; select * from test_bylhr3 * ERROR at line 1: ORA-01219: database not open: queries allowed on fixed tables/views only
SYS@SBDB1> alter database open;
Database altered.
SYS@SBDB1> select * from test_bylhr3;
D - X
|
至此,该实验完毕。即主备库执行Failover后,通过闪回重新恢复最初的DG环境。
第四章 实验2
实验2、PROD1意外宕机,SBDB1执行Failover操作变为主库;然后将SBDB1利用闪回数据库功能闪回到SBDB1变为主库的SCN时间点,此时SBDB1仍然是主库的角色,然后将SBDB1转换为备库。<===SBDB1需要开启闪回,会丢失部分数据。
4.1 Failover操作
主库操作:
| SYS@PROD1> select dbid,name,current_scn,protection_mode,protection_level,database_role,force_logging,open_mode,switchover_status from v$database;
DBID NAME CURRENT_SCN PROTECTION_MODE PROTECTION_LEVEL DATABASE_ROLE FOR OPEN_MODE SWITCHOVER_STATUS ---------- ------ ----------- -------------------- -------------------- ---------------- --- -------------------- -------------------- 2177200393 PROD1 901700 MAXIMUM PERFORMANCE MAXIMUM PERFORMANCE PRIMARY YES READ WRITE TO STANDBY
SYS@PROD1> create table test_bylhr4 as select * from dual;
Table created.
SYS@PROD1> select * from test_bylhr4;
D - X
SYS@PROD1> shutdown abort ORACLE instance shut down.
|
备库操作:
|
SYS@SBDB1> select * from test_bylhr4;
D - X
SYS@SBDB1> alter database recover managed standby database finish force;
Database altered.
SYS@SBDB1> select name, LOG_MODE, OPEN_MODE, database_role, SWITCHOVER_STATUS, db_unique_name from v$database;
NAME LOG_MODE OPEN_MODE DATABASE_ROLE SWITCHOVER_STATUS DB_UNIQUE_NAME --------- ------------ -------------------- ---------------- -------------------- ------------------------------ PROD1 ARCHIVELOG MOUNTED PHYSICAL STANDBY TO PRIMARY SBDB1
SYS@SBDB1> alter database commit to switchover to primary with session shutdown;
Database altered.
SYS@SBDB1> select name, LOG_MODE, OPEN_MODE, database_role, SWITCHOVER_STATUS, db_unique_name from v$database;
NAME LOG_MODE OPEN_MODE DATABASE_ROLE SWITCHOVER_STATUS DB_UNIQUE_NAME --------- ------------ -------------------- ---------------- -------------------- ------------------------------ PROD1 ARCHIVELOG MOUNTED PRIMARY NOT ALLOWED SBDB1
SYS@SBDB1> select * from test_bylhr4; select * from test_bylhr4 * ERROR at line 1: ORA-01219: database not open: queries allowed on fixed tables/views only
SYS@SBDB1> alter database open;
Database altered.
SYS@SBDB1> select * from test_bylhr4;
D - X
SYS@SBDB1> create table test_bylhr5 as select * from dual;
Table created.
SYS@SBDB1> select * from test_bylhr5;
D - X
|
4.2 新主库闪回
| SYS@SBDB1> shutdown immediate Database closed. Database dismounted. ORACLE instance shut down. SYS@SBDB1> startup mount ORACLE instance started.
Total System Global Area 313860096 bytes Fixed Size 1336232 bytes Variable Size 243272792 bytes Database Buffers 62914560 bytes Redo Buffers 6336512 bytes Database mounted. SYS@SBDB1> select STANDBY_BECAME_PRIMARY_SCN from v$database;
STANDBY_BECAME_PRIMARY_SCN -------------------------- 901723
SYS@SBDB1> flashback database to scn 901723;
Flashback complete.
SYS@SBDB1> select * from test_bylhr5; select * from test_bylhr5 * ERROR at line 1: ORA-01219: database not open: queries allowed on fixed tables/views only
SYS@SBDB1> select name, LOG_MODE, OPEN_MODE, database_role, SWITCHOVER_STATUS, db_unique_name from v$database;
NAME LOG_MODE OPEN_MODE DATABASE_ROLE SWITCHOVER_STATUS DB_UNIQUE_NAME --------- ------------ -------------------- ---------------- -------------------- ------------------------------ PROD1 ARCHIVELOG MOUNTED PRIMARY NOT ALLOWED SBDB1
SYS@SBDB1> alter database convert to physical standby;
Database altered.
SYS@SBDB1> shutdown immediate ORA-01507: database not mounted
ORACLE instance shut down. SYS@SBDB1> startup mount ORACLE instance started.
Total System Global Area 313860096 bytes Fixed Size 1336232 bytes Variable Size 243272792 bytes Database Buffers 62914560 bytes Redo Buffers 6336512 bytes Database mounted. SYS@SBDB1> select name, LOG_MODE, OPEN_MODE, database_role, SWITCHOVER_STATUS, db_unique_name from v$database;
NAME LOG_MODE OPEN_MODE DATABASE_ROLE SWITCHOVER_STATUS DB_UNIQUE_NAME --------- ------------ -------------------- ---------------- -------------------- ------------------------------ PROD1 ARCHIVELOG MOUNTED PHYSICAL STANDBY TO PRIMARY SBDB1
SYS@SBDB1> alter database open;
Database altered.
SYS@SBDB1> select name, LOG_MODE, OPEN_MODE, database_role, SWITCHOVER_STATUS, db_unique_name from v$database;
NAME LOG_MODE OPEN_MODE DATABASE_ROLE SWITCHOVER_STATUS DB_UNIQUE_NAME --------- ------------ -------------------- ---------------- -------------------- ------------------------------ PROD1 ARCHIVELOG READ ONLY PHYSICAL STANDBY TO PRIMARY SBDB1
SYS@SBDB1> SYS@SBDB1> alter database recover managed standby database using current logfile disconnect from session;
Database altered.
SYS@SBDB1> select * from test_bylhr5; select * from test_bylhr5 * ERROR at line 1: ORA-00942: table or view does not exist
SYS@SBDB1> select name, LOG_MODE, OPEN_MODE, database_role, SWITCHOVER_STATUS, db_unique_name from v$database;
NAME LOG_MODE OPEN_MODE DATABASE_ROLE SWITCHOVER_STATUS DB_UNIQUE_NAME --------- ------------ -------------------- ---------------- -------------------- ------------------------------ PROD1 ARCHIVELOG READ ONLY WITH APPLY PHYSICAL STANDBY SESSIONS ACTIVE SBDB1
|
4.3 原主库打开
| SYS@PROD1> startup force ORACLE instance started.
Total System Global Area 313860096 bytes Fixed Size 1336232 bytes Variable Size 251661400 bytes Database Buffers 54525952 bytes Redo Buffers 6336512 bytes Database mounted. Database opened. SYS@PROD1> create table test_bylhr6 as select * from dual;
Table created.
SYS@PROD1> select * from test_bylhr6;
D - X
|
备库查询:
| SYS@SBDB1> select * from test_bylhr6;
D - X
|
DGMGRL中查看配置:
| DGMGRL> show CONFIGURATION VERBOSE;
Configuration - PROD1.us.oracle.com
Protection Mode: MaxPerformance Databases: PROD1 - Primary database SBDB1 - Physical standby database
Fast-Start Failover: DISABLED
Configuration Status: SUCCESS
|
说明直接在原备库上执行闪回操作也可以让Failover后的环境重新恢复最初的环境。不过这也意味着部分数据的丢失。
第五章 实验总结
1、主库在开启闪回数据库功能后,备库并不会开启闪回数据库的功能。
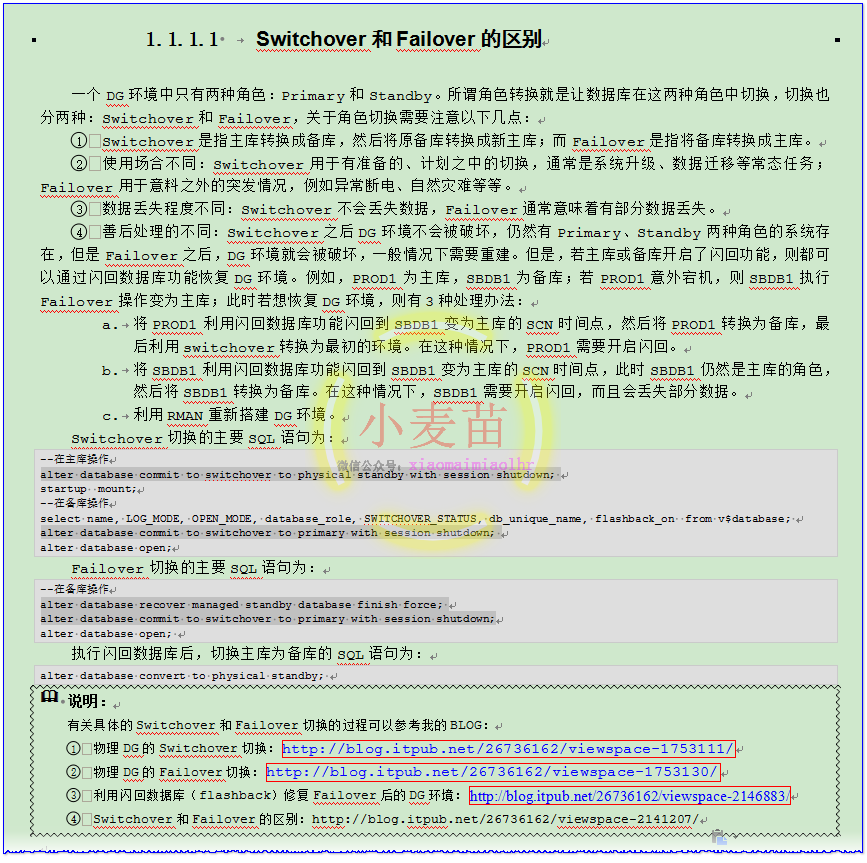
2、PROD1为主库,SBDB1为备库;若PROD1意外宕机,则SBDB1执行Failover操作变为主库;此时若想恢复DG环境,则有3种处理办法:
① 将PROD1利用闪回数据库功能闪回到SBDB1变为主库的SCN时间点,然后将PROD1转换为备库,最后利用switchover转换为最初的环境。<===PROD1需要开启闪回
② 将SBDB1利用闪回数据库功能闪回到SBDB1变为主库的SCN时间点,此时SBDB1仍然是主库的角色,然后将SBDB1转换为备库。<===SBDB1需要开启闪回,会丢失部分数据。
③ 利用RMAN重新搭建DG环境。详情请参考:http://blog.itpub.net/26736162/viewspace-1753130/
第六章 参考文章
6.1 MOS或官网
https://docs.oracle.com/cd/E11882_01/server.112/e41134/scenarios.htm#SBYDB4889
https://docs.oracle.com/cd/E11882_01/server.112/e41134/scenarios.htm#SBYDB00900
This chapter describes scenarios you might encounter while administering your Data Guard configuration. Each scenario can be adapted to your specific environment.聽Table 13-1lists the scenarios presented in this chapter.
Table 13-1 Data Guard Scenarios
这8个实验,建议有兴趣的朋友都做一遍。
http://blog.itpub.net/24500180/viewspace-1068495/
http://blog.itpub.net/24500180/viewspace-1068141/
http://blog.itpub.net/24500180/viewspace-1069602/
13.2 Converting a Failed Primary Into a Standby Database Using Flashback Database
After a failover occurs, the original primary database can no longer participate in the Data Guard configuration until it is repaired and established as a standby database in the new configuration. To do this, you can use the Flashback Database feature to recover the failed primary database to a point in time before the failover occurred, and then convert it into a physical or logical standby database in the new configuration. The following sections describe:
-
Flashing Back a Failed Primary Database into a Physical Standby Database
-
Flashing Back a Failed Primary Database into a Logical Standby Database
Note:
You must have already enabled Flashback Database on the original primary database before the failover. See Oracle Database Backup and Recovery User's Guide for more information. -
Flashing Back a Logical Standby Database to a Specific Applied SCN
See Also:
Oracle Data Guard Broker for automatic reinstatement of the failed primary database as a new standby database (as an alternative to using Flashback Database)
13.2.1 Flashing Back a Failed Primary Database into a Physical Standby Database
The following steps assume that a failover has been performed to a physical standby database and that Flashback Database was enabled on the old primary database at the time of the failover. This procedure brings the old primary database back into the Data Guard configuration as a physical standby database.
Step 1 Determine the SCN at which the old standby database became the primary database.On the new primary database, issue the following query to determine the SCN at which the old standby database became the new primary database:
SQL> SELECT TO_CHAR(STANDBY_BECAME_PRIMARY_SCN) FROM V$DATABASE;Step 2 Flash back the failed primary database.
Shut down the old primary database (if necessary), mount it, and flash it back to the value for STANDBY_BECAME_PRIMARY_SCN that was determined in Step 1.
SQL> SHUTDOWN IMMEDIATE;
SQL> STARTUP MOUNT;
SQL> FLASHBACK DATABASE TO SCN standby_became_primary_scn;
Step 3 Convert the database to a physical standby database.
Perform the following steps on the old primary database:
-
Issue the following statement on the old primary database:
SQL> ALTER DATABASE CONVERT TO PHYSICAL STANDBY;
This statement will dismount the database after successfully converting the control file to a standby control file.
-
Shut down and restart the database:
SQL> SHUTDOWN IMMEDIATE;
SQL> STARTUP MOUNT;
Perform the following steps on the new primary database:
-
Issue the following query to see the current state of the archive destinations:
SQL> SELECT DEST_ID, DEST_NAME, STATUS, PROTECTION_MODE, DESTINATION, -
> ERROR,SRL FROM V$ARCHIVE_DEST_STATUS;
-
If necessary, enable the destination:
SQL> ALTER SYSTEM SET LOG_ARCHIVE_DEST_STATE_n=ENABLE; -
Perform a log switch to ensure the standby database begins receiving redo data from the new primary database, and verify it was sent successfully. Issue the following SQL statements on the new primary database:
SQL> ALTER SYSTEM SWITCH LOGFILE;
SQL> SELECT DEST_ID, DEST_NAME, STATUS, PROTECTION_MODE, DESTINATION,-
> ERROR,SRL FROM V$ARCHIVE_DEST_STATUS;
On the new standby database, you may also need to change the LOG_ARCHIVE_DEST_n initialization parameters so that redo transport services do not transmit redo data to other databases.
Issue the following SQL statement on the new physical standby database:
SQL> ALTER DATABASE RECOVER MANAGED STANDBY DATABASE -
> USING CURRENT LOGFILE DISCONNECT;
Redo Apply automatically stops each time it encounters a redo record that is generated as the result of a role transition, so Redo Apply will need to be restarted one or more times until it has applied beyond the SCN at which the new primary database became the primary database. Once the failed primary database is restored and is running in the standby role, you can optionally perform a switchover to transition the databases to their original (pre-failure) roles. See Section 8.2.1, "Performing a Switchover to a Physical Standby Database" for more information.
6.2 博客
Data Guard高级玩法:通过闪回恢复failover备库:http://blog.itpub.net/23718752/viewspace-2124234/
使用Flashback让Failover数据库重新加入DG环境:http://blog.itpub.net/17203031/viewspace-1184082
http://blog.itpub.net/24500180/viewspace-1068495/
http://blog.itpub.net/24500180/viewspace-1068141/
http://blog.itpub.net/24500180/viewspace-1069602/
------------------------------------------------------------------------
About Me
.............................................................................................................................................
● 本文作者:小麦苗,部分内容整理自网络,若有侵权请联系小麦苗删除
● 本文在itpub(http://blog.itpub.net/26736162/abstract/1/)、博客园(http://www.cnblogs.com/lhrbest)和个人微信公众号(xiaomaimiaolhr)上有同步更新
● 本文itpub地址:http://blog.itpub.net/26736162/viewspace-2146883/
● 本文博客园地址:http://www.cnblogs.com/lhrbest/p/7793934.html
● 本文pdf版、个人简介及小麦苗云盘地址:http://blog.itpub.net/26736162/viewspace-1624453/
● 数据库笔试面试题库及解答:http://blog.itpub.net/26736162/viewspace-2134706/
● DBA宝典今日头条号地址:http://www.toutiao.com/c/user/6401772890/#mid=1564638659405826
.............................................................................................................................................
● QQ群号:230161599(满)、618766405
● 微信群:可加我微信,我拉大家进群,非诚勿扰
● 联系我请加QQ好友(646634621),注明添加缘由
● 于 2017-11-01 09:00 ~ 2017-11-30 22:00 在魔都完成
● 文章内容来源于小麦苗的学习笔记,部分整理自网络,若有侵权或不当之处还请谅解
● 版权所有,欢迎分享本文,转载请保留出处
.............................................................................................................................................
● 小麦苗的微店:https://weidian.com/s/793741433?wfr=c&ifr=shopdetail
● 小麦苗出版的数据库类丛书:http://blog.itpub.net/26736162/viewspace-2142121/
.............................................................................................................................................
使用微信客户端扫描下面的二维码来关注小麦苗的微信公众号(xiaomaimiaolhr)及QQ群(DBA宝典),学习最实用的数据库技术。
小麦苗的微信公众号 小麦苗的DBA宝典QQ群2 《DBA笔试面宝典》读者群 小麦苗的微店
.............................................................................................................................................