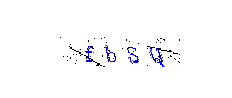
思路如下:
1.根据验证码图片的分析结果(主要是分析数字所在的像素位置)确定处理办法。
2.灰度化,然后二值化,生成单色位图。
3.对图片进行分割
3.读取单色位图的像素点,转换为0,1数组。
4.把该数组和提前生成好的0-9的字模数组进行比对,取匹配率最大的那个字模所对应的数字。
相关代码:
       /// <summary>
        /// To convert color image to grayscale image
        /// </summary>
        /// <param name="img">color images</param>
        /// <returns>grayscale images</returns>
        public static Bitmap ColorImageConvetGrayScale(Bitmap img)
        {

            int h = img.Height;
            int w = img.Width;
            int gray = 0;    //灰度值

            Bitmap bmpOut = new Bitmap(w, h, PixelFormat.Format24bppRgb);    //每像素3字节
            BitmapData dataIn = img.LockBits(new Rectangle(0, 0, w, h), ImageLockMode.ReadOnly, PixelFormat.Format24bppRgb);
            BitmapData dataOut = bmpOut.LockBits(new Rectangle(0, 0, w, h), ImageLockMode.ReadWrite, PixelFormat.Format24bppRgb);

            unsafe
            {

                byte* pIn = (byte*)(dataIn.Scan0.ToPointer());      //指向源文件首地址

                byte* pOut = (byte*)(dataOut.Scan0.ToPointer());  //指向目标文件首地址

                for (int y = 0; y < dataIn.Height; y++)  //列扫描
                {

                    for (int x = 0; x < dataIn.Width; x++)   //行扫描
                    {
                        gray = (pIn[0] * 19595 + pIn[1] * 38469 + pIn[2] * 7472) >> 16;  //灰度计算公式
                        pOut[0] = (byte)gray;     //R分量
                        pOut[1] = (byte)gray;     //G分量
                        pOut[2] = (byte)gray;     //B分量
                        pIn += 3; pOut += 3;      //指针后移3个分量位置
                    }
                    pIn += dataIn.Stride - dataIn.Width * 3;
                    pOut += dataOut.Stride - dataOut.Width * 3;
                }
            }
            bmpOut.UnlockBits(dataOut);
            img.UnlockBits(dataIn);
            return bmpOut;
        }
        /// <summary>
        ///Remove the border(For the custom)
        /// </summary>
        /// <param name="bitmap"></param>
        /// <param name="width">2</param>
        /// <returns></returns>
        public static Bitmap CutBorder(Bitmap bitmap,int width){
            Rectangle rect = new Rectangle(width,width,bitmap.Width-width*2,bitmap.Height-width*2);
            return bitmap.Clone(rect, bitmap.PixelFormat);
           // return newBitmap;
        }
       /// <summary>
        /// Image binarization, using fixed threshold HSB
        /// </summary>
        /// <param name="img">gray bitmap image</param>
        /// <returns></returns>
        public static Bitmap ConvertTo1BppWithHSBSpecifiedThreshold(Bitmap img)
        {
            int w = img.Width;
            int h = img.Height;
            Bitmap bmp01 = new Bitmap(w, h, PixelFormat.Format1bppIndexed);
            BitmapData data = bmp01.LockBits(new Rectangle(0, 0, w, h), ImageLockMode.ReadWrite,PixelFormat.Format1bppIndexed);
            for (int y = 0; y < h; y++)
            {
                byte[] scan = new byte[(w + 7) / 8];
                for (int x = 0; x < w; x++)
                {
                    Color c = img.GetPixel(x, y);

                    if (c.GetBrightness() >= 0.5) scan[x / 8] |= (byte)(0x80 >> (x % 8));
                    //scan数组,然后八个像素为一组填进去,每个像素占字节的一个位(白1黑0)。使用位运算0x80 >> (x % 8)保证像素从左到右依次保存在字节的8个位上。
                   //你这个二值化代码回填像素信息的时候用的是Marshal的字节拷贝而已
                }
                Marshal.Copy(scan, 0, (IntPtr)((int)data.Scan0 + data.Stride * y), scan.Length);
            }
            bmp01.UnlockBits(data);
            return bmp01;
        }
       /// <summary>
        ///split img (custom made for the this verify code)
        /// </summary>
        /// <param name="grayBitmap"></param>
        /// <returns></returns>
        public static List<Bitmap> SplitImg(Bitmap grayBitmap)
        {
            List<int> listWidth = new List<int>();
            bool find = true;
            //找x轴坐标
            for (int x = 0; x < grayBitmap.Width; x++)
            {
                int times = 0;
                Color pixelColor;
                for (int y = 0; y < grayBitmap.Height; y++)
                {
                    pixelColor = grayBitmap.GetPixel(x, y);
                    if (find)
                    {
                        //if (Color.FromArgb(255, 255, 255).Equals(pixelColor))//check code color
                        if (pixelColor.R == 255)
                        {
                            listWidth.Add(x);
                            find = false;
                            continue;
                        }
                    }//the left of verify code
                    else
                    {

                       // if (Color.FromArgb(0, 0, 0).Equals(pixelColor))//this column is black
                        if (pixelColor.R==0)
                        {
                            times++;//make sure all the pixel is black;
                            if (times == grayBitmap.Height)
                            {
                                listWidth.Add(x);
                                find = true;
                            }
                        }
                    }//the right of verify code
                    //Console.WriteLine(string.Format("x:{0} \t left:{1} \t Red:{2} \t grayBitmap.Height:{3}  times:{4}", x, find, pixelColor.R,grayBitmap.Height,times));
                }//height
            }//width

            List<Bitmap> bitmpaList = new List<Bitmap>();
            Rectangle tempRect;

            if (listWidth.Count == 8 || listWidth.Count == 7)
            {
                for (int i = 0; i < listWidth.Count; i = i + 2)
                {
                    if (listWidth.Count == 8)
                    {
                        tempRect = new Rectangle(new Point(listWidth[i], 0), new Size(listWidth[i + 1] - listWidth[i], grayBitmap.Height));
                    }
                    else
                    {
                        if (i < 6)
                        {
                            tempRect = new Rectangle(new Point(listWidth[i], 0), new Size(listWidth[i + 1] - listWidth[i], grayBitmap.Height));
                        }
                        else
                        {
                            tempRect = new Rectangle(new Point(listWidth[i], 0), new Size(grayBitmap.Width - listWidth[i], grayBitmap.Height));
                        }
                    }
                    bitmpaList.Add(grayBitmap.Clone(tempRect, grayBitmap.PixelFormat));
                }//split the pic
            }//the verify code is right
            else
            {
                logger.InfoFormat("[Fail]:{0}",listWidth.Count);
                grayBitmap.Save(string.Format("{0}\\{1}.bmp", FileHelper.MakeDir("pic"), DateTime.Now.ToString("yyyyMMddHHmmss")), ImageFormat.Bmp);
                Bitmap bitmapTemp = grayBitmap.Clone(new Rectangle(4, 0, grayBitmap.Width-4,grayBitmap.Height),grayBitmap.PixelFormat);
                bitmpaList = new List<Bitmap>(SplitImg(bitmapTemp, 4, 1));
            }
            return bitmpaList;
        }
        /// 返回黑白图片的点阵描述字串,1表示黑点,0表示白点
        /// </summary>
        /// <param name="singlepic">黑白图片</param>
        /// <param name="dgGrayValue">dgGrayValue:default 128</param>
        /// <returns></returns>
        public static string Get01BmpCode(Bitmap singlepic, int dgGrayValue)
        {
            Color piexl;
            StringBuilder sbPixelCode = new StringBuilder(1024);
            for (int posy = 0; posy < singlepic.Height; posy++)
                for (int posx = 0; posx < singlepic.Width; posx++)
                {
                    piexl = singlepic.GetPixel(posx, posy);
                    if (piexl.R < dgGrayValue)// Color.Black )
                    {
                        sbPixelCode.Append("1");
                    }
                    else
                    {
                        sbPixelCode.Append("0");
                    }
                }
            return sbPixelCode.ToString();
        }


        public static string getVerifyCodeStr(IDictionary<string, string> fdbCodesDic, string bitmapSpecialCode)
        {
            string verifyCodeStr ="";//the string to get
            string fdbCode = string.Empty;//the key
            int maxMatchNumber =-1;//最大的匹配次数

            foreach (KeyValuePair<string, string> kvp in fdbCodesDic)
            {
                fdbCode = kvp.Key;
                int currMatchNumber =0;//

                #region getMathchNumber
                int count = 0;
                if (fdbCode.Length > bitmapSpecialCode.Length)
                {
                    count = bitmapSpecialCode.Length;
                }//get the min index
                else
                {
                    count = fdbCode.Length;
                }


                for (int i = 0; i < count; i++)
                {
                    if (fdbCode[i]==bitmapSpecialCode[i])
                    {
                        currMatchNumber++;
                    }
                }//get the similarity
                #endregion

                currMatchNumber =currMatchNumber-Math.Abs(fdbCode.Length - bitmapSpecialCode.Length);

                //logger.DebugFormat("Curr:{0}\t Max:{1}",currMatchNumber,maxMatchNumber);
                //logger.DebugFormat(bitmapSpecialCode);
                //logger.DebugFormat("Bitmap Key:{0} \t Value:{1}",kvp.Key,kvp.Value);
                if (currMatchNumber > maxMatchNumber)
                {

                    maxMatchNumber = currMatchNumber;
                    verifyCodeStr = kvp.Value;
                }//get the target verifycode


            }//dic


            return verifyCodeStr;
        }
补充:
彩色转灰度图片算法详解:
一、基础
对于彩色转灰度,有一个很著名的心理学公式:
Gray = R*0.299 + G*0.587 + B*0.114
二、整数算法
而实际应用时,希望避免低速的浮点运算,所以需要整数算法。
注意到系数都是3位精度的没有,我们可以将它们缩放1000倍来实现整数运算算法:
Gray = (R*299 + G*587 + B*114 + 500) / 1000
RGB一般是8位精度,现在缩放1000倍,所以上面的运算是32位整型的运算。注意后面那个除法是整数除法,所以需要加上500来实现四舍五入。
就是由于该算法需要32位运算,所以该公式的另一个变种很流行:
Gray = (R*30 + G*59 + B*11 + 50) / 100
但是,虽说上一个公式是32位整数运算,但是根据80x86体系的整数乘除指令的特点,是可以用16位整数乘除指令来运算的。而且现在32位早普及了(AMD64都出来了),所以推荐使用上一个公式。
三、整数移位算法
上面的整数算法已经很快了,但是有一点仍制约速度,就是最后的那个除法。移位比除法快多了,所以可以将系数缩放成 2的整数幂。
习惯上使用16位精度,2的16次幂是65536,所以这样计算系数:
0.299 * 65536 = 19595.264 ≈ 19595
0.587 * 65536 + (0.264) = 38469.632 + 0.264 = 38469.896 ≈ 38469
0.114 * 65536 + (0.896) = 7471.104 + 0.896 = 7472
可能很多人看见了,我所使用的舍入方式不是四舍五入。四舍五入会有较大的误差,应该将以前的计算结果的误差一起计算进去,舍入方式是去尾法:
写成表达式是:
Gray = (R*19595 + G*38469 + B*7472) << 16
2至20位精度的系数:
Gray = (R*1 + G*2 + B*1) << 2
Gray = (R*2 + G*5 + B*1) << 3
Gray = (R*4 + G*10 + B*2) << 4
Gray = (R*9 + G*19 + B*4) << 5
Gray = (R*19 + G*37 + B*8) << 6
Gray = (R*38 + G*75 + B*15) << 7
Gray = (R*76 + G*150 + B*30) << 8
Gray = (R*153 + G*300 + B*59) << 9
Gray = (R*306 + G*601 + B*117) << 10
Gray = (R*612 + G*1202 + B*234) << 11
Gray = (R*1224 + G*2405 + B*467) << 12
Gray = (R*2449 + G*4809 + B*934) << 13
Gray = (R*4898 + G*9618 + B*1868) << 14
Gray = (R*9797 + G*19235 + B*3736) << 15
Gray = (R*19595 + G*38469 + B*7472) << 16
Gray = (R*39190 + G*76939 + B*14943) << 17
Gray = (R*78381 + G*153878 + B*29885) << 18
Gray = (R*156762 + G*307757 + B*59769) << 19
Gray = (R*313524 + G*615514 + B*119538) << 20
仔细观察上面的表格,这些精度实际上是一样的:3与4、7与8、10与11、13与14、19与20
所以16位运算下最好的计算公式是使用7位精度,比先前那个系数缩放100倍的精度高,而且速度快:
Gray = (R*38 + G*75 + B*15) << 7
其实最有意思的还是那个2位精度的,完全可以移位优化:
Gray = (R + (WORD)G< B >< 2
由于误差很大,所以做图像处理绝不用该公式(最常用的是16位精度)。但对于游戏编程,场景经常变化,用户一般不可能观察到颜色的细微差别,所以最常用的是2位精度。
http://www.cnblogs.com/diewcs/archive/2010/10/03/1841744.html