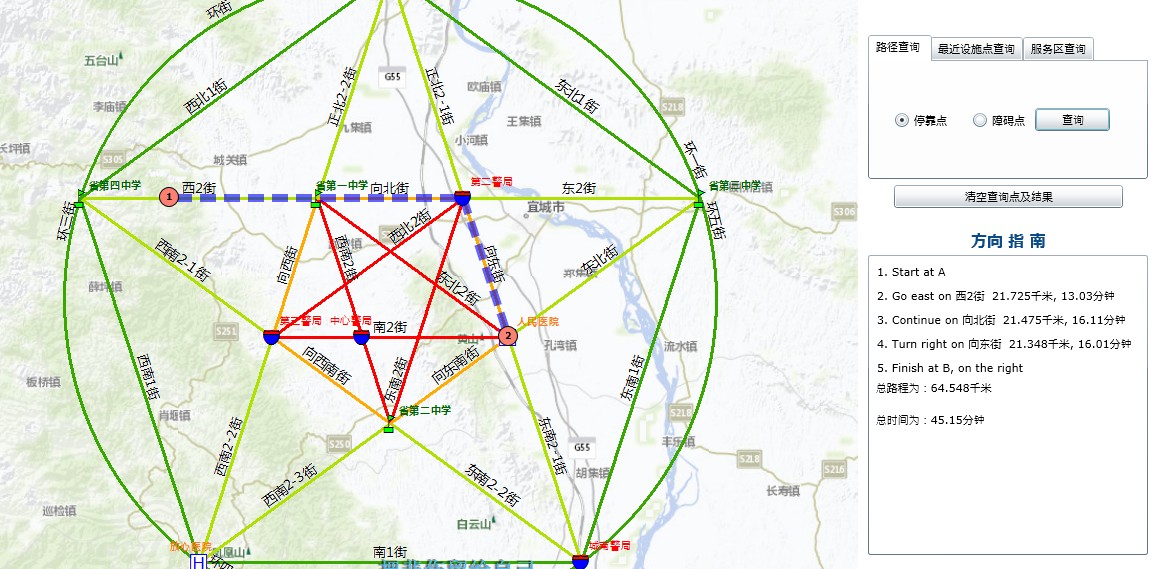
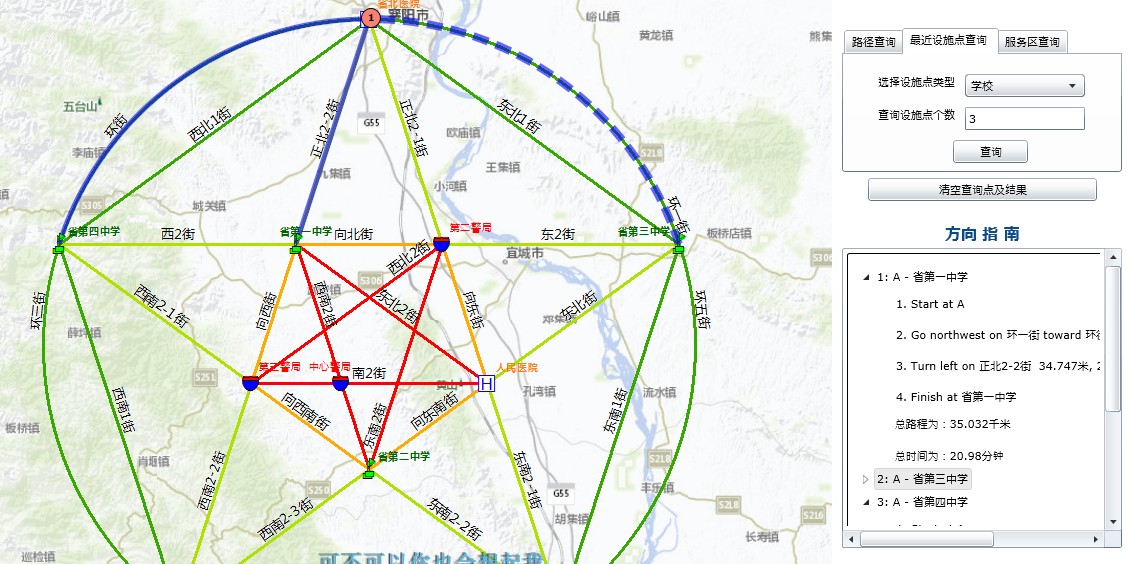
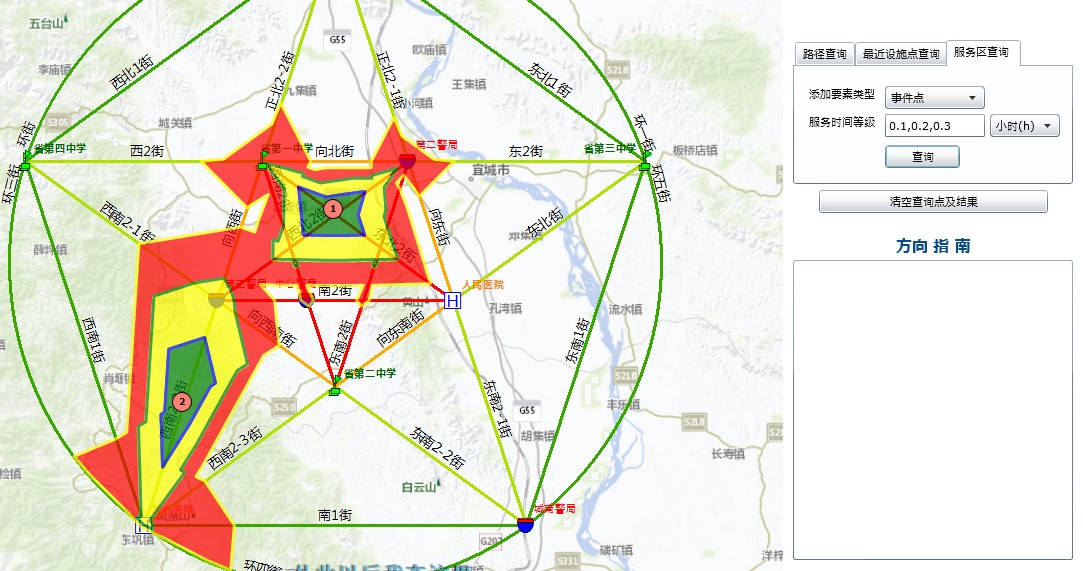
首先贴上最终的效果图:
a.路径查询
2.最近设施点查询
3.服务区分析
说明:
1.以上的示例使用的数据是随意在ArcMap中创建的数据,也就是之前博文新建的数据,这里的单位和比例尺并不是实际的单位和比例尺。所以和底图的显示不一致,这里的底图只是为了增加显示的效果。
2.以上所以的实现基于之前的两篇关于网络分析的博文,在此推荐看一看。
3.以上示例的具体细节将会分别为大家讲解,欢迎大家相互交流,批评指正。
一.路径分析服务概述
路径分析服务可以为Silverlight WEBGIS提供最佳路径的选择功能,用户指定两个点便可以查询出两点之间的最佳路径,同时用户还可以考虑不同的因素来找到最佳的路径,例如设置障碍点,阻抗等。使用路径分析功能时需要使用ArcGIS Api for Silverlight中的TouteTask类。同时还需提供网络分析服务中路径分析图层的地址(即上一篇博文中我们发布的网络分析服务中路径服务的地址。其地址的一般格式是:
http://<GIS服务器地址>/ArcGIS/rest/services/<网络分析服务名称>/NAServer/Route.
关于网络分析服务的发布在之前的博文中已经详细说明,读者可参考之前的博文。
二、路径分析服务的实现过程
这里我初步将实现的过程分为一下几步:
a.实例化TouteTask变量,指定路径服务的地址RouteTask是实现路径分析的重中之重。同时还可以声明三个图层:一个图层用来绘制事件点,一个用来绘制障碍(点,线,面),一个用来绘制所得的路径,并进行实例化。
例如:
声明一个RouteTask
RouteTask routeTask = new RouteTask("http://qzj-pc/ArcGIS/rest/services/NetworkAnaysisMap/NAServer/Route");//最短路径服务Task
声明三个GraphicsLayer:
        GraphicsLayer stopsGraphicsLayer;//停靠点或事件点图层
        GraphicsLayer barriesGraphicsLayer;//障碍物图层
        GraphicsLayer RoutegraphicsLayer;//查询返回的路径图层
在Map空间的Load事件中指定GraphicsLayer到相应的图层:
 private void MyMap_Loaded(object sender, RoutedEventArgs e)
        {
            stopsGraphicsLayer = MyMap.Layers["MyStopGraphicsLayer"] as GraphicsLayer;
            barriesGraphicsLayer = MyMap.Layers["MyBarriesGraphicsLayer"] as GraphicsLayer;
            RoutegraphicsLayer = MyMap.Layers["MyRouteLayer"] as GraphicsLayer;
            }
以上过程需要在在XAML中添加相应的GraphicsLayer声明。
 <esri:Map Background="White" HorizontalAlignment="Stretch" x:Name="MyMap" VerticalAlignment="Stretch" WrapAround="True"
             Loaded="MyMap_Loaded" MouseClick="MyMap_MouseClick" IsLogoVisible="False">
            <esri:Map.Layers>
                <esri:LayerCollection>
                    <esri:ArcGISTiledMapServiceLayer ID="BaseMap"
                    Url="http://www.arcgisonline.cn/ArcGIS/rest/services/ChinaOnlineStreetGray/MapServer"/>
                    <esri:ArcGISDynamicMapServiceLayer ID="ChinaBaseMap"
                    Url="http://qzj-pc/ArcGIS/rest/services/NetworkAnaysisMap/MapServer"
                    InitializationFailed="ArcGISDynamicMapServiceLayer_InitializationFailed" />
                    <esri:GraphicsLayer ID="MyRouteLayer"/>
                    <esri:GraphicsLayer ID="MyStopGraphicsLayer"/>
                    <esri:GraphicsLayer ID="MyBarriesGraphicsLayer"/>
                    </esri:LayerCollection>
            </esri:Map.Layers>
        </esri:Map>
b.注册RouteTask的SolveCompleted以及Failed事件例如:
注册事件:
routeTask.SolveCompleted += new EventHandler<RouteEventArgs>(routeTask_SolveCompleted);
 routeTask.Failed += new EventHandler<TaskFailedEventArgs>(Task_Failed);
private void routeTask_SolveCompleted(object sender, RouteEventArgs e)
        {
        }
 private void Task_Failed(object sender, TaskFailedEventArgs e)
        {
            MessageBox.Show("求解失败" + e.Error.ToString());
        }
c.添加用于计算路径的点,并设置相应的Symbol.
例如:我们点击地图就添加一个点,示例代码如下:
    private void MyMap_MouseClick(object sender, Map.MouseEventArgs e)
        {
            if (tabControl1.SelectedIndex != 0)
                StopsRadioButton.IsChecked = true;
            StopsGraphic = new Graphic();
            if (StopsRadioButton.IsChecked == true)
            {
                StopsGraphic.Symbol = LayoutRoot.Resources["MyStopsMarkerSymbol"] as Symbol;
                StopsGraphic.Geometry = new MapPoint(e.MapPoint.X, e.MapPoint.Y);
                addFacilityName.Show();
            }
            else
            {
                StopsGraphic.Symbol = LayoutRoot.Resources["MyBarriesMarkerSymbol"] as Symbol;
                StopsGraphic.Geometry = new MapPoint(e.MapPoint.X, e.MapPoint.Y);
                StopsGraphic.Selected = true;
                barriesGraphicsLayer.Graphics.Add(StopsGraphic);
            }
        }
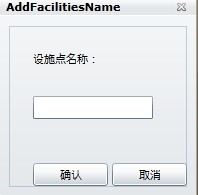
代码说明:addFacilityName表示的是一个ChildWindow,如下图的所示:
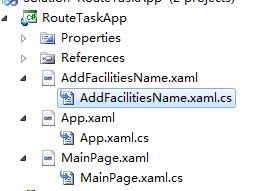
addFacilityName是AddFacilitiesName的一个实例用来给添加的停靠点增加一个Name属性,界面如下:
ChildWindow中的关键代码:
在AddFacilitiesName.xaml.cs中定义一个事件:
public event EventHandler OnAddFacilityName;
该事件当用户点击确定是触发,即表示用户确定添加一个停靠点。
 private void OKButton_Click(object sender, RoutedEventArgs e)
        {
            this.DialogResult = true;
            OnAddFacilityName(this, new EventArgs());
        }
然后在MainPage中注册OnAddFacilityName的事件,并在其事件的响应函数中完成停靠点的最终添加工作。
声明AddFacilitiesName的一个实例:
public AddFacilitiesName addFacilityName = new AddFacilitiesName();
注册OnAddFacilityName事件:
addFacilityName.OnAddFacilityName += new EventHandler(FacilityName_OnAddFacilityName);
在事件回调函数中完成点的添加工作:
 private void FacilityName_OnAddFacilityName(object sender, EventArgs e)
        {
            //清空停靠点的属性,否则当再次添加Name属性时,则会因为存在Name属性而报错
            StopsGraphic.Attributes.Clear();
            //停靠点样式中显示的数字与该属性进行绑定
            StopsGraphic.Attributes.Add("StopNumber", stopsGraphicsLayer.Graphics.Count + 1);
            //获取ChildWindow输入的名称,并添加Name属性
            StopsGraphic.Attributes.Add("Name", addFacilityName.NameTextBox.Text.ToString());
            //将停靠点添加到当前图层中
            stopsGraphicsLayer.Graphics.Add(StopsGraphic);
        }
以上代码使用到了在XAML中定义的资源文件,用来描述停靠点和障碍点的样式。
示例代码如下:
   <esri:SimpleMarkerSymbol x:Key="MyStopsMarkerSymbol" Size="20" Style="Circle" Color="Salmon" >
                <esri:SimpleMarkerSymbol.ControlTemplate>
                    <ControlTemplate>
                        <Grid>
                            <Ellipse Fill="{Binding Symbol.Color}" Width="{Binding Symbol.Size}" Height="{Binding Symbol.Size}" S
                            troke="Black" StrokeThickness="1" />
                            <TextBlock HorizontalAlignment="Center" VerticalAlignment="Center"
                                Text="{Binding Path=Attributes[StopNumber]}"
                                FontSize="9" Margin="0" FontWeight="Bold" Foreground="Black" />
                        </Grid>
                    </ControlTemplate>
                </esri:SimpleMarkerSymbol.ControlTemplate>
            </esri:SimpleMarkerSymbol>
            <esri:SimpleMarkerSymbol x:Name="MyBarriesMarkerSymbol" Color="#FF833232" Style="Square" Size="18"/>
同时我们在这里再定义一下路径的Graphic样式:
  <esri:SimpleLineSymbol x:Key="RouteRenderer">
                <!--<esri:SimpleRenderer.Symbol>-->
                    <!--<esri:LineSymbol>-->
                        <esri:LineSymbol.ControlTemplate>
                            <ControlTemplate>
                                <Grid>
                                    <VisualStateManager.VisualStateGroups>
                                        <VisualStateGroup x:Name="CommonStates">
                                            <VisualState x:Name="Normal">
                                                <Storyboard RepeatBehavior="Forever">
                                                    <DoubleAnimation BeginTime="0:0:0" Storyboard.TargetName="Element"
                                                                                 Storyboard.TargetProperty="StrokeDashOffset"
                                                                                 To="1000" Duration="0:3:0" />
                                                </Storyboard>
                                            </VisualState>
                                        </VisualStateGroup>
                                    </VisualStateManager.VisualStateGroups>
                                    <!--For polyline and polygon template, a Path
                                                    element with the name "Element" is required-->
                                    <Path x:Name="Element" StrokeDashArray="2,1" StrokeDashOffset="0"
                                                     Stroke="#990000FF" StrokeThickness="8" />
                                </Grid>
                            </ControlTemplate>
                        </esri:LineSymbol.ControlTemplate>
                    <!--</esri:LineSymbol>-->
                <!--</esri:SimpleRenderer.Symbol>-->
            </esri:SimpleLineSymbol>
d.设置路径服务的输入参数
路径服务的参数:RouteParameters,继承自BaseRouteParameters。RouteParameters的主要成员有:
成员参数名 |
参数描述 |
| DirectionsLanguage | 计算方向时使用的语言,默认与路径网绚图层的设置一致,但是NAServer只安装了en_US,其他语言需要管理员自行安装。 |
| DirectionsLengthUnits | 计算方向时使用的长度单位。默认与路径网络图层的设置一致。可用的值包括esriFeet,esriKilometers, esriMeters,esriMile,esriNauticalMiles和esriYards。 |
| DirectionsTimeAttribute | 用于计算驾驶时间的网绚属性。默认与路径网络图层的设置一致。 |
| ReturnDirections | 是否返回方向。 |
| ReturnRoutes | 是否返回路径 |
| FindBestSequence | 如果为true,解析器将优化路径中停靠点(Stop)的顸序(如果preserveFirstStop和preserveLastStop为true,则不考虑起点和终点)。 |
| StartTime | 指定路径(从第一个停靠点)开始的时间。 |
| Stops | 路径分析时的停靠点。可以使DataLayer或FeatureSet。 |
| Barriers | 路径分析时的障碍点。可以使DataLayer或FeatureSet。 |
| UseHierarchy | 是否在分析中使用网络的等级属性。默认与路径网络图层的设置一致。 |
示例代码:
 RouteParameters routeParameters = new RouteParameters()
            {
                Stops = stopsGraphicsLayer,
                Barriers = barriesGraphicsLayer,
                OutSpatialReference = MyMap.SpatialReference,
                ReturnDirections = true,
                FindBestSequence = true,
                PreserveFirstStop = true,
                PreserveLastStop = true,
            };
这里需要注意:如果在构建网络时没有构建等级属性,这里一定不要使用等级属性否则会报错,当在构建网络时设置了等级属性,那么这里才可以使用等级设置.
e.开始计算路径
  if (routeTask.IsBusy)
                routeTask.CancelAsync();
            routeTask.SolveAsync(routeParameters);
f. 在Completed事件的回调函数中获取结果(包含路径和方向指南)
当执行结果完成后RouteTask将最后的结果传递给RouteEventArgs的RouteResults属性,RouteResults是RouteResult的集合,对于路径查询来说,最后的RouteResults集合只有一个RouteResult。RouteResult的主要成员如下:
主要成员参数名 |
成员描述 |
| Directions | 如果RouteParameters.ReturnDirections为true,则迒回路径方向(DirectionsFeatureSet类实例)。 |
| Route | 如果returnRoutes为true并且outputLines属性不是esriNAOutputLineNone,则将返回路径图形(polyline)。 |
| RouteName | 路径名称。 |
| Stops | 停靠点集合。 |
RouteResult中的Route表示一个Graphic,也就是我们最后的路径结果。所以这里我们想获得最佳的路径结果,只需要取得Route,并设置其样式,最后添加到地图中即可。
RouteResult中的Directions表示路径中包含的方向指南,Drirections的类型是DirectionsFeatureSet,其成员如下:
主要成员参数名 |
成员描述 |
| Extent | 路径的范围。 |
| RouteID | 获得服务器返回的路径ID |
| RouteName | RouteParameters.Stops中指定的名称。 |
| TotalDriveTime | 路径时间驾驶时间。 |
| TotalLength | 路径总长度。 |
| TotalTime | 路径总通行时间。 |
| MergedGeometry | 表示整个路径的单条线。 |
DirectionsFeatureSet继承自FeatureSet。所以Drirections实际上也是一系列的Graphic.并且这些Graphic包含了三个重要的属性:
Drirections中Graphic的属性 |
属性描述 |
| text | 对某一段路径的方向描述。 |
| length | 表示某一段路径的长度 |
| time | 表示某一段路径的所需的时间 |
所以我们现在只需要将上述所有信息收集起来并合理编排就能够得到路径和方向指南。
示例代码如下:
    private void routeTask_SolveCompleted(object sender, RouteEventArgs e)
        {
            DirectionStackPanel.Children.Clear();//清空路径指南中的所有方向提示
            RoutegraphicsLayer.Graphics.Clear();//清空之前的路径图层
            RouteResult routeResult = e.RouteResults[0];//最佳路线查询只有一个结果,因此数组的长度是1.
            routeResult.Route.Symbol = LayoutRoot.Resources["RouteRenderer"] as SimpleLineSymbol;//设置路径的样式
            RoutegraphicsLayer.Graphics.Add(routeResult.Route);//将路径添加到当前的地图中
            int i = 1;
            foreach (Graphic g in routeResult.Directions)
            {
                StringBuilder direction = new StringBuilder();
                //设置方向描述的格式:<i>.<描述>
                direction.AppendFormat("{0}. {1}", i, g.Attributes["text"]);
                if (i > 1 && i < routeResult.Directions.Features.Count)
                {
                    //由于当在起点或中间停靠点时,Graphic中的length属性为0
                    //因此在执行强制转换时会出错,
                    //同时也是格式化输出,在停靠点不输出时间和长度属性,每一个停靠点都看作是一个起点
                    if (Convert.ToDecimal(g.Attributes["length"])!= 0)
                    {
                        //当length属性不为0时,在路径指南中显示出来
                        decimal Distance = (decimal)g.Attributes["length"];
                        direction.AppendFormat("  {0}千米", Distance.ToString("#0.000"));
                        decimal NeedTime = (decimal)g.Attributes["time"];
                        direction.AppendFormat(", {0}分钟", NeedTime.ToString("#0.00"));
                    }
                }
                //显示路线提示的Panel
                DirectionStackPanel.Children.Add(new TextBlock()
                {
                    Text = direction.ToString(),
                    Margin = new Thickness(4)
                });
                i++;
            }
            DirectionStackPanel.Children.Add(new TextBlock()
            {
                Text = string.Format(" 总路程为:{0}千米\n\n 总时间为:{1}分钟", routeResult.Directions.TotalLength.ToString("#0.000"),
                routeResult.Directions.TotalDriveTime.ToString("#0.00"))
            });
        }
到此位置所关于路径服务就已结束。下一篇将讲解如何实现最近设施点分析。
本文参考了ArcGIS API For Silverlight的官网的Network Analysis的例子,以及ESRI中国的ArcGIS Api for Silverlight的帮助文档。
(版权所有,转载请标明出处)