目录[-]
转载请注明出处:Gaussic(一个致力于AI研究却不得不兼顾项目的研究生)。
注:在阅读本文前,请先阅读:
使用IntelliJ IDEA开发SpringMVC网站(一)开发环境
使用IntelliJ IDEA开发SpringMVC网站(二)框架配置
访问GitHub下载最新源码:https://github.com/gaussic/SpringMVCDemo
文章已针对IDEA 15做了一定的更新,部分更新较为重要,请重新阅读文章并下载最新源码。
六、数据库配置
下面,就要通过一个简单的例子,来介绍SpringMVC如何集成Spring Data JPA(由 Hibernate JPA 提供),来进行强大的数据库访问,并通过本章节的讲解,更加深刻地认识Controller是如何进行请求处理的,相信看完这一章节,你就可以开始你的开发工作了。
准备工作:
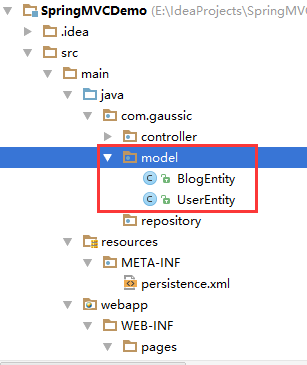
在src\main\java中新建两个包:com.gaussic.model、com.gaussic.repository,将在后面用上,如下图所示:

1、创建Mysql数据库
本文的讲解使用Mysql数据库,如果使用其它数据库的读者,可以去网上参考其他的配置教程,在此不做太多的叙述。数据库是一个底层的东西,底层的细节对上层的抽象并没有太大的影响,因此,只要配置好数据库,本章的内容仍然是适用于所有数据库的(貌似如此)。
假设我们现在要建立一个小小的博客系统,其数据库ER图如下所示(当然这只是一个小小的例子,真实的博客系统比这要复杂的多):
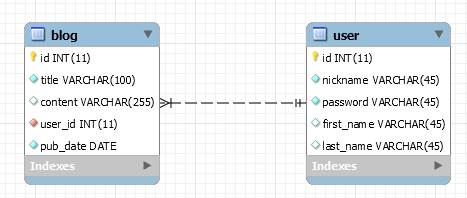
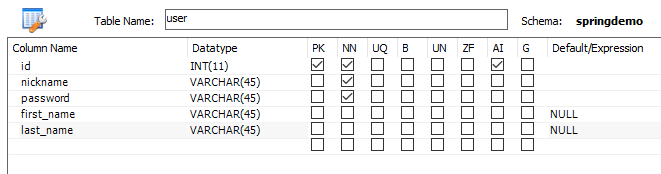
新建一个数据库springdemo,在数据库中,有两张表:
(1)用户表user:用户登录信息,主键id设为自增;
(2)博文表blog:储存用户发表的博文,主键id设为自增,其中有一个外键user_id链接到user表。
详细表结构如下图所示:

使用MySQL Workbench添加外键流程:
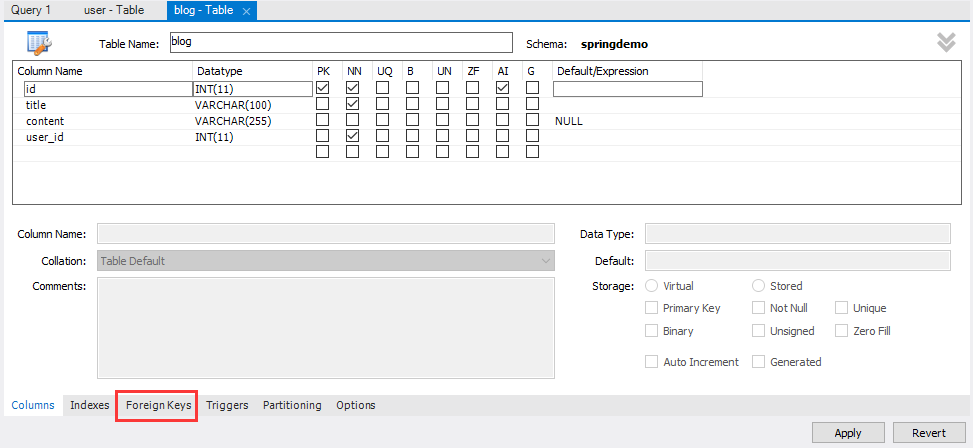

注意:在添加外键时,应该根据需求设置,例如右边红框中的Foreign Key Options,默认在Delete时是NO ACTION,说明在删除一个用户时,如果数据库中存在该用户的文章,那么就无法删除该用户,也无法删除该用户的所有文章,而如果将该选项改为CASCADE,那么删除该用户,就会同时删除该用户所有的文章。通常后者是不太可取的,因为如果发生了删除用户的误操作,很有可能该用户的内容被连带删除,且不可逆,这也是实现真实系统时需要考虑的原因之一。
2、IntelliJ IDEA导入数据库
对于此前所接触的一些常用的框架中,一张数据表往往对应一个Java Bean。在SpringMVC中,这个Java Bean相当于model。那么,这个类是否需要自己来写呢?不需要,利用IntelliJ IDEA可以帮我们自动的生成这些JavaBean。
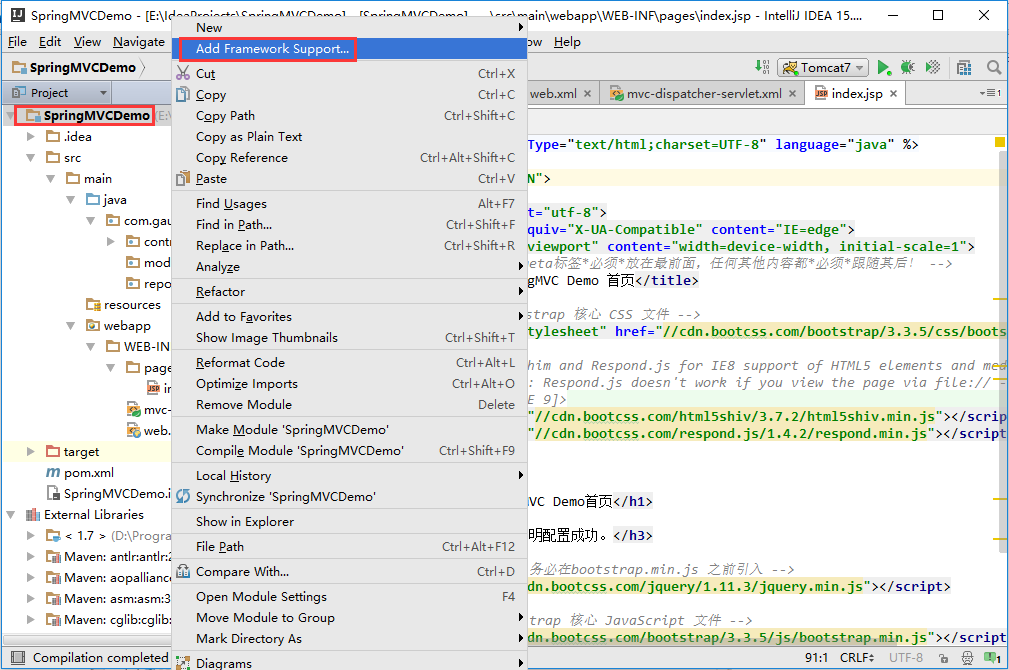
首先,右键项目,选择Add Framework Support:
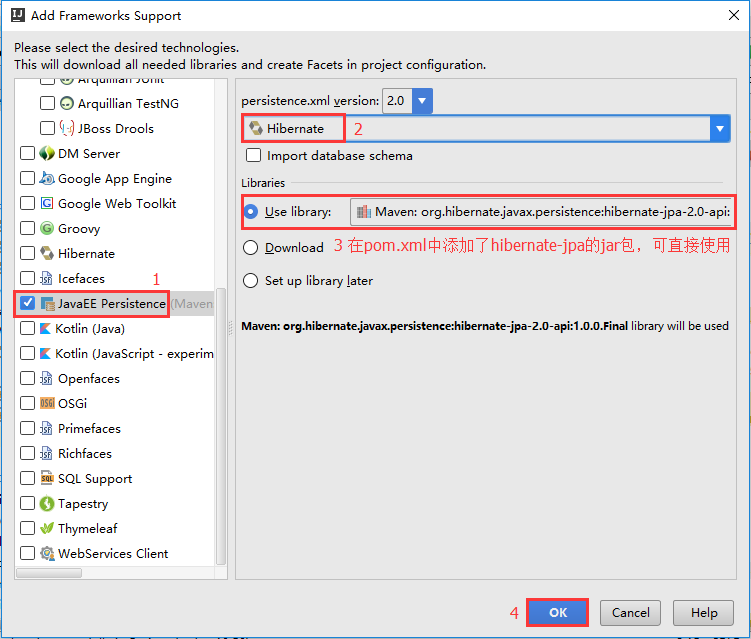
下拉选择JavaEE Persistence,右边provider选择Hibernate:
在这一步结束后,我们可以发现,在resources里面生成了persistence.xml配置文件,左边栏出现了一个Persistence标题(若没有请点击左下角那个灰框):
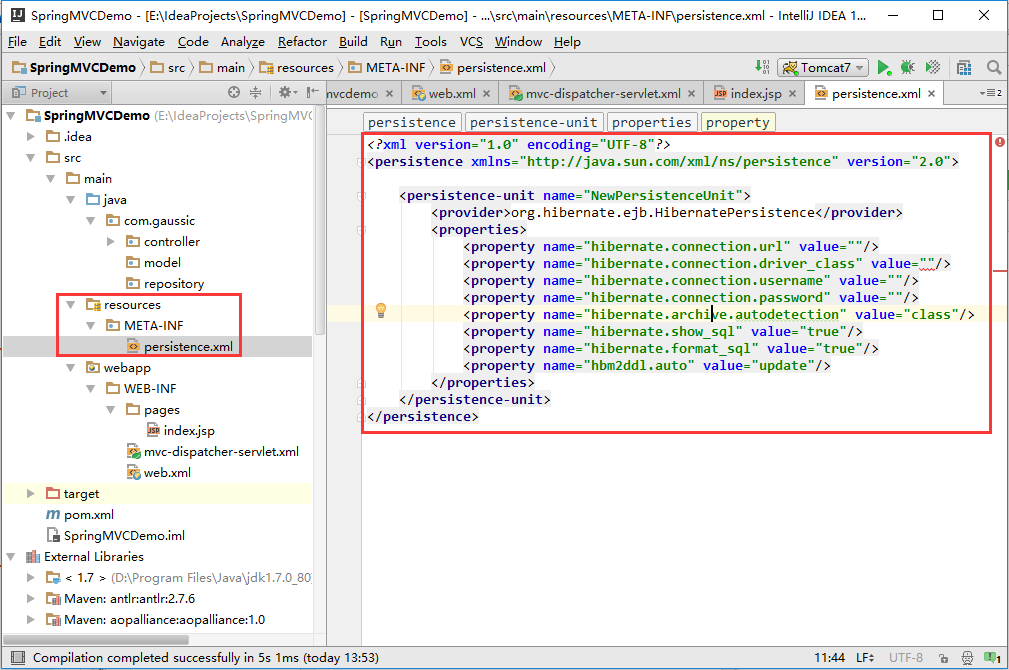
persistemce.xml具体如下:
<?xml version="1.0" encoding="UTF-8"?>
<persistence xmlns="http://java.sun.com/xml/ns/persistence" version="2.0">

    <persistence-unit name="NewPersistenceUnit">
        <provider>org.hibernate.ejb.HibernatePersistence</provider>
        <properties>
            <property name="hibernate.connection.url" value=""/>
            <property name="hibernate.connection.driver_class" value=""/>
            <property name="hibernate.connection.username" value=""/>
            <property name="hibernate.connection.password" value=""/>
            <property name="hibernate.archive.autodetection" value="class"/>
            <property name="hibernate.show_sql" value="true"/>
            <property name="hibernate.format_sql" value="true"/>
            <property name="hbm2ddl.auto" value="update"/>
        </properties>
    </persistence-unit>
</persistence>
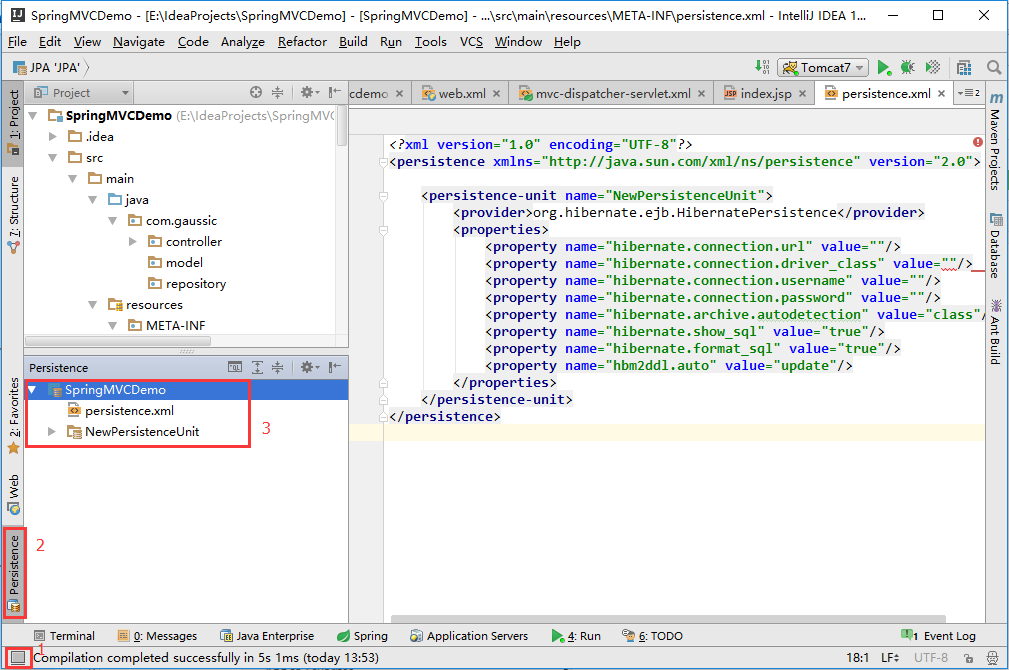
我们先不着急填写这个配置文件。点开左边栏的Persistence,显示如下图所示:
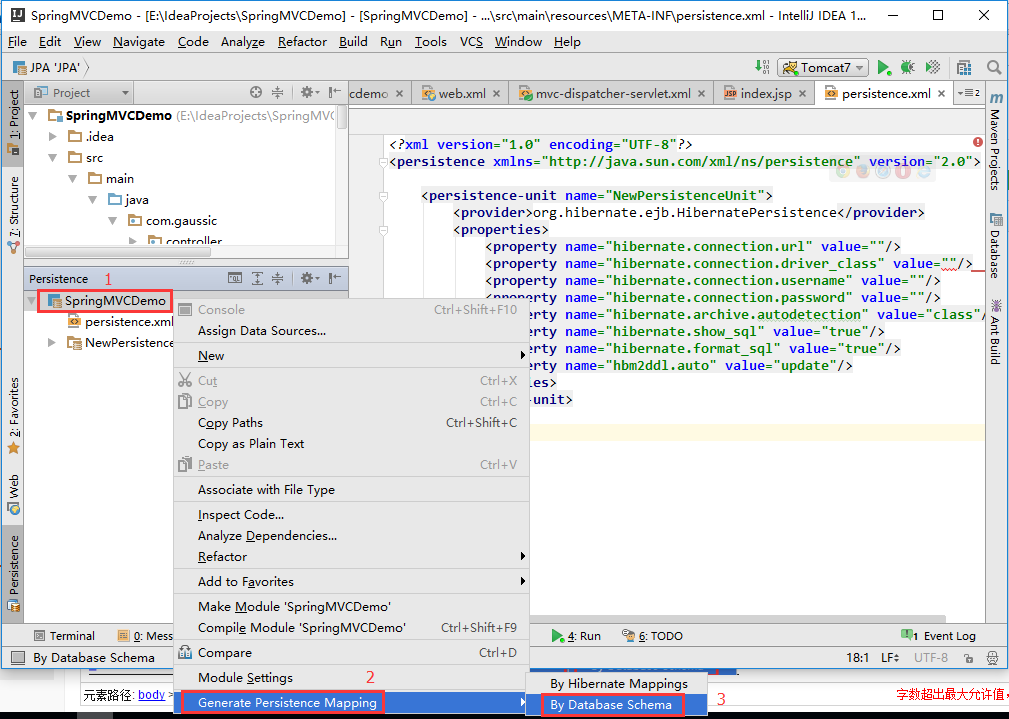
右键项目名,选择Generate Persistence Mapping,再选择By Database Schema:
出现如下界面,其主要需要配置的地方如下图红框所示:
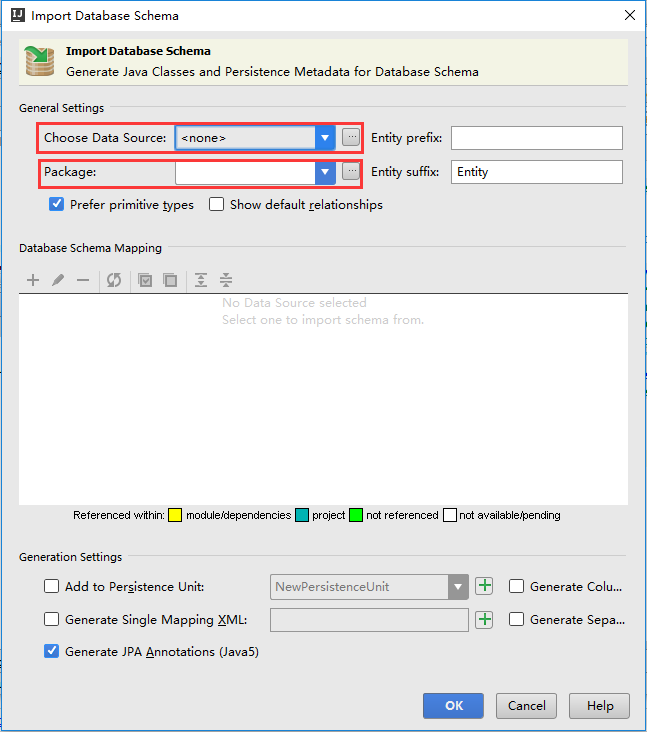
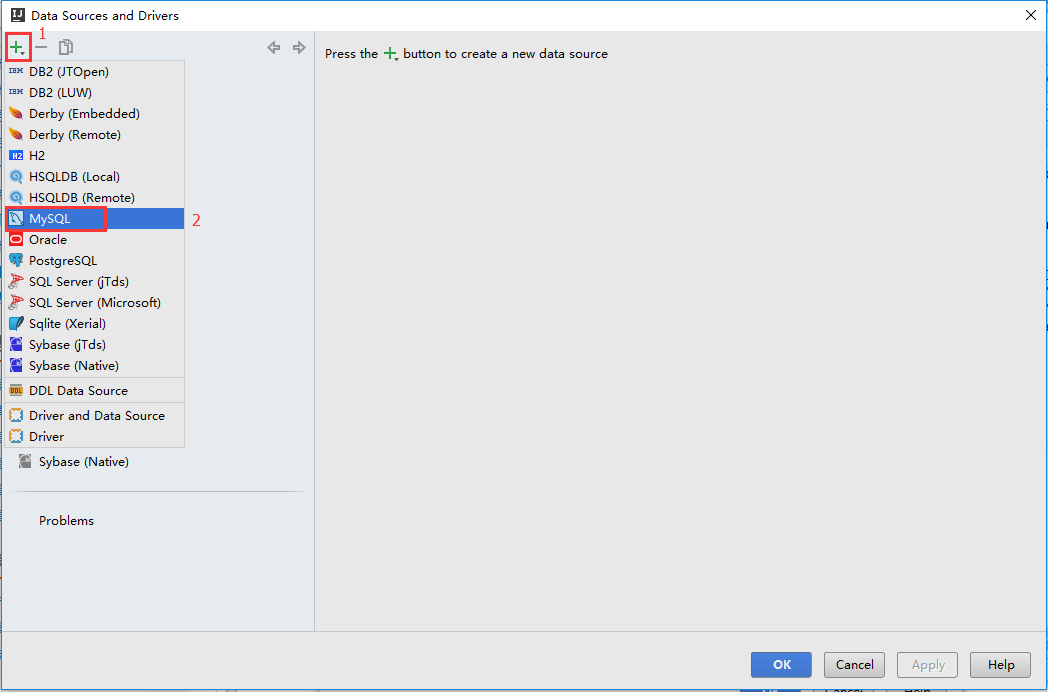
点击Choose Data Source右边的三个点选择数据源,在弹出的界面左上角选择“+”,选择Mysql:
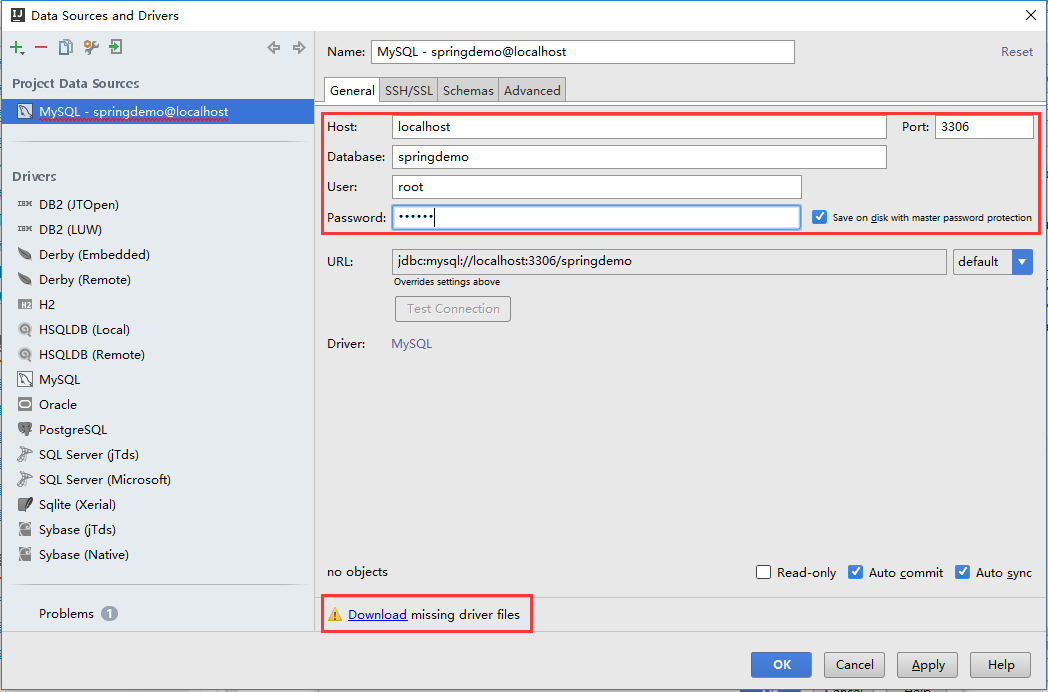
在如下界面填写主机、端口号、数据库名、用户名、密码,如果驱动丢失点击下面的Download可以下载驱动,点击 Test Connection可以测试数据库是否连接成功:
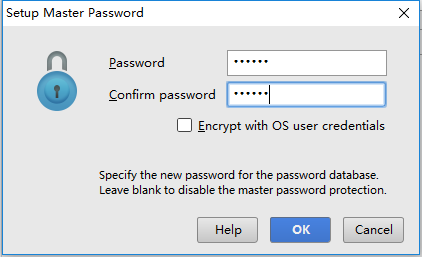
在以上界面配置完成后,点OK,第一次使用需要Setup Master Password:
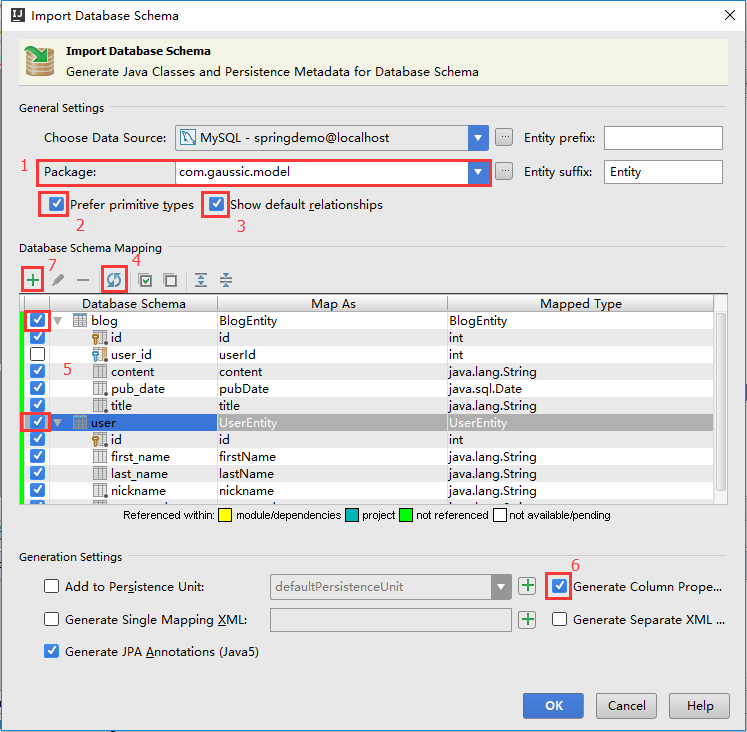
回到如下页面,package填写model包(1),勾选Prefer primitive type使用原始数据类型(2),勾选Show default relationships以显示所有数据库关系(3),再点击刷新按钮(4),将会找到数据库中的两个表,勾选两个数据表(5),再勾选Generate Column Defination以生成每一列的描述信息(6)。选中blog表然后点击“+”号按钮,添加外键关系(7)。
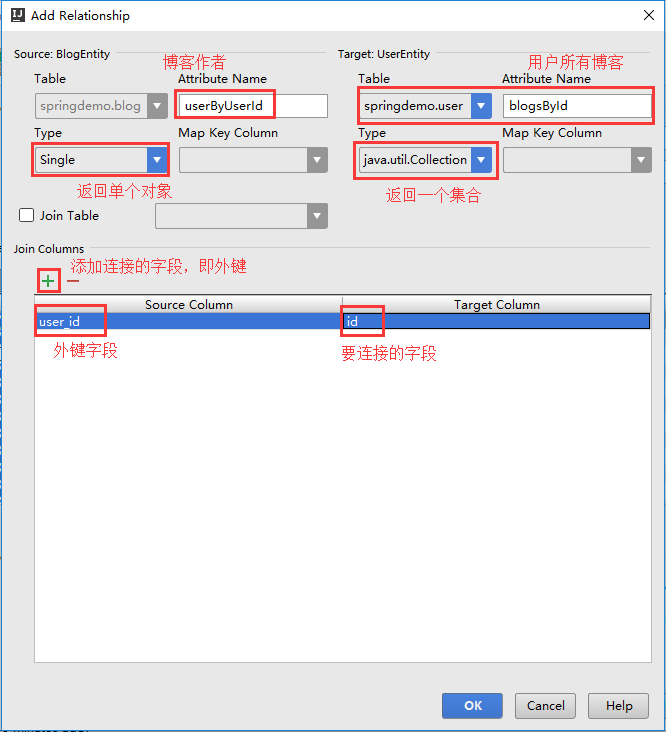
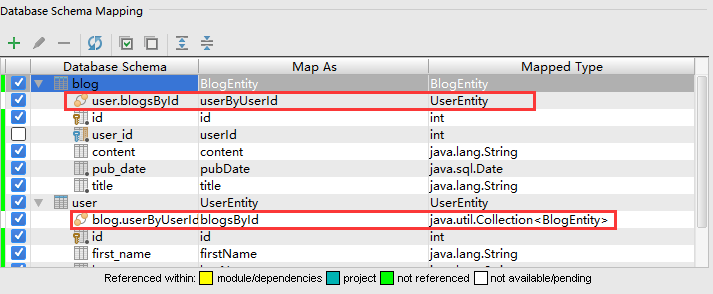
点击OK后,在Database Schema Mapping中可以发现多出了两个关系,如图所示:
再点击OK,稍后,打开model包,可以看到生成了两个Java Bean,在SpringMVC中称为两个实体,它们对应了数据库的两张表:
BlogEntity如下所示(注意把java.sql.Date改为java.util.Date):
package com.gaussic.model;

import javax.persistence.*;
import java.util.Date;

/**
 * Created by dzkan on 2016/3/8.
 */
@Entity
@Table(name = "blog", schema = "springdemo", catalog = "")
public class BlogEntity {
    private int id;
    private String title;
    private String content;
    private Date pubDate;
    private UserEntity userByUserId;

    @Id
    @Column(name = "id", nullable = false)
    public int getId() {
        return id;
    }

    public void setId(int id) {
        this.id = id;
    }

    @Basic
    @Column(name = "title", nullable = false, length = 100)
    public String getTitle() {
        return title;
    }

    public void setTitle(String title) {
        this.title = title;
    }

    @Basic
    @Column(name = "content", nullable = true, length = 255)
    public String getContent() {
        return content;
    }

    public void setContent(String content) {
        this.content = content;
    }

    @Basic
    @Column(name = "pub_date", nullable = false)
    public Date getPubDate() {
        return pubDate;
    }

    public void setPubDate(Date pubDate) {
        this.pubDate = pubDate;
    }

    @Override
    public boolean equals(Object o) {
        if (this == o) return true;
        if (o == null || getClass() != o.getClass()) return false;

        BlogEntity that = (BlogEntity) o;

        if (id != that.id) return false;
        if (title != null ? !title.equals(that.title) : that.title != null) return false;
        if (content != null ? !content.equals(that.content) : that.content != null) return false;
        if (pubDate != null ? !pubDate.equals(that.pubDate) : that.pubDate != null) return false;

        return true;
    }

    @Override
    public int hashCode() {
        int result = id;
        result = 31 * result + (title != null ? title.hashCode() : 0);
        result = 31 * result + (content != null ? content.hashCode() : 0);
        result = 31 * result + (pubDate != null ? pubDate.hashCode() : 0);
        return result;
    }

    @ManyToOne
    @JoinColumn(name = "user_id", referencedColumnName = "id", nullable = false)
    public UserEntity getUserByUserId() {
        return userByUserId;
    }

    public void setUserByUserId(UserEntity userByUserId) {
        this.userByUserId = userByUserId;
    }
}
再看UserEntity:
package com.gaussic.model;

import javax.persistence.*;
import java.util.Collection;

/**
 * Created by dzkan on 2016/3/8.
 */
@Entity
@Table(name = "user", schema = "springdemo", catalog = "")
public class UserEntity {
    private int id;
    private String nickname;
    private String password;
    private String firstName;
    private String lastName;
    private Collection<BlogEntity> blogsById;

    @Id
    @Column(name = "id", nullable = false)
    public int getId() {
        return id;
    }

    public void setId(int id) {
        this.id = id;
    }

    @Basic
    @Column(name = "nickname", nullable = false, length = 45)
    public String getNickname() {
        return nickname;
    }

    public void setNickname(String nickname) {
        this.nickname = nickname;
    }

    @Basic
    @Column(name = "password", nullable = false, length = 45)
    public String getPassword() {
        return password;
    }

    public void setPassword(String password) {
        this.password = password;
    }

    @Basic
    @Column(name = "first_name", nullable = true, length = 45)
    public String getFirstName() {
        return firstName;
    }

    public void setFirstName(String firstName) {
        this.firstName = firstName;
    }

    @Basic
    @Column(name = "last_name", nullable = true, length = 45)
    public String getLastName() {
        return lastName;
    }

    public void setLastName(String lastName) {
        this.lastName = lastName;
    }

    @Override
    public boolean equals(Object o) {
        if (this == o) return true;
        if (o == null || getClass() != o.getClass()) return false;

        UserEntity that = (UserEntity) o;

        if (id != that.id) return false;
        if (nickname != null ? !nickname.equals(that.nickname) : that.nickname != null) return false;
        if (password != null ? !password.equals(that.password) : that.password != null) return false;
        if (firstName != null ? !firstName.equals(that.firstName) : that.firstName != null) return false;
        if (lastName != null ? !lastName.equals(that.lastName) : that.lastName != null) return false;

        return true;
    }

    @Override
    public int hashCode() {
        int result = id;
        result = 31 * result + (nickname != null ? nickname.hashCode() : 0);
        result = 31 * result + (password != null ? password.hashCode() : 0);
        result = 31 * result + (firstName != null ? firstName.hashCode() : 0);
        result = 31 * result + (lastName != null ? lastName.hashCode() : 0);
        return result;
    }

    @OneToMany(mappedBy = "userByUserId")
    public Collection<BlogEntity> getBlogsById() {
        return blogsById;
    }

    public void setBlogsById(Collection<BlogEntity> blogsById) {
        this.blogsById = blogsById;
    }
}
3、配置数据库
既然数据库已经导入了,那么前期准备工作基本完成,还需要进行最终的配置。
首先,打开mvc-dispatcher-servlet.xml,添加下列配置(如果某些地方报错,请选中并按Alt + Insert补全配置):
<!-- 表示JPA Repository所在的包 -->
<jpa:repositories base-package="com.gaussic.repository"/>

<!-- 链接到persistence.xml -->
<bean id="entityManagerFactory" class="org.springframework.orm.jpa.LocalEntityManagerFactoryBean">
    <property name="persistenceUnitName" value="defaultPersistenceUnit"/>
</bean>

<!-- 事务管理 -->
<bean id="transactionManager" class="org.springframework.orm.jpa.JpaTransactionManager">
    <property name="entityManagerFactory" ref="entityManagerFactory"/>
</bean>

<!-- 开启事务管理注解 -->
<tx:annotation-driven transaction-manager="transactionManager"/>
讲解:
(1) jpa:repositories:这一部分涉及到数据库的接口,将在后面详解;
(2)entityManagerFactory:实体管理器工厂,读取persistence.xml配置;
(3)transactionManager:事务管理器,利用entityManager进行事务管理;
(4)tx:annotation-driven:打开事务管理器的注解驱动,可以使用注解的方法操纵数据库。
整体如下所示:
<?xml version="1.0" encoding="UTF-8"?>
<beans xmlns="http://www.springframework.org/schema/beans"
       xmlns:xsi="http://www.w3.org/2001/XMLSchema-instance"
       xmlns:context="http://www.springframework.org/schema/context"
       xmlns:mvc="http://www.springframework.org/schema/mvc"
       xmlns:jpa="http://www.springframework.org/schema/data/jpa"
       xmlns:tx="http://www.springframework.org/schema/tx"
       xsi:schemaLocation="http://www.springframework.org/schema/beans http://www.springframework.org/schema/beans/spring-beans.xsd
       http://www.springframework.org/schema/context http://www.springframework.org/schema/context/spring-context.xsd
       http://www.springframework.org/schema/mvc http://www.springframework.org/schema/mvc/spring-mvc.xsd
       http://www.springframework.org/schema/data/jpa http://www.springframework.org/schema/data/jpa/spring-jpa.xsd
       http://www.springframework.org/schema/tx http://www.springframework.org/schema/tx/spring-tx.xsd">

    <!--指明 controller 所在包,并扫描其中的注解-->
    <context:component-scan base-package="com.gaussic.controller"/>

    <!-- 静态资源(js、image等)的访问 -->
    <mvc:default-servlet-handler/>

    <!-- 开启注解 -->
    <mvc:annotation-driven/>

    <!--ViewResolver 视图解析器-->
    <!--用于支持Servlet、JSP视图解析-->
    <bean id="jspViewResolver" class="org.springframework.web.servlet.view.InternalResourceViewResolver">
        <property name="viewClass" value="org.springframework.web.servlet.view.JstlView"/>
        <property name="prefix" value="/WEB-INF/pages/"/>
        <property name="suffix" value=".jsp"/>
    </bean>

    <!-- 表示JPA Repository所在的包 -->
    <jpa:repositories base-package="com.gaussic.repository"/>

    <!-- 链接到persistence.xml -->
    <bean id="entityManagerFactory" class="org.springframework.orm.jpa.LocalEntityManagerFactoryBean">
        <property name="persistenceUnitName" value="defaultPersistenceUnit"/>
    </bean>

    <!-- 事务管理 -->
    <bean id="transactionManager" class="org.springframework.orm.jpa.JpaTransactionManager">
        <property name="entityManagerFactory" ref="entityManagerFactory"/>
    </bean>

    <!-- 开启事务管理注解 -->
    <tx:annotation-driven transaction-manager="transactionManager"/>
</beans>
下面,填充persistence.xml,将persistence-unit的name改为 defaultPersistenceUnit。在下面的文件中,我添加了一些更为详细的配置:
<?xml version="1.0" encoding="UTF-8"?>
<persistence xmlns="http://java.sun.com/xml/ns/persistence" version="2.0">

    <persistence-unit name="defaultPersistenceUnit"  transaction-type="RESOURCE_LOCAL">
        <provider>org.hibernate.ejb.HibernatePersistence</provider>
        <properties>
            <!-- 使用MySQL方言 -->
            <property name="hibernate.dialect" value="org.hibernate.dialect.MySQL5Dialect"/>
            <!-- 数据库连接的URL地址 -->
            <property name="hibernate.connection.url"
                      value="jdbc:mysql://localhost:3306/springdemo"/>
            <!-- 数据库连接的驱动 -->
            <property name="hibernate.connection.driver_class" value="com.mysql.jdbc.Driver"/>
            <!-- 数据库连接的用户名 -->
            <property name="hibernate.connection.username" value="root"/>
            <!-- 数据库连接的密码 -->
            <property name="hibernate.connection.password" value="111111"/>
            <!-- 显示SQL语句 -->
            <property name="hibernate.show_sql" value="true"/>

            <property name="hibernate.connection.useUnicode" value="true"/>
            <property name="hibernate.connection.characterEncoding" value="UTF-8"/>

            <!-- 在显示SQL语句时格式化语句 -->
            <property name="hibernate.format_sql" value="true"/>
            <property name="hibernate.use_sql_comments" value="false"/>
            <!-- 自动输出schema创建DDL语句 -->
            <property name="hibernate.hbm2ddl.auto" value="update"/>

            <!-- 数据库连接超时后自动重连 -->
            <property name="hibernate.connection.autoReconnect" value="true"/>
            <property name="connection.autoReconnectForPools" value="true"/>
            <property name="connection.is-connection-validation-required" value="true"/>
        </properties>
    </persistence-unit>
</persistence>
现在,重新启动tomcat,如果没有报错,说明数据库已经配置完成了,接下来就要讲解数据库的相关开发工作。
更新:
阅读评论发现许多同学的persistence.xml出现了问题,因为出现问题的原因可能有很多,如果没有完全的报错以及代码的话,我这边很难解决问题,一个办法就是在GitHub Issues上面提问并贴出代码,我这边尽量解答。另一个办法就是下载最新的代码运行看有没有什么问题。
最后一个办法,尝试另外一种配置方法,无需persistence.xml,直接在mvc-dispatcher-servlet.xml中配置数据库,如下所示:
<bean id="entityManagerFactory" class="org.springframework.orm.jpa.LocalContainerEntityManagerFactoryBean">
    <property name="persistenceUnitName" value="defaultPersistenceUnit"/>
    <property name="packagesToScan" value="com.gaussic.model" />
    <property name="jpaVendorAdapter">
        <bean class="org.springframework.orm.jpa.vendor.HibernateJpaVendorAdapter"/>
    </property>
    <property name="jpaProperties">
        <props>
            <prop key="hibernate.connection.driver_class">com.mysql.jdbc.Driver</prop>
            <prop key="hibernate.connection.url">jdbc:mysql://localhost:3306/springdemo</prop>
            <prop key="hibernate.connection.username">root</prop>
            <prop key="hibernate.connection.password">111111</prop>
            <prop key="hibernate.show_sql">false</prop>
            <prop key="hibernate.connection.useUnicode">true</prop>
            <prop key="hibernate.connection.characterEncoding">UTF-8</prop>
            <prop key="hibernate.format_sql">true</prop>
            <prop key="hibernate.use_sql_comments">true</prop>
            <prop key="hibernate.hbm2ddl.auto">validate</prop>
            <prop key="hibernate.connection.autoReconnect">true</prop>
            <prop key="hibernate.dialect">org.hibernate.dialect.MySQL5Dialect</prop>
            <prop key="connection.autoReconnectForPools">true</prop>
            <prop key="connection.is-connection-validation-required">true</prop>
        </props>
    </property>
</bean>
删除persistence.xml,直接修改entityManagerFactory bean为如上图所示。这个方法可以拜托persistence.xml的困扰,但是有一个小小的问题,如果之前没有添加Java EE Persistence这个框架的,文中的Persistence工具栏将不会显示。一个解决办法就是,先修改mvc-dispatcher-servlet,然后再添加Java EE Persistence框架,等能够看到Persistence工具栏后,删除persistence.xml,余下的步骤可以继续操作。
转载请注明出处:Gaussic(一个致力于AI研究却不得不兼顾项目的研究生)。