转载请注明出处:http://blog.csdn.net/horkychen (以前写的资料,不准备翻了。)
Index
1. Introduction
2. Purpose
3. Basic concepts of Unit Test
3.1 Suite
3.2 Test Case
4. Target programming languages
5. Target Unit Test Framework
6. Google Test
6.1 Google Test for Windows
6.1.1 Install the Google Test
6.1.2 Apply Google Test in your project
6.2 Google Test for Mac OS
6.2.1 Install the Google Test
6.2.2 Apply Google Test in your project
6.3 Supported Test Macros
7. CPPUnit
7.1 CPPUnit for Windows DDK
7.1.1 Install the CPPUnit
7.1.2 Create new project in WDK.
7.2 Supported Test Macros
8. OCUnit
8.1 Overview
8.2 Sample to add unit test
8.3 Supported Test Macros
9. Guideline to apply unit test
9.1 While one bug is found (Core module)
9.2 While new design is requested
10. Reference
1. Introduction
Different platform has different Unit Test framework, which depends on the development mythology.
In xUnit framework, JUnit is best popular one, it supports many powerful features to allow programmer could write test case easily. For other unit testing framework, they all try to keep same architecture with JUnit, so all of them have many core value and common concepts.
2. Purpose
Application of Unit Test could improve the development quality entirely. The document is used to introduce how to apply unit test in the project
, and help to write testing case easily in your project.
To apply Unit Test as regression testing is useful for current situation. While there are some bugs was found in core module, so the unit test is suggested to create regression testing. For UI operation, that could be identified as block box issue and test with Automatic Testing Mechanical.
Unit Test will be integrated with main project and build together. The unit test will be modified while new core issue is found. For some testing case will generate output files, that need confirmation manually. Anyway, that won’t affect the unit test application.
In this document, three unit test framework are introduced. Google Test and OCUnit is preferred for generally testing purpose. For Mac OS, even though XCode provide CPlusUnit as default C++ Unit Test framework, Google Test still is preferred for C++ Unit Test, that’s because Google Test has qualified maintenance from Google, and more useful links and documentation on Internet. The most important point, Google Test has better platform independent capability.
3. Basic concepts of Unit Test
3.1 Suite
One suite involves one or more test cases. Generally, it has below running cycle:

“Set up” is called before running of each test case to initialize or reset the testing target.
“Tear down” is called after running of each test case to clear testing target, such as allocated memory or instances.
3.2 Test Case
One test case is implemented as a single function in suite, it will perform one or more testing in a series. Each unit testing frame supplies many assertions to check the performing result.
Below is a table which list several test macros in Google Test, OCUnit and CPPUnit:
|
Google Test
|
OCUnit
|
CPPUnit
|
|
EXPECT_EQ
|
STAssertEquals
|
CPPUNIT_ASSERT_EQUAL
|
|
EXPECT_TRUE
|
STAssertTrue
|
CPPUNIT_ASSERT
|
|
EXPECT_FALSE
|
STAssertFalse
|
CPPUNIT_ASSERT_ASSERTION_FAIL
|
|
EXPECT_THROW
|
STAssertThrows
|
CPPUNIT_ASSERT_THROW
|
|
EXPECT_FLOAT_EQ
|
STAssertEqualsWithAccuracy
|
CPPUNIT_ASSERT_DOUBLES_EQUAL
|
4. Target programming languages
C/C++
Objective – C
5. Target Unit Test Framework
OCUnit for Objective-C (Cocoa Framework)
6. Google Test
Google testing framework is a C/C++ unit testing framework which be hold by Google. That is base on xUnit architecture, and supports automatic test discovery.
Google Test should be downloaded from its website and compiled by developer own. There are two libraries and several header files are generated for further application.
gtest library (gtest.lib in Windows, and libgtest.a in Mac OS)
This is the main library of Google Test framework. All testing project should link with this library.
gtest_main library (gtest_main.lib in Windows, and libgtest_main.a in Mac OS)
This library provides the main function, so developer won’t implement it again. The main function is very simple also; you could find codes it in gtest_main.c.
There is only one header file needs to include in source code, below line should be added in testing unit:
#include <gtest/gtest.h>
*Remember to specify the search path for your header files.
6.1 Google Test for Windows
6.1.1 Install the Google Test
Step 1. Download the source code and extract all files.
Step 2. Open the Visual Studio solution inmsvc subfolder in downloaded gtest. Finish the converting wizard if open with newer Visual Studio.
Step 3. Compilegtest and gtest_main project. Below files are generated in gtest/msvc/gtest/Release folder:
gtest.lib,
gtest_main.lib
And, header files are placed in gtest/include folder. For easily use, you could put them together as below structure:
gtest/
/include
/lib
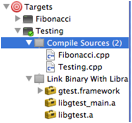
6.1.2 Apply Google Test in your project
One Fibonacci number program will be created to introduce application of Google Test. For implementation of Fibonacci number will be ignored, we just create one command line tool and name source file and class as Fibonacci. Below steps is shown how to add Google Test base on this project.
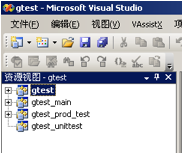
Step 1. Add one new Win32 Console project in the solution, and name as “UnitTest”. Remove the main function in UnitTest.cpp.
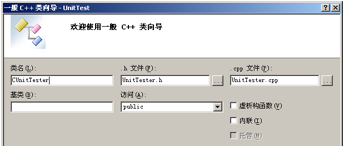
Step 2. Add Fibonacci.cpp in new project, and create new Class name as CUnitTester as below:
Step 3. Set the project properties as below:
Additional including path: C:\project\gtest\include
Additional library path: C:\project\gtest\lib
Additional dependencies: gtest.lib gtest_main.lib
Runtime Library: /MT
*Special note: Runtime Library should be kept same as gtest.
The testing project should link to specified release version or debug version Google Test libraries.
Step 4. Edit the UnitTester.h as below:
#include
"Fibonacci.h"
#include
<gtest/gtest.h>
class
CUnitTester:publictesting::Test
{
protected
:
CFibonacci * fib;
protected
:
virtual void SetUp()
{
fib= new CFibonacci();
}
virtual void TearDown()
{
delete fib;
}
};
Step 5. Edit the UnitTester.cpp as below:
#include
"StdAfx.h"
#include
"UnitTester.h"
TEST_F
(CUnitTester,Negative)
{
EXPECT_EQ( 1, fib->GetFibonacci(-1) );
}
TEST_F
(CUnitTester,TestForThree)
{
EXPECT_EQ( 3, fib->GetFibonacci(3) );
}
*The source code is described to use SetUp and TearDown, for easy purpose, below source codes is work fine also:
1. Empty the UnitTester.h
2. Edit UnitTester.cpp as below:
#include
"Fibonacci.h"
#include
<gtest/gtest.h>
TEST
(FibonacciTest,Negative)
{
CFibonacci * fib = new CFibonacci();
EXPECT_EQ( 1, fib->GetFibonacci(-1) );
delete fib;
}
TEST
(FibonacciTest,TestForThree)
{
CFibonacci * fib = new CFibonacci();
EXPECT_EQ( 3, fib->GetFibonacci(3) );
delete fib;
}
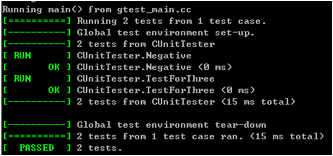
Step 6. Build the testing project, and check the result:
6.2 Google Test for Mac OS
6.2.1 Install the Google Test
Step 1. Download the Google Test from its download website:
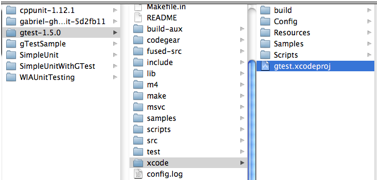
Step 2. Open XCode project file in its xcode subfolder:
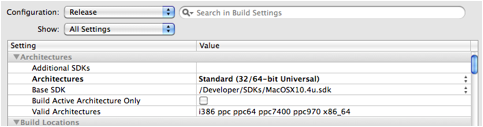
Step 3. Set below three targets as Universal binary with Mac OS 10.4u SDK for release configuration.
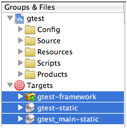
*That will be easy to use for most of our projects. Below is a sample setting:
Step 4. Build out one framework and two static libraries.

Copy gtest.framework to /Library/Frameworks, copy two static libraries to one specified folder, or /usr/local/lib in each SDK (All of them are placed in /Developer/SDKs).
Now, Google Test is ready to use.
6.2.2 Apply Google Test in your project
One Fibonacci number program will be created to introduce application of Google Test. For implementation of Fibonacci number will be ignorred, we just create one command line tool and name source file and class as Fibonacci. Below steps is shown how to add Google Test base on this project.
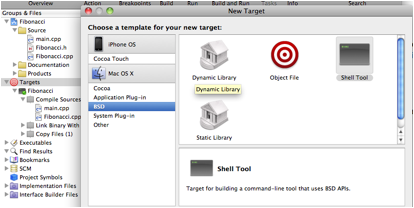
Step 1. Add new “BSD - Shell Tool” target in the project , and name as Testing:
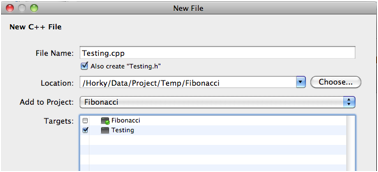
Step 2. Create new group “UnitTest” in source tree, and add new C++ file and name as Testing.
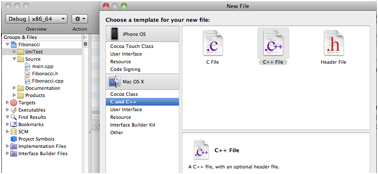
Assign these new file to be included in “Testing” target only as below:
Step 3. Drag below files into the project, and assign for Testing Target only.
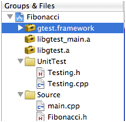
Drag Fibonacci.cpp to Testing target also. Finally, the Testing target should include below files:
Step 4. Edit the Testing.h as below:
#include
"Fibonacci.h"
#include
<gtest/gtest.h>
class
FibTest :
public
testing::
Test
{
protected
:
Fibonacci
*
fib
;
protected
:
virtual
void
SetUp()
{
fib
=
new
Fibonacci
();
}
virtual
void
TearDown()
{
delete
fib
;
}
};
Step 5. Edit Testing.cpp as below:
#include
"Testing.h"
TEST_F(
FibTest
,Negative)
{
EXPECT_EQ
(
1
, fib->
GetFibonacci
(-
1
) );
}
TEST_F(
FibTest
,TestForThree)
{
EXPECT_EQ
(
3
, fib->
GetFibonacci
(
3
) );
}
int
main(
int
argc,
char
**argv)
{
::testing::
InitGoogleTest
(&argc, argv);
return
RUN_ALL_TESTS
();
}
If we won’t like to use these SetUp and TearDown functions, we could use below source codes:
a.
Clear Testing.h.
b.
Edit Testng.cpp as below:
#include
"Fibonacci.h"
#include
<gtest/gtest.h>
TEST(FibonacciTest,Negative)
{
Fibonacci
* fib =
new
Fibonacci
();
EXPECT_EQ
(
1
, fib->
GetFibonacci
(-
1
) );
delete
fib;
}
TEST(FibonacciTest,TestForThree)
{
Fibonacci
* fib =
new
Fibonacci
();
EXPECT_EQ
(
3
, fib->
GetFibonacci
(
3
) );
delete
fib;
}
int
main(
int
argc,
char
**argv)
{
::
testing
::
InitGoogleTest
(&argc, argv);
return
RUN_ALL_TESTS
();
}
*If we won’t add main function by our own, perhaps below error will be happened:
This test program did NOT call ::testing::InitGoogleTest before calling RUN_ALL_TESTS(). Please fix it.
Step 6. Run it and check the result.
[==========] Running 2 tests from 1 test case.
[----------] Global test environment set-up.
[----------] 2 tests from FibonacciTest
[ RUN ] FibonacciTest.Negative
[ OK ] FibonacciTest.Negative (0 ms)
[ RUN ] FibonacciTest.TestForThree
[ OK ] FibonacciTest.TestForThree (0 ms)
[----------] 2 tests from FibonacciTest (0 ms total)
[----------] Global test environment tear-down
[==========] 2 tests from 1 test case ran. (0 ms total)
[ PASSED ] 2 tests.
6.3 Supported Test Macros
Google Test allows use EXPECT_XX or ASSERT_XX for test macros.
|
Category
|
Macro
|
Description
|
|
Equality Tests
|
EXPECT_EQ(expected,actual)
|
Tests that expected == actual
|
|
EXPECT_NE(v1, v2)
|
Tests that v1 != v2
|
|
|
EXPECT_LT(v1, v2)
|
Tests that v1 < v2
|
|
|
EXPECT_LE(v1, v2)
|
Tests that v1 <= v2
|
|
|
EXPECT_GT(v1, v2)
|
Tests that v1 > v2
|
|
|
EXPECT_GE(v1, v2)
|
Tests that v1 >= v2
|
|
|
C String
|
EXPECT_STREQ(s1, s2)
|
Tests that s1 == s2
|
|
EXPECT_STRNE(s1, s2)
|
Tests that s1 != s2
|
|
|
EXPECT_STRCASEEQ(s1, s2)
|
Tests that s1 == s2, ignoring case
|
|
|
EXPECT_STRCASENE(s1, s2)
|
Tests that s1 != s2, ignoring case
|
|
|
Float & Double
|
EXPECT_FLOAT_EQ(expected,actual)
|
Tests that two float values are almost equal.
|
|
EXPECT_NEAR(v1,v2,abs_error)
|
Tests that v1 and v2 are within the given distance to each other.
|
|
|
EXPECT_DOUBLE_EQ(expected,actual)
|
Tests that two double values are almost equal.
|
|
|
Exception Tests
|
EXPECT_THROW(statement,
expected_exception)
|
Tests that the statement throws the expected exception.
|
|
EXPECT_NO_THROW(statement)
|
Tests that the statement doesn't throw any exception.
|
|
|
EXPECT_ANY_THROW(statement)
|
Tests that the statement throws an exception.
|
|
|
Boolean
|
EXPECT_TRUE(condition)
|
Tests that the condition is true.
|
|
EXPECT_FALSE(condition)
|
Tests that the condition is false.
|
For more details, please refer to gtest/gtest.h.
7. CPPUnit
CPPUnit is a powerful unit testing framework for C/C++, and it could provide DLL testing mechnisam to support widely testing purpose. It also could support DDK environment, but the environment setup is more complex than other application.
Here, only CPPUnit for Windows DDK will be introduced.
7.1 CPPUnit for Windows DDK
7.1.1 Install the CPPUnit
CPPUnit should be built with the specified WDK at first.
1. Setup the environment of Visual Studio for WDK
A. Visual Studio -> Tools -> Options -> Projects and Solutions -> VC++ Directories. Show directories for:
Include files
. Add below list:
C:\WinDDK\6801.0\inc\api
C:\WinDDK\6801.0\inc\crt
C:\WinDDK\6801.0\inc\ddk
C:\WinDDK\6801.0\inc\api\crt\stl60
B. Same setting UI.
. Show directories for:
Library files
. Add below list:
C:\WinDDK\6801.0\Lib\Crt\i386
C:\WinDDK\6801.0\Lib\wnet\i386 <- For Windows 2003 only
NOTE: Base on these settings, Visual Studio could build the WDK project also.
2. Open cppunit project and change below settings:
Project Properties -> C/C++ -> Advanced ->Calling Convention should be "__stdcall(/Gz)"
*Remember target application should have same "Calling Convention" setting.
*WDK compiler set the "Calling Convention" to stdcall. (And I don't know how to change it)
Project Properties -> C/C++ -> Code Generation -> Runtime Library should be "Multi-threaded (/MT)"
*Note that different linking mode has different settings.
3. Build "cppunit" solutions in Release mode. (Debug mode is unnecessary.)
*Remember to copy one to specified folder for WDK using only.
7.1.2 Create new project in WDK.
1. Add below items in source files
CPPUNITDIR=E:\project\cppunit <- Constant definition
TARGETNAME=UnitRunner <- Target application name
TARGETPATH=obj
TARGETTYPE=PROGRAM
UMTYPE=console
UMENTRY=main
USE_LIBCMT = 1 <- To use standard runtime library for /MT. DO NOT USE MSVCRT, that is for /MD
USE_IOSTREAM =1
USE_STL=1 <- The cppunit is depended on STL library
STL_VER=60 <- This version should keep same as cppunit. cppunit(VS2005) should set this item to 60.
USE_NATIVE_EH=1
MSC_OPTIMIZATION=/Od /Oi
_NT_TARGET_VERSION = 0x0501 <-Define the target operation system. This is same as testing platform.
C_DEFINES=$(C_DEFINES) /D_STL60_
2. Add include path of CPPUnit
INCLUDES=$(DDK_INC_PATH);$(INCLUDES);$(CPPUNITDIR)\include;
3. Add cppunit library in LIB list:
TARGETLIBS=$(TARGETLIBS) \
......
$(CPPUNITDIR)\lib\WDK\cppunit.lib
*Sometime, you may need other libraries, add them here.
4. Add source files in sources and start building.
Below are sample codes:
main.cpp
#include <cppunit/BriefTestProgressListener.h>
#include <cppunit/CompilerOutputter.h>
#include <cppunit/extensions/TestFactoryRegistry.h>
#include <cppunit/TestResult.h>
#include <cppunit/TestResultCollector.h>
#include <cppunit/TestRunner.h>
extern "C"
{
int __cdecl main( int argc, char* argv[] )
{
// Create the event manager and test controller
CPPUNIT_NS::TestResult controller;
// Add a listener that colllects test result
CPPUNIT_NS::TestResultCollector result;
controller.addListener( &result );
// Add a listener that print dots as test run.
CPPUNIT_NS::BriefTestProgressListener progress;
controller.addListener( &progress );
// Add the top suite to the test runner
CPPUNIT_NS::TestRunner runner;
runner.addTest( CPPUNIT_NS::TestFactoryRegistry::getRegistry().makeTest() );
runner.run( controller );
// Print test in a compiler compatible format.
CPPUNIT_NS::CompilerOutputter outputter( &result, CPPUNIT_NS::stdCOut() );
outputter.write();
return result.wasSuccessful() ? 0 : 1;
}
}
TestCase.h
#include <cppunit/extensions/HelperMacros.h>
class ScanAPITestSuite : public CPPUNIT_NS::TestFixture
{
CPPUNIT_TEST_SUITE( ScanAPITestSuite );
CPPUNIT_TEST( InitializeTesting );
CPPUNIT_TEST_SUITE_END();
protected:
CPMXScanAPI * m_pScanAPI;
public:
ScanAPITestSuite();
public:
void setUp();
void tearDown();
protected:
void InitializeTesting();
};
TestCase.cpp
#include <cppunit/config/SourcePrefix.h>
#include "TestCase.h"
CPPUNIT_TEST_SUITE_REGISTRATION( ScanAPITestSuite );
/*!
@brief Description:
Test case for initializing.
*/
void ScanAPITestSuite::InitializeTesting()
{
HRESULT hr=S_OK;
hr = CreatePMXScanner(&m_pScanAPI,KILO_WIA_PROJECT,TEXT("USBScan001"));
CPPUNIT_ASSERT_MESSAGE("CreatePMXScanner won't be failed!", S_OK==hr);
hr = m_pScanAPI->PMXScanner_Initialize();
CPPUNIT_ASSERT_MESSAGE("PMXScanner_Initialize won't be failed!", S_OK==hr);
}
/*!
@brief Description:
Test case for PMXScanner_GetTopPropertyInfo function.
*/
void ScanAPITestSuite::Check_GetTopPropertyInfo()
{
PTOP_ITEM_INFORMATION pTopItem = new TOP_ITEM_INFORMATION;
InitializeTesting();
m_pScanAPI->PMXScanner_GetTopPropertyInfo(pTopItem);
CPPUNIT_ASSERT(100 == pTopItem->Brightness.lMax);
CPPUNIT_ASSERT(-100 == pTopItem->Brightness.lMin);
CPPUNIT_ASSERT(100 == pTopItem->Contrast.lMax);
CPPUNIT_ASSERT(-100 == pTopItem->Contrast.lMin);
CPPUNIT_ASSERT(100 == pTopItem->Threshold.lMax);
CPPUNIT_ASSERT(-100 == pTopItem->Threshold.lMin);
CPPUNIT_ASSERT(600 == pTopItem->XResolution.lMax);
CPPUNIT_ASSERT(75 == pTopItem->XResolution.lMin);
CPPUNIT_ASSERT(150 == pTopItem->XResolution.lNom);
CPPUNIT_ASSERT(600 == pTopItem->YResolution.lMax);
CPPUNIT_ASSERT(75 == pTopItem->YResolution.lMin);
CPPUNIT_ASSERT(150 == pTopItem->YResolution.lNom);
delete pTopItem;
}
/* Below are helper functions*/
ScanAPITestSuite::ScanAPITestSuite()
{
m_pScanAPI = NULL;
}
void ScanAPITestSuite::setUp()
{
if(m_pScanAPI)
{
delete m_pScanAPI;
m_pScanAPI = NULL;
}
}
void ScanAPITestSuite::tearDown()
{
if(m_pScanAPI)
{
delete m_pScanAPI;
m_pScanAPI = NULL;
}
}
*Note: The building target should same as testing platform. If you want run the unit testing on Win XP, you should define the target to Windows XP.
7.2 Supported Test Macros
|
Macro
|
Description
|
|
Assertions that a condition is true.
|
|
|
Assertion with a user specified message.
|
|
|
Fails with the specified message.
|
|
|
Asserts that two values are equals.
|
|
|
Asserts that two values are equals, provides additional messafe on failure.
|
|
|
Macro for primitive value comparisons.
|
|
|
Asserts that the given expression throws an exception of the specified type.
|
|
|
Asserts that the given expression does not throw any exceptions.
|
|
|
Asserts that an assertion fails.
|
|
|
Asserts that an assertion passes.
|
8. OCUnit
OCUnit the standard Objective-C Unit Test framework for Mac OS and iOS development, that is extedned from SenTesting Framework which is written by Sen:Te. Due to it is bundled with XCode, developer could use it directly without any else installation.
8.1 Overview
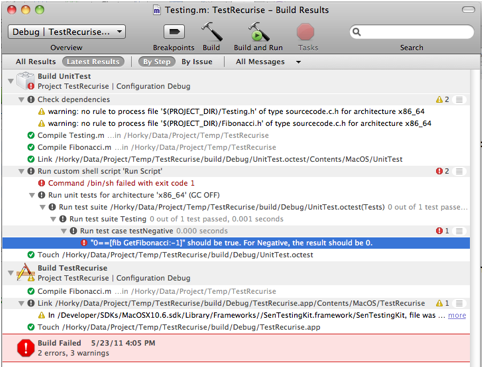
OCUnit works in different way with other Unit Test framework, all suites and cases are runned after building, so all unexcepted result will be shown as compiling errors.
OCUnit is similar as Google Test without main function, it will be built as one bundle with .octest extention, and run with developer tools – RunUnitTests, which is placed in /Developer/Tools folder.
8.2 Sample to add unit test
Below is a sample code to generate Fibonacci numbers. There are three source files:
Fibonacci.h, Fibonacci.m and main.m
The implementation of this project is ignored. Below steps are shown to add unit test base on this project.
Step 1. Create new group “UnitTest” in source tree, and add new source file as below:
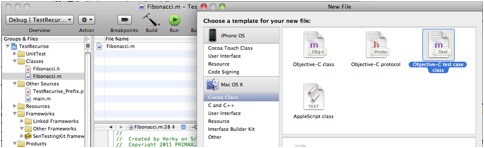
Step 2. Name new class as Testing, and finish with wizard.
Step 3. Add below codes for Testing.h
#import
<SenTestingKit/SenTestingKit.h>
#import
"Fibonacci.h"
@interface
Testing : SenTestCase {
Fibonacci
*
fib
;
}
-(
void
)testNegative;
@end
Step 4. Add below codes for Testing.m
#import
"Testing.h"
@implementation
Testing
-(
void
)setUp
{
fib
= [[
Fibonacci
alloc
]
init
];
}
-(
void
)tearDown
{
[
fib
release
];
}
-(
void
)testNegative
{
STAssertTrue
(
1
==[
fib
GetFibonacci
:-
1
],
@"For Negative, the result should be 0."
);
}
@end
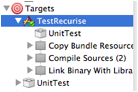
Step 5. Add new unit test bundle target.
Create new unit test bundle as below:

And drag Fibonacci.h, Fibonacci.m, Testing.h and Testing.m into this target as below:

*And remove Testing.m from original target. You also could create the target first, and then add new file for it only. That method was introduced in 6.2.
Step 6. Drag the new target into our own target to merge it with the project. Then the unit testing bundle will be built first while building the project.
Step 7. Try to build the project and check the message for failed case:
8.3 Supported Test Macros
Below is the table to list major supported test macros:
|
Category
|
Macro
|
Description
|
|
Equality Tests
|
STAssertEqualObjects
|
Fails the test case when two objects are different.
|
|
STAssertEquals
|
Fails the test case when two values are different.
|
|
|
STAssertEqualsWithAccuracy
|
Fails the test case when the difference between two values is greater than a given value.
|
|
|
Nil Tests
|
STAssertNil
|
Fails the test case when a given expression is not nil
|
|
STAssertNotNil
|
Fails the test case when a given expression is nil.
|
|
|
Boolean Tests
|
STAssertTrue
|
Fails the test case when a given expression is false.
|
|
STAssertFalse
|
Fails the test case when a given expression is true.
|
|
|
Exception Tests
|
STAssertThrows
|
Fails the test case when an expression doesn’t raise an exception.
|
|
STAssertThrowsSpecific
|
Fails the test case when an expression doesn’t raise an exception of a particular class.
|
|
|
STAssertThrowsSpecificNamed
|
Fails the test case when an expression doesn’t raise an exception of a particular class with a given name.
|
|
|
STAssertNoThrow
|
Fails the test case when an expression raises an exception.
|
|
|
STAssertNotThrowsSpecific
|
Fails the test case when an expression raises an exception of a particular class.
|
|
|
STAssertNotThrowsSpecificNamed
|
Fails the test case when an expression doesn’t raise an exception of a particular class with a given name.
|
|
|
STAssertTrueNoThrow
|
Fails the test case when an expression is false or raises an exception.
|
|
|
STAssertFalseNoThrow
|
Fails the test case when an expression is true or raises an exception.
|
For more details, please refer to <<Unit-Test Result Macro Reference >> from Apple Developer Documentation.
9. Guideline to apply unit test
The major problem to apply unit test is how to balance it with general development. The benefit could not be turned up if unit test still be kept in discussion. That’s difficult to apply mutual Unit Test at first time. The unit test should be applied step by step, and implement regression test is a good start point.
Generally, there are two steps to think about one unit test case.
1.
The key point is identifying the core module, which should be low coupling with other modules.
2.
To identify the testing interface and all available testing conditions. (To find when it could not work.)
Below are correct situations to apply unit test:
9.1 While one bug is found (Core module)
Try to think about to add one test case to keep the correction, and remember to run the test case while building.
Think about below questions:
Why this error happened?
How to ensure similar errors won’t happen again?
9.2 While new design is requested
Try to think about involving unit test for your new design; though one simple testing suite will be designed.
At this point, it is a very good chance to think about to implement unit test. Think about below questions:
How many classes/objects or functions in the new design?
What major interface or functions for each of them?
How to ensure them won’t make mistake?
Which classes/objects or functions could be picked up for unit test?
What will you get from unit test?
10. Reference
1.
便利的开发工具
CppUnit
快速使用指南
2.
Test Driving Your Code with OCUnit
3.
玩转
Google
开源
C++
单元测试框架
Google Test
系列
4.
单元测试之
JUnit
秘籍专题
http://tech.it168.com/zt/Junit/index.html
5.玩转Google开源C++单元测试框架 http://www.cnitblog.com/zouzheng/archive/2009/09/28/61614.html