最近在用百词斩这个网站来学单词,感觉很不错,就是在回顾单词列表的时候只有单词和意思,却没有读音。感觉很不方便,思来思去,想到了Chrome插件可以胜任这个工作,于是小小的研究了一下。
Chrome插件的本质就是一个由 manifest.json 文件和插件所需要的图片,css,html,js资源组成的一个web页面,只是和传统的web页面不同的,它是以chrome浏览器为宿主运行的一个web程序。
Chrome插件可以与Web页面交互,也可以通过content script或cross-origin XMLHttpRequests与服务器交互。还可以访问浏览器提供的内部功能,例如标签或书签等。同时也可以以browser action或page action的形式在浏览器界面上展现出来。

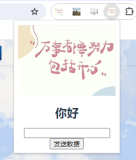
上图中工具栏所显示的电脑管家的插件就是采用了browser action,而在地址栏最后的那个T型图标(公告终结者)则是采用了page action和content script注入到页面中的。每个插件最多可以有一个browser action或page action。当插件的图标是否显示出来是取决于单个的页面时,应当选择page action;当其它情况时可以选择browser action。


上面第一副图是原图,第二幅图则是采用了content script来改变了页面的内容。content script可以很轻松地给页面注入脚本。这样就可以实现个性化的操作了。
下面是一个简单的manifest.json(manifest.json文件格式需为utf-8):
{
    "name": "我的第一个Chrome插件",
    "version": "1.0.0",
    "manifest_version": 2,
    "icons": {
        "48": "logo_avatar.png"
    }
}
这就是最简单的 manifest.json文件了。在扩展程序中选择“正在开发的扩展程序”,选择manifest.json和图片所在的目录就可以看到如下效果:

看起来是不是很简单的呢。当然现在它什么功能也没有,如果你想要开发的话,需要了解更多。可以点击这里。
附一个简单的小例子:
manifest.json文件
{
    "name": "我的第一个Chrome插件",
    "version": "1.0.1",
    "manifest_version": 2,
    "description": "我的第一个Chrome插件",
    "icons": {
        "48": "logo_avatar.png"
    },
    "browser_action": {
      "default_icon": "icon.png",
      "default_popup": "popup.html"
    }
}
popup.html
<!doctype html>
<html>
  <head>
    <title>Getting Started Extension's Popup</title>
    <style>
      body {
        min-width: 357px;
        overflow-x: hidden;
      }

	      img {
	        margin: 5px;
	        border: 2px solid black;
	        vertical-align: middle;
	        width: 75px;
	        height: 75px;
	      }
	    </style>
	    <script src="popup.js"></script>
	  </head>
	  <body>
	  </body>
	</html>
popup.js
// Copyright (c) 2012 The Chromium Authors. All rights reserved.
// Use of this source code is governed by a BSD-style license that can be
// found in the LICENSE file.

/**
 * Global variable containing the query we'd like to pass to Flickr. In this
 * case, kittens!
 *
 * @type {string}
	 */
	var QUERY = 'kittens';

	var kittenGenerator = {
	  /**
	   * Flickr URL that will give us lots and lots of whatever we're looking for.
	   *
	   * See http://www.flickr.com/services/api/flickr.photos.search.html for
	   * details about the construction of this URL.
	   *
	   * @type {string}
	   * @private
	   */
	  searchOnFlickr_: 'https://secure.flickr.com/services/rest/?' +
	      'method=flickr.photos.search&' +
	      'api_key=90485e931f687a9b9c2a66bf58a3861a&' +
	      'text=' + encodeURIComponent(QUERY) + '&' +
	      'safe_search=1&' +
	      'content_type=1&' +
	      'sort=interestingness-desc&' +
	      'per_page=20',

	  /**
	   * Sends an XHR GET request to grab photos of lots and lots of kittens. The
	   * XHR's 'onload' event is hooks up to the 'showPhotos_' method.
	   *
	   * @public
	   */
	  requestKittens: function() {
	    var req = new XMLHttpRequest();
	    req.open("GET", this.searchOnFlickr_, true);
	    req.onload = this.showPhotos_.bind(this);
	    req.send(null);
	  },

	  /**
	   * Handle the 'onload' event of our kitten XHR request, generated in
	   * 'requestKittens', by generating 'img' elements, and stuffing them into
	   * the document for display.
	   *
	   * @param {ProgressEvent} e The XHR ProgressEvent.
	   * @private
	   */
	  showPhotos_: function (e) {
	    var kittens = e.target.responseXML.querySelectorAll('photo');
	    for (var i = 0; i < kittens.length; i++) {
	      var img = document.createElement('img');
	      img.src = this.constructKittenURL_(kittens[i]);
	      img.setAttribute('alt', kittens[i].getAttribute('title'));
	      document.body.appendChild(img);
	    }
	  },

	  /**
	   * Given a photo, construct a URL using the method outlined at
	   * http://www.flickr.com/services/api/misc.urlKittenl
	   *
	   * @param {DOMElement} A kitten.
	   * @return {string} The kitten's URL.
	   * @private
	   */
	  constructKittenURL_: function (photo) {
	    return "http://farm" + photo.getAttribute("farm") +
	        ".static.flickr.com/" + photo.getAttribute("server") +
	        "/" + photo.getAttribute("id") +
	        "_" + photo.getAttribute("secret") +
	        "_s.jpg";
	  }
	};

	// Run our kitten generation script as soon as the document's DOM is ready.
	document.addEventListener('DOMContentLoaded', function () {
	  kittenGenerator.requestKittens();
	});
图片:
48×48:

放到同一个目录中,然后在扩展程序页中加载进来,在工具栏中就会多一个图标,点击以后显示一下效果:

demo下载:请点击这里下载demo。