AVEVA .NET Quick Start Guide
AVEVA .NET快速入门引导
一、概述 Introduction
AVEVA提供.Net的二次开发接口,可使有C#编程经验的软件工程师使用Visual Studio来对AVEVA的工厂(Plant)设计和船舶(Marine)设计产品进行二次开发。使用.NET不仅可以对原来的PDMS进行二次开发,还可以对整合后的AVEVA Marine中的Hull Design、Hull Drafting等原来属于Tribon的程序进行二次开发。
使用PML二次开发要受限于AVEVA提供的PML对象,可使用的资源有限。而使用.Net来进行二次开发,不仅可以利用AVEVA提供的类库,还可以利用很多资源,开发效率更高。
如要对AVEVA进行二次开发去满足PDM或CIMS等管理软件的数据格式,使用PML可能就有些受限,而使用.NET则可以满足任何要求。
还有一个代码加密问题。对于PML,AVEVA也有提供加密程序PML Publisher来保证PML源代码的安全问题。使用.NET开发,提供给用户的就是个DLL,相对而言安全些。虽然也可通过有关工具可以得到DLL中的源代码。
当掌握了.NET和PML后,可根据需要选择合适的、快速的开发方法。
本文仅供使用C#进行AVEVA .NET二次开发的爱好者入门学习参考使用,若你是AVEVA .NET开发高手,欢迎多提宝贵意见和建议。由于本人水平有限,定有错误之处,欢迎批评指正。若有任何意见、建议,都可以与我交流:eryar@163.com。
二、.NET 二次开发架构 .NET Customisation Architecture
引入微软的.NET技术来对AVEVA进行二次开发,为AVEVA的二次开发打开了一个全新的世界,也便于其它系统与AVEVA产品的集成。.NET API可以访问产品的各方面,包括图形用户界面(Graphical User Interface),数据库(Database)和几何库(Geometry)。
作为AVEVA持续进步(continual progression)方针的一部分,引入的.NET二次开发也可以在PML中使用。通过PML.NET这个加强的PML可以调用.NET的程序,加强了二次开发能力。
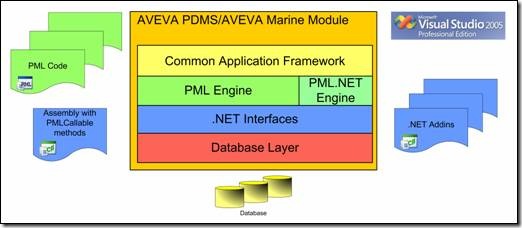
Figure 2.1 .NET customisation Architecture
上图所示为使用.NET二次开发的两种方式。一种是使用.NET插件;另一种是使用PML.NET。两种方式的机制都可以使用程序被动态加载到使用的模块中。
2.1 通用程序框架接口 Common Application Framework Interfaces
通用程序框架(CAF)是提供给程序员使用支持程序开发和自定义开发各种功能的一个扩展框架。CAF的基本功能由以下两个组件提供:
u Aveva.AppliationFramework.dll;
u Aveva.AppliationFramework.Presentation.dll;
Namespace: Aveva.ApplicationFramework
u AddinManager: 这个类提供对程序框架插件管理的属性和方法;
u ServiceManager: 这个类定义了程序框架发布服务的接口;
u SettingsManager: 这个类提供了程序设置的管理的属性和方法;
Namespace: Aveva.ApplicationFramework.Presentation
u CommandBarManager: 提供使用CAF程序的菜单和命令栏的能力。还可以从用户接口文件(User Interface Customisation)中载入菜单和命令栏定义。
u CommandManager: 这个类定义了接口来管理命令对象,命令对象是与工具条或其它用户接口关联的对象。使用工具将会使用其相关联的命令对象执行。即命令模式。
u ResourceManager: 对本地资源文件的管理类。使用ResourceManager提供的方法可以使用资源文件包含的各种资源,如字符串、图像、光标、图标等。
u WindowManager: 提供访问主程窗口、状态栏和一系列MDI和浮动窗口。也提供了使用这些窗口包含用户控件的方法。
2.2 数据库接口 Database Interfaces
与数据库相关的接口由下列组件提供:
u Aveva.Pdms.Database.dll;
u PDMSFilters.dll
Namespace: Aveva.Pdms.Database
u DatabaseService:这个类仅有功能就是打开一个工程;
u DbAttribute:这个类有个功能:
n 类的实例可以用来标识和传递属性;
n 提供可以获得属性元数据的方法,如类型、尺寸、名称、等等。对系统属性和自定义属性(UDA)也可用。
u DB:提供打开DB的相关信息;
u DbElement:类的实例用来表示一个元素。这是对数据库进行读写的一个主要的类。方法涉及:
n 创建元素;
n 删除元素;
n 复制;
n 获取/设置属性和规则;
n 数据的导航;
n evaluating database expressions.
u DbElementType:类有两个功能:
n 类的实例用来表示元素类型;
n 也可获取元素类型的元数据;
u DbEvents:这个类包含处理数据库的机制。如savework, getwork, undo, redo, flush, refresh, drop等。
u DbExpression:
u DbPseudoAttribute:This Class allows pseudo attribute code to be plugged in for UDAs;
u DbRule:Class to hold a database rule;
u DbUserChanges:当数据库改变时触发的事件;
u MDB:对MDB的操作,如:savework, getwork;
u Table:各种类访问内部Dabacon表,如name table;
u Project:主要方法是用来打开MDB;
2.3 几何库接口 Geometry Interfaces
与几何库相关的接口由下列组件提供:
u AVEVA.Pdms.Geometry.dll
提供与几何计算相关的类,请参考相关文档。
2.4 共享接口 Shared Interfaces
一些常用的接口由下列组件提供:
u Aveva.Pdms.Shared.dll
提供当前元素(current element)、选择改变事件(selection changed events)和数据列表(Data listing)功能。
2.5 功能接口 Utilities Interfaces
功能接口由下列组件提供:
u Aveva.Pdms.Ultilitis.dll
提供了消息、字符串、跟踪、单位和重做功能。还提供了使用命令窗口的方法,但是对其支持不是很好。
2.6 图形接口 Graphics Interfaces
提供访问图形列表(drawlist)和颜色的接口由下列组件提供:
u Aveva.Pdms.Graphics.dll
上述是对使用AVEVA的.NET开发的一个概要介绍,也许还是很抽象。本文将会以一个具体例子来实现使用.NET进行二次开发的过程。(.NET开发的组件PML也可调用。)在例子中将会介绍.NET接口的使用方法。若理解了这个简单例子后,对上述介绍也会有更感性的认识。关于这些接口中属性和方法的定义,请参考文后列举的参考资料。
三、怎样开发插件 How to Write an Addin
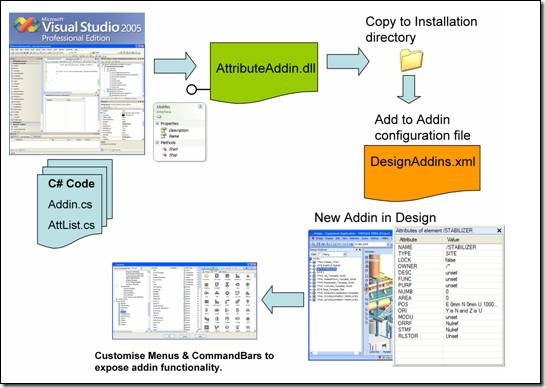
Figure 3.1 Writing a .NET Addin
如上图所示,描述了开发.NET插件的主要步骤,及对程序的配置使其加载CAF的插件。
u 编写.NET程序,生成动态库;
u 将生成的动态库复制到安装目录;
u 在相关的配置文件中添加插件信息,以使相关模块可以加载插件;
u 自定义调用插件的菜单或命令栏;
以下对二次开发的方式进行介绍:
3.1 IAddin接口
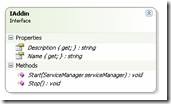
Figure 3.2 IAddin Interface
区别AVEVA的.NET插件与其它.NET组件的关键点就是:AVEVA的.NET插件都包含对IAddin接口实现的类。当CAF加载和启动插件时,会询问这个插件对IAddin接口的实现类,创建这个类的实例并调用IAddin.Start方法。
如下程序为实现IAddin接口类的简单例子:
1: using System;
2: using System.Collections.Generic;
3: using System.Text;
4: // Add additional using statements
5: using Aveva.ApplicationFramework;
6: using Aveva.ApplicationFramework.Presentation;
7: using Aveva.Pdms.Shared;
8: using Aveva.Pdms.Database;
9:
10: namespace Aveva.Presentation.AttributeBrowserAddin
11: {
12: public class AttributeBrowserAddin : IAddin
13: {
14: private DockedWindow attributeListWindow;
15: private AttributeListControl attributeListControl;
16: #region IAddin Members
17:
18: public string Description
19: {
20: get
21: {
22: return "Provides a simple attribute browser";
23: }
24: }
25:
26: public string Name
27: {
28: get
29: {
30: return "AttributeBrowserAddin";
31: }
32: }
33:
34: public void Start(ServiceManager serviceManager)
35: {
36: System.Windows.Forms.MessageBox.Show("Blcok");
37:
38: // Create Addins Windows
39: // Get the WindowManager service
40: WindowManager windowManager = (WindowManager)serviceManager.GetService(typeof(WindowManager));
41: attributeListControl = new AttributeListControl();
42: // Create a docked window to host an AttributeListControl
43: attributeListWindow = windowManager.CreateDockedWindow("Aveva.AttributeBrowser.AttributeList", "Attributes", attributeListControl, DockedPosition.Right);
44: attributeListWindow.Width = 200;
45: // Docked windows created at addin start should ensure their layout is saved between sessions.
46: attributeListWindow.SaveLayout = true;
47:
48: // Create and register addins commands
49: // Get the CommandManager
50: CommandManager commandManager = (CommandManager)serviceManager.GetService(typeof(CommandManager));
51: ShowAttributeBrowserCommand showCommand = new ShowAttributeBrowserCommand(attributeListWindow);
52: commandManager.Commands.Add(showCommand);
53:
54: // Add event handler for current element changed event.
55: CurrentElement.CurrentElementChanged += new CurrentElementChangedEventHandler(CurrentElement_CurrentElementChanged);
56:
57: // Get the ResourceManager service.
58: ResourceManager resourceManager = (ResourceManager)serviceManager.GetService(typeof(ResourceManager));
59: resourceManager.LoadResourceFile("AttributeBrowserAddin");
60:
61: // Add a new panel to contain the project name.
62: StatusBar statusBar = windowManager.StatusBar;
63: StatusBarTextPanel projectNamePanel = statusBar.Panels.AddTextPanel("Aveva.ProjectName", "Project : " + Project.CurrentProject.Name);
64: projectNamePanel.SizingMode = PanelSizingMode.Automatic;
65: // Get the panel image from the addins resource file.
66: projectNamePanel.Image = resourceManager.GetImage("ID_PROJECT_ICON");
67:
68: // Load a UIC file for the AttributeBrowser.
69: CommandBarManager commandBarManager = (CommandBarManager)serviceManager.GetService(typeof(CommandBarManager));
70: commandBarManager.AddUICustomizationFile("AttributeBrowser.uic", "AttributeBrowser");
71: }
72:
73: void CurrentElement_CurrentElementChanged(object sender, CurrentElementChangedEventArgs e)
74: {
75: // Set the window title to the name of the element.
76: string windowTitle = "Attributes of element " + CurrentElement.Element.GetAsString(DbAttributeInstance.FLNM);
77: attributeListWindow.Title = windowTitle;
78: // Clear attribute list
79: attributeListControl.Clear();
80: // Populate the attribute list with attributes of the current element
81: foreach (DbAttribute attribute in CurrentElement.Element.GetAttributes())
82: {
83: attributeListControl.AddAttribute(attribute.Name, CurrentElement.Element.GetAsString(attribute));
84: }
85:
86: }
87:
88: public void Stop()
89: {
90: }
91:
92: #endregion
93: }
94: }
95:
3.2 The WindowManager
1.窗口的创建
一个插件通常是通过用户接口(Graphical User Interface)将其功能暴露给用户使用。这些用户接口一般是菜单或命令栏。有时插件开发人员希望插件的用户接口在浮动的窗口中或是MDI的一个子窗口。CAF的WindowManager可以用来创建这两种类型的窗口:
Figure 3.3 Use WindowManager to Create Window
上述代码中使用了ServiceManager.GetService方法来获取WindowManager功能,并使用WindowManager的CreateDockedWindow方法创建一个浮动窗口来放置AttributeListControl。函数CreateDockedWindow的第一个参数:Key,是窗口惟一的标识符。为了避免冲突,推荐的命名方式为:<公司名>.<插件名>.<窗口名>。
使用WindowManager.CreateMdiWindow方法可以创建多文档窗口MDI(Multiple Document Interface)。
2.IWindow接口
类DockedWindow和MdiWindow都是IWindow接口的实现,都有如下方法和属性:
u void Hide() Conceals the window from the user
u void Show() Displays the window to the user
u void Float() Displays the window as a floating window
u void Dock() Docks the window within the main window
u void Close() Destroys the window removing it from the windows collection.
u System.Windows.Forms.Control Control 取得窗口上的控件;
u bool Enabled: Gets or sets whether the window is enabled.
u bool Floatable: Gets or sets whether the window is floatable.
u int Height: Gets or sets the height of the window.
u bool IsFloating: Gets the floating state of a window.
u string Key: Gets the Key of the window in the WindowsCollection.
u string Title: Gets or sets the title/caption of the window.
u bool Visible: Gets or sets the visible state of the window.
u int Width: Gets or sets the width of the window.
u Size Maximum Size: Get or set the maximum size of the window.
u Size Minimum Size: Get or set the minimum size of the window.
窗口事件Window Events:浮动窗口和多文档窗口也支持一些事件,如关闭Closed、当前激活状态Activated、未激活状态Deactivated、重设窗口大小Resized。
WindowManager Events:WindowManager也支持两个事件:
u System.EventHandler WindowLayoutLoaded:当加载窗口布局时触发;
u WindowEventHandler WindowAdded:当创建浮动窗口或多文档窗口时触发;
3. 状态栏 The StatusBar
CAF也提供状态栏的接口,如下图所示:
Figure 3.1 The StatusBar
状态栏是通过WindowManager的属性StatusBar来设置的。
1: // Add a new panel to contain the project name.
2: StatusBar statusBar = windowManager.StatusBar;
状态栏有如下属性:
u bool Visible - Gets or sets the visibility of the StatusBar.
u string Text - Gets or sets the text to display in the default StatusBar text pane.
u int Progress - Gets or sets the progress bar value [0-100]. If this is set to 0 then the progress bar is hidden.
u string ProgressText - Text to describe the action being tracked by the progress bar.
u bool ShowDateTime - Gets or sets whether the Date and Time should be displayed on the StatusBar.
u bool ShowCapsLock - Gets or sets whether the panel showing the CapsLock state is displayed on the StatusBar.
u bool ShowNumLock - Gets or sets whether the panel showing the NumLock state is displayed on the StatusBar.
u bool ShowScrollLock - Gets or sets whether the panel showing the ScrollLock state is displayed on the StatusBar.
u bool ShowInsertMode - Gets or sets whether the panel showing the InsertMode is displayed on the statusbar.
u StatusBarPanelsCollection Panels - Gets the collection of application defined StatusBar panels.
使用StatusBar的集合属性可以创建常见的Panels。如下所示为在状态栏上创建文字。
Figure 3.1 Add TextPanel to the StatusBar
StatusBarTextPanel对象也支持PanelClick和PanelDoubleClick事件。具体请参考相关帮助文档。
4.插件命令 Addin Commands
用户使用插件的功能通常是通过菜单或右键菜单或工具栏上的按钮来实现的。通用程序框架CAF提供了一个接口CommandBarManager来创建菜单、命令栏及其它包含的各种类型的按钮。这些工具支持传统的菜单响应方式,即由程序员来提供各种响应函数。尽管传统的方式CAF还支持,但是不推荐。通用程序框架还支持用一种类似XML的文件来定义菜单、命令栏及其上的工具按钮。通过加载用户接口自定义文件(User Interface Customisation)方便程序的开发。
5.配置模块使其加载插件 Configuring a Module to Load an Addin
插件程序写好之后就是要让某个模块加载它。每个模块都有一个在启动时加载插件的配置文件。插件默认路径是执行程序的路径。配置插件的文件名形式为:<模块名>Addins.xml。例如:设计Design模块的插件配置文件名为:DesignAddins.xml,文件内容如下所示。插件默认路径也是执行程序所在目录,当然你也可以指定插件的完整路径。如果不想修改安装目录下的这些插件配置文件,可以使用环境变量CAF_ADDINS_PATH来重新指定插件配置文件的路径。
1: <?xml version="1.0" encoding="utf-8"?>
2: <ArrayOfString xmlns:xsd="http://www.w3.org/2001/XMLSchema" xmlns:xsi="http://www.w3.org/2001/XMLSchema-instance">
3: <string>ExplorerAddin</string>
4: <string>DrawListAddin</string>
5: <string>MyDataAddin</string>
6: <string>HistoryAddin</string>
7: <string>ReferenceListAddin</string>
8: <string>PipeCheckAddin</string>
9: <string>OutputAddin</string>
10: <string>FindAddin</string>
11: <string>LinksAddin</string>
12: <string>AttributesAddin</string>
13: <string>C:\Documents and Settings\User1\My Documents\Visual Studio 2005\AttributeBrowserAddin\AttributeBrowserAddin\bin\Debug\AttributeBrowserAddin</string>
14: </ArrayOfString>
15:
四、Hello World示例程序
对AVEVA的.NET二次开发架构和常用的开发接口有个大概认识之后,现在将以一个具体的程序来详细介绍开发过程。通过动手实践会加深上述内容的认识。
1.创建新的工程
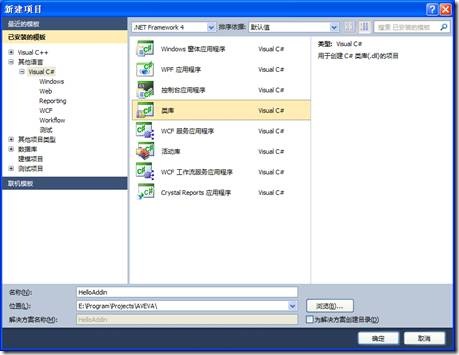
Figure 4.1 Create a New Project
创建一个C#类库的工程,命名为HelloAddin。
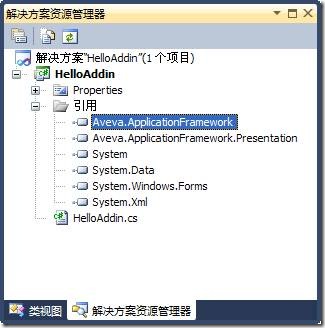
2.添加需要使用的引用库
Figure 4.2 Add Reference Library
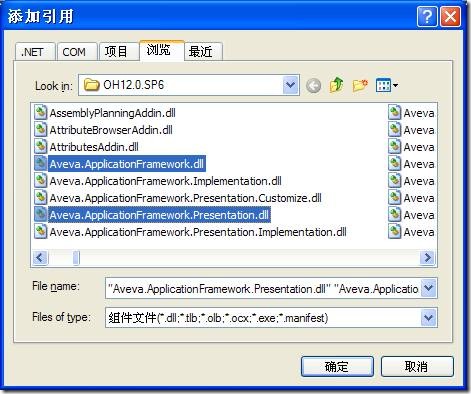
根据上文的介绍,添加引用的库。这里用到了两个AVEVA的库,添加方式如下图所示:
Figure 4.3 Add AVEVA .NET Library
为了使用消息框还需要添加.Net的库:System.Windows.Forms。
3.编写程序代码
1: using System;
2: using System.Collections.Generic;
3: using System.Text;
4:
5: // Add additional using statements
6: using Aveva.ApplicationFramework;
7: using Aveva.ApplicationFramework.Presentation;
8:
9: namespace Aveva.Presentation.HelloAddin
10: {
11: public class HelloAddin : IAddin
12: {
13: #region IAddin Members
14:
15: public string Description
16: {
17: get
18: {
19: return "AVEVA .NET Hello World program!";
20: }
21: }
22:
23: public string Name
24: {
25: get
26: {
27: return "HelloAddin";
28: }
29: }
30:
31: public void Start(ServiceManager serviceManager)
32: {
33: // Show a Hello World message box.
34: System.Windows.Forms.MessageBox.Show("Hello AVEVA .NET!");
35: }
36:
37: public void Stop()
38: {
39: //
40: }
41:
42: #endregion
43: }
44: }
因为AVEVA中的.NET插件都是派生自接口:IAddin,这也是插件与其它动态库组件的区别。打开IAddin,可以看到这个接口有如下内容:
1: using System;
2:
3: namespace Aveva.ApplicationFramework
4: {
5: public interface IAddin
6: {
7: string Description { get; }
8: string Name { get; }
9: void Start(ServiceManager serviceManager);
10: void Stop();
11: }
12: }
所以派生的插件类都要重写这几个虚函数。当插件被加载时,函数Start将会被调用。所以我在Start函数加只显示一个消息框。当HelloAddin被加载时,会弹出“Hello AVEVA .NET!”的消息框。
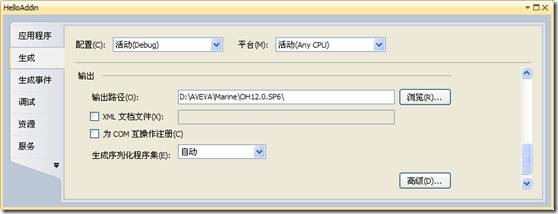
4.将插件生成到AVEVA安装目录
Figure 4.4 Modify Assembly Output Path
将会在AVEVA安装目录生成:HelloAddin.dll。
5.配置加载插件文件
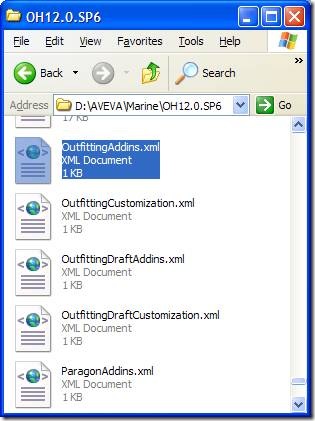
在安装目录下有个OutfittingAddins.xml是用来配置Outfitting模块插件的文件。各模块配置插件的名称已在前文中介绍过了。
Figure 4.5 Configure the Addins.xml file to load the Addin
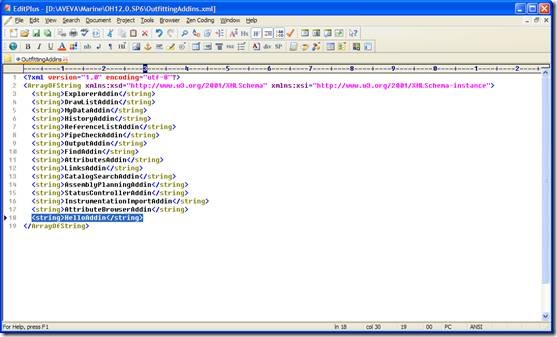
用文本编辑工具打开这个插件配置文件,在其中添加上示例插件:HelloAddin。如下图所示:
Figure 4.6 Add HelloAddin to the Addin Configure file
6.启动程序
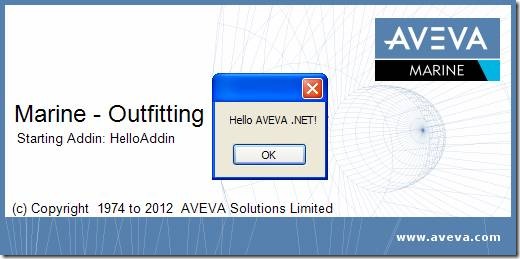
Figure 4.7 Startup Window of the HelloAddin
选择Outfitting模块,启动程序,这个插件将被加载,如上图所示。
7.调试程序
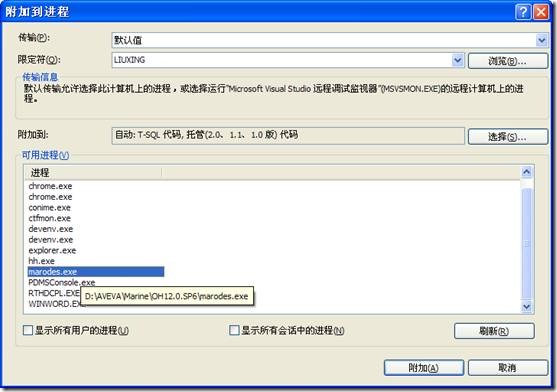
调试程序的方式也许有些笨拙,但也是实用的。若你有更好的方法,请不吝赐教。调试的方法也是利用上述消息框来阻塞,使加载停滞不前,这时可以使用Visual Studio中的调试,附加到进程就可以了。
当出现上述消息框时,使附加到进程,选择marodes.exe即可。如下图所示:
Figure 4.8 Debug for the HelloAddin
附加进程后对消息框ok后即可进入到插件中的断点处。
五、 结论
上文的工程是使用AVEVA的CAF二次开发最简单的程序。这个程序什么事情也做不了。关于使用.NET对AVEVA进行二次开发的详细教程请参考:《.NET Customisation User Guide》。
关于更详细的例子,请参考AVEVA提供的示例代码:AttributeBrowserAddin和ExamplesAddin。
u 示例工程:AttributeBrowserAddin。本程序实现了一个简单的属性查看列表。其中实现了插件命令对象,即通过响应工具条上的按钮来控制窗口的可见性。
u 示例工程:ExamplesAddin。本程序实现的对设计数据元素的访问和控制,并在提供了一个配置插件被加载的文件:DesignAddins.xml。
六、 参考资料
1.AVEVA .NET Customisation User Guide
2.Sample Code: AttributeBrowserAddin
3.Sample Code: ExamplesAddin
4..NET Interface Reference Files: Aveva.ApplicationFramework.chm
5..Net Interface Reference File: Aveva.Pdms.chm
6..Net Interface Reference File: Aveva.Pdms.Database.chm
7..Net Interface Reference File: Aveva.Pdms.Database.Filters.chm
8..Net Interface Reference File: Aveva.Pdms.Design.chm
9..Net Interface Reference File: Aveva.Pdms.Geometry.chm
10..Net Interface Reference File: Aveva.Pdms.Graphics.chm
11..Net Interface Reference File: Aveva.Pdms.Maths.Geometry.chm
12..Net Interface Reference File: Aveva.Pdms.Piping.chm
13..Net Interface Reference File: Aveva.Pdms.Shared.chm
14..Net Interface Reference File: Aveva.Pdms.Standalone.chm
15..Net Interface Reference File: Aveva.Pdms.Utilities.chm
16.AVEVA Marine .NET Interface:.NETmarAPI.chm
PDF Version and Source Code: AVEVA .NET Quick Start Guide
Shanghai China
2012-11-03
