关键字: JMS
1 JMS
在介绍ActiveMQ之前,首先简要介绍一下JMS规范。
1.1 JMS的基本构件
1.1.1 连接工厂
连接工厂是客户用来创建连接的对象,例如ActiveMQ提供的ActiveMQConnectionFactory。
1.1.2 连接
JMS Connection封装了客户与JMS提供者之间的一个虚拟的连接。
1.1.3 会话
JMS Session是生产和消费消息的一个单线程上下文。会话用于创建消息生产者(producer)、消息消费者(consumer)和消息(message)等。会话提供了一个事务性的上下文,在这个上下文中,一组发送和接收被组合到了一个原子操作中。
1.1.4 目的地
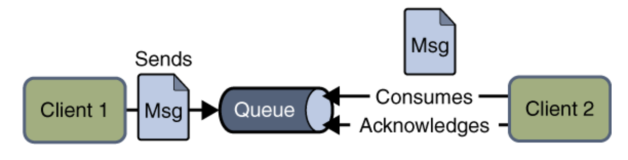
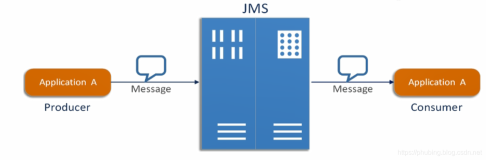
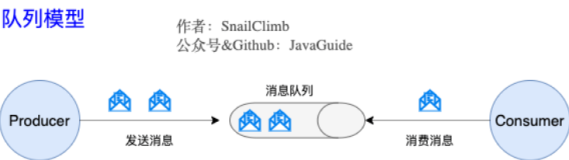
目的地是客户用来指定它生产的消息的目标和它消费的消息的来源的对象。JMS1.0.2规范中定义了两种消息传递域:点对点(PTP)消息传递域和发布/订阅消息传递域。
点对点消息传递域的特点如下:
- 每个消息只能有一个消费者。
- 消息的生产者和消费者之间没有时间上的相关性。无论消费者在生产者发送消息的时候是否处于运行状态,它都可以提取消息。
发布/订阅消息传递域的特点如下:
- 每个消息可以有多个消费者。
- 生产者和消费者之间有时间上的相关性。订阅一个主题的消费者只能消费自它订阅之后发布的消息。JMS规范允许客户创建持久订阅,这在一定程度上放松了时间上的相关性要求。持久订阅允许消费者消费它在未处于激活状态时发送的消息。
在点对点消息传递域中,目的地被成为队列(queue);在发布/订阅消息传递域中,目的地被成为主题(topic)。
1.1.5 消息生产者
消息生产者是由会话创建的一个对象,用于把消息发送到一个目的地。
1.1.6 消息消费者
消息消费者是由会话创建的一个对象,它用于接收发送到目的地的消息。消息的消费可以采用以下两种方法之一:
- 同步消费。通过调用消费者的receive方法从目的地中显式提取消息。receive方法可以一直阻塞到消息到达。
- 异步消费。客户可以为消费者注册一个消息监听器,以定义在消息到达时所采取的动作。
1.1.7 消息
JMS消息由以下三部分组成:
- 消息头。每个消息头字段都有相应的getter和setter方法。
- 消息属性。如果需要除消息头字段以外的值,那么可以使用消息属性。
- 消息体。JMS定义的消息类型有TextMessage、MapMessage、BytesMessage、StreamMessage和ObjectMessage。
1.2 JMS的可靠性机制
1.2.1 确认
JMS消息只有在被确认之后,才认为已经被成功地消费了。消息的成功消费通常包含三个阶段:客户接收消息、客户处理消息和消息被确认。
在事务性会话中,当一个事务被提交的时候,确认自动发生。在非事务性会话中,消息何时被确认取决于创建会话时的应答模式(acknowledgement mode)。该参数有以下三个可选值:
- Session.AUTO_ACKNOWLEDGE。当客户成功的从receive方法返回的时候,或者从MessageListener.onMessage方法成功返回的时候,会话自动确认客户收到的消息。
- Session.CLIENT_ACKNOWLEDGE。客户通过消息的acknowledge方法确认消息。需要注意的是,在这种模式中,确认是在会话层上进行:确认一个被消费的消息将自动确认所有已被会话消费的消息。例如,如果一个消息消费者消费了10个消息,然后确认第5个消息,那么所有10个消息都被确认。
- Session.DUPS_ACKNOWLEDGE。该选择只是会话迟钝第确认消息的提交。如果JMS provider失败,那么可能会导致一些重复的消息。如果是重复的消息,那么JMS provider必须把消息头的JMSRedelivered字段设置为true。
1.2.2 持久性
JMS 支持以下两种消息提交模式:
- PERSISTENT。指示JMS provider持久保存消息,以保证消息不会因为JMS provider的失败而丢失。
- NON_PERSISTENT。不要求JMS provider持久保存消息。
1.2.3 优先级
可以使用消息优先级来指示JMS provider首先提交紧急的消息。优先级分10个级别,从0(最低)到9(最高)。如果不指定优先级,默认级别是4。需要注意的是,JMS provider并不一定保证按照优先级的顺序提交消息。
1.2.4 消息过期
可以设置消息在一定时间后过期,默认是永不过期。
1.2.5 临时目的地
可以通过会话上的createTemporaryQueue方法和createTemporaryTopic方法来创建临时目的地。它们的存在时间只限于创建它们的连接所保持的时间。只有创建该临时目的地的连接上的消息消费者才能够从临时目的地中提取消息。
1.2.6 持久订阅
首先消息生产者必须使用PERSISTENT提交消息。客户可以通过会话上的createDurableSubscriber方法来创建一个持久订阅,该方法的第一个参数必须是一个topic。第二个参数是订阅的名称。
JMS provider会存储发布到持久订阅对应的topic上的消息。如果最初创建持久订阅的客户或者任何其它客户使用相同的连接工厂和连接的客户ID、相同的主题和相同的订阅名再次调用会话上的createDurableSubscriber方法,那么该持久订阅就会被激活。JMS provider会象客户发送客户处于非激活状态时所发布的消息。
持久订阅在某个时刻只能有一个激活的订阅者。持久订阅在创建之后会一直保留,直到应用程序调用会话上的unsubscribe方法。
1.2.7 本地事务
在一个JMS客户端,可以使用本地事务来组合消息的发送和接收。JMS Session接口提供了commit和rollback方法。事务提交意味着生产的所有消息被发送,消费的所有消息被确认;事务回滚意味着生产的所有消息被销毁,消费的所有消息被恢复并重新提交,除非它们已经过期。
事务性的会话总是牵涉到事务处理中,commit或rollback方法一旦被调用,一个事务就结束了,而另一个事务被开始。关闭事务性会话将回滚其中的事务。
需要注意的是,如果使用请求/回复机制,即发送一个消息,同时希望在同一个事务中等待接收该消息的回复,那么程序将被挂起,因为知道事务提交,发送操作才会真正执行。
需要注意的还有一个,消息的生产和消费不能包含在同一个事务中。
1.3 JMS 规范的变迁
JMS的最新版本的是1.1。它和同1.0.2版本之间最大的差别是,JMS1.1通过统一的消息传递域简化了消息传递。这不仅简化了JMS API,也有利于开发人员灵活选择消息传递域,同时也有助于程序的重用和维护。
以下是不同消息传递域的相应接口:
| JMS 公共 | 点对点域 | 发布/订阅域 |
| ConnectionFactory | QueueConnectionFactory | TopicConnectionFactory |
| Connection | QueueConnection | TopicConnection |
| Destination | Queue | Topic |
| Session | QueueSession | TopicSession |
| MessageProducer | QueueSender | TopicPublisher |
| MessageConsumer | QueueReceiver | TopicSubscriber |
2 ActiveMQ
2.1 Broker
2.1.1 Running Broker
ActiveMQ5.0 的二进制发布包中bin目录中包含一个名为activemq的脚本,直接运行这个脚本就可以启动一个broker。
此外也可以通过Broker Configuration URI或Broker XBean URI对broker进行配置,以下是一些命令行参数的例子:
| Example | Description |
| activemq | Runs a broker using the default 'xbean:activemq.xml' as the broker configuration file. |
| activemq xbean:myconfig.xml | Runs a broker using the file myconfig.xml as the broker configuration file that is located in the classpath. |
| activemq xbean:file:./conf/broker1.xml | Runs a broker using the file broker1.xml as the broker configuration file that is located in the relative file path ./conf/broker1.xml |
| activemq xbean:file:C:/ActiveMQ/conf/broker2.xml | Runs a broker using the file broker2.xml as the broker configuration file that is located in the absolute file path C:/ActiveMQ/conf/broker2.xml |
| activemq broker:(tcp://localhost:61616, tcp://localhost:5000)?useJmx=true | Runs a broker with two transport connectors and JMX enabled. |
| activemq broker:(tcp://localhost:61616, network:tcp://localhost:5000)?persistent=false | Runs a broker with 1 transport connector and 1 network connector with persistence disabled. |
2.1.2 Embedded Broker
可以通过在应用程序中以编码的方式启动broker,例如:
- BrokerService broker = new BrokerService();
- broker.addConnector("tcp://localhost:61616");
- broker.start();
- BrokerService broker = new BrokerService();
- broker.setName("fred");
- broker.addConnector("tcp://localhost:61616");
- broker.start();
- BrokerService broker = BrokerFactory.createBroker(new URI(someURI));
| URI scheme | Example | Description |
| xbean: | xbean:activemq.xml | Searches the classpath for an XML document with the given URI (activemq.xml in this case) which will then be used as the Xml Configuration |
| file: | file:foo/bar/activemq.xml | Loads the given file (in this example foo/bar/activemq.xml) as the Xml Configuration |
| broker: | broker:tcp://localhost:61616 | Uses the Broker Configuration URI to configure the broker |
当使用XBean的配置方式的时候,需要指定一个xml配置文件,例如:
- BrokerService broker = BrokerFactory.createBroker(new URI("xbean:com/test/activemq.xml"));
- <bean id="broker" class="org.apache.activemq.xbean.BrokerFactoryBean">
- <property name="config" value="classpath:org/apache/activemq/xbean/activemq.xml" />
- <property name="start" value="true" />
- </bean>
2.1.3 Monitoring Broker
2.1.3.1 JMX
在使用JMX监控broker之前,首先要启用broker的JMX监控功能,例如在配置文件中设置useJmx="true",如下:
- <broker useJmx="true" brokerName="broker1>
- <managementContext>
- <managementContext createConnector="true"/>
- </managementContext>
- ...
- </broker>
在jconsole的MBeans标签中,可以查看详细信息,也可以执行相应的operation。需要注意的是,在jconsole连接到broker的时候,并不需要输入用户名和密码,如果这存在潜在的安全问题,那么就需要为JMX Connector配置密码保护(需要使用1.5以上版本的JDK)。
首先要禁止ActiveMQ创建自己的connector,例如:
- <broker xmlns="http://activemq.org/config/1.0" brokerName="localhost"useJmx="true">
- <managementContext>
- <managementContext createConnector="false"/>
- </managementContext>
- </broker>
# The "monitorRole" role has readonly access.
# The "controlRole" role has readwrite access.
monitorRole readonly
controlRole readwrite
conf/jmx.password:
# The "monitorRole" role has password "abc123".
# The "controlRole" role has password "abcd1234".
monitorRole abc123
controlRole abcd1234
然后修改ActiveMQ的bin目录下activemq的启动脚本,查找包含"SUNJMX="的一行如下:
REM set SUNJMX=-Dcom.sun.management.jmxremote.port=1616 -Dcom.sun.management.jmxremote.authenticate=false -Dcom.sun.management.jmxremote.ssl=false
把它替换成
set SUNJMX=-Dcom.sun.management.jmxremote.port=1616 -Dcom.sun.management.jmxremote.authenticate=true -Dcom.sun.management.jmxremote.ssl=false -Dcom.sun.management.jmxremote.password.file=%ACTIVEMQ_BASE%/conf/jmx.password -Dcom.sun.management.jmxremote.access.file=%ACTIVEMQ_BASE%/conf/jmx.access
最后重启ActiveMQ和jconsole,这时候需要强制login。如果在启动activemq的过程中出现以下错误,那么需要为这个文件增加访问控制。Windows平台上的具体解决方法请参考如下网址:http://java.sun.com/j2se/1.5.0/docs/guide/management/security-windows.html
Error: Password file read access must be restricted: D:\apache-activemq-5.0.0\bin\../conf/jmx.password
2.1.3.2 Web Console
Web Console被集成到了ActiveMQ的二进制发布包中,因此缺省访问http://localhost:8161/admin即可访问Web Console。
在配置文件中,可以通过修改nioConnector的port属性来修改Web console的缺省端口:
- <jetty xmlns="http://mortbay.com/schemas/jetty/1.0">
- <connectors>
- <nioConnector port="8161" />
- </connectors>
- ...
- </jetty>
需要注意的是,要将activemq-all-5.0.0.jar拷贝到WEB-INF\lib目录中(可能还需要拷贝jms.jar)。还要为Tomcat设置以下五个系统属性(修改catalina.bat文件):
set JAVA_OPTS=%JAVA_OPTS% -Dwebconsole.type="properties"
set JAVA_OPTS=%JAVA_OPTS% -Dwebconsole.jms.url="tcp://localhost:61616"
set JAVA_OPTS=%JAVA_OPTS% -Dwebconsole.jmx.url="service:jmx:rmi:///jndi/rmi://localhost:1099/jmxrmi"
set JAVA_OPTS=%JAVA_OPTS% -Dwebconsole.jmx.role=""
set JAVA_OPTS=%JAVA_OPTS% -Dwebconsole.jmx.password=""
如果JMX没有配置密码保护,那么webconsole.jmx.role和webconsole.jmx.password设置成""即可。如果broker被配置成了Master/Slave模式,那么可以配置成使用failover transport,例如:
-Dwebconsole.jms.url=failover:(tcp://serverA:61616,tcp://serverB:61616)
顺便说一下,由于webconsole.type 属性是properties,因此实际上起作用的Web Console的配置文件是WEB-INF/ webconsole-properties.xml。最后启动被监控的ActiveMQ,访问http://localhost:8080/activemq-web-console/,查看显示是否正常。
2.1.3.3 Advisory Message
ActiveMQ 支持Advisory Messages,它允许你通过标准的JMS 消息来监控系统。目前的Advisory Messages支持:
- consumers, producers and connections starting and stopping
- temporary destinations being created and destroyed
- messages expiring on topics and queues
- brokers sending messages to destinations with no consumers.
- connections starting and stopping
Advisory Messages可以被想象成某种的管理通道,通过它你可以得到关于JMS provider、producers、consumers和destinations的信息。Advisory topics都使用ActiveMQ.Advisory.这个前缀,以下是目前支持的topics:
Client based advisories
| Advisory Topics | Description |
| ActiveMQ.Advisory.Connection | Connection start & stop messages |
| ActiveMQ.Advisory.Producer.Queue | Producer start & stop messages on a Queue |
| ActiveMQ.Advisory.Producer.Topic | Producer start & stop messages on a Topic |
| ActiveMQ.Advisory.Consumer.Queue | Consumer start & stop messages on a Queue |
| ActiveMQ.Advisory.Consumer.Topic | Consumer start & stop messages on a Topic |
在消费者启动/停止的Advisory Messages的消息头中有个consumerCount属性,他用来指明目前desination上活跃的consumer的数量。
| Advisory Topics | Description |
| ActiveMQ.Advisory.Queue | Queue create & destroy |
| ActiveMQ.Advisory.Topic | Topic create & destroy |
| ActiveMQ.Advisory.TempQueue | Temporary Queue create & destroy |
| ActiveMQ.Advisory.TempTopic | Temporary Topic create & destroy |
| ActiveMQ.Advisory.Expired.Queue | Expired messages on a Queue |
| ActiveMQ.Advisory.Expired.Topic | Expired messages on a Topic |
| ActiveMQ.Advisory.NoConsumer.Queue | No consumer is available to process messages being sent on a Queue |
| ActiveMQ.Advisory.NoConsumer.Topic | No consumer is available to process messages being sent on a Topic |
以上的这些destnations都可以用来作为前缀,在其后面追加其它的重要信息,例如topic、queue、clientID、producderID和consumerID等。这令你可以利用Wildcards 和 Selectors 来过滤Advisory Messages(关于Wildcard和Selector会在稍后介绍)。
例如,如果你希望订阅FOO.BAR这个queue上Consumer的start/stop的消息,那么可以订阅ActiveMQ.Advisory.Consumer.Queue.FOO.BAR;如果希望订阅所有queue上的start/stop消息,那么可以订阅ActiveMQ.Advisory.Consumer.Queue.>;如果希望订阅所有queue或者topic上的start/stop消息,那么可以订阅ActiveMQ.Advisory.Consumer. >。
org.apache.activemq.advisory.AdvisorySupport类上有如下的helper methods,用来在程序中得到advisory destination objects。
- AdvisorySupport.getConsumerAdvisoryTopic()
- AdvisorySupport.getProducerAdvisoryTopic()
- AdvisorySupport.getDestinationAdvisoryTopic()
- AdvisorySupport.getExpiredTopicMessageAdvisoryTopic()
- AdvisorySupport.getExpiredQueueMessageAdvisoryTopic()
- AdvisorySupport.getNoTopicConsumersAdvisoryTopic()
- AdvisorySupport.getNoQueueConsumersAdvisoryTopic()
- Destination advisoryDestination = AdvisorySupport.getProducerAdvisoryTopic(destination)
- MessageConsumer consumer = session.createConsumer(advisoryDestination);
- consumer.setMessageListener(this);
- ...
- public void onMessage(Message msg){
- if (msg instanceof ActiveMQMessage){
- try {
- ActiveMQMessage aMsg = (ActiveMQMessage)msg;
- ProducerInfo prod = (ProducerInfo) aMsg.getDataStructure();
- } catch (JMSException e) {
- log.error("Failed to process message: " + msg);
- }
- }
- }
2.1.3.4 Command Agent
在介绍Command Agent前首先简要介绍一下XMPP(Jabber)协议,XMPP是一种基于XML的即时通信协议,它由Jabber软件基金会开发。在配置文件中通过增加transportConnector来支持XMPP协议:
- <broker xmlns="http://activemq.org/config/1.0">
- <transportConnectors>
- ...
- <transportConnector name="xmpp" uri="xmpp://localhost:61222"/>
- </transportConnectors>
- </broker>
- 如果客户加入了一个聊天室,那么这个聊天室的名字会被映射到一个JMS topic。
- 尝试在聊天室内发送消息会导致一个JMS消息被发送到这个topic。
- 呆在一个聊天室中意味着这将保持一个对相应JMS topic的订阅。因此发送到这个topic的JMS消息也会被发送到聊天室。
推荐XMPP客户端Spark(http://www.igniterealtime.org/)。
从4.2版本起,ActiveMQ支持Command Agent。在配置文件中,通过设置commandAgent来启用Command Agent:
- <beans>
- <broker useJmx="true" xmlns="http://activemq.org/config/1.0">
- ...
- </broker>
- <commandAgent xmlns="http://activemq.org/config/1.0"/>
- </beans>
- <commandAgent xmlns="http://activemq.org/config/1.0" brokerUser="user" brokerPassword="passward"/>
2.1.3.5 Visualization plugin
ActiveMQ支持以broker插件的形式生成DOT文件(可以用agrviewer来查看),以图表的方式描述connections、sessions、producers、consumers、destinations等信息。配置方式如下:
- <broker xmlns="http://activemq.org/config/1.0" brokerName="localhost" useJmx="true">
- ...
- <plugins>
- <connectionDotFilePlugin file="connection.dot"/>
- <destinationDotFilePlugin file="destination.dot"/>
- </plugins>
- </broker>
关键字: Transport
2.2 Transport
ActiveMQ目前支持的transport有:VM Transport、TCP Transport、SSL Transport、Peer Transport、UDP Transport、Multicast Transport、HTTP and HTTPS Transport、Failover Transport、Fanout Transport、Discovery Transport、ZeroConf Transport等。以下简单介绍其中的几种,更多请参考Apache官方文档。
2.2.1 VM Transport
VM transport允许在VM内部通信,从而避免了网络传输的开销。这时候采用的连接不是socket连接,而是直接地方法调用。 第一个创建VM 连接的客户会启动一个embed VM broker,接下来所有使用相同的broker name的VM连接都会使用这个broker。当这个broker上所有的连接都关闭的时候,这个broker也会自动关闭。
以下是配置语法:
vm://brokerName?transportOptions
例如:vm://broker1?marshal=false&broker.persistent=false
Transport Options的可选值如下:
| Option Name | Default Value | Description |
| Marshal | false | If true, forces each command sent over the transport to be marshlled and unmarshlled using a WireFormat |
| wireFormat | default | The name of the WireFormat to use |
| wireFormat.* | All the properties with this prefix are used to configure the wireFormat | |
| create | true | If the broker should be created on demand if it does not allready exist. Only supported in ActiveMQ 4.1 |
| broker.* | All the properties with this prefix are used to configure the broker. See Configuring Wire Formats for more information |
以下是高级配置语法:
vm:(broker:(tcp://localhost)?brokerOptions)?transportOptions
vm:broker:(tcp://localhost)?brokerOptions
例如:vm:(broker:(tcp://localhost:6000)?persistent=false)?marshal=false
Transport Options的可选值如下:
| Option Name | Default Value | Description |
| marshal | false | If true, forces each command sent over the transport to be marshlled and unmarshlled using a WireFormat |
| wireFormat | default | The name of the WireFormat to use |
| wireFormat.* | All the properties with this prefix are used to configure the wireFormat |
使用配置文件的配置语法:
vm://localhost?brokerConfig=xbean:activemq.xml
例如:vm:// localhost?brokerConfig=xbean:com/test/activemq.xml
使用Spring的配置:
- <bean id="broker" class="org.apache.activemq.xbean.BrokerFactoryBean">
- <property name="config" value="classpath:org/apache/activemq/xbean/activemq.xml" />
- <property name="start" value="true" />
- </bean>
- <bean id="connectionFactory" class="org.apache.activemq.ActiveMQConnectionFactory" depends-on="broker">
- <property name="brokerURL" value="vm://localhost"/>
- </bean>
2.2.2 TCP Transport
TCP transport 允许客户端通过TCP socket连接到远程的broker。以下是配置语法:
tcp://hostname:port?transportOptions
Transport Options的可选值如下:
| Option Name | Default Value | Description |
| minmumWireFormatVersion | 0 | The minimum version wireformat that is allowed |
| trace | false | Causes all commands that are sent over the transport to be logged |
| useLocalHost | true | When true, it causes the local machines name to resolve to "localhost". |
| socketBufferSize | 64 * 1024 | Sets the socket buffer size in bytes |
| soTimeout | 0 | sets the socket timeout in milliseconds |
| connectionTimeout | 30000 | A non-zero value specifies the connection timeout in milliseconds. A zero value means wait forever for the connection to be established. Negative values are ignored. |
| wireFormat | default | The name of the WireFormat to use |
| wireFormat.* | All the properties with this prefix are used to configure the wireFormat. See Configuring Wire Formats for more information |
例如:tcp://localhost:61616?trace=false
2.2.3 Failover Transport
Failover Transport是一种重新连接的机制,它工作于其它transport的上层,用于建立可靠的传输。它的配置语法允许制定任意多个复合的URI。Failover transport会自动选择其中的一个URI来尝试建立连接。如果没有成功,那么会选择一个其它的URI来建立一个新的连接。以下是配置语法:
failover:(uri1,...,uriN)?transportOptions
failover:uri1,...,uriN
Transport Options的可选值如下:
| Option Name | Default Value | Description |
| initialReconnectDelay | 10 | How long to wait before the first reconnect attempt (in ms) |
| maxReconnectDelay | 30000 | The maximum amount of time we ever wait between reconnect attempts (in ms) |
| useExponentialBackOff | true | Should an exponential backoff be used between reconnect attempts |
| backOffMultiplier | 2 | The exponent used in the exponential backoff attempts |
| maxReconnectAttempts | 0 | If not 0, then this is the maximum number of reconnect attempts before an error is sent back to the client |
| randomize | true | use a random algorithm to choose the URI to use for reconnect from the list provided |
| backup | false | initialize and hold a second transport connection - to enable fast failover |
例如:failover:(tcp://localhost:61616,tcp://remotehost:61616)?initialReconnectDelay=100
2.2.4 Discovery transport
Discovery transport是可靠的tranport。它使用Discovery transport来定位用来连接的URI列表。以下是配置语法:
discovery:(discoveryAgentURI)?transportOptions
discovery:discoveryAgentURI
Transport Options的可选值如下:
| Option Name | Default Value | Description |
| initialReconnectDelay | 10 | How long to wait before the first reconnect attempt |
| maxReconnectDelay | 30000 | The maximum amount of time we ever wait between reconnect attempts |
| useExponentialBackOff | true | Should an exponential backoff be used btween reconnect attempts |
| backOffMultiplier | 2 | The exponent used in the exponential backoff attempts |
| maxReconnectAttempts | 0 | If not 0, then this is the maximum number of reconnect attempts before an error is sent back to the client |
例如:discovery:(multicast://default)?initialReconnectDelay=100
为了使用Discovery来发现broker,需要为broker启用discovery agent。 以下是XML配置文件中的一个例子:
- <broker name="foo">
- <transportConnectors>
- <transportConnector uri="tcp://localhost:0" discoveryUri="multicast://default"/>
- </transportConnectors>
- ...
- </broker>
在transport重连的时候,可以在connection上注册TransportListener来获得回调,例如:
- (ActiveMQConnection)connection).addTransportListener(new TransportListener() {
- public void onCommand(Object cmd) {
- }
- public void onException(IOException exp) {
- }
- public void transportInterupted() {
- // The transport has suffered an interruption from which it hopes to recover.
- }
- public void transportResumed() {
- // The transport has resumed after an interruption.
- }
- });
关键字: Persistence
2.3 Persistence
2.3.1 AMQ Message Store
AMQ Message Store是ActiveMQ5.0缺省的持久化存储。Message commands被保存到transactional journal(由rolling data logs组成)。Messages被保存到data logs中,同时被reference store进行索引以提高存取速度。Date logs由一些单独的data log文件组成,缺省的文件大小是32M,如果某个消息的大小超过了data log文件的大小,那么可以修改配置以增加data log文件的大小。如果某个data log文件中所有的消息都被成功消费了,那么这个data log文件将会被标记,以便在下一轮的清理中被删除或者归档。以下是其配置的一个例子:
- <broker brokerName="broker" persistent="true" useShutdownHook="false">
- <persistenceAdapter>
- <amqPersistenceAdapter directory="${activemq.base}/data" maxFileLength="32mb"/>
- </persistenceAdapter>
- </broker>
2.3.2 Kaha Persistence
Kaha Persistence 是一个专门针对消息持久化的解决方案。它对典型的消息使用模式进行了优化。在Kaha中,数据被追加到data logs中。当不再需要log文件中的数据的时候,log文件会被丢弃。以下是其配置的一个例子:
- <broker brokerName="broker" persistent="true" useShutdownHook="false">
- <persistenceAdapter>
- <kahaPersistenceAdapter directory="activemq-data" maxDataFileLength="33554432"/>
- </persistenceAdapter>
- </broker>
2.3.3 JDBC Persistence
目前支持的数据库有Apache Derby, Axion, DB2, HSQL, Informix, MaxDB, MySQL, Oracle, Postgresql, SQLServer, Sybase。
如果你使用的数据库不被支持,那么可以调整StatementProvider 来保证使用正确的SQL方言(flavour of SQL)。通常绝大多数数据库支持以下adaptor:
- org.activemq.store.jdbc.adapter.BlobJDBCAdapter
- org.activemq.store.jdbc.adapter.BytesJDBCAdapter
- org.activemq.store.jdbc.adapter.DefaultJDBCAdapter
- org.activemq.store.jdbc.adapter.ImageJDBCAdapter
也可以在配置文件中直接指定JDBC adaptor,例如:
- <jdbcPersistenceAdapter adapterClass="org.apache.activemq.store.jdbc.adapter.ImageBasedJDBCAdaptor"/>
- <persistence>
- <jdbcPersistence dataSourceRef=" mysql-ds"/>
- </persistence>
- <bean id="mysql-ds" class="org.apache.commons.dbcp.BasicDataSource" destroy-method="close">
- <property name="driverClassName" value="com.mysql.jdbc.Driver"/>
- <property name="url" value="jdbc:mysql://localhost/activemq?relaxAutoCommit=true"/>
- <property name="username" value="activemq"/>
- <property name="password" value="activemq"/>
- <property name="poolPreparedStatements" value="true"/>
- </bean>
2.3.4 Disable Persistence
以下是其配置的一个例子:
- <broker persistent="false">
- </broker>