http://www.cnblogs.com/and_he/archive/2012/03/31/2426248.html
一、摘要
偶然在一个论坛上面看到有人模拟网易新闻客户端首页顶部那个组件效果,一时兴起,也来自己动手完整地模拟一个,包括顶部的特效组件和底部的类似于TabHost的组件。下面就动手一步一步地Coding...
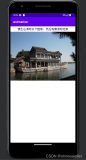
二、效果截图

三、底部类似TabHost组件切换效果的实现
为了便于大家亲自动手实践,这里的讲解顺序就按照开发的顺序来讲,所以先做这个底部的“TabHost”,然后再具体来实现里面的五个页面布局。
类似于图3到图5三张图片所示,当点击“新闻”或者“话题”或者“投票”的时候,有个稍微透明的红色背景的ImageView做相应的移动。这其实就是给ImageView设置了一个位移动画,当点击事件触发的时候,首先切换点击后的图片(有点类似于按下效果的图片),然后开始移动铺在上面的红色图片,让用户感觉到有移动的过程,增强用户体验。
关于这个位移动画,需要用到TranslateAnimation类,移动的核心代码也就几行,因为这个移动功能不但在底部控件上使用,而且在顶部也使用了,所以,为了以后使用方便,我们把它单独定义在一个类里面MoveBg.java
package com.and.netease.utils;

import android.view.View;
import android.view.animation.TranslateAnimation;

public class MoveBg {
    /**
     * 移动方法
     *
     * @param v
     *            需要移动的View
     * @param startX
     *            起始x坐标
     * @param toX
     *            终止x坐标
     * @param startY
     *            起始y坐标
     * @param toY
     *            终止y坐标
     */
    public static void moveFrontBg(View v, int startX, int toX, int startY, int toY) {
        TranslateAnimation anim = new TranslateAnimation(startX, toX, startY, toY);
        anim.setDuration(200);
        anim.setFillAfter(true);
        v.startAnimation(anim);
    }
}
里面的各个参数有相应的说明。
然后就来开发这个带有TabHost功能的组件。根据文档 http://developer.android.com/res ... ello-tabwidget.html 说明,在xml中定义TabHost的时候,必须使用TabWidget和FrameLayou两个组件,而且它们的id也应该是android:id="@android:id/tabs"和android:id="@android:id/tabcontent",由于系统提供的TabHost界面不怎么好看,所以这里想到自己来定义它,但是这两个组件是不可以不写的,这里,把TabWidget界面隐藏掉了,取而代之的是RadioGroup组件来实现底部类似于TabHost的控件。具体布局代码如main.xml
View Code

<?xml version="1.0" encoding="utf-8"?>
<LinearLayout xmlns:android="http://schemas.android.com/apk/res/android"
    android:layout_width="fill_parent"
    android:layout_height="fill_parent"
    android:orientation="vertical" >

    <TabHost
        android:id="@android:id/tabhost"
        android:layout_width="fill_parent"
        android:layout_height="fill_parent" >

        <LinearLayout
            android:layout_width="fill_parent"
            android:layout_height="fill_parent"
            android:orientation="vertical" >

            <FrameLayout
                android:id="@android:id/tabcontent"
                android:layout_width="fill_parent"
                android:layout_height="0.0dip"
                android:layout_weight="1.0" >
            </FrameLayout>

            <TabWidget
                android:id="@android:id/tabs"
                android:layout_width="fill_parent"
                android:layout_height="wrap_content"
                android:visibility="gone" />

            <RelativeLayout
                android:id="@+id/layout_bottom"
                android:layout_width="fill_parent"
                android:layout_height="wrap_content" >

                <RadioGroup
                    android:id="@+id/radiogroup"
                    android:layout_width="fill_parent"
                    android:layout_height="wrap_content"
                    android:layout_gravity="bottom"
                    android:background="@drawable/bottombg"
                    android:gravity="center_vertical"
                    android:orientation="horizontal" >

                    <RadioButton
                        android:id="@+id/radio_news"
                        android:layout_width="wrap_content"
                        android:background="@drawable/tab_selector_news"
                        android:button="@null"
                        android:checked="true" />

                    <RadioButton
                        android:id="@+id/radio_topic"
                        android:layout_width="wrap_content"
                        android:background="@drawable/tab_selector_topic"
                        android:button="@null" />

                    <RadioButton
                        android:id="@+id/radio_pic"
                        android:layout_width="wrap_content"
                        android:background="@drawable/tab_selector_pic"
                        android:button="@null" />

                    <RadioButton
                        android:id="@+id/radio_follow"
                        android:layout_width="wrap_content"
                        android:background="@drawable/tab_selector_follow"
                        android:button="@null" />

                    <RadioButton
                        android:id="@+id/radio_vote"
                        android:layout_width="wrap_content"
                        android:background="@drawable/tab_selector_vote"
                        android:button="@null" />
                </RadioGroup>
            </RelativeLayout>
        </LinearLayout>
    </TabHost>

</LinearLayout>
注意里面的RadioButton组件,当初测试的时候没有设置android:button="@null",只设置了background="@drawable/..."属性(这是一个selector属性,可以在xml文件中定义一些控件的按下效果,或者获取焦点等不同状态下的资源),出现点击不切换图片的问题。
对应的selector文件对应如下tab_selector_news.xml
<?xml version="1.0" encoding="utf-8"?>
<selector xmlns:android="http://schemas.android.com/apk/res/android">

    <item android:drawable="@drawable/current_news_tab" android:state_checked="true"/>
    <item android:drawable="@drawable/back_news_tab" android:state_checked="false"/>

</selector>
其它几个,只是替换不同的图片资源罢了,不再一一列出。这些资源文件放在res目录下的drawable文件夹下(如果没有,则新建)
有了布局文件,还需要在Activity中设置一下,为每个TabHost添加具体的Tab页面,如下
tabHost = getTabHost();
        tabHost.addTab(tabHost.newTabSpec("news").setIndicator("News").setContent(new Intent(this, TabNewsActivity.class)));
        tabHost.addTab(tabHost.newTabSpec("topic").setIndicator("Topic").setContent(new Intent(this, TabTopicActivity.class)));
        tabHost.addTab(tabHost.newTabSpec("picture").setIndicator("Picture").setContent(new Intent(this, TabPicActivity.class)));
        tabHost.addTab(tabHost.newTabSpec("follow").setIndicator("Follow").setContent(new Intent(this, TabFollowActivity.class)));
        tabHost.addTab(tabHost.newTabSpec("vote").setIndicator("Vote").setContent(new Intent(this, TabVoteActivity.class)));
当然,相应的目标Activity自然暂且随意创建
然后为RadioGroup设置选择改变事件监听器,当选择改变,改变TabHost中当前显示的Activity页面
private OnCheckedChangeListener checkedChangeListener = new OnCheckedChangeListener() {

        @Override
        public void onCheckedChanged(RadioGroup group, int checkedId) {
            switch (checkedId) {
            case R.id.radio_news:
                tabHost.setCurrentTabByTag("news");
                break;
            case R.id.radio_topic:
                tabHost.setCurrentTabByTag("topic");
                break;
            case R.id.radio_pic:
                tabHost.setCurrentTabByTag("picture");
                break;
            case R.id.radio_follow:
                tabHost.setCurrentTabByTag("follow");
                break;
            case R.id.radio_vote:
                tabHost.setCurrentTabByTag("vote");
                break;

            default:
                break;
            }
        }
    };
 是一个RelativeLayout布局,我只是在这个layout上面添加了一个ImageView,然后当点击的时候,移动它的位置来实现效果
private OnCheckedChangeListener checkedChangeListener = new OnCheckedChangeListener() {

        @Override
        public void onCheckedChanged(RadioGroup group, int checkedId) {
            switch (checkedId) {
            case R.id.radio_news:
                tabHost.setCurrentTabByTag("news");
//                moveFrontBg(img, startLeft, 0, 0, 0);
                MoveBg.moveFrontBg(img, startLeft, 0, 0, 0);
                startLeft = 0;
                break;
            case R.id.radio_topic:
                tabHost.setCurrentTabByTag("topic");
                MoveBg.moveFrontBg(img, startLeft, img.getWidth(), 0, 0);
                startLeft = img.getWidth();
                break;
            case R.id.radio_pic:
                tabHost.setCurrentTabByTag("picture");
                MoveBg.moveFrontBg(img, startLeft, img.getWidth() * 2, 0, 0);
                startLeft = img.getWidth() * 2;
                break;
            case R.id.radio_follow:
                tabHost.setCurrentTabByTag("follow");
                MoveBg.moveFrontBg(img, startLeft, img.getWidth() * 3, 0, 0);
                startLeft = img.getWidth() * 3;
                break;
            case R.id.radio_vote:
                tabHost.setCurrentTabByTag("vote");
                MoveBg.moveFrontBg(img, startLeft, img.getWidth() * 4, 0, 0);
                startLeft = img.getWidth() * 4;
                break;

            default:
                break;
            }
        }
    };
此处要记住移动的初始位置和起始位置就行了。Y坐标轴上不变,只横向移动。至此,这个功能实现完了
四、顶部按下效果实现
顶部和底部那个自定义控件的实现效果大体是一样的,唯一不同的就是,这个移动的不再是ImageView,而是一个TextView,在移动完成之后还需要改变这个TextView上的文字,仅此而已,而已文件如下layout_news.xml
<?xml version="1.0" encoding="utf-8"?>
<LinearLayout xmlns:android="http://schemas.android.com/apk/res/android"
    android:layout_width="fill_parent"
    android:layout_height="fill_parent"
    android:orientation="vertical" >

    <RelativeLayout
        android:id="@+id/layout_top"
        android:layout_width="match_parent"
        android:layout_height="40dip"
        android:background="#990000" >

        <ImageView
            android:id="@+id/img_netease_top"
            android:layout_width="wrap_content"
            android:layout_height="wrap_content"
            android:layout_centerVertical="true"
            android:layout_marginLeft="10dip"
            android:src="@drawable/netease_top" />

        <TextView
            android:layout_width="wrap_content"
            android:layout_height="wrap_content"
            android:layout_centerVertical="true"
            android:layout_toRightOf="@+id/img_netease_top"
            android:text="@string/news_top_left_text"
            android:textColor="@android:color/white"
            android:textSize="20sp" />

        <ImageView
            android:layout_width="wrap_content"
            android:layout_height="wrap_content"
            android:layout_alignParentRight="true"
            android:src="@drawable/duoyun" />
    </RelativeLayout>

    <RelativeLayout
        android:id="@+id/layout_title_bar"
        android:layout_width="fill_parent"
        android:layout_height="35dip"
        android:background="@android:color/white"
        android:paddingLeft="10dip"
        android:paddingRight="10dip" >

        <LinearLayout
            android:layout_width="fill_parent"
            android:layout_height="match_parent"
            android:orientation="horizontal" >

            <RelativeLayout
                android:id="@+id/layout"
                android:layout_width="match_parent"
                android:layout_height="match_parent"
                android:layout_weight="1" >

                <TextView
                    android:id="@+id/tv_title_bar_news"
                    android:layout_width="wrap_content"
                    android:layout_height="wrap_content"
                    android:layout_centerInParent="true"
                    android:text="@string/title_news_category_tops" />
            </RelativeLayout>

            <RelativeLayout
                android:layout_width="match_parent"
                android:layout_height="match_parent"
                android:layout_weight="1" >

                <TextView
                    android:id="@+id/tv_title_bar_sport"
                    android:layout_width="wrap_content"
                    android:layout_height="wrap_content"
                    android:layout_centerInParent="true"
                    android:text="@string/title_news_category_sport" />
            </RelativeLayout>

            <RelativeLayout
                android:layout_width="match_parent"
                android:layout_height="match_parent"
                android:layout_weight="1" >

                <TextView
                    android:id="@+id/tv_title_bar_play"
                    android:layout_width="wrap_content"
                    android:layout_height="wrap_content"
                    android:layout_centerInParent="true"
                    android:text="@string/title_news_category_play" />
            </RelativeLayout>

            <RelativeLayout
                android:layout_width="match_parent"
                android:layout_height="match_parent"
                android:layout_weight="1" >

                <TextView
                    android:id="@+id/tv_title_bar_finance"
                    android:layout_width="wrap_content"
                    android:layout_height="wrap_content"
                    android:layout_centerInParent="true"
                    android:text="@string/title_news_category_finance" />
            </RelativeLayout>

            <RelativeLayout
                android:layout_width="match_parent"
                android:layout_height="match_parent"
                android:layout_weight="1" >

                <TextView
                    android:id="@+id/tv_title_bar_science"
                    android:layout_width="wrap_content"
                    android:layout_height="wrap_content"
                    android:layout_centerInParent="true"
                    android:text="@string/title_news_category_science" />
            </RelativeLayout>

            <RelativeLayout
                android:layout_width="match_parent"
                android:layout_height="match_parent"
                android:layout_weight="1" >

                <TextView
                    android:id="@+id/tv_title_bar_more"
                    android:layout_width="wrap_content"
                    android:layout_height="wrap_content"
                    android:layout_centerInParent="true"
                    android:text="@string/title_news_category_more" />
            </RelativeLayout>
        </LinearLayout>
    </RelativeLayout>

</LinearLayout>
应的Activity代码TabNewsActivity.java
package com.and.netease;

import com.and.netease.utils.MoveBg;

import android.app.Activity;
import android.graphics.Color;
import android.os.Bundle;
import android.view.Gravity;
import android.view.View;
import android.view.View.OnClickListener;
import android.widget.RelativeLayout;
import android.widget.RelativeLayout.LayoutParams;
import android.widget.TextView;

public class TabNewsActivity extends Activity {
    RelativeLayout layout;
    TextView tv_front;//需要移动的View

    TextView tv_bar_news;
    TextView tv_bar_sport;
    TextView tv_bar_play;
    TextView tv_bar_finance;
    TextView tv_bar_science;
    TextView tv_bar_more;

    int avg_width = 0;// 用于记录平均每个标签的宽度,移动的时候需要

    @Override
    protected void onCreate(Bundle savedInstanceState) {
        super.onCreate(savedInstanceState);
        setContentView(R.layout.layout_news);

        initViews();
    }

    private void initViews() {
        layout = (RelativeLayout) findViewById(R.id.layout_title_bar);

        tv_bar_news = (TextView) findViewById(R.id.tv_title_bar_news);
        tv_bar_sport = (TextView) findViewById(R.id.tv_title_bar_sport);
        tv_bar_play = (TextView) findViewById(R.id.tv_title_bar_play);
        tv_bar_finance = (TextView) findViewById(R.id.tv_title_bar_finance);
        tv_bar_science = (TextView) findViewById(R.id.tv_title_bar_science);
        tv_bar_more = (TextView) findViewById(R.id.tv_title_bar_more);

        tv_bar_news.setOnClickListener(onClickListener);
        tv_bar_sport.setOnClickListener(onClickListener);
        tv_bar_play.setOnClickListener(onClickListener);
        tv_bar_finance.setOnClickListener(onClickListener);
        tv_bar_science.setOnClickListener(onClickListener);
        tv_bar_more.setOnClickListener(onClickListener);

        tv_front = new TextView(this);
        tv_front.setBackgroundResource(R.drawable.slidebar);
        tv_front.setTextColor(Color.WHITE);
        tv_front.setText("头条");
        tv_front.setGravity(Gravity.CENTER);
        RelativeLayout.LayoutParams param = new RelativeLayout.LayoutParams(LayoutParams.WRAP_CONTENT, LayoutParams.WRAP_CONTENT);
        param.addRule(RelativeLayout.CENTER_VERTICAL, RelativeLayout.TRUE);
        layout.addView(tv_front, param);

    }

    private OnClickListener onClickListener = new OnClickListener() {
        int startX;//移动的起始位置

        @Override
        public void onClick(View v) {
            avg_width = findViewById(R.id.layout).getWidth();
            switch (v.getId()) {
            case R.id.tv_title_bar_news:
                MoveBg.moveFrontBg(tv_front, startX, 0, 0, 0);
                startX = 0;
                tv_front.setText(R.string.title_news_category_tops);
                break;
            case R.id.tv_title_bar_sport:
                MoveBg.moveFrontBg(tv_front, startX, avg_width, 0, 0);
                startX = avg_width;
                tv_front.setText(R.string.title_news_category_sport);
                break;
            case R.id.tv_title_bar_play:
                MoveBg.moveFrontBg(tv_front, startX, avg_width * 2, 0, 0);
                startX = avg_width * 2;
                tv_front.setText(R.string.title_news_category_play);
                break;
            case R.id.tv_title_bar_finance:
                MoveBg.moveFrontBg(tv_front, startX, avg_width * 3, 0, 0);
                startX = avg_width * 3;
                tv_front.setText(R.string.title_news_category_finance);
                break;
            case R.id.tv_title_bar_science:
                MoveBg.moveFrontBg(tv_front, startX, avg_width * 4, 0, 0);
                startX = avg_width * 4;
                tv_front.setText(R.string.title_news_category_science);
                break;
            case R.id.tv_title_bar_more:
                MoveBg.moveFrontBg(tv_front, startX, avg_width * 5, 0, 0);
                startX = avg_width * 5;
                tv_front.setText(R.string.title_news_category_more);
                break;

            default:
                break;
            }

        }
    };

}
五、总结
通过这种例子,我个人总结有两点需要掌握,一个是TranslateAnimation类的使用,另一个就是布局文件的嵌套使用,经验多了,慢慢就会有感觉了。以上仅代表我个人的一点点想法和总结,还请各位多多指教。
下载地址:
http://download.csdn.net/detail/jdsjlzx/4326508