Istio Gateway提供多个自定义入口网关的支持能力,通过开放一系列端口用于承载网格边缘的进入连接,同时可以使用不同loadbalancer来隔离不同的入口流量。cert-manager可用于使用存储在Kubernetes Secret资源中的任意签名密钥对来获取证书。本文提供了手动创建自定义入口网关的步骤说明,以及在该网关中如何使用cert-manager实现自动配置证书。
生成签名密钥对
CA Issuer不会自动创建和管理签名密钥对,要么用户自己提供,要么通过诸如OpenSSL的工具生成一个自签名CA的新签名密钥对。例如,通过如下命令可以生成x509类型的密钥和证书:
# Generate a CA private key
$ docker run -it -v $(pwd):/export frapsoft/openssl genrsa -out /export/ca.key 2048
# Create a self signed Certificate, valid for 10yrs with the 'signing' option set
$ docker run -it -v $(pwd):/export frapsoft/openssl req -x509 -new -nodes -key /export/ca.key -subj "/CN=${COMMON_NAME}" -days 3650 -reqexts v3_req -extensions v3_ca -out /export/ca.crt
这些命令的输出将是两个文件,ca.key以及ca.crt签名密钥对的密钥和证书。如果你已经有了自己的密钥对,你应该将私钥和证书分别命名为ca.key与ca.crt。
将签名密钥对保存为Secret
我们将创建一个将使用此密钥对生成签名证书的颁发者Issuer,为了允许颁发者Issuer引用我们的密钥对,我们将其存储在Kubernetes Secret资源中。
颁发者Issuer是命名空间资源,因此他们只能在自己的命名空间中引用Secrets。因此,我们将密钥对放入与Issuer相同的名称空间中。当然也可以创建一个面向集群范围版本的ClusterIssuer。
以下命令将在默认命名空间中创建包含签名密钥对的Secret:
kubectl create secret tls ca-key-pair \
   --cert=ca.crt \
   --key=ca.key \
   --namespace=default
准备K8s+Istio环境
阿里云容器服务Kubernetes 1.11.5目前已经支持 Istio 1.0.5的一键部署,可以通过容器服务管理控制台非常方便地快速创建 Kubernetes 集群以及部署Istio。具体过程可以参考创建Kubernetes集群、部署Istio。
请注意,当前部署Istio之后并不会创建IngressGateway。
部署Istio-init
点击左侧的应用目录,在右侧选中ack-istio-init,在右侧选择对应的集群,同时可以看到命名空间已设定为 istio-system ,发布名称已设定为istio-init,然后点击部署。几秒钟之后,Istio CRD在集群中被创建出来。
通过应用目录简便部署Istio certmanager
点击左侧的应用目录,在右侧选中ack-istio-certmanager,在打开的页面中点击参数, 可以通过修改参数配置进行定制化(当前不需要进行额外修改,保持默认值即可),如下所示:
在右侧选择对应的集群,同时可以看到命名空间已设定为 istio-system ,发布名称已设定为istio-certmanager,然后点击部署。几秒钟之后,Istio certmanager发布就可以创建出来,如下图所示容器组certmanager的启动日志:
可以看到certmanager已经成功启动。
创建引用Secret的Issuer
现在可以创建一个引用我们刚刚创建的Secret资源的颁发者Issuer:
kubectl apply -f - <<EOF
apiVersion: certmanager.k8s.io/v1alpha1
kind: Issuer
metadata:
  name: ca-issuer
  namespace: default
spec:
  ca:
    secretName: ca-key-pair
EOF
接下来准备获得证书!
获得签名证书
现在可以创建以下证书资源,该资源指定所需的证书。为了使用Issuer获取证书,我们必须在与Issuer相同的命名空间中创建Certificate资源,因为Issuer是命名空间资源,如本例所示。如果我们想要跨多个名称空间重用签名密钥对,那么就可以使用一个集群ClusterIssuer。
首先通过以下命令为域名myexample.com创建证书:
kubectl apply -f - <<EOF
apiVersion: certmanager.k8s.io/v1alpha1
kind: Certificate
metadata:
  name: myexample-certificate
  namespace: default
spec:
  secretName: istio-myexample-customingressgateway-certs
  issuerRef:
    name: ca-issuer
    # 可以通过引用ClusterIssuer类型的颁发者Issuer;默认情况使用只适用于命名空间的Issuer
    kind: Issuer
  commonName: myexample.com
  organization:
  - MyExample CA
  dnsNames:
  - myexample.com
  - www.myexample.com
EOF
记下secretName因为接下来的步骤会需要引用它。
创建证书资源后,cert-manager将尝试使用颁发者ca-issuer获取证书。如果成功,证书将存储在与证书资源相同的命名空间(default)中的Secret资源istio-myexample-customingressgateway-certs中。
检查证书与密钥
由于我们已指定commonName字段,因此myexample.com将是证书的通用名称,并且通用名称和dnsNames阵列的所有元素都将是主题备用名称 (SAN)。如果我们没有指定公共名称,那么dnsNames列表的第一个元素 将用作公共名称,dnsNames列表的所有元素 也将是SAN。
创建上述证书后,我们可以检查是否已成功获取,如下所示查看了证书myexample-certificate:
kubectl describe certificate myexample-certificate
Name:         myexample-certificate
Namespace:    default
Labels:       <none>
Annotations:  kubectl.kubernetes.io/last-applied-configuration:
                {"apiVersion":"certmanager.k8s.io/v1alpha1","kind":"Certificate","metadata":{"annotations":{},"name":"myexample-certificate","namespace":"...
API Version:  certmanager.k8s.io/v1alpha1
Kind:         Certificate
Metadata:
  Creation Timestamp:  2019-01-14T08:38:20Z
  Generation:          1
  Resource Version:    19727
  Self Link:           /apis/certmanager.k8s.io/v1alpha1/namespaces/default/certificates/myexample-certificate
  UID:                 bf47b776-17d7-11e9-bafe-00163e069e12
Spec:
  Common Name:  myexample.com
  Dns Names:
    myexample.com
    www.myexample.com
  Issuer Ref:
    Kind:  Issuer
    Name:  ca-issuer
  Organization:
    MyExample CA
  Secret Name:  istio-myexample-customingressgateway-certs
Status:
  Conditions:
    Last Transition Time:  2019-01-14T08:38:22Z
    Message:               Certificate issued successfully
    Reason:                CertIssued
    Status:                True
    Type:                  Ready
Events:
  Type    Reason      Age   From          Message
  ----    ------      ----  ----          -------
  Normal  IssueCert   80s   cert-manager  Issuing certificate...
  Normal  CertIssued  80s   cert-manager  Certificate issued successfully
最后一行显示了证书成功被创建。
您还可以检查Issuer是否成功,应该看到base64编码的签名TLS密钥对。
kubectl get secret istio-myexample-customingressgateway-certs -oyaml获得证书后,cert-manager将继续检查其有效性,并在接近到期时尝试更新。当证书上的“Not After”字段小于当前时间之后30天时,cert-manager认为证书即将到期。对于基于CA的颁发者,cert-manager将颁发证书,其中“Not After”字段设置为当前时间加上365天。
部署自定义网关
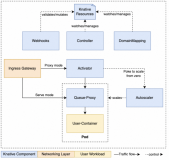
Gateway描述了在网格边缘操作的负载均衡器,用于接收传入或传出的HTTP / TCP连接。
点击左侧的应用目录,在右侧选中ack-istio-ingressgateway,在打开的页面中点击参数, 将在67行附近的名为istio-ingressgateway-certs的secretName修改为上述创建出的 istio-myexample-customingressgateway-certs 。修改如下如下所示:
在右侧选择对应的集群,同时选择与保密字典istio-myexample-customingressgateway-certs相同的命名空间即上文中设定的default ,发布名称设定为myexample-customingressgateway,然后点击部署。几秒钟之后,自定义的Istio 网关发布就可以创建出来。其中网关配置设置代理以充当负载平衡器,为入口公开端口80和443(https)。如下图所示:
定义内部服务
本示例中的内部服务是基于nginx实现的,首先为 NGINX 服务器创建配置文件。以域名myexample.com的内部服务为例,定义请求根路径直接返回字样"Welcome to myexample.com! This is one custom Istio Ingress Gateway powered by cert-manager!"及状态码200。
myexample-nginx.conf的具体内容如下:
events {
}

http {
  log_format main '$remote_addr - $remote_user [$time_local]  $status '
  '"$request" $body_bytes_sent "$http_referer" '
  '"$http_user_agent" "$http_x_forwarded_for"';
  access_log /var/log/nginx/access.log main;
  error_log  /var/log/nginx/error.log;

  server {
    listen 80;

    location / {
        return 200 'Welcome to myexample.com! This is one custom Istio Ingress Gateway powered by cert-manager!';
        add_header Content-Type text/plain;
    }
  }
}
创建 Kubernetes ConfigMap 存储 NGINX 服务器的配置:
kubectl create configmap myexample-nginx-configmap --from-file=nginx.conf=./myexample-nginx.conf设置命名空间default,启用sidecar自动注入:
kubectl label namespace default istio-injection=enabled注意: 确保该sidecar自动注入的Label需要在IngressGateway创建之后再进行标注,以确保IngressGateway不会自动注入。或者不启用自动注入,通过手工注入完成,具体参见手工注入。
部署 NGINX 服务器,创建域名myexample.com的内部服务:
kubectl apply -f - <<EOF
apiVersion: v1
kind: Service
metadata:
  name: myexampleapp
  labels:
    app: myexampleapp
spec:
  ports:
  - port: 80
    protocol: TCP
  selector:
    app: myexampleapp
---
apiVersion: apps/v1
kind: Deployment
metadata:
  name: myexampleapp
spec:
  selector:
    matchLabels:
      app: myexampleapp
  replicas: 1
  template:
    metadata:
      labels:
        app: myexampleapp
    spec:
      containers:
      - name: nginx
        image: nginx
        ports:
        - containerPort: 80
        volumeMounts:
        - name: nginx-config
          mountPath: /etc/nginx
          readOnly: true
      volumes:
      - name: nginx-config
        configMap:
          name: myexample-nginx-configmap

EOF
创建自定义网关配置对象
以域名myexample.com为例,创建Istio自定义网关配置对象,如下所示:
kubectl apply -f - <<EOF
apiVersion: networking.istio.io/v1alpha3
kind: Gateway
metadata:
  annotations:
  name: istio-myexample-customingressgateway
  namespace: default
spec:
  selector:
    istio: ingressgateway
  servers:
  - hosts:
    - '*.myexample.com'
    port:
      name: http
      number: 80
      protocol: HTTP
    tls:
      httpsRedirect: true
  - hosts:
    - '*.myexample.com'
    port:
      name: https
      number: 443
      protocol: HTTPS
    tls:
      mode: SIMPLE
      privateKey: /etc/istio/ingressgateway-certs/tls.key
      serverCertificate: /etc/istio/ingressgateway-certs/tls.crt
EOF
创建VirtualService
同样地,接下来以域名myexample.com为例,创建链接到istio-myexample-customingressgateway的VirtualService:
kubectl apply -f - <<EOF
apiVersion: networking.istio.io/v1alpha3
kind: VirtualService
metadata:
  name: istio-myexample-customvirtualservice
spec:
  hosts:
  - "www.myexample.com"
  gateways:
  - istio-myexample-customingressgateway
  http:
  - route:
    - destination:
        host: myexampleapp
        port:
          number: 80
EOF
通过网关访问服务
以域名myexample.com为例,获取对应的自定义网关服务的公网IP地址,执行以下命令获取:
kubectl get svc -l istio=ingressgateway
NAME                   TYPE           CLUSTER-IP     EXTERNAL-IP     PORT(S)                      AGE
istio-ingressgateway   LoadBalancer   172.19.12.75   106.14.48.121   80:31144/TCP,443:30441/TCP   11m
设置INGRESS_HOST 以及 SECURE_INGRESS_PORT 这两个环境变量,确定它们的正确取值,即替换成你实际环境的地址值:
INGRESS_HOST=106.14.48.121
SECURE_INGRESS_PORT=443
检查 istio-ingressgateway Pod 是否正确的加载了证书和私钥:
kubectl exec -it -n default $(kubectl -n default get pods -l istio=ingressgateway -o jsonpath='{.items[0].metadata.name}') -- ls -al /etc/istio/ingressgateway-certstls.crt 和 tls.key 都应该保存在这个目录中。
检查 Ingress gateway 证书中的 Subject 字段的正确性:
kubectl exec -i -n default $(kubectl get pod -l istio=ingressgateway -n default -o jsonpath='{.items[0].metadata.name}')  -- cat /etc/istio/ingressgateway-certs/tls.crt | openssl x509 -text -noout | grep 'Subject:'
        Subject: O=MyExample CA, CN=myexample.com
检查 Ingress gateway 的代理能够正确访问证书:
kubectl exec -ti $(kubectl get po -l istio=ingressgateway -n default -o jsonpath={.items[0]..metadata.name}) -n default -- curl  127.0.0.1:15000/certs
{
    "ca_cert": "",
    "cert_chain": "Certificate Path: /etc/istio/ingressgateway-certs/tls.crt, Serial Number: c181438895a781c98759fb56b9cc1508, Days until Expiration: 364"
}
至此,使用cert-manager部署自定义入口网关的所有步骤已完成。通过 HTTPS 协议访问 myexample.com 服务,即curl 发送 https 请求到istio-myexample-customingressgateway:
curl -k -HHost:www.myexample.com --resolve www.myexample.com:443:106.14.48.121  https://www.myexample.com
Welcome to myexample.com! This is one custom Istio Ingress Gateway powered by cert-manager!
回顾一下,获得证书后cert-manager将继续检查其有效性,并在接近到期时尝试更新。当证书上的“Not After”字段小于当前时间之后30天时,cert-manager认为证书即将到期。对于基于CA的颁发者,cert-manager将颁发证书,其中“Not After”字段设置为当前时间加上365天。