目 录
本文主要记录一下手动部署rgw的过程,环境是使用的之前手动部署的ceph环境,之前的环境部署可以参考以下链接https://yq.aliyun.com/articles/604372
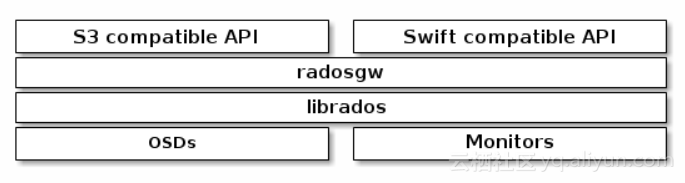
Ceph RGW(即RADOS Gateway)是Ceph对象存储网关服务,是基于LIBRADOS接口封装实现的FastCGI服务,对外提供存储和管理对象数据的Restful API。 对象存储适用于图片、视频等各类文件的上传下载,可以设置相应的访问权限。目前Ceph RGW兼容常见的对象存储API,例如兼容绝大部分Amazon S3 API,兼容OpenStack Swift API。
1 设备列表
| 功能 |
主机名 |
IP |
| mon,osd,mds,rgw |
node1 |
192.168.1.10 |
| mon,osd,mds,rgw |
node2 |
192.168.1.11 |
| mon,osd,mds,rgw |
node3 |
192.168.1.12 |
2 Ceph RGW 部署
Ceph RGW的FastCGI支持多种Web服务器作为前端,例如Nginx、Apache2等。 从Ceph Hammer版本开始,使用ceph-deploy部署时将会默认使用内置的civetweb作为前端。本文分别采用civeweb和nginx进行一下部署。
2.1 使用civetweb配置
1、安装radosgw
如果之前已经进行过安装,可以跳过此步骤
[root@node1 ~]# yum -y install ceph-radosgw

[root@node2 ~]# yum -y install ceph-radosgw

[root@node3 ~]# yum -y install ceph-radosgw2、创建资源池
需要创建的资源池列表如下
[root@node1 ~]# cat pool

.rgw

.rgw.root

.rgw.control

.rgw.gc

.rgw.buckets

.rgw.buckets.index

.rgw.buckets.extra

.log

.intent-log

.usage

.users

.users.email

.users.swift

.users.uid
这里通过脚本快速创建这些资源池,脚本内容如下
#!/bin/bash

PG_NUM=64

PGP_NUM=64

SIZE=3

for i in `cat /root/pool`

        do

        ceph osd pool create $i $PG_NUM

        ceph osd pool set $i size $SIZE

        done

for i in `cat /root/pool`

        do

        ceph osd pool set $i pgp_num $PGP_NUM

done3、创建keyring
[root@node1 ~]# sudo ceph-authtool --create-keyring /etc/ceph/ceph.client.radosgw.keyring

creating /etc/ceph/ceph.client.radosgw.keyring4、修改文件权限
[root@node1 ~]# sudo chown ceph:ceph /etc/ceph/ceph.client.radosgw.keyring5、生成ceph-radosgw服务对应的用户和key
[root@node1 ~]# sudo ceph-authtool /etc/ceph/ceph.client.radosgw.keyring -n client.rgw.node1 --gen-key6、为用户添加访问权限
[root@node1 ~]# sudo ceph-authtool -n client.rgw.node1 --cap osd 'allow rwx' --cap mon 'allow rwx' /etc/ceph/ceph.client.radosgw.keyring7、导入keyring到集群中
[root@node1 ~]# sudo ceph -k /etc/ceph/ceph.client.admin.keyring auth add client.rgw.node1 -i /etc/ceph/ceph.client.radosgw.keyring

added key for client.rgw.node18、配置ceph.conf
[client.rgw.node1]

host=node1

keyring=/etc/ceph/ceph.client.radosgw.keyring

log file=/var/log/radosgw/client.radosgw.gateway.log

rgw_s3_auth_use_keystone = False

rgw_frontends = civetweb port=80809、创建日志目录并修改权限
[root@node1 ~]# mkdir /var/log/radosgw

[root@node1 ~]# chown ceph:ceph /var/log/radosgw10、启动rgw
[root@node1 ~]# systemctl start ceph-radosgw@rgw.node1

[root@node1 ~]# systemctl status ceph-radosgw@rgw.node1

● ceph-radosgw@rgw.node1.service - Ceph rados gateway

   Loaded: loaded (/usr/lib/systemd/system/ceph-radosgw@.service; disabled; vendor preset: disabled)

   Active: active (running) since Tue 2018-07-03 12:53:42 CST; 5s ago

 Main PID: 13660 (radosgw)

   CGroup: /system.slice/system-ceph\x2dradosgw.slice/ceph-radosgw@rgw.node1.service

           └─13660 /usr/bin/radosgw -f --cluster ceph --name client.rgw.node1 --setuser ceph --setgr...


Jul 03 12:53:42 node1 systemd[1]: Started Ceph rados gateway.

Jul 03 12:53:42 node1 systemd[1]: Starting Ceph rados gateway...11、查看端口监听状态
[root@node1 ~]# netstat -antpu | grep 8080

tcp 0 0 0.0.0.0:8080 0.0.0.0:* LISTEN 13660/radosgw12、设置rgw开机自动启动
[root@node1 ~]# systemctl enable ceph-radosgw@rgw.node1

Created symlink from /etc/systemd/system/ceph-radosgw.target.wants/ceph-radosgw@rgw.node1.service to /usr/lib/systemd/system/ceph-radosgw@.service.13、在node2、node3上部署rgw
以下命令在node1上执行即可
a、 创建对应的client.rgw.node2、client.rgw.node3用户并进行授权
[root@node1 ~]# sudo ceph-authtool /etc/ceph/ceph.client.radosgw.keyring -n client.rgw.node2 --gen-key

[root@node1 ~]# sudo ceph-authtool -n client.rgw.node2 --cap osd 'allow rwx' --cap mon 'allow rwx' /etc/ceph/ceph.client.radosgw.keyring

[root@node1 ~]# sudo ceph -k /etc/ceph/ceph.client.admin.keyring auth add client.rgw.node2 -i /etc/ceph/ceph.client.radosgw.keyring

added key for client.rgw.node2


[root@node1 ~]# sudo ceph-authtool /etc/ceph/ceph.client.radosgw.keyring -n client.rgw.node3 --gen-key

[root@node1 ~]# sudo ceph-authtool -n client.rgw.node3 --cap osd 'allow rwx' --cap mon 'allow rwx' /etc/ceph/ceph.client.radosgw.keyring

[root@node1 ~]# sudo ceph -k /etc/ceph/ceph.client.admin.keyring auth add client.rgw.node3 -i /etc/ceph/ceph.client.radosgw.keyring

added key for client.rgw.node3
b、 在ceph.conf文件中添加如下内容
[client.rgw.node2]

host=node2

keyring=/etc/ceph/ceph.client.radosgw.keyring

log file=/var/log/radosgw/client.radosgw.gateway.log

rgw_s3_auth_use_keystone = False

rgw_frontends = civetweb port=8080

[client.rgw.node3]

host=node3

keyring=/etc/ceph/ceph.client.radosgw.keyring

log file=/var/log/radosgw/client.radosgw.gateway.log

rgw_s3_auth_use_keystone = False

rgw_frontends = civetweb port=8080
c、 把创建好的ceph.client.radosgw.keyring和ceph.conf传到node2和node3上
[root@node1 ~]# scp /etc/ceph/ceph.client.radosgw.keyring node2:/etc/ceph/ceph.client.radosgw.keyring

[root@node1 ~]# scp /etc/ceph/ceph.client.radosgw.keyring node3:/etc/ceph/ceph.client.radosgw.keyring

[root@node1 ~]# scp /etc/ceph/ceph.conf node2:/etc/ceph/ceph.conf

[root@node1 ~]# scp /etc/ceph/ceph.conf node3:/etc/ceph/ceph.conf
d、 在node2和node3上分别创建日志目录并修改权限
[root@node2 ~]# mkdir /var/log/radosgw

[root@node2 ~]# chown ceph:ceph /var/log/radosgw

[root@node3 ~]# mkdir /var/log/radosgw

[root@node3 ~]# chown ceph:ceph /var/log/radosgw
e、 启动node2和node3上的rgw服务
[root@node2 ~]# systemctl restart ceph-radosgw@rgw.node1

[root@node2 ~]# systemctl status ceph-radosgw@rgw.node1

● ceph-radosgw@rgw.node1.service - Ceph rados gateway

   Loaded: loaded (/usr/lib/systemd/system/ceph-radosgw@.service; disabled; vendor preset: disabled)

   Active: active (running) since Tue 2018-07-03 13:19:51 CST; 5s ago

 Main PID: 12016 (radosgw)

[root@node3 ~]# systemctl start ceph-radosgw@rgw.node3

[root@node3 ~]# systemctl status ceph-radosgw@rgw.node3

● ceph-radosgw@rgw.node3.service - Ceph rados gateway

   Loaded: loaded (/usr/lib/systemd/system/ceph-radosgw@.service; disabled; vendor preset: disabled)

   Active: active (running) since Tue 2018-07-03 13:21:51 CST; 6s ago

 Main PID: 2435 (radosgw)
f、 设置rgw开机自动启动
[root@node2 ~]# systemctl enable ceph-radosgw@rgw.node2

Created symlink from /etc/systemd/system/ceph-radosgw.target.wants/ceph-radosgw@rgw.node2.service to /usr/lib/systemd/system/ceph-radosgw@.service.

[root@node3 ~]# systemctl enable ceph-radosgw@rgw.node3

Created symlink from /etc/systemd/system/ceph-radosgw.target.wants/ceph-radosgw@rgw.node3.service to /usr/lib/systemd/system/ceph-radosgw@.service.
2.2 使用nginx配置
1、在node1上安装nginx
[root@node1 ~]# yum -y install nginx2、在/etc/nginx/conf.d/目录下生成rgw.conf并添加如下配置
server {

    listen   80;

    server_name node1;

    location / {

        fastcgi_pass_header Authorization;

        fastcgi_pass_request_headers on;

        fastcgi_param QUERY_STRING  $query_string;

        fastcgi_param REQUEST_METHOD $request_method;

        fastcgi_param CONTENT_LENGTH $content_length;

        fastcgi_param CONTENT_LENGTH $content_length;

        if ($request_method = PUT) {

                rewrite ^ /PUT$request_uri;

        }

        include fastcgi_params;

        fastcgi_pass 192.168.1.10:9000;

    }

    location /PUT/ {

        internal;

        fastcgi_pass_header Authorization;

        fastcgi_pass_request_headers on;

        include fastcgi_params;

        fastcgi_param QUERY_STRING  $query_string;

        fastcgi_param REQUEST_METHOD $request_method;

        fastcgi_param CONTENT_LENGTH $content_length;

        fastcgi_param  CONTENT_TYPE $content_type;

        fastcgi_pass 192.168.1.10:9000;

    }

}

server {

    listen   80;

    server_name node2;

    location / {

        fastcgi_pass_header Authorization;

        fastcgi_pass_request_headers on;

        fastcgi_param QUERY_STRING  $query_string;

        fastcgi_param REQUEST_METHOD $request_method;

        fastcgi_param CONTENT_LENGTH $content_length;

        fastcgi_param CONTENT_LENGTH $content_length;

        if ($request_method = PUT) {

                rewrite ^ /PUT$request_uri;

        }

        include fastcgi_params;

        fastcgi_pass 192.168.1.11:9000;

    }

    location /PUT/ {

        internal;

        fastcgi_pass_header Authorization;

        fastcgi_pass_request_headers on;

        include fastcgi_params;

        fastcgi_param QUERY_STRING  $query_string;

        fastcgi_param REQUEST_METHOD $request_method;

        fastcgi_param CONTENT_LENGTH $content_length;

        fastcgi_param  CONTENT_TYPE $content_type;

        fastcgi_pass 192.168.1.11:9000;

    }

}

server {

    listen   80;

    server_name node3;

    location / {

        fastcgi_pass_header Authorization;

        fastcgi_pass_request_headers on;

        fastcgi_param QUERY_STRING  $query_string;

        fastcgi_param REQUEST_METHOD $request_method;

        fastcgi_param CONTENT_LENGTH $content_length;

        fastcgi_param CONTENT_LENGTH $content_length;

        if ($request_method = PUT) {

                rewrite ^ /PUT$request_uri;

        }

        include fastcgi_params;

        fastcgi_pass 192.168.1.12:9000;

    }

    location /PUT/ {

        internal;

        fastcgi_pass_header Authorization;

        fastcgi_pass_request_headers on;

        include fastcgi_params;

        fastcgi_param QUERY_STRING  $query_string;

        fastcgi_param REQUEST_METHOD $request_method;

        fastcgi_param CONTENT_LENGTH $content_length;

        fastcgi_param  CONTENT_TYPE $content_type;

        fastcgi_pass 192.168.1.12:9000;

    }

}注:由于是使用nginx端口使用是80端口,需要删掉或注释nginx.conf中的默认端口80的站点配置,否则nginx无法启动
4、启动nginx并设置为开机自动启动
[root@node1 ~]# systemctl start nginx

[root@node1 ~]# systemctl enable nginx3、修改ceph.conf内容如下
[client.rgw.node1]

rgw frontends=fastcgi socket_port=9000 socket_host=0.0.0.0

host=node1

keyring=/etc/ceph/ceph.client.radosgw.keyring

log file=/var/log/radosgw/client.radosgw.gateway.log

rgw print continue=false

rgw content length compat = true


[client.rgw.node2]

rgw frontends=fastcgi socket_port=9000 socket_host=0.0.0.0

host=node2

keyring=/etc/ceph/ceph.client.radosgw.keyring

log file=/var/log/radosgw/client.radosgw.gateway.log

rgw print continue=false

rgw content length compat = true


[client.rgw.node3]

rgw frontends=fastcgi socket_port=9000 socket_host=0.0.0.0

host=node3

keyring=/etc/ceph/ceph.client.radosgw.keyring

log file=/var/log/radosgw/client.radosgw.gateway.log

rgw print continue=false

rgw content length compat = true4、把修改好的/etc/ceph.conf 文件传到node2和node3上
[root@node1 ~]# scp  /etc/ceph/ceph.conf node2:/etc/ceph/ceph.conf

[root@node1 ~]# scp /etc/ceph/ceph.conf node3:/etc/ceph/ceph.conf5、在3个节点上分别重启rgw并观察端口是否修改为了9000
[root@node1 ~]# systemctl restart ceph-radosgw@rgw.node1

[root@node1 ~]# systemctl status ceph-radosgw@rgw.node1

● ceph-radosgw@rgw.node1.service - Ceph rados gateway

   Loaded: loaded (/usr/lib/systemd/system/ceph-radosgw@.service; enabled; vendor preset: disabled)

   Active: active (running) since Tue 2018-07-03 15:00:44 CST; 5s ago

 Main PID: 16087 (radosgw)

 [root@node1 ~]# netstat -antpu | grep 9000

tcp        0      0 0.0.0.0:9000            0.0.0.0:*               LISTEN      16087/radosgw


[root@node2 ~]# systemctl restart ceph-radosgw@rgw.node2

[root@node2 ~]# systemctl status ceph-radosgw@rgw.node2

● ceph-radosgw@rgw.node2.service - Ceph rados gateway

   Loaded: loaded (/usr/lib/systemd/system/ceph-radosgw@.service; enabled; vendor preset: disabled)

   Active: active (running) since Tue 2018-07-03 15:01:46 CST; 5s ago

[root@node2 ~]# netstat -anptu | grep 9000

tcp        0      0 0.0.0.0:9000            0.0.0.0:*               LISTEN      13983/radosgw


[root@node3 ~]# systemctl restart ceph-radosgw@rgw.node3

[root@node3 ~]# systemctl status ceph-radosgw@rgw.node3

● ceph-radosgw@rgw.node3.service - Ceph rados gateway

   Loaded: loaded (/usr/lib/systemd/system/ceph-radosgw@.service; enabled; vendor preset: disabled)

   Active: active (running) since Tue 2018-07-03 15:02:43 CST; 14s ago

 [root@node3 ~]# netstat -antpu | grep 9000

tcp        0      0 0.0.0.0:9000            0.0.0.0:*               LISTEN      3737/radosgw
注:这一步做的过程中出了点小问题,node2上的rgw一直无法重启成功,后来查看是ceph.client.radosgw.keyring 中node2的用户信息没有了,需要重新添加一下,添加之前先通过ceph auth list看一下是否还有node2的信息,如果有的话,需要手动清除一下,然后在执行之前的创建用户和添加授权的命令即可。正确的文件内容如下
[root@node1 ~]# cat /etc/ceph/ceph.client.radosgw.keyring

[client.rgw.node1]

        key = AQCPADtbk6AoJxAAXSUaO5FmHAJl9BJBCeVZVA==

        caps mon = "allow rwx"

        caps osd = "allow rwx"

[client.rgw.node2]

        key = AQBRFjtb5zz0LRAAwr7RdxLprs344gA8v60Qhw==

        caps mon = "allow rwx"

        caps osd = "allow rwx"

[client.rgw.node3]

        key = AQCeBztbQPdFChAAgoDcmDWsQwRCo5SDPaHAIw==

        caps mon = "allow rwx"

        caps osd = "allow rwx"